General Configuration
To configure a table, perform the following steps:
- Click the Configure Tables tab.
- Enter the ingestion configuration details.
- Click Save.
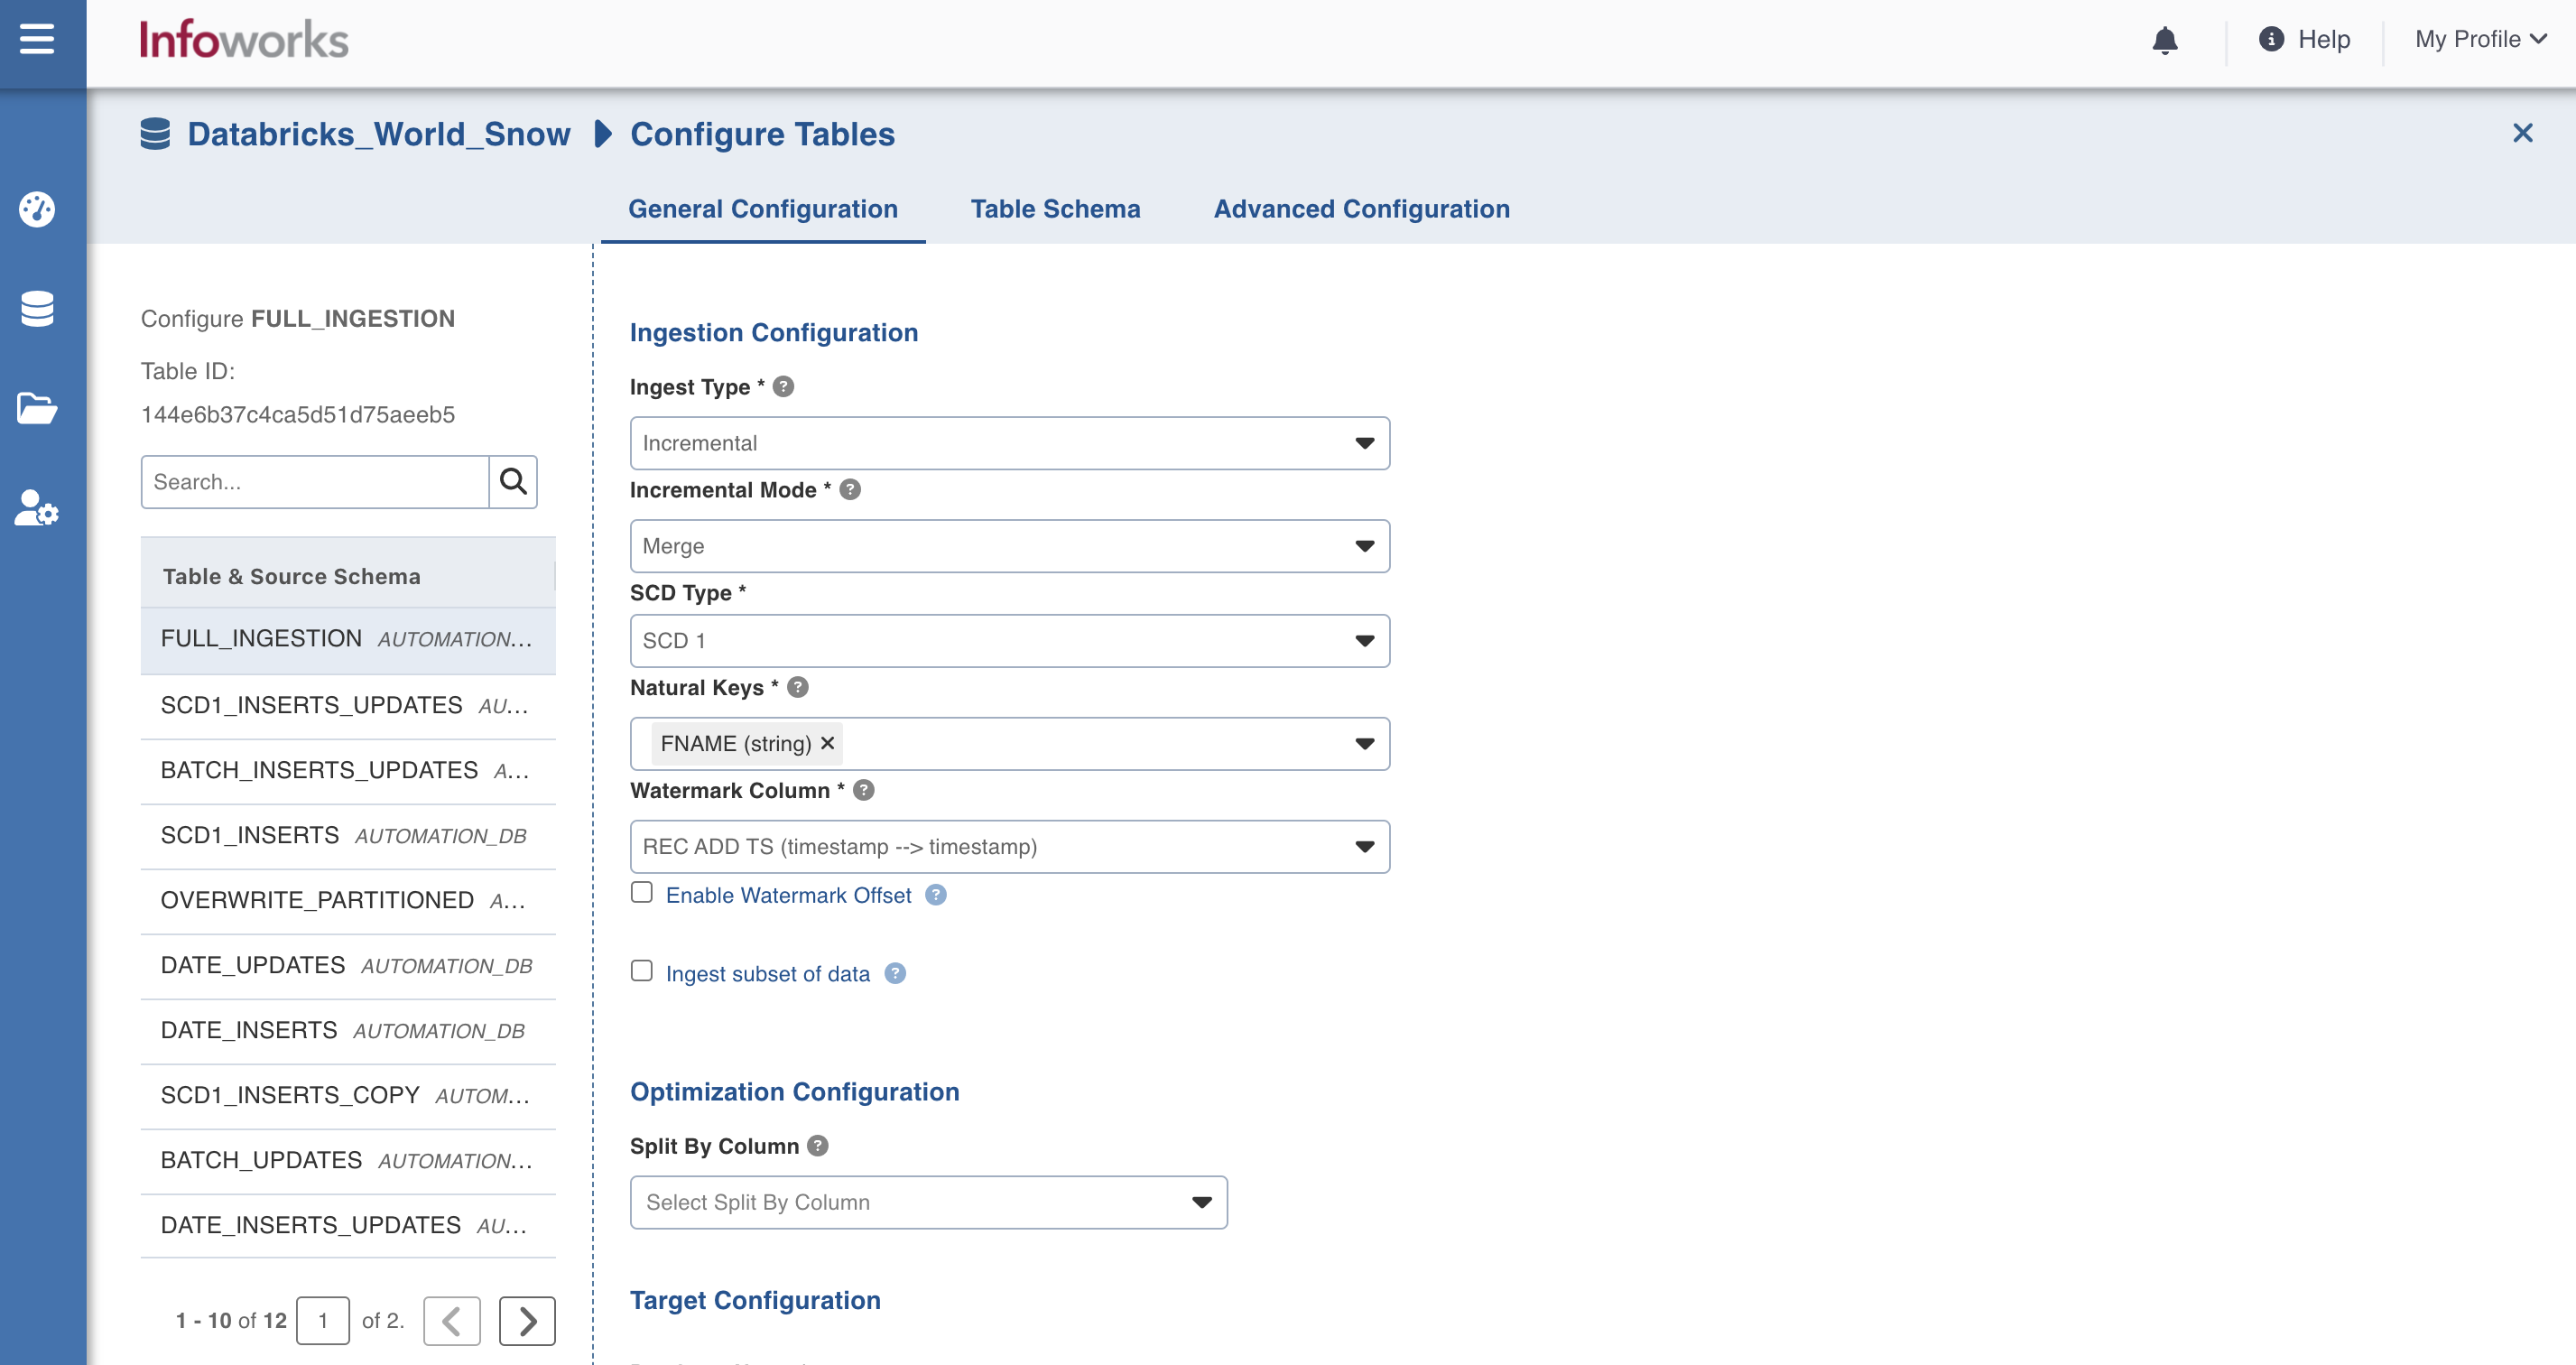
Ingestion Configurations
| Field | Description |
|---|---|
| Query | The custom query based on which the table has been created. The option is available only for RDBMS, Generic JDBC and CDATA sources. |
| Ingest Type | The type of synchronization for the table. The options include full refresh and incremental. |
| Natural Keys | The combination of keys to uniquely identify the row. This field is mandatory in incremental ingestion tables. It helps in identifying and merging incremental data with the already existing data on target. |
| Incremental Mode | The option to indicate if the incremental data must be appended or merged to the base table. This field is displayed only for incremental ingestion. The options include append, merge and insert overwrite (only available for RDBMS, Generic JDBC and OEM connector sources). |
| Incremental Fetch Mechanism | The fetch mechanism options include Archive Log and Watermark Column. This field is available only for Oracle log-based ingestion. |
| Watermark Column | The watermark column to identify the incremental records. |
| Use JDBC for This Table | The option to ingest data from Teradata via JDBC driver, if the table cannot be crawled by TPT, for any reason. This option is available for Teradata TPT ingestion. |
| Ingest subset of data | The option to configure filter conditions to ingest a subset of data. This option is available for all the RDBMS and Generic JDBC sources. For more details, see Filter Query for RDBMS Sources. |
| Sorting Columns | Select columns on which the target table will be sorted. |
SQL Queries
Select Query: The additional inputs required with a select clause, like optimization hints or lock changes. The default value is SELECT ${columnList} FROM <schemaName>.<tableName>, where, ${columnList} is the placeholder for all the columns to be queried and <schemaName> and <tableName> will be pre-filled with the appropriate values. This option is available only for Generic JDBC sources.
Target Configuration
| Field | Description |
|---|---|
| Target Catalog Name | The catalog name of the target table. |
| Staging Catalog Name | The staging catalog name for temp tables. |
| Staging Schema Name | The staging schema name for temp tables. |
| Target Table Name | The name of the target table. |
| Storage Format | The format in which the tables must be stored. The options include Read Optimised (Parquet),Read Optimised (ORC), Write Optimised (Avro), Delimited Text Files and Universal Format (UniForm). |
| Partition Column | The column used to partition the data in target. Selecting the Create Derived Column option allows you to derive a column from the partition column. This option is enabled only if the partition column datatype is date or timestamp. Provide the Derived Column Function and Derived Column Name. Data will be partitioned based on this derived column. |
| Detect Schema Change | This checkbox detects if a new column is added. |
| Schema Change Behavior | This dropdown provides the list of responses you can choose for the added columns. The responses are: Ignore Column Addition and Notify on Job Failure. Ignore Column Addition: If you select this value, the job won’t fail and it won't add an additional column to the target. Notify on Job Failure: If you select this value and a column is added, the job will fail and an error message which says, “Error in sync schema” will appear on top of the page. |
User Managed Table: With Data
Available for: Incremental Sync only
Use this option when the target table already contains historical data, and you want to load only incremental data from the source via Infoworks. Key Points:
- Ideal for scenarios where the target table has been populated by another system (e.g., external system or a previous Infoworks Ingestion Job).
- From the first job, merge operations or similar actions (such as insert-overwrite) can be performed.
- There is no need to truncate the target table.
- Truncate privileges are not required.
- For append-only use cases, only new rows will be inserted, leaving existing rows unchanged. Only insert privileges are needed in such cases.
User Managed Table: Without Data
Available for: Both Full Refresh and Incremental Sync
Use this option when Infoworks is responsible for ingesting all data into the target table, and you do not wish to grant DDL privileges (such as table creation) to Infoworks. Key Points:
- You must manually create the empty target table, ensuring that the schema matches the source data.
- If the target table already contains data, Infoworks will truncate the table before the first job.
- For Full Refresh, each job will truncate and reload the entire dataset.
- For Incremental Sync, the first job will perform a full refresh, truncating the table before loading incremental data.
- Truncate privileges are required on the target table.
Optimization Configuration
| Field | Description |
|---|---|
| Split By Column | The column used to crawl the table in parallel with multiple connections to database. Split-by column can be an existing column in the data. Any column for which minimum and maximum values can be computed, can be a split-by key. Select the Create Derived Split Column option and provide the Derived Split Column Function to derive a column from the split-by column. This option is enabled only if the split-by column datatype is date or timestamp. The data will be split based on the derived value. |
| Is Wide Table | The option to be enabled when any insert, update or delete statement in logs can exceed 4000 characters. |
Job Configuration
| Field | Description |
|---|---|
| Custom Tag | This dropdown provides the list of tags which you can choose. It can be used to identify/segregate the table based on the selected tags. |
Additional Information: Delimited Text Files
If you select Delimited Text Files from the Storage Format dropdown, the following fields will appear.
| Field | Description |
|---|---|
| Add Header Row | This field indicates if header will be part of the delimited file that is generated on target. |
| Record Separator | This character is used to separate records in the output CSV file. |
| Delimiter Character | This character is used to separate fields in the output delimited file. |
| Escape Character | This character is used to escape the quote character and the separator character within a field. |
| Quote Character | This character is used to enclose fields in the output delimited file. If a field contains the separator character or any characters specified as escape characters, the field will be enclosed in quotes. |
| Character Encoding | This character encoding is used while writing the output delimited file. |
| Compression | The compression codec is used while writing the output delimited file. Supported codecs include "gzip", "bzip2", "lz4", and "snappy". |
Table Schema
You can view the following pages under table schema:
Editing Table Schema
You can edit the target datatype of columns using the following steps:
- Click the Data Sources menu and click View Source for the required source
- Click the Configure button for the required table.
- Click the Table Schema tab and edit the target data type for required columns. The Databricks metastore table will be created with the specified datatypes.
- The Options field allows you to edit the precision and scale of the specific column.
- You can select a relevant column and click Manage Column to Exclude, Include or Bulk Edit.
- Select Include if you want the column to be a part of the target.
- Select Exclude if you want the column to be excluded from the target.
- Select Bulk Edit to edit the precision and scale of all the columns.
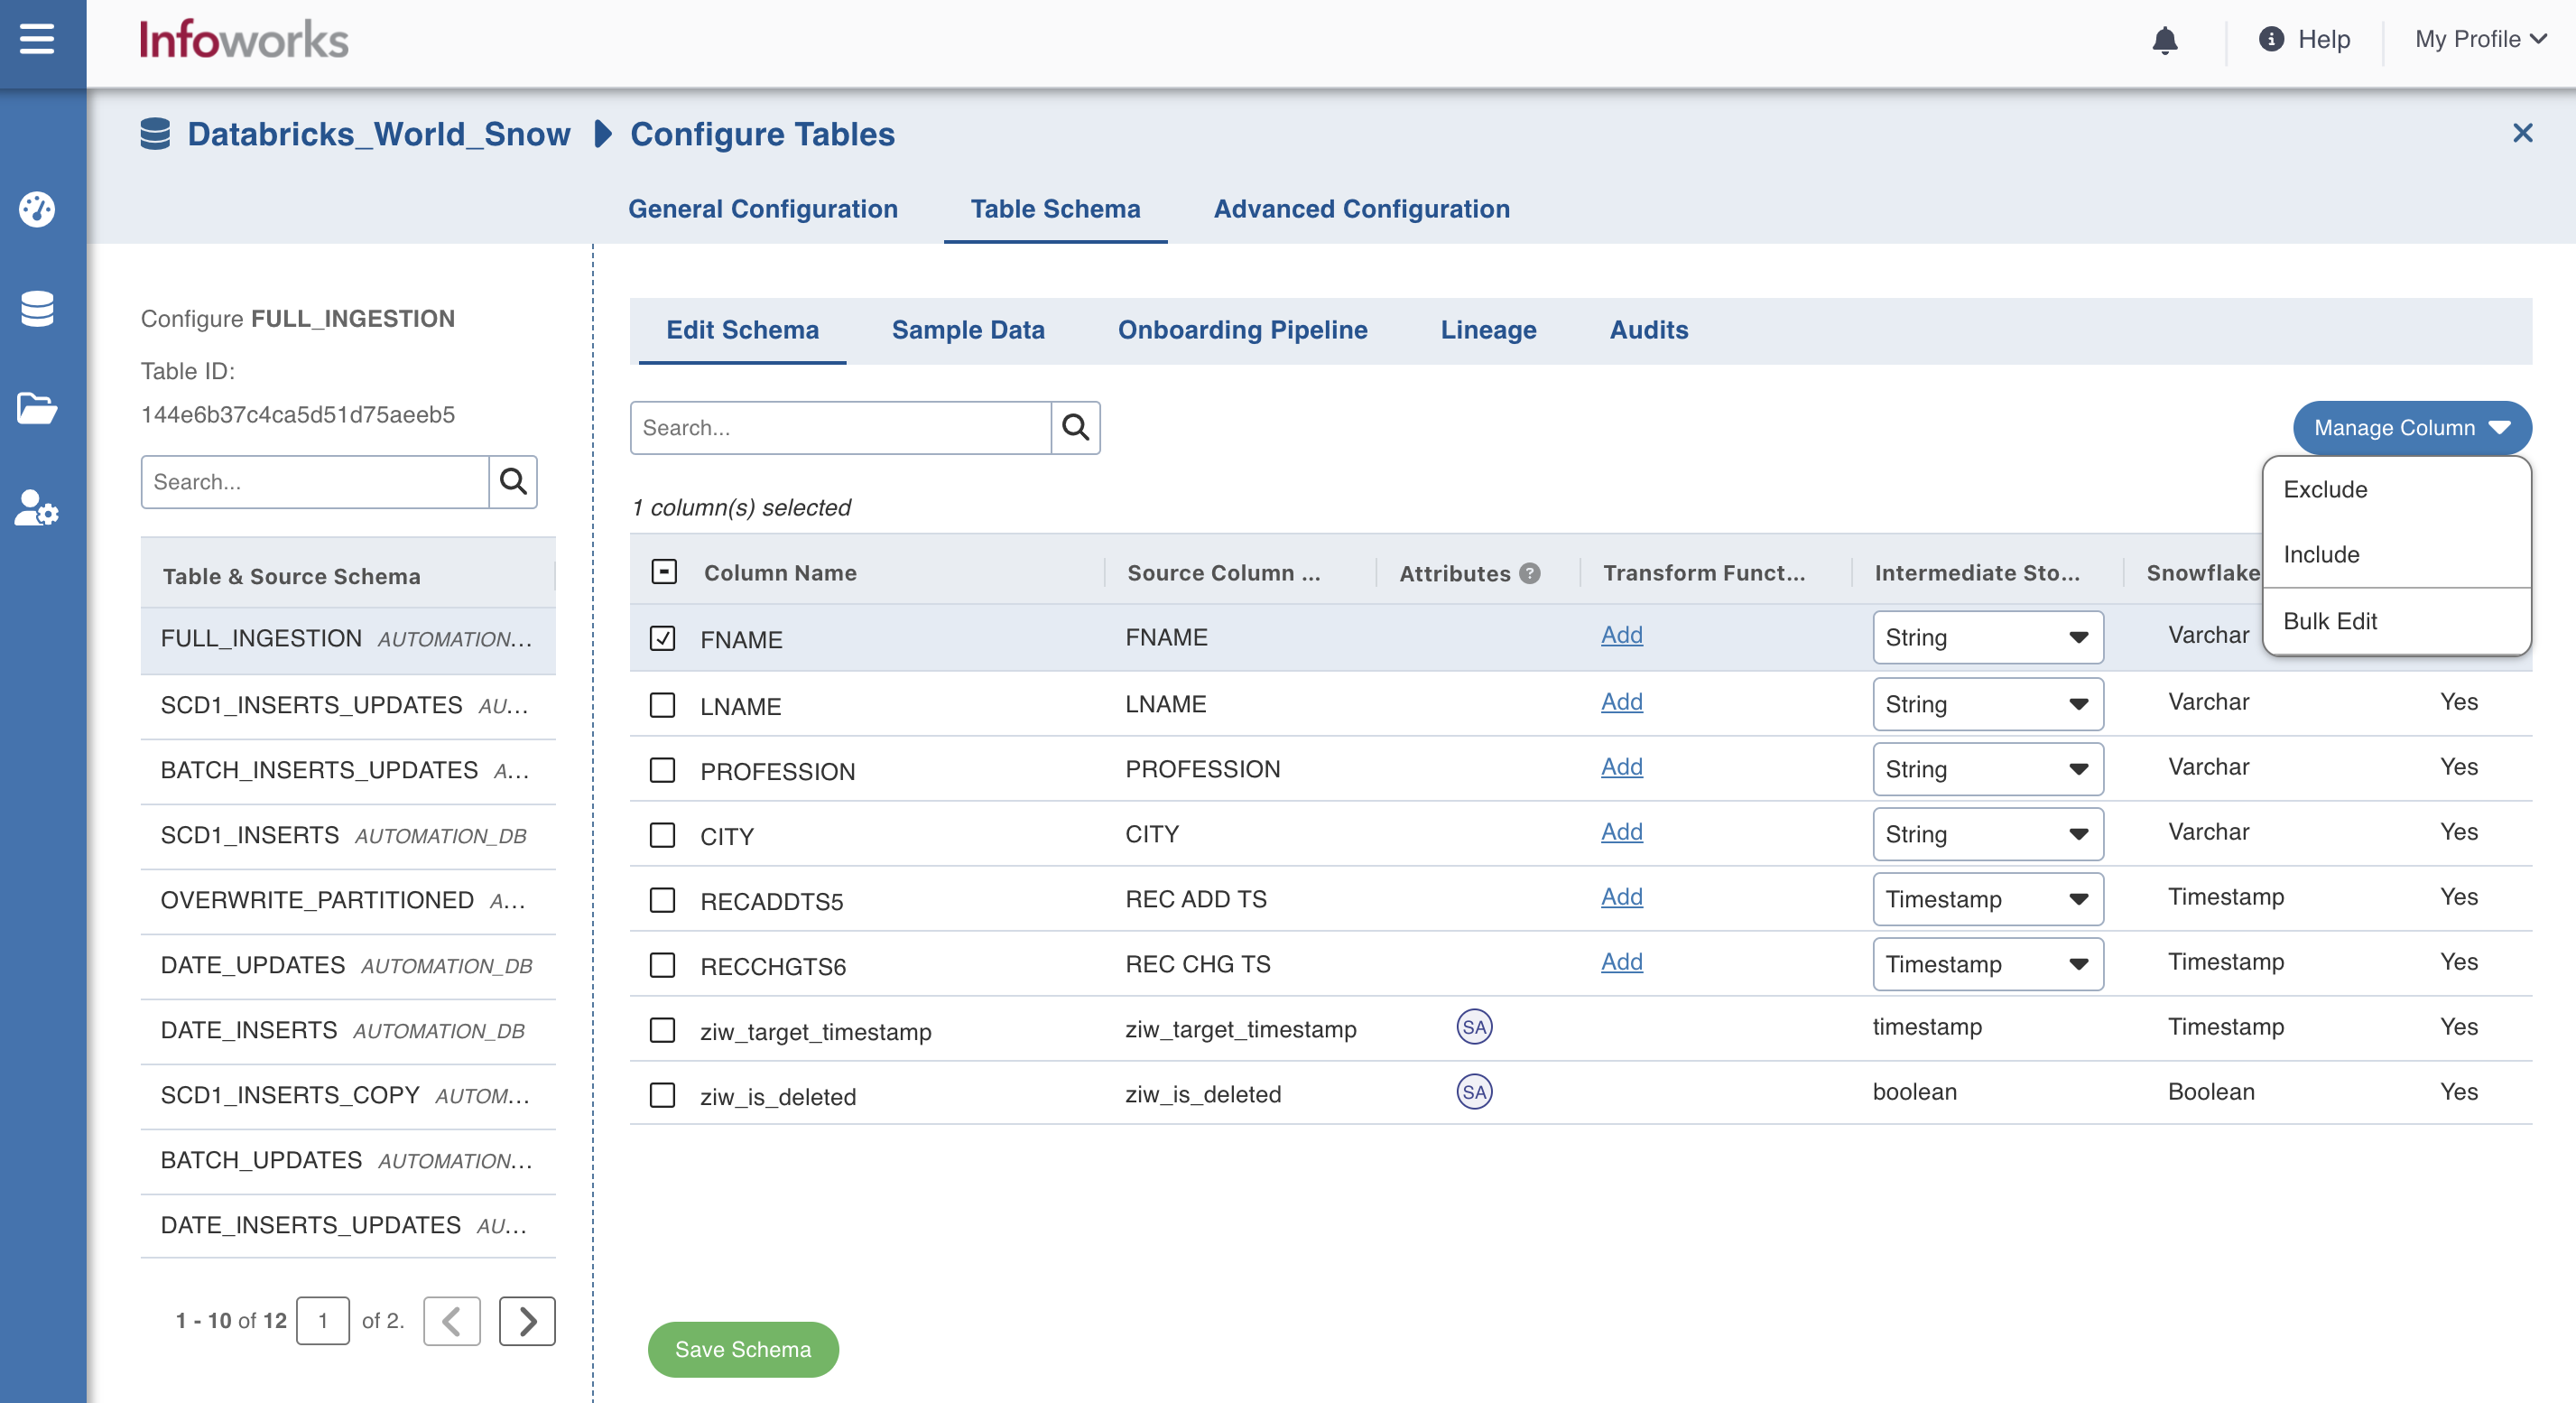
- Click Save Schema.
Following are the datatype conversions supported:
| Source Datatype | Target Datatype |
|---|---|
| String | Boolean, Integer, Float, Double, Long, Decimal, Date, Timestamp.Following are date and timestamp formats supported:Date: yyyy-MM-ddTimestamp: yy-MM-dd hh:mm:ss |
| Boolean | String |
| Integer | Float, Double, Long, Decimal, String |
| Float | Double, Long, Decimal, String |
| Double | Float, Long, Decimal, String |
| Long | Float, Double, Decimal, String |
| Decimal | Integer, Float, Long, String |
| Date | String |
| Timestamp | String |
| Byte | String |
Adding Transform Derivation
You can apply Spark Expressions on the columns in the Ingestion table. Spark expressions can be applied in the Transform Derivation field. The Transform Derivation field appears only if Transform Mode is set to Advanced.
To apply Spark expressions on a newly created column:
Step 1: Go to the Table Schema tab.
Step 2: Click Add Column.
Step 3: Set the Transform Mode to Advanced.
Step 4: Provide the Spark Expression in the Transform Derivation field.
To apply Spark expressions for an existing column:
Step 1: Click the Add button under the Transform Derivation column.
Step 2: Set the Transform Mode to Advanced.
Step 3: Provide the Spark Expression in the Transform Derivation field.
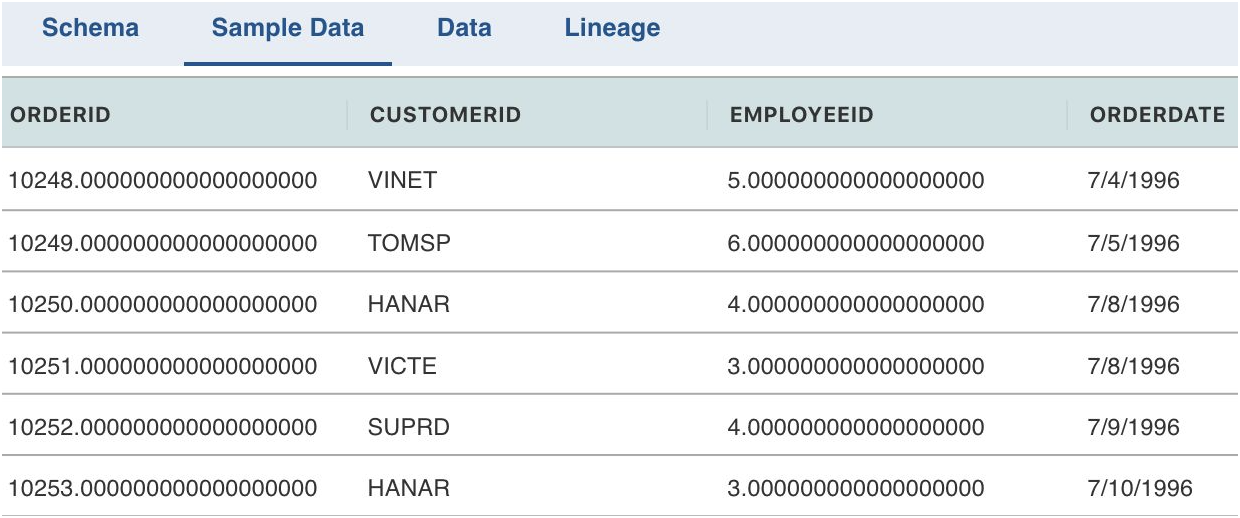
Viewing Sample Data
The Sample Data page includes the sample data of the source table.
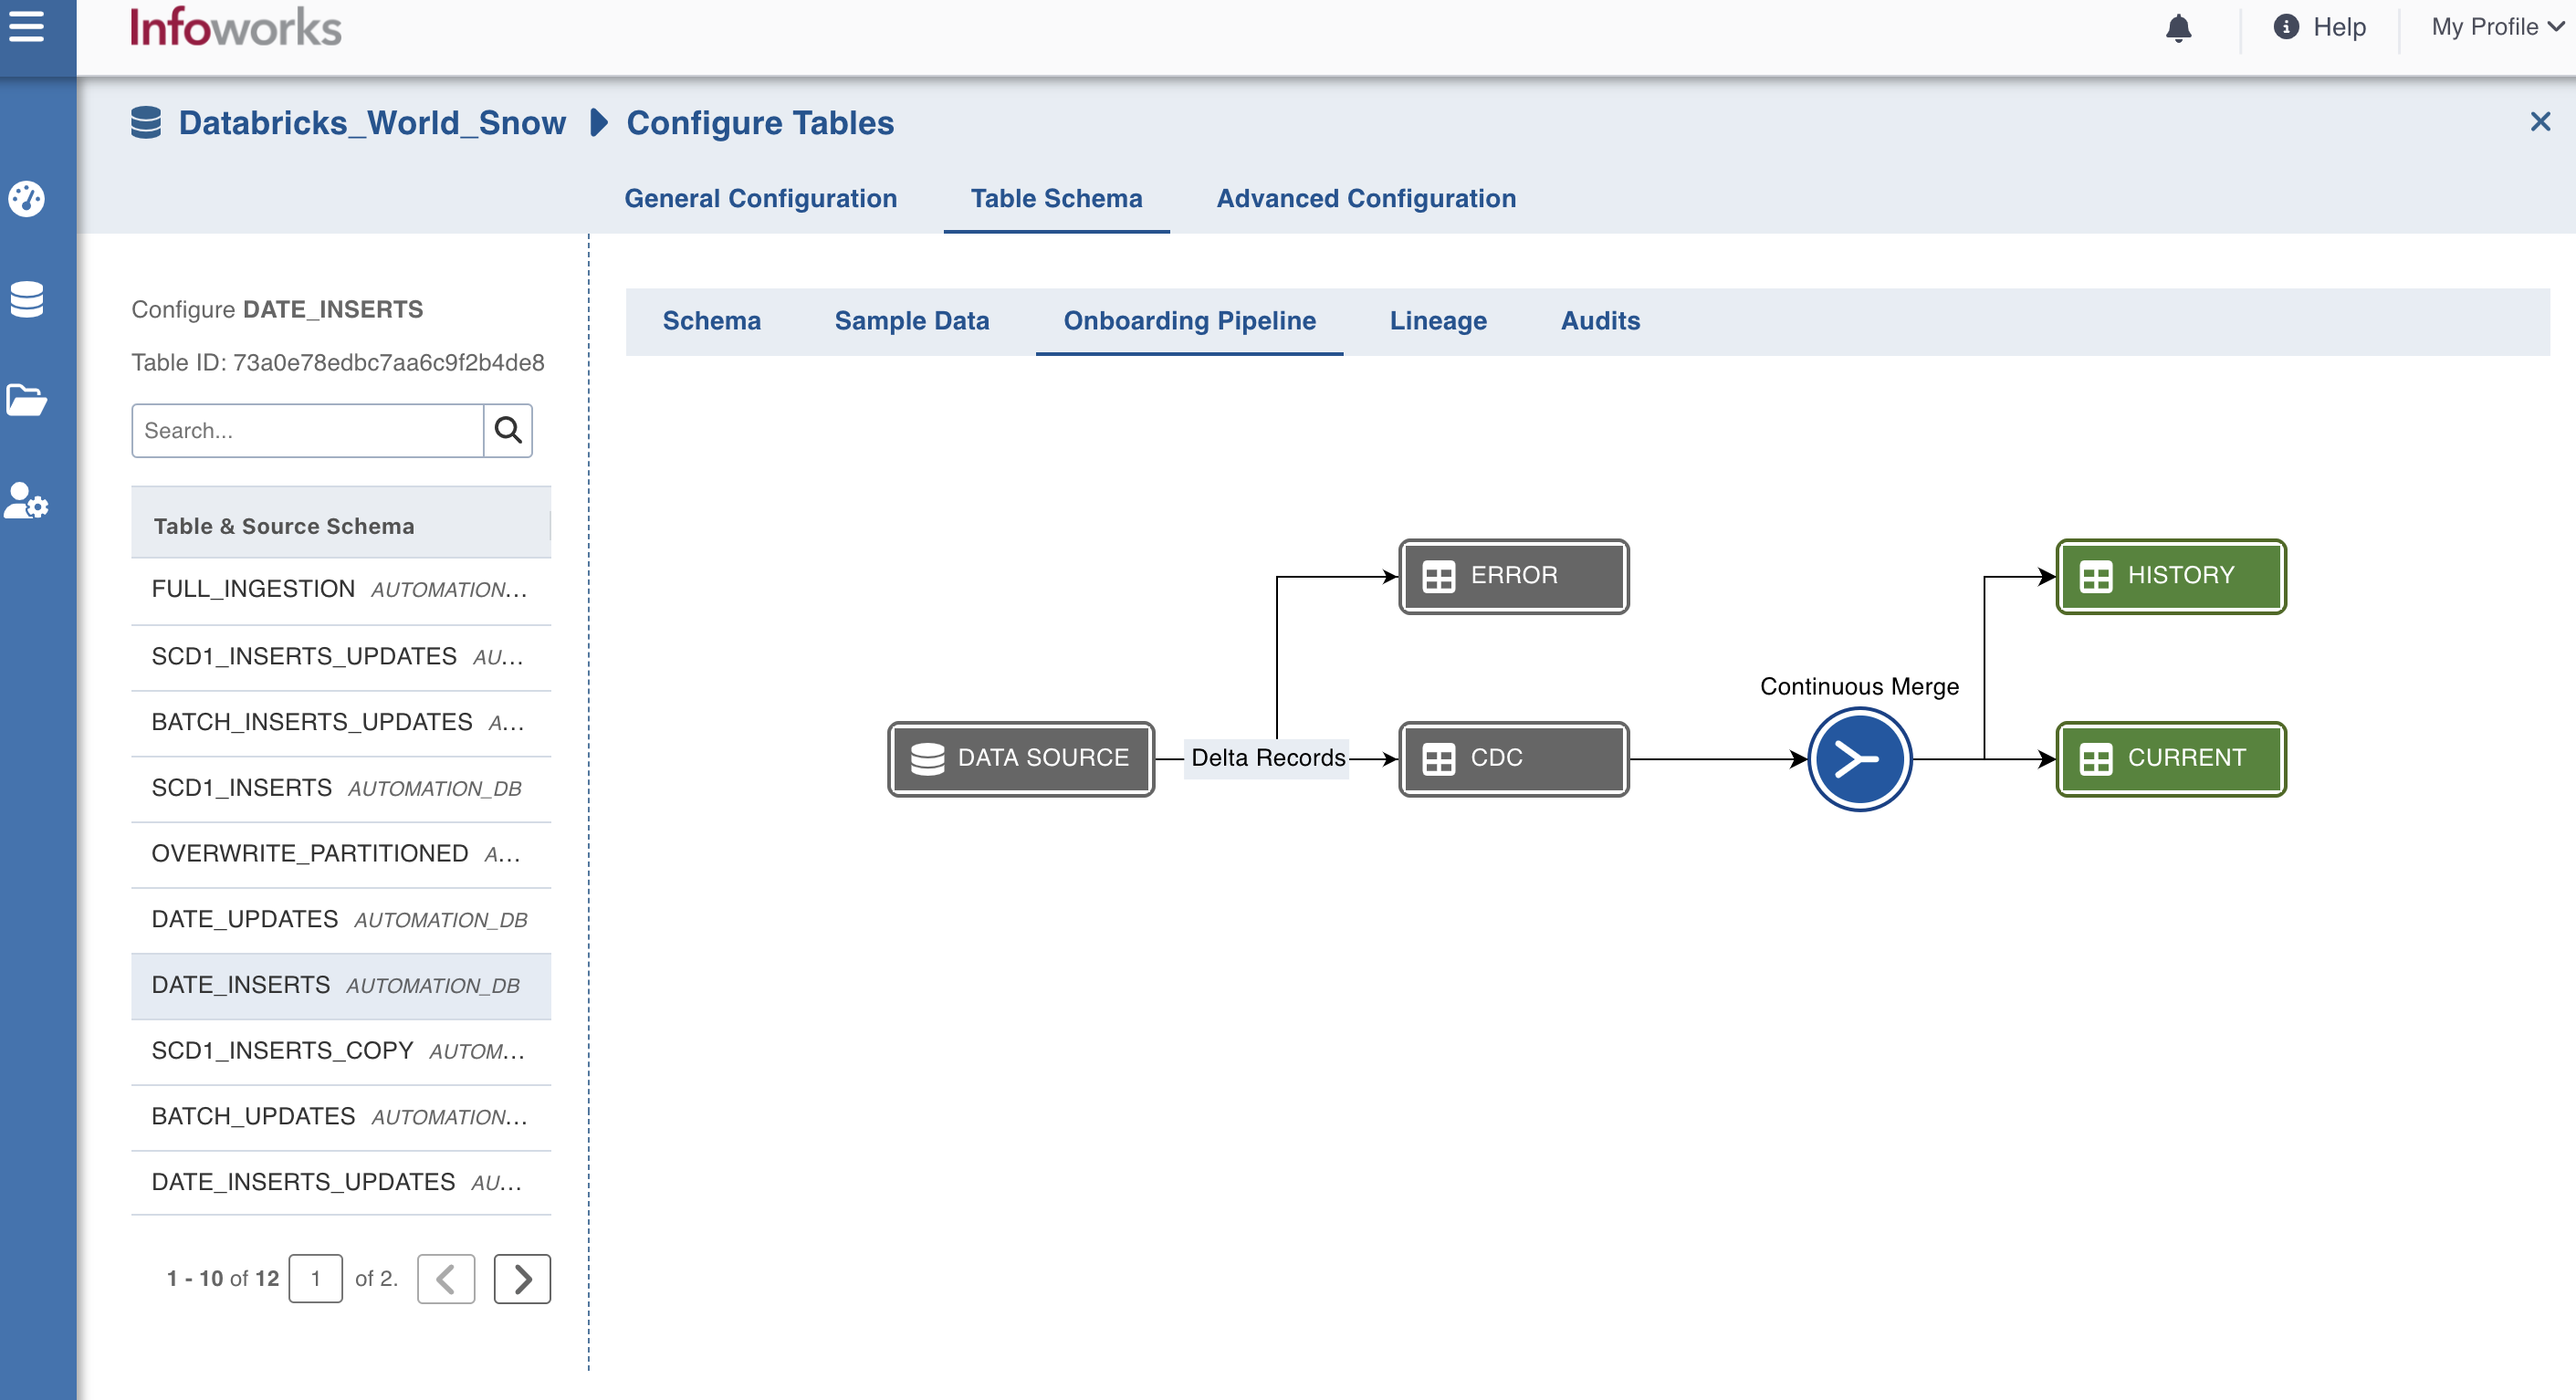
Onboarding Pipeline
The Data page includes a visual representation of all the Databricks metastore tables.
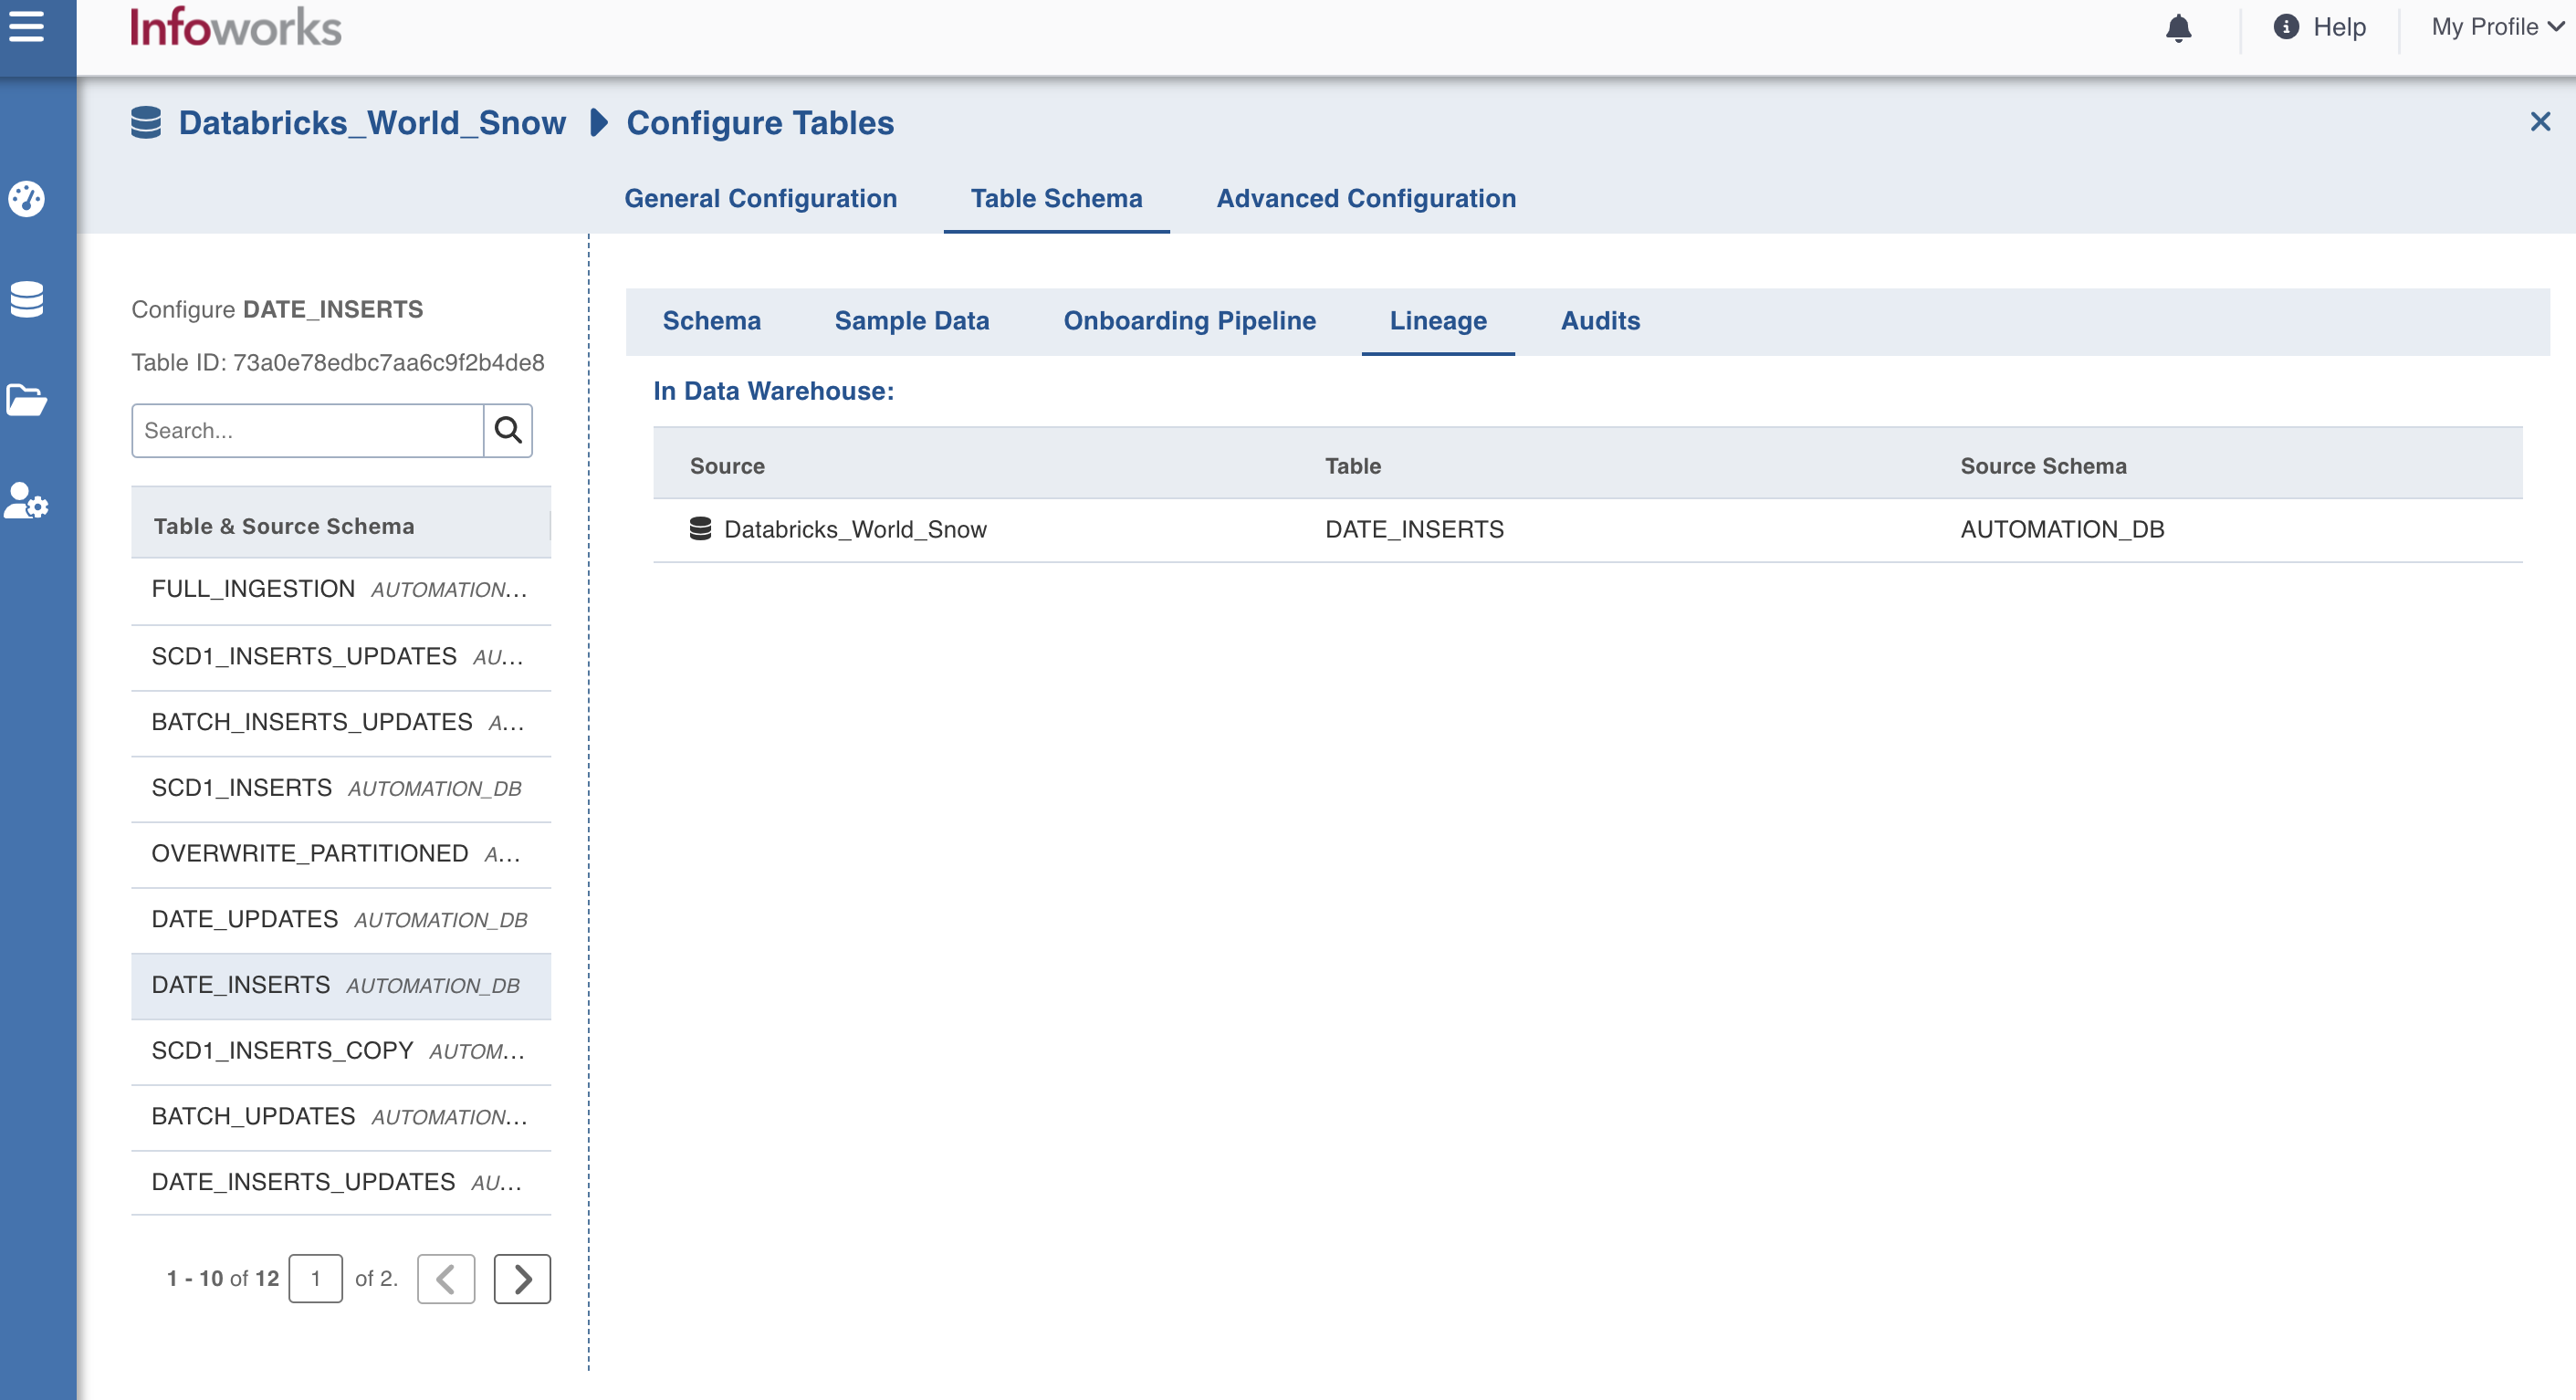
Viewing Data Lineage
The Lineage page displays all the instances where the data of the table is being used.
Viewing Source Audits
To view Source Audits, perform the following steps:
- Click the Data Sources menu and click View Source for the required source.
- Click the Source Setup tab and scroll down to the Audits section. The audit logs for the source is displayed.
Alternatively, click the Tables tab > Configuration > Table Schema > Audits to view the audits section.
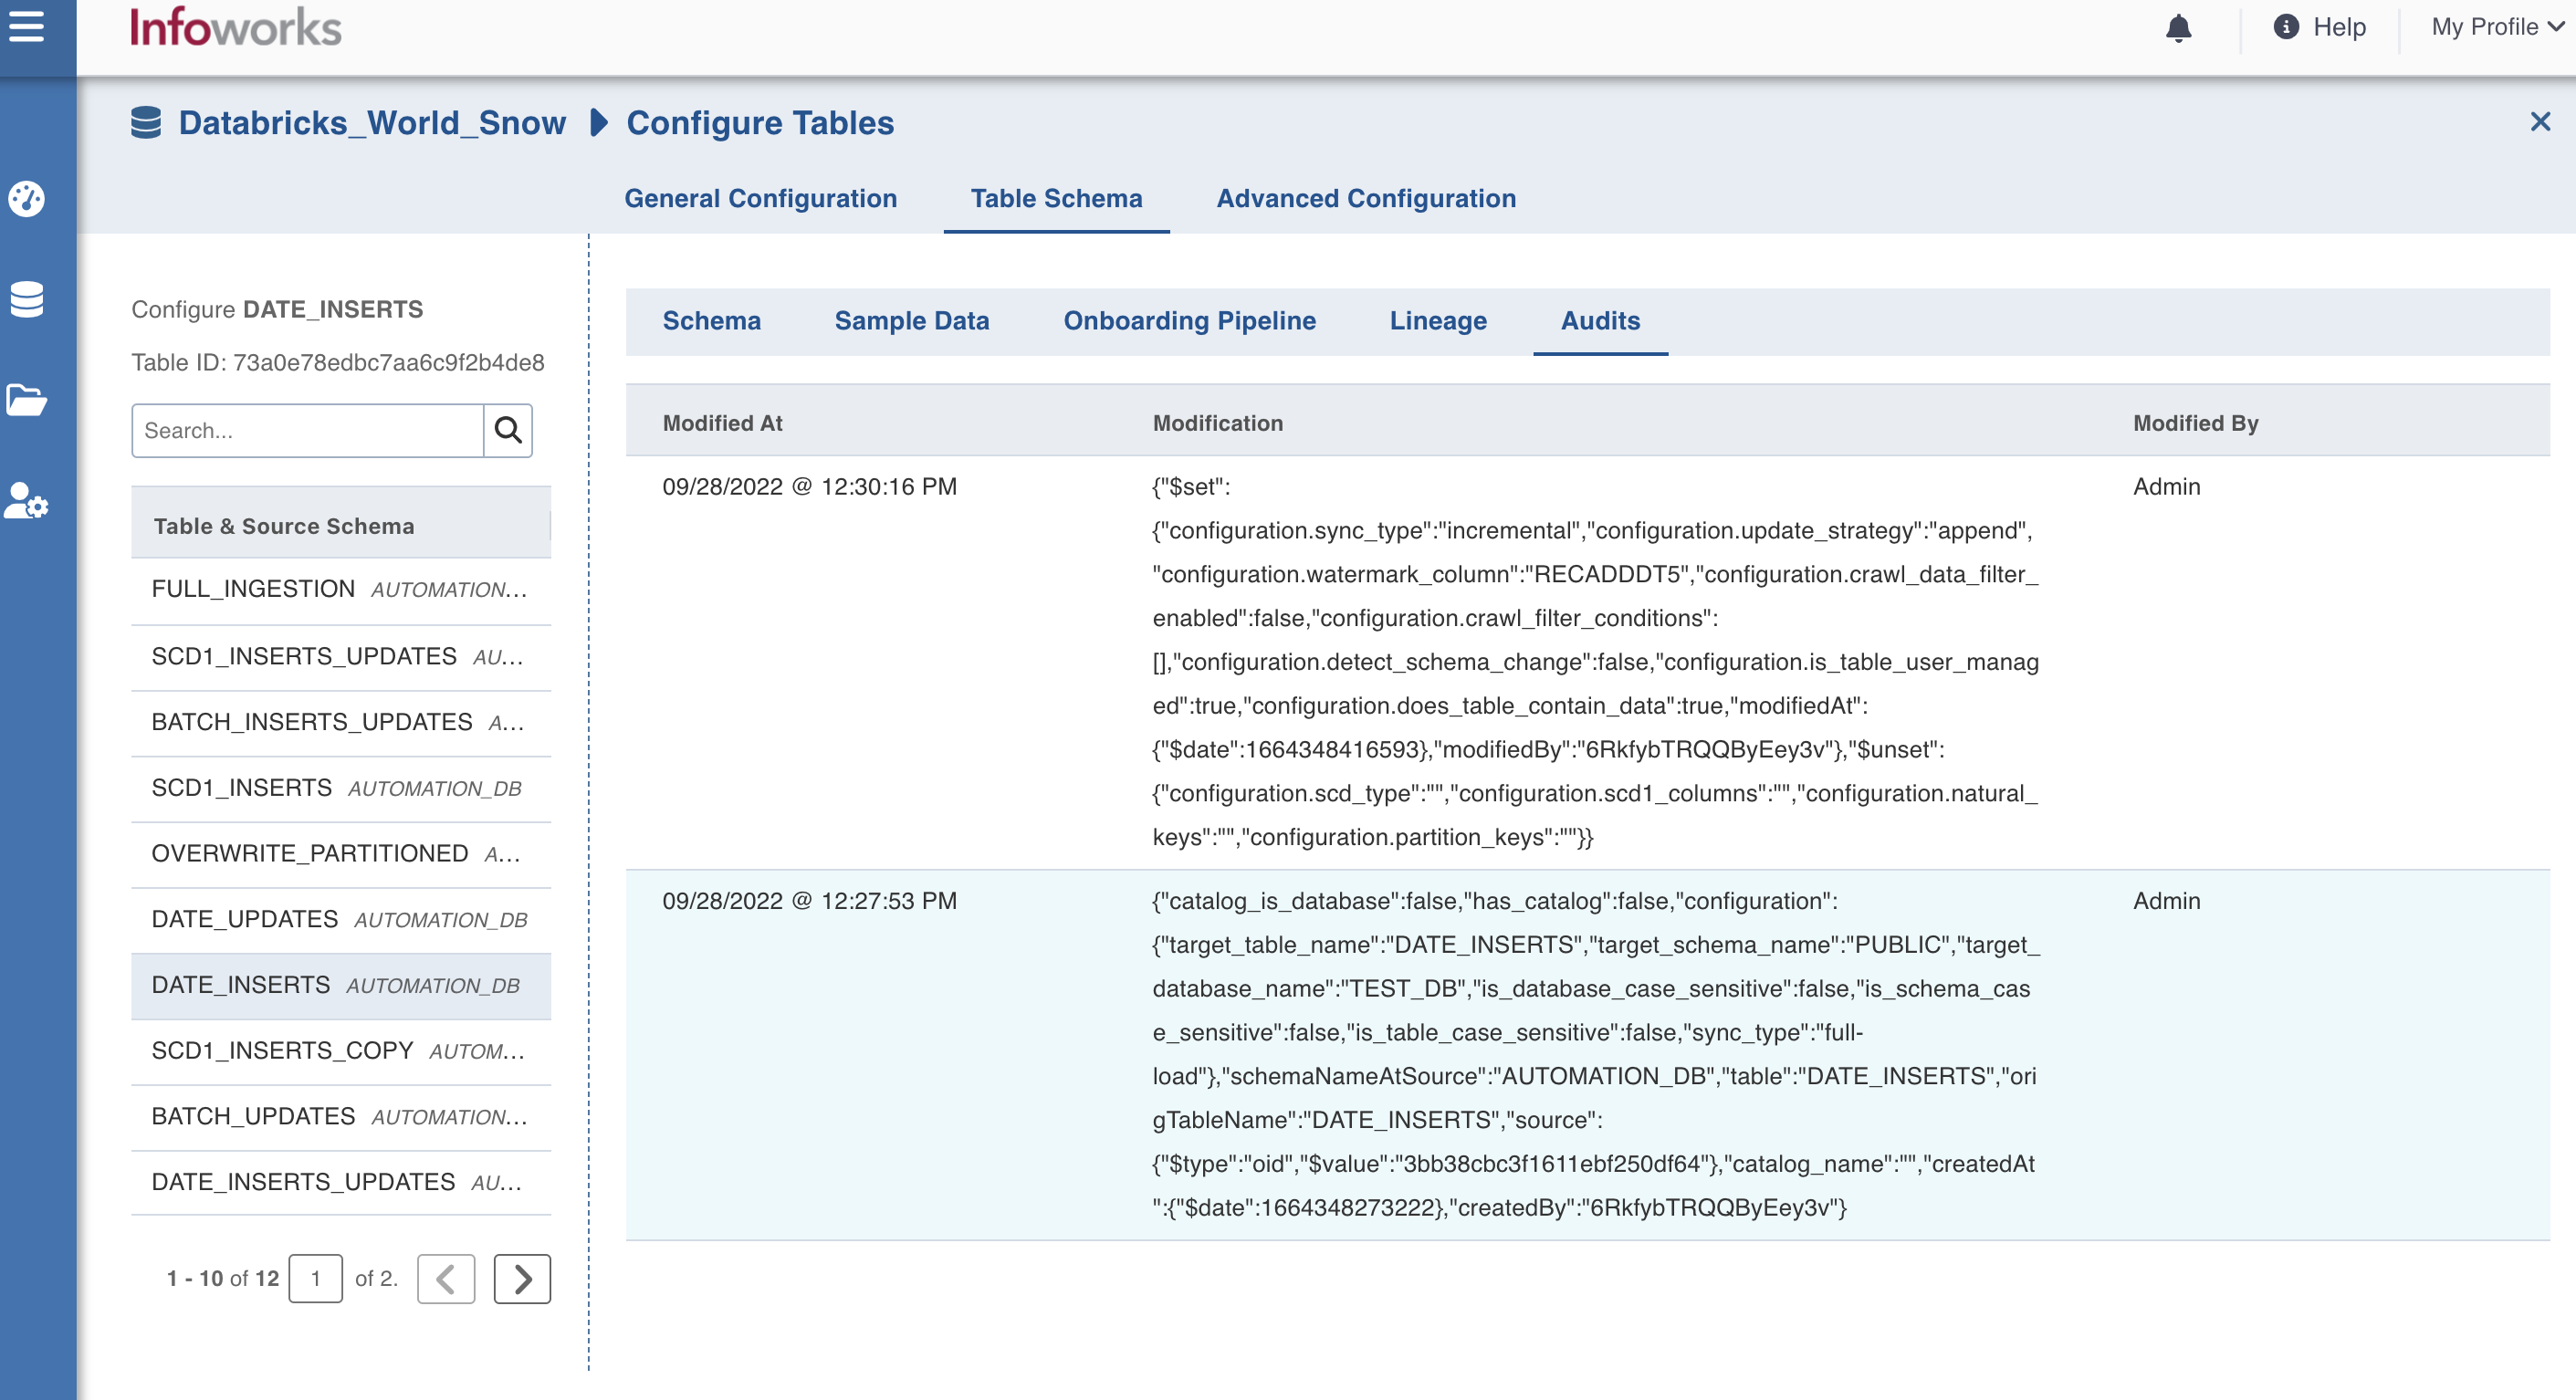
Audit Logs
In source audit logs, following are some operators:
- $push - the operator displayed when an entity is added.
- $pull - the operator displayed when an entity is deleted.
In table audit logs, when updating column details, following logs are displayed:
columns.<columnIndexInTable>.<key>:<UpdatedValue>- indicates single column update.columns:[<list of all the columns with details>]- indicates bulk column update.
Audit Trail
The audit trail displays records of all fields that have been created, updated, or deleted. Each entry includes:
- Action Type - Indicates the type of operation performed by the user — Created, Updated, or Deleted.
- Modification - Shows the details of the change made to a field. For updated fields, both the previous value and the updated value are displayed.
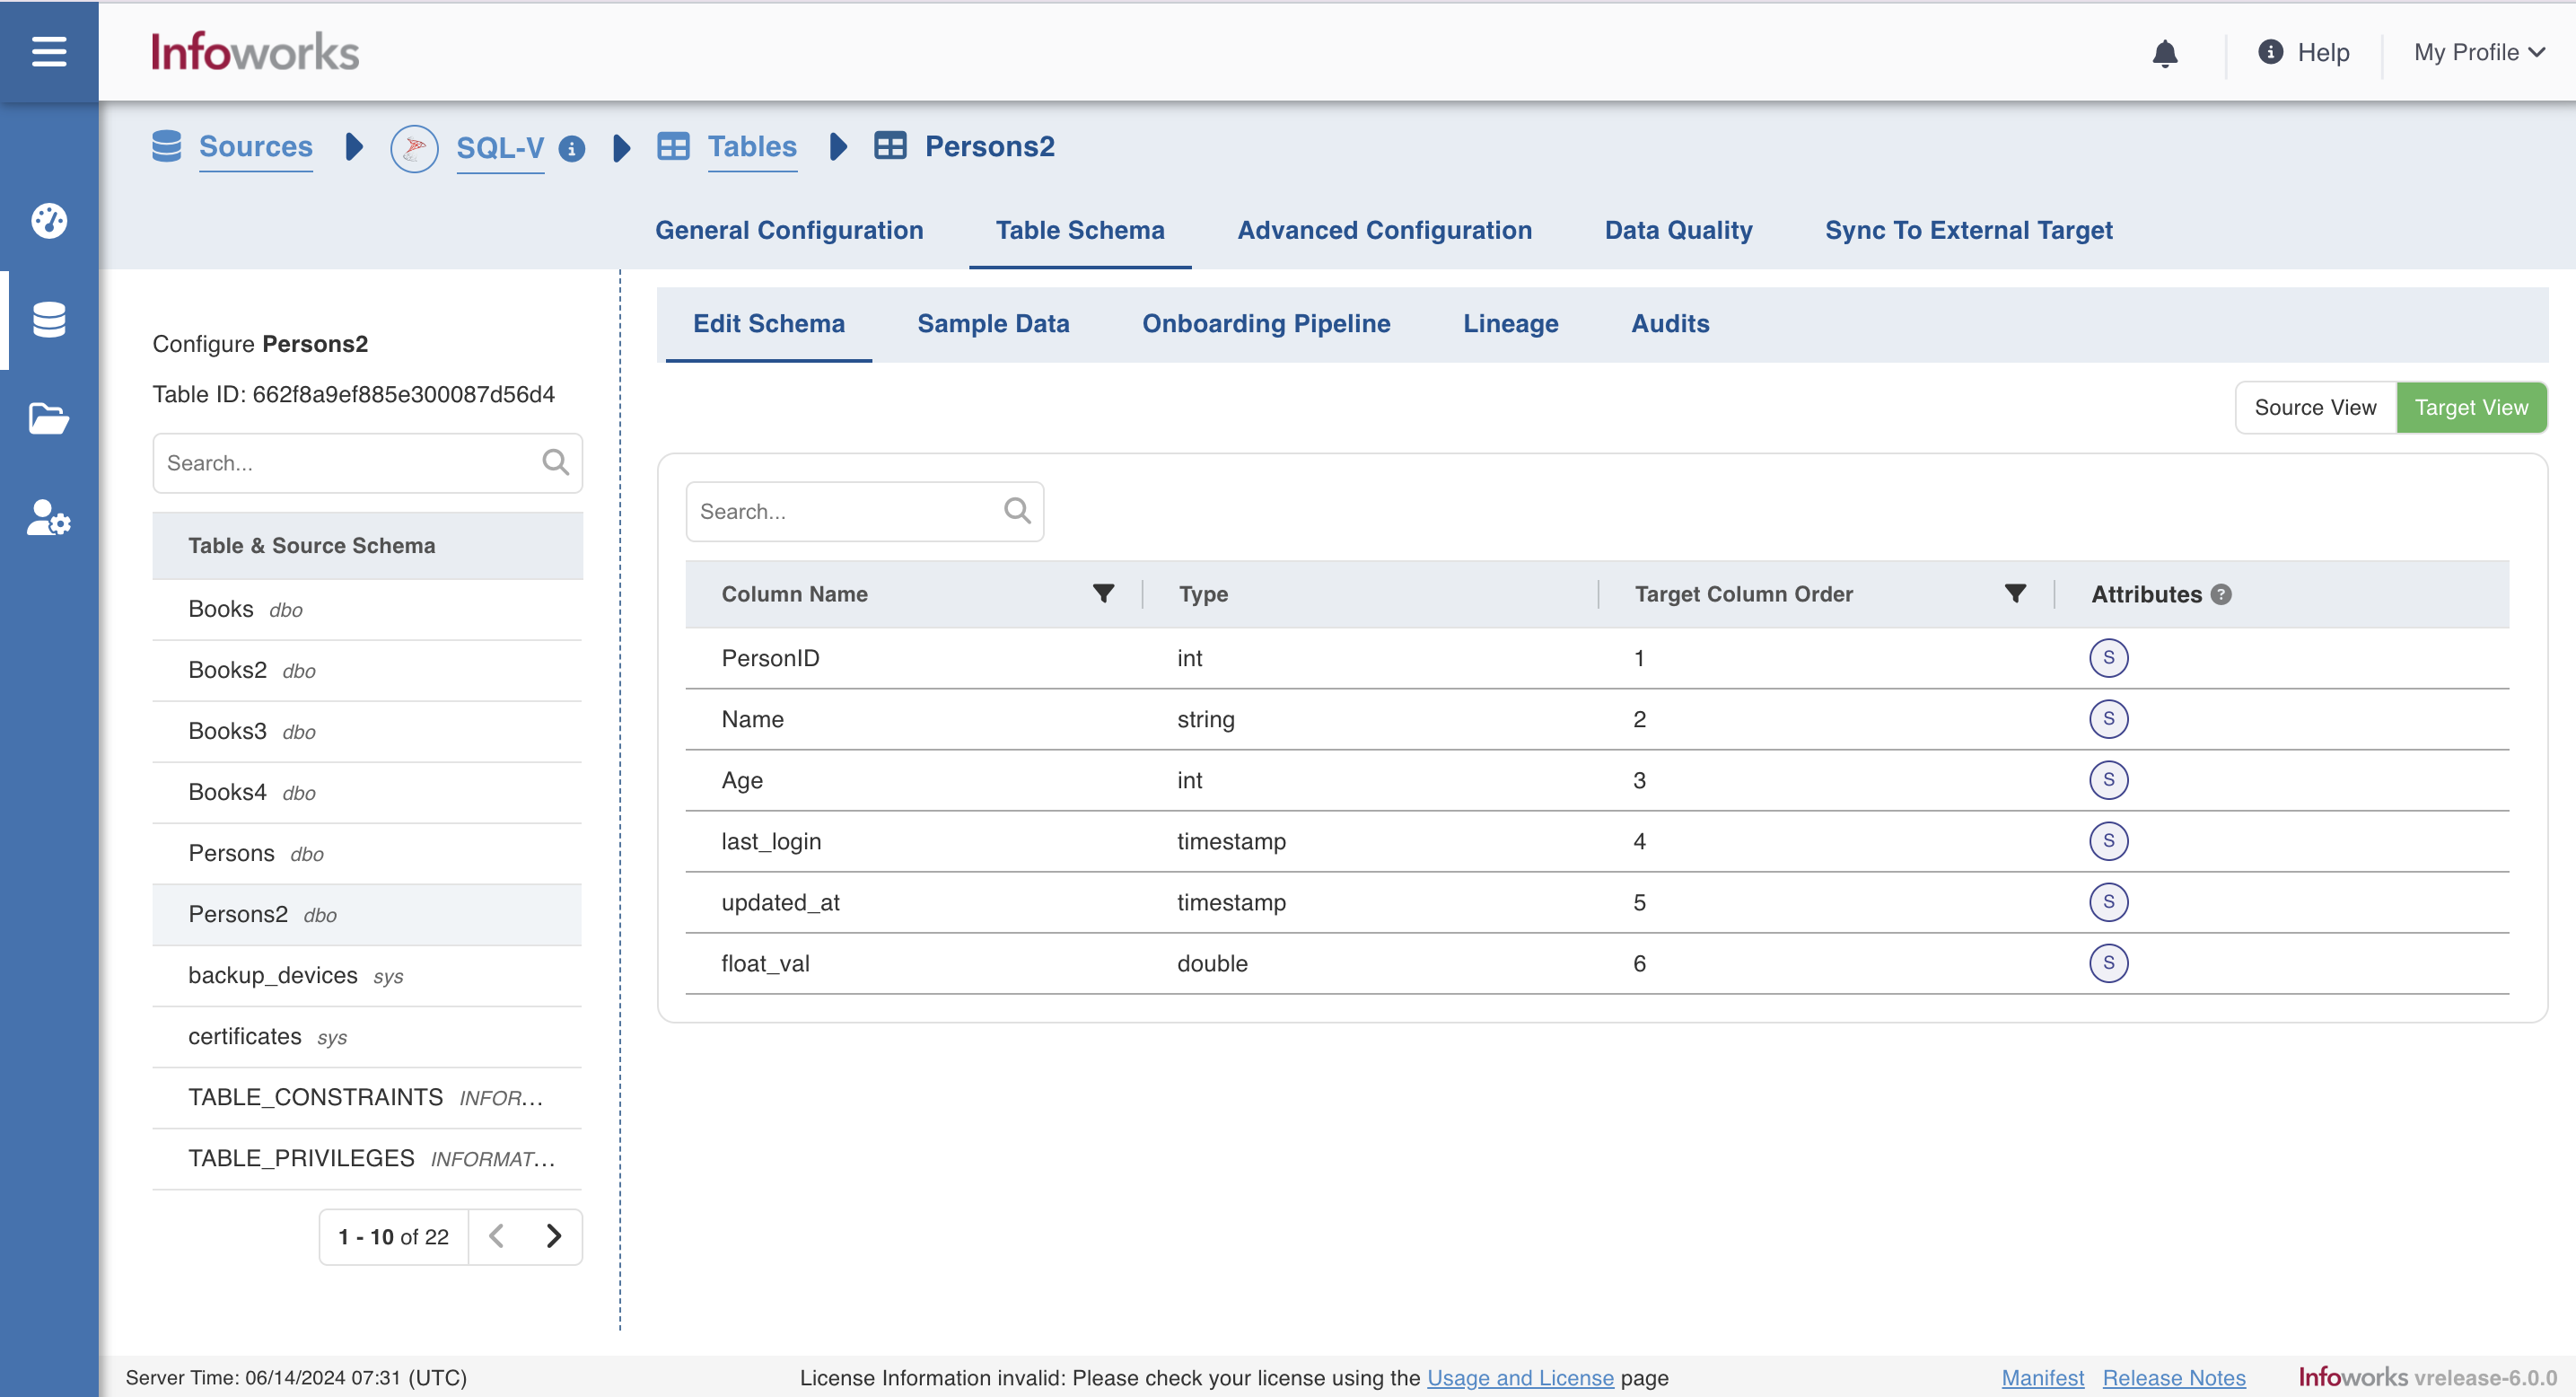
Target Column Order
You can use the Target Column Order feature to set the target table columns in a specific order.
Consider the following scenario.
FNAME column will appear at position 1 in the target table, LNAME at 2, and so on.
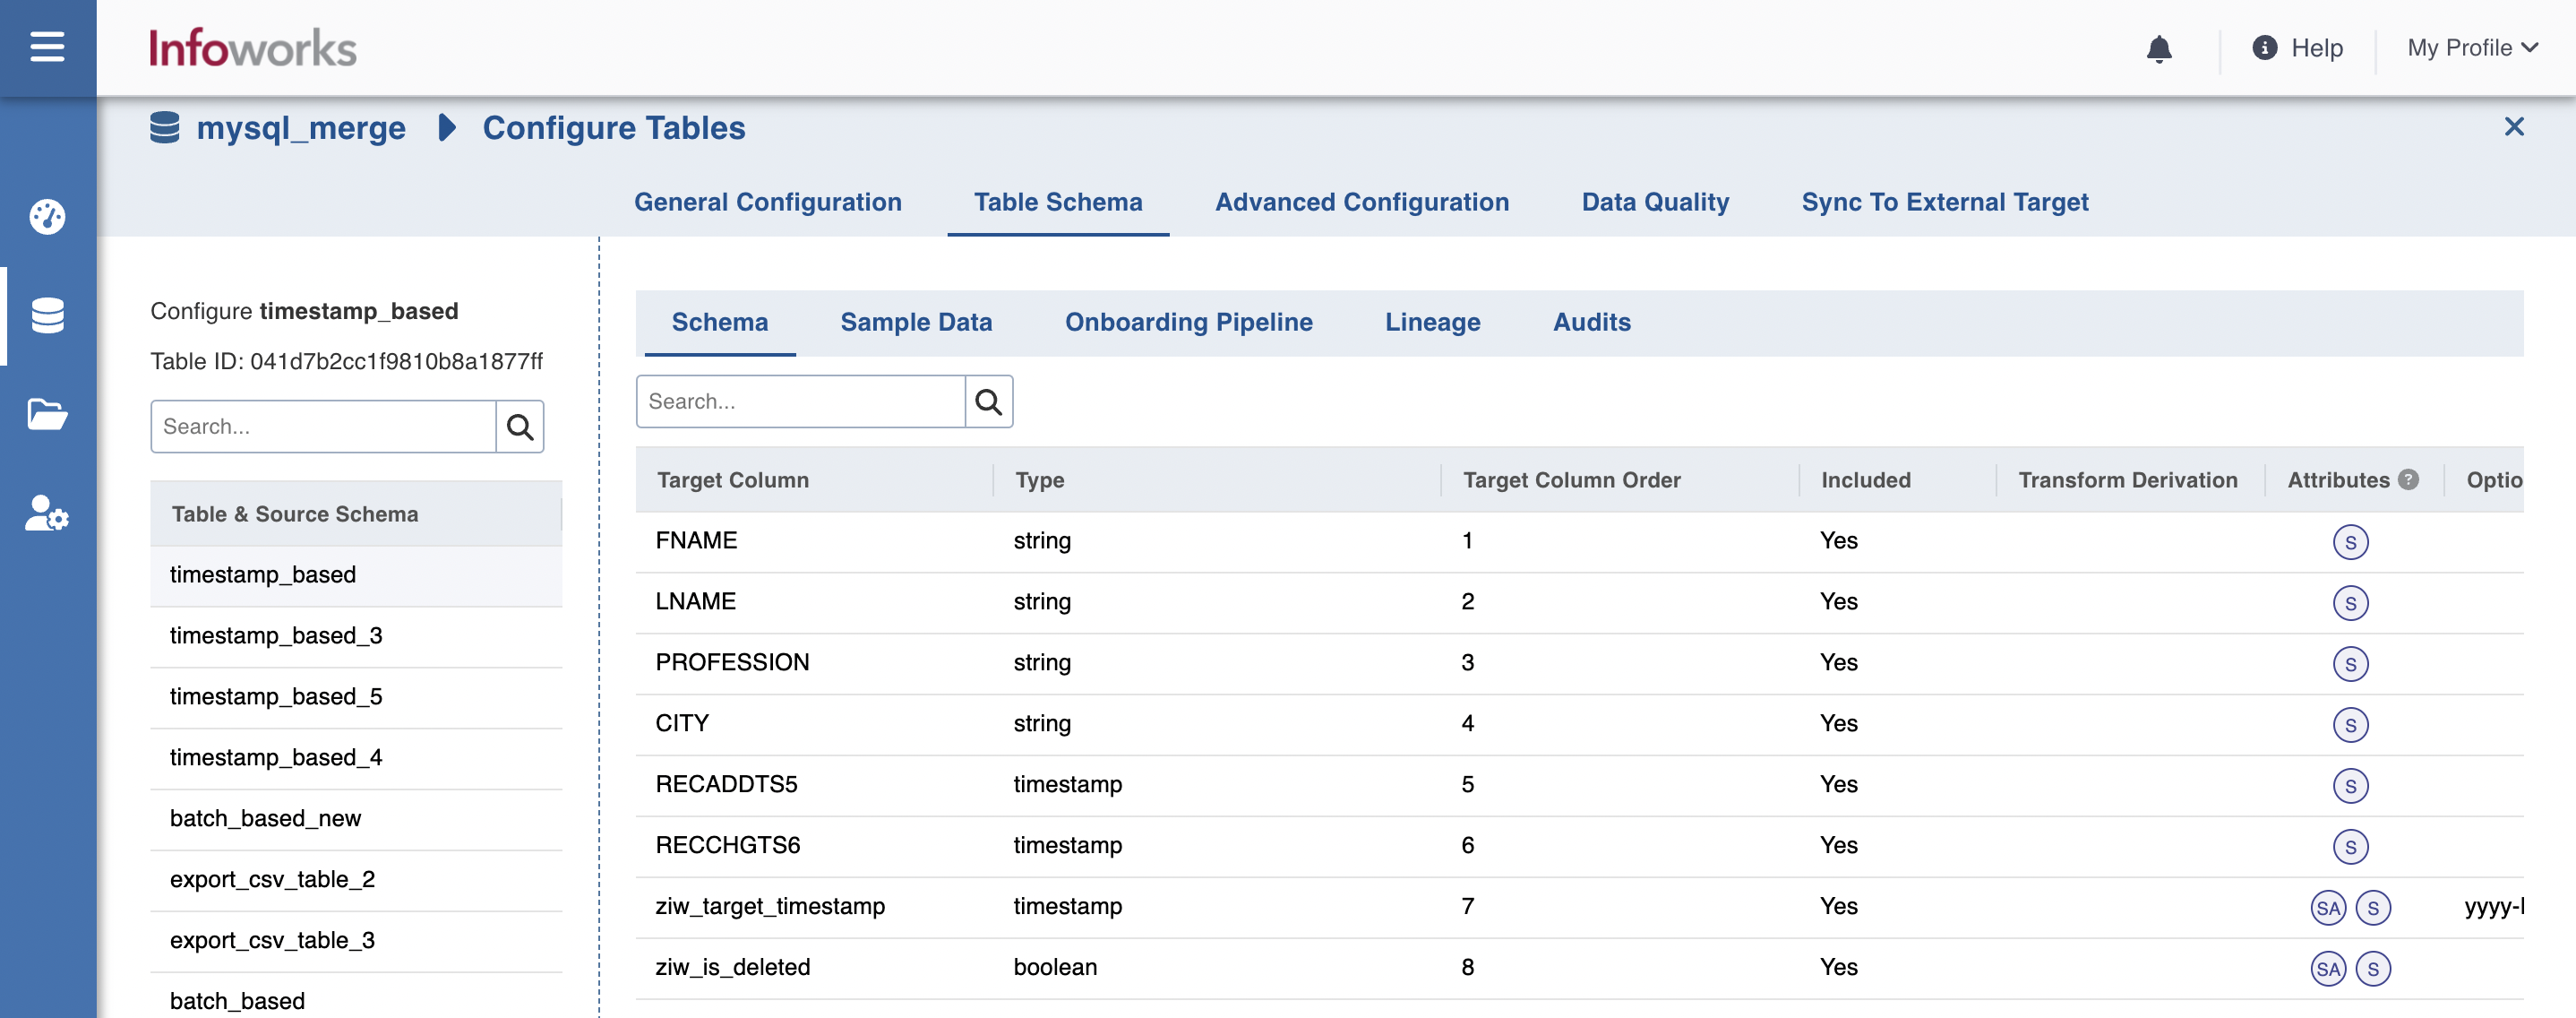
You can re-order columns during the Ingestion on UI by specifying the target column order in which you want the columns to land in target.
To reorder target columns:
Step 1: Go to the Table Schema tab.
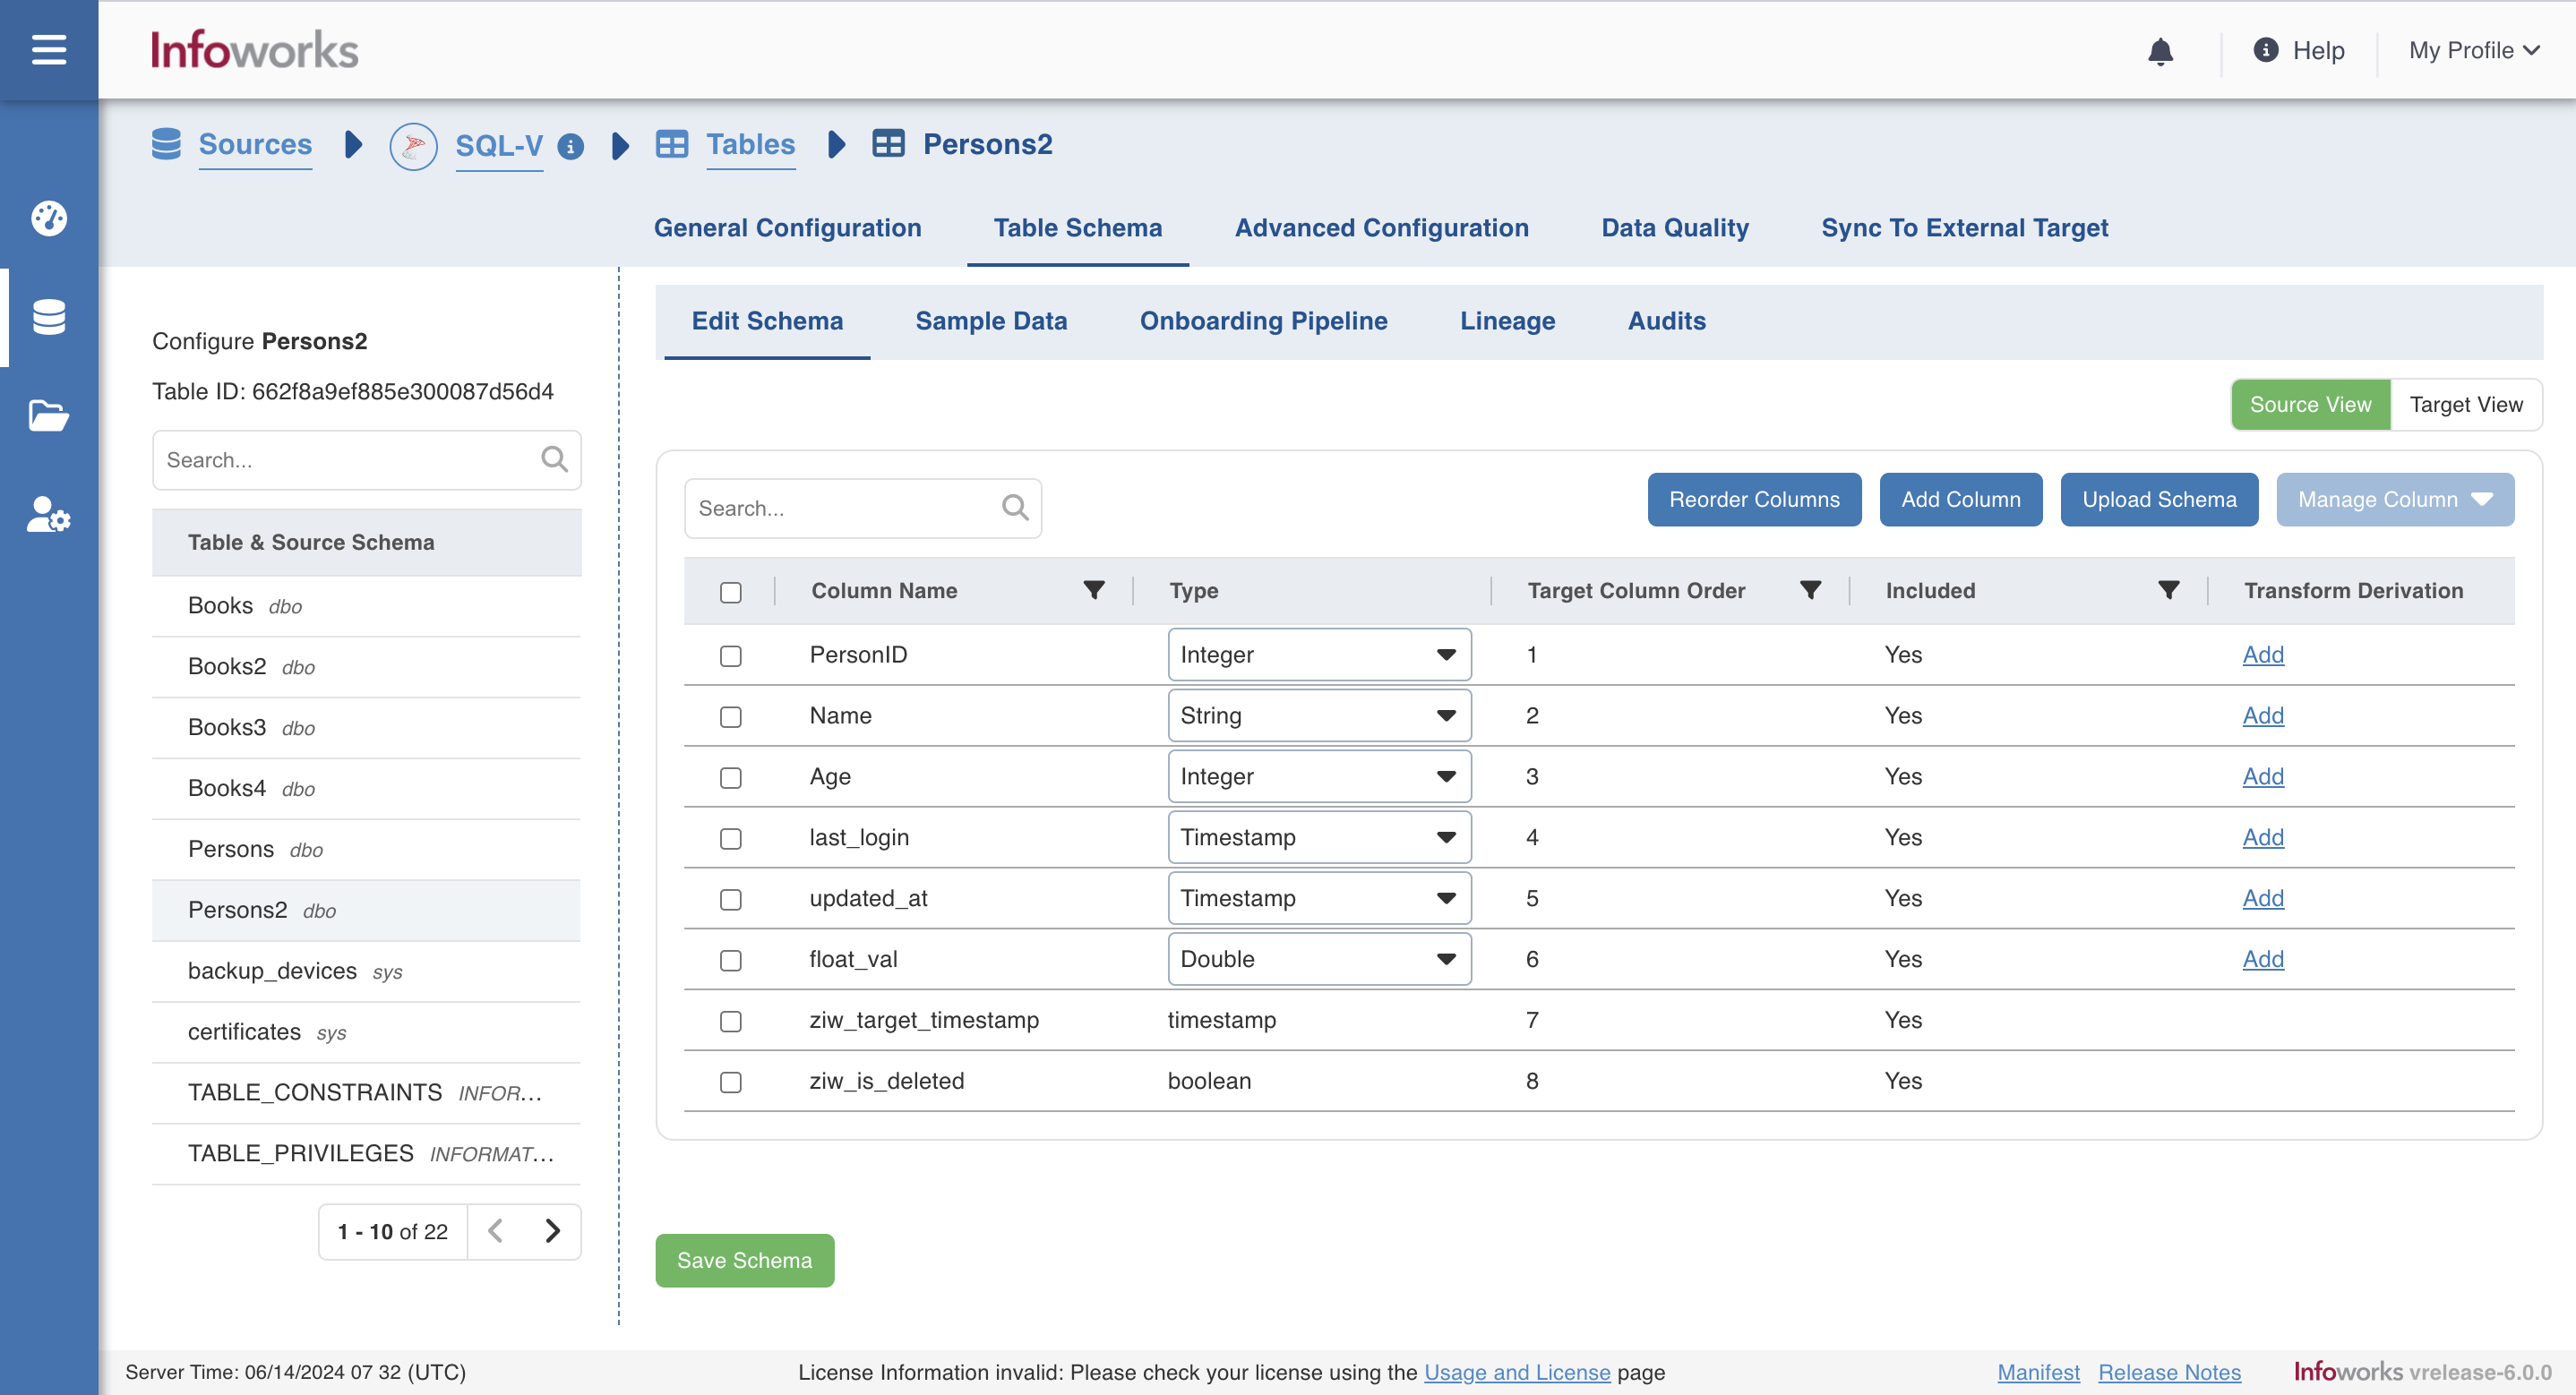
Step 2: Click Reorder Columns.
Step 3: Change the order of the columns by double clicking on the column row. You can also change the column order by clicking on the arrows in each row on right side.
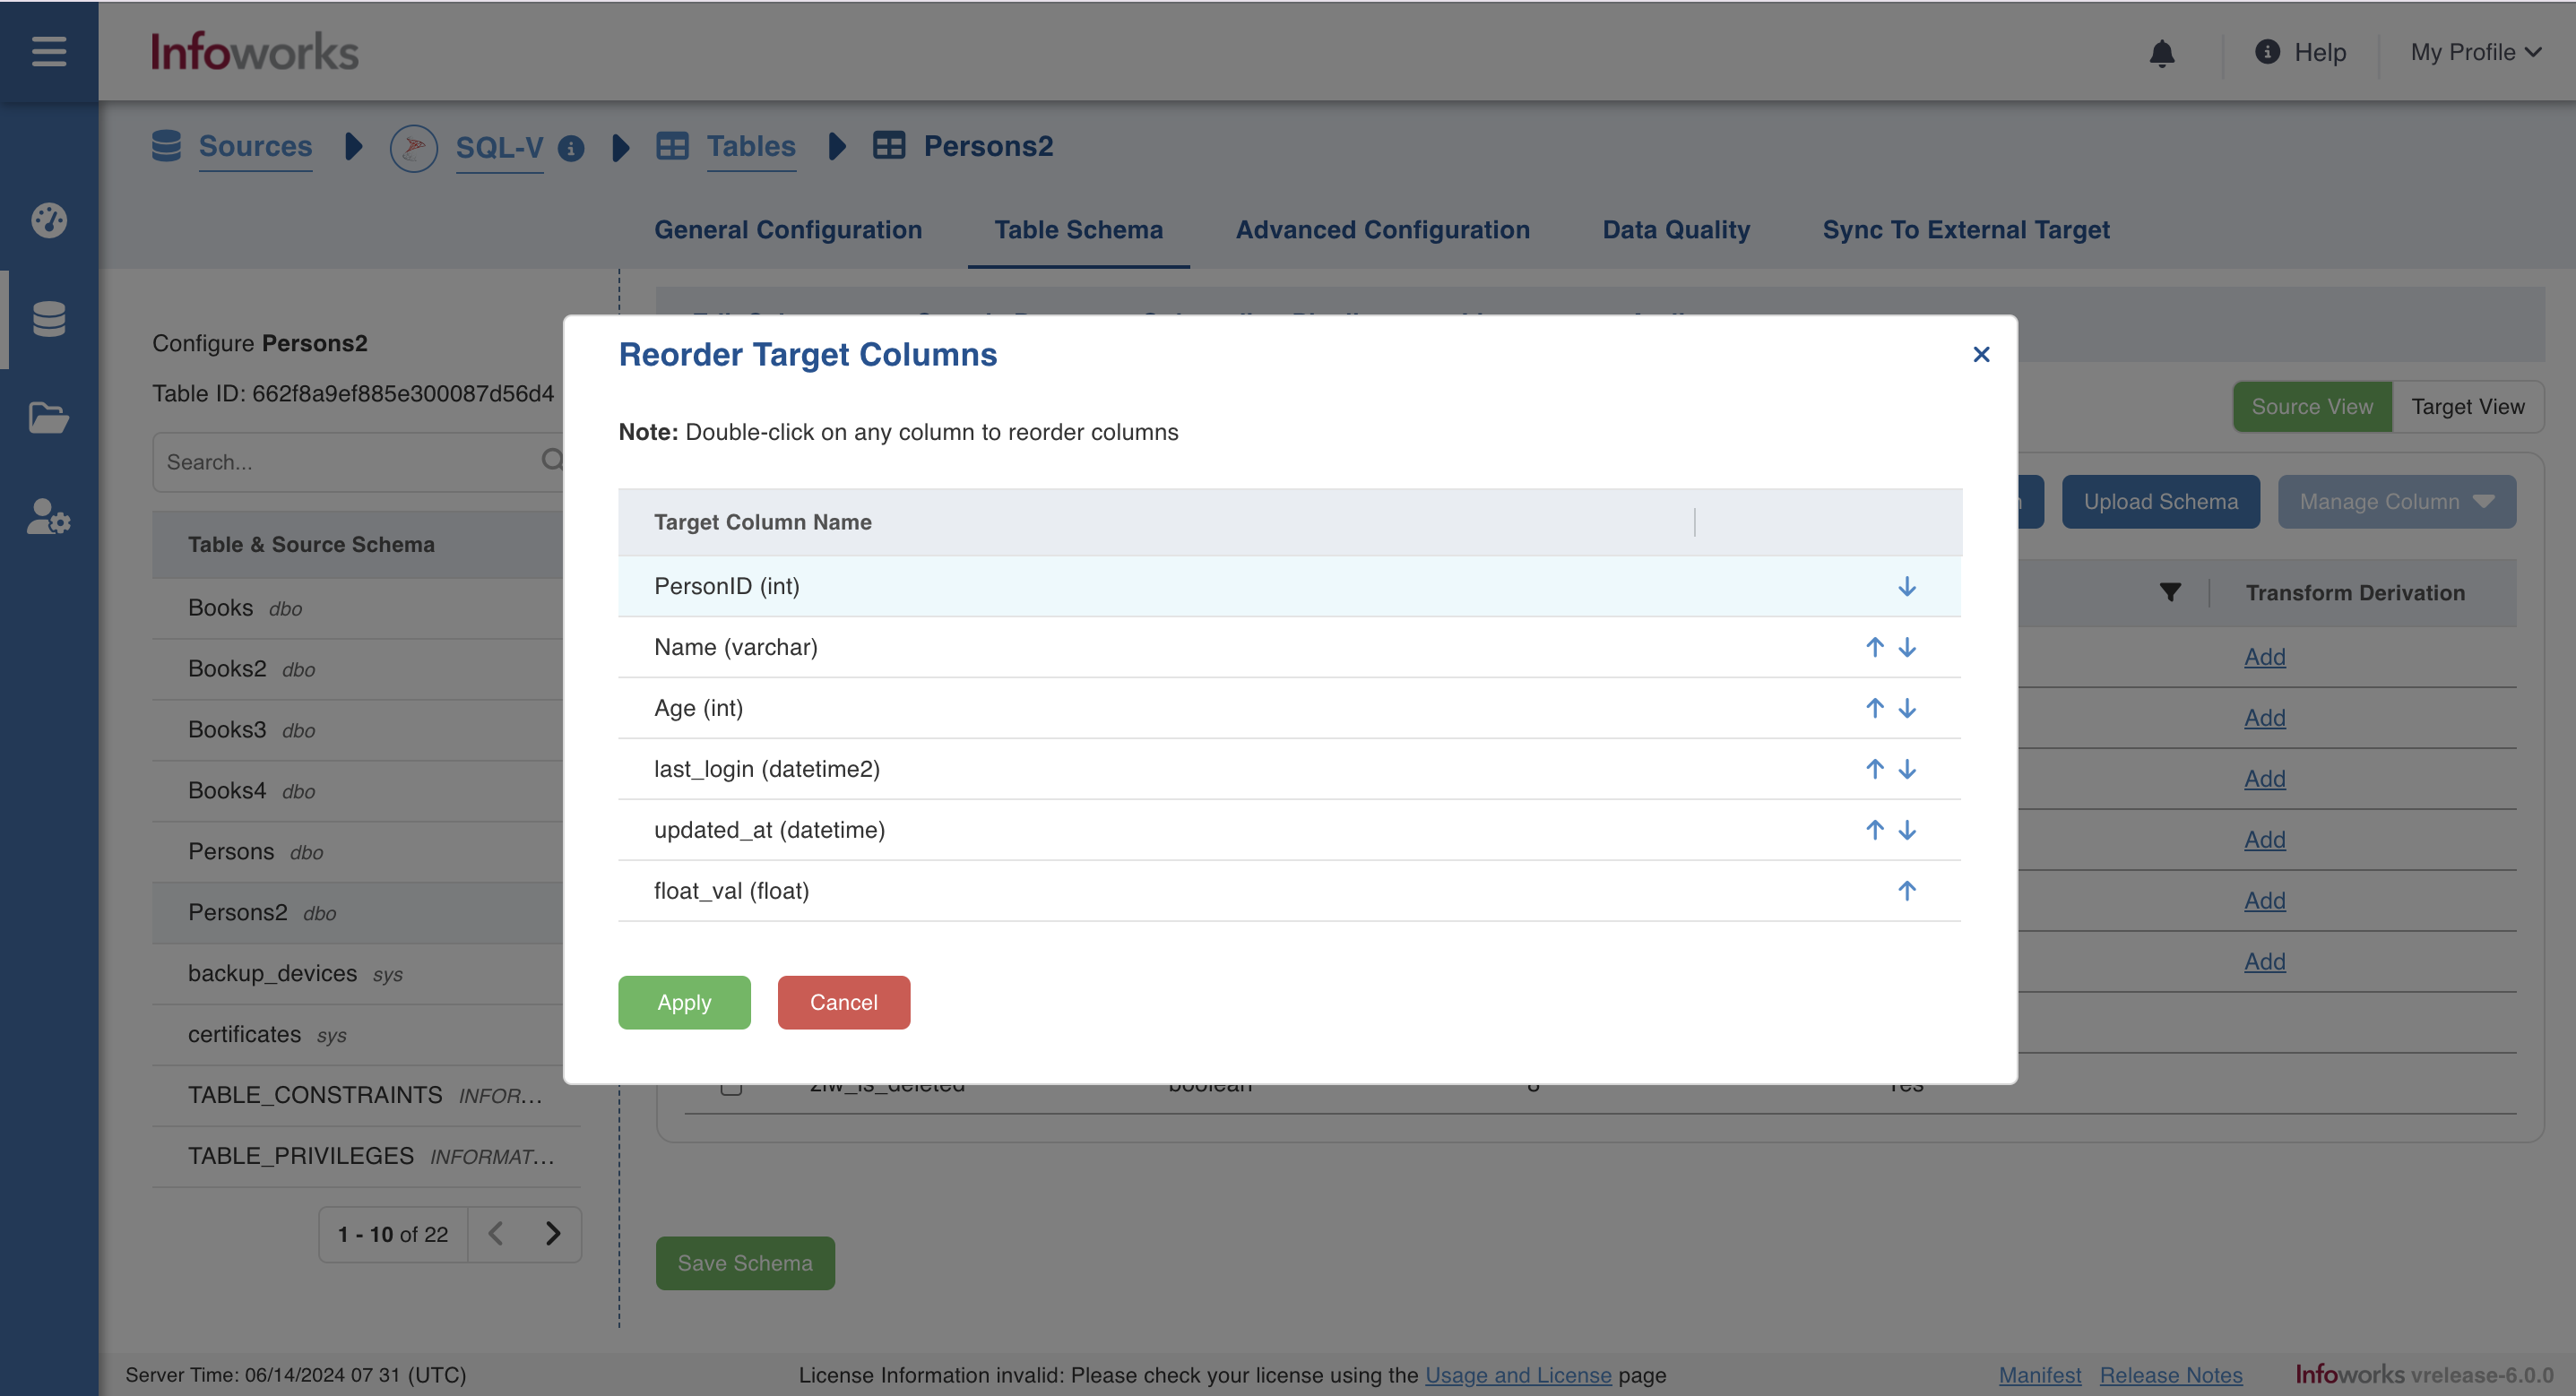
Step 4: Click on Apply.
Step 5: You can view the target column order by clicking on the Target View on the left top corner of Edit Schema page.
Target Configurations
Enter the following fields under Target Configuration.
| Field | Description |
|---|---|
| Target Table Name | The name of the target table created, if the incremental mode selected is Append. |
| Staging Catalog Name | The staging catalog name for temp tables. |
| Staging Schema Name | The staging schema name for temp tables. |
| Database Name | The name of the target database. |
| Catalog Name | The catalog name of the target table. |
| Schema Name | The schema name of the target table. |
| Table Name | The name of the target table maintained in Infoworks UI. |
| Storage Format | The format in which the tables must be stored. The options include Read Optimized (Delta), Write Optimized (Avro), Parquet, Delimited File Target and Universal Format (UniForm). UniForm is available only to the Unity Catalog enabled data environments. |
| Table Type | This field indicated the way table is managed. There are three table types: Infoworks Managed Table: The table will be managed by Infoworks User Managed Table without Data: User does not have data for the table on the target yet. The tables will be treated as external tables and Infoworks will not manage (including CREATE/DROP) the Target table, Merge Table and Error Table. These need to be created and managed outside Infoworks by the user. If the tables exist and the schema does not match, the job will fail. User managed Table with Data: User already has the data for the table on the target. The tables will be treated as external tables and Infoworks will not manage (including CREATE/DROP) the Target table, Merge Table and Error Table. These need to be created and managed outside Infoworks by the user. If the tables exist and the schema does not match, the job will fail. |
| Target Table Directory | This field indicates the path where the target table’s data is stored. This field appears only if you have selected either User Managed Table without Data or User Managed Table with Data.
|
| Partition Column | The column used to partition the data in target. Selecting the Create Derived Column option allows you to derive a column from the partition column. This option is enabled only if the partition column datatype is date or timestamp. Provide the Derived Column Function and Derived Column Name. Data will be partitioned based on this derived column. Click Add Partition to add a new partition. Note This is not supported in Snowflake environments |
Advanced Configurations
Following are the steps to set advanced configuration for a table:
- Click the Data Catalog menu and click Ingest for the required source.
- Click the Configure Tables tab, click the Advanced Configurations tab, and click Add Configuration.
- Enter key, value, and description. You can also select the configuration from the list displayed.
For common ingestion job advanced configurations, please refer to the following:
| Key | Description |
|---|---|
| dbx_cluster_timeout_seconds | For Databricks environment, the user can specify the number of seconds in which the job should get terminated. If its not specified then the default value (7200 seconds) which is there in the ingestion_databricks_default file will be picked up. |
Partitioning of Temporary Storage
This feature is not being used in 5.2 pilot release.
Subscribers
You can add subscribers to be notified for the ingestion at the table level.
Click Add Subscriber, and enter the following fields:
- Emails: The email ID of the subscriber.
- Notify Via: The means of notification. Available options are Email and Slack.
- Notify For: The jobs for which subscribers must be notified.
Configuring a Table with CDW Onboarding
With the source metadata in the catalog, you can now configure the table for CDC and incremental synchronization. There are two types of Cloud Data Warehouse: Snowflake and BigQuery. Click the Configuration link for the desired table.
General Configurations (Snowflake)
In the General Configurations tab, provide the following Ingestion Configuration details:
| Field | Description |
|---|---|
| Ingest Type | The type of synchronization for the table. The options include full refresh and incremental. |
| Natural Keys | The combination of keys to uniquely identify the row. This field is mandatory in incremental ingestion tables. It helps in identifying and merging incremental data with the already existing data on target. |
| Incremental Mode | The option to indicate if the incremental data must be appended or merged to the base table. This field is displayed only for incremental ingestion. The options include append and merge. |
| SCD Type | A dimension that stores and manages both current and historical data over time in a data warehouse. The options include SCD1 and SCD2. |
| Watermark Column | The watermark column to identify the incremental records. |
| Enable Watermark Offset | For Timestamp and Date watermark columns, this option enables an additional offset (decrement) to the starting point for ingested data. Records created or modified within the offset time period are included in the next incremental ingestion job. |
| Ingest subset of data | The option to configure filter conditions to ingest a subset of data. This option is available for all the RDBMS and Generic JDBC sources. For more details, see Filter Query for RDBMS Sources |
| Optimization Configuration | |
| Split By Column | The column used to crawl the table in parallel with multiple connections to the database. Split-by column can be an existing column in the data. Any column for which minimum and maximum values can be computed, can be a split-by key. Select the Create Derived Split Column option and provide the Derived Split Column Function to derive a column from the Split By column. This option is enabled only if the Split By column datatype is date or timestamp. The data will be split based on the derived value. |
| Create Derived Split Column | Select the Create Derived Split Column option and provide the Derived Split Column Function to derive from the Split By column. This option is enabled only if the Split By column data type is integer or timestamp. The data will be split based on the derived value. mod: For every float, integer, or long value, the mod function is performed on the number of connections that are available on the database and based on the mod value the corresponding database is updated. The mod function is first applied to the column and after getting the output the split gets applied and the data is evenly distributed. The mod function is applied on each row level and all the connections run parallelly until the end of the job. |
| Target Configuration | |
| Database Name | Database name of the Snowflake target. |
| Table Name | Table name of the Snowflake Target. |
| Schema Name | The schema name of the Snowflake Target. |
| Generate History View | Select this option to preserve data in the History table. After each CDC, the data will be appended to the history table. |
General Configurations (BigQuery)
| Field | Description |
|---|---|
| Ingest Type | The type of synchronization for the table. The options include full refresh and incremental. |
| Natural Keys | The combination of keys to uniquely identify the row. This field is mandatory in incremental ingestion tables. It helps in identifying and merging incremental data with the already existing data on target. |
| Incremental Mode | The option to indicate if the incremental data must be appended or merged to the base table. This field is displayed only for incremental ingestion. The options include append and merge. |
| SCD Type | A dimension that stores and manages both current and historical data over time in a data warehouse. The options include SCD1 and SCD2. |
| Watermark Column | The watermark column to identify the incremental records. |
| Enable Watermark Offset | For Timestamp and Date watermark columns, this option enables an additional offset (decrement) to the starting point for ingested data. Records created or modified within the offset time period are included in the next incremental ingestion job. |
| Ingest subset of data | The option to configure filter conditions to ingest a subset of data. This option is available for all the RDBMS and Generic JDBC sources. For more details, see Filter Query for RDBMS Sources |
| Optimization Configuration | |
| Split By Column | The column used to crawl the table in parallel with multiple connections to the database. Split-by column can be an existing column in the data. Any column for which minimum and maximum values can be computed, can be a split-by key. Select the Create Derived Split Column option and provide the Derived Split Column Function to derive a column from the Split By column. This option is enabled only if the Split By column datatype is date or timestamp. The data will be split based on the derived value. |
| Create Derived Split Column | Select the Create Derived Split Column option and provide the Derived Split Column Function to derive from the Split By column. This option is enabled only if the Split By column data type is integer or timestamp. The data will be split based on the derived value. mod: For every float, integer, or long value, the mod function is performed on the number of connections that are available on the database and based on the mod value the corresponding database is updated. The mod function is first applied to the column and after getting the output the split gets applied and the data is evenly distributed. The mod function is applied on each row level and all the connections run parallelly until the end of the job. |
| Target Configuration | |
| Onboarding Option | Select the target onboarding option. The options available are direct and indirect. direct: It is a one-step process where data is directly loaded into BigQuery from Source. indirect: It is a two-step process where data is loaded to BigQuery via temporary GCS location. You can also persist this data present in temporary GCS location by setting the following advanced configuration |
| Dataset Name | Dataset name of the BigQuery target. |
| Table Name | Table name of the BigQuery Target. |
| Partition Type | The type of partition for the BigQuery table. By default, the Partition Type is set to None. The available options are Date Column, Timestamp Column, Integer Column. BigQuery Load Time option is available when the Onboarding Option is set to Indirect. |
| Partition Column | The column to be used to partition tables in target. The column needs to be of Date data type. |
| Partition Time Interval | This field is visible when the Partition type is BigQuery Load Time, Date Column, or Timestamp Column. |
| Clustering Columns | The columns to be used for clustering. You can select up to 4 columns. Cluster columns must be one of the following types: STRING INT LONG DECIMAL DATE TIMESTAMP |
| Generate History View | Select this option to preserve data in the History table. After each CDC, the data will be appended to the history table. |
| BigQuery Labels | This label enables you to add labels to your tables in BigQuery. For more information about BigQuery Labels, refer to BigQuery Labels. |
- If the combination of schema name, database name and table name are same across different tables in the same environment, an error appears showing the combination of the three is conflicting with another table.
- For Snowflake, we check the combination of table name, schema name and database name
- For BigQuery, we check the combination of dataset name and table name.
- For all other environments, we check combination of schema name and table name.