
Date of Release: May 2024
Resolved Issues
NOTE The "*" symbol next to ID refers to the issues that have been resolved in the current release.
JIRA ID | Issue |
|---|---|
IPD-25940* | Snowflake pipeline export job on the existing artifacts (created in 5.0) creating the DB/SCHEMA/TABLE names as case sensitive (in lower case). |
IPD-25952* | Status.sh showing connection error warnings/exception stack trace when all services are in stopped state. |
IPD-26017* | Ingestion jobs fail when access control list parameter is configured with 'group'. |
IPD-26110* | The upload schema option is erroring if the user tries to update the column name. |
IPD-26115* | CICD failing for Pipeline group migration. |
IPD-26143* | Issue with executing snowflake stored procedure. |
IPD-26178* | Merge to Snowflake table fails SQL compilation error. |
IPD-25719 | Data validation for failed failure |
IPD-25837 | API to change table group scheduled user is not working |
IPD-25839 | GET table group call gives a refresh token of the scheduled user in the response |
IPD-25868 | Incorrect success response of verify refresh token API |
IPD-25840 |
|
IPD-25869 | Add table action of the file mapping doesn't validate the uniqueness of the target DB, schema, and table name combination |
IPD-25952 | Status.sh showing connection error warnings/exception stack trace when all services are in stopped state. |
v5.5.1.2 - Upgrade instructions for Kubernetes based deployment
Prerequisites
NOTE Before going through the below mentioned prerequisites for this section, ensure that all the Prerequisites for Installing Infoworks on AKS are validated.
Ensure the current deployment’s chart is present in /opt/infoworks.
Python 3.8 or later version with the pip module is installed in the Bastion VM.
Stable internet connectivity on the Bastion VM to download the required python packages from the python repository during installation/upgrades.
Validate that the version of the old chart is 5.5.1.1.
Ensure to take backup of MongoDB Atlas and PostgresDB PaaS. In case you don't take the backup, jobs will fail after the rollback operation. For more information, refer to the MongoDB Backup and PostgresDB PaaS Backup
Upgrade Instructions
NOTE Due to limitations in DataBricks interactive cluster session management, to ensure successful upgrade and usage of upgraded Infoworks libraries:
Jobs using old versions of libraries must be completed/stopped.
Old versions of libraries must be uninstalled and databricks cluster should be restarted to clear the cache.
For the procedure of libraries uninstalling, refer Step 4 below.
To upgrade Infoworks on Kubernetes:
It is assumed that the existing chart is placed in the /opt/infoworks directory and the user has the access permission.
Before selecting the type of upgrade execute the following commands.
Step 1: Create the required directories and change the path to that directory.
NOTE If your Infoworks installation is configured not to use the Infoworks hosted registry (IW_HOSTED_REGISTRY=false), you should download the Docker image ‘infoworks-mongo-utils_v5.5.1.tar.gz’ following the instructions that have been shared with you. After downloading, push this image to your configured registry, ensuring that you do not change the image tags.
Internet-free Upgrade
NOTE If you are upgrading via Internet-based procedure, skip to the next section.
Step 1: Download the upgrade tar files shared by the Infoworks team to the Bastion (Jump host) VM and place it under $IW_HOME/downloads.

Step 2: To configure Internet-free upgrade, execute the following command:
Internet-based Upgrade
Step 1: Download the Update script tar file.
Common Steps for Both Internet-free and Internet-based
NOTE Once you have selected the type of upgrade, the below mentioned steps are common for both Internet-free and Internet-based.
Step 1: Extract the iwx_updater_k8s_5.5.1.2.tar.gz under $IW_HOME/downloads.
Do not extract the tar file to /opt/infoworks/iw-k8s-installer as it would result in loss of data.
This should create two new files as follows - update-k8s.sh and configure.sh.
Step 2: Run the script.
NOTE At the end of the above command's execution, if you want to run helm upgrade manually, then type N and press Enter. There is a 30-second timeout set to abandon the deployment of the upgraded version. If no input is received within the timeout duration, the deployment is triggered.
Step 3: To modify any of the configurations listed below, follow the steps:
Email configurations: smtpHost, smtpPort, smtpUsername, smtpPassword, sslEnabled
Timeout for DT
Timeout for ingestion
nginx.ingress.kubernetes.io/proxy-body-size
Step 3A: Navigate to the directory IW_HOME/iw-k8s-installer. And Edit the values.yaml file
Name | Description | Default Values | |
|---|---|---|---|
Email configuration | smtpHost | The SMTP host URL to connect to | smtp.gmail.com |
smtpPort | SMTP port | 587 | |
smtpUsername | The SMTP User to authenticate as | email address | |
smtpPassword | The Password for the SMTP user | Encrypted password | |
sslEnabled | The SSL flag | true | |
DT | timeoutSeconds | Timeout for DT | 7200 |
Ingestion | timeoutSeconds | Timeout for Ingestion | 7200 |
nginx.ingress | kubernetes.io/proxy-body-size | Nginx proxy body size | 10m |
NOTE
Email configurations can be found under customiwConfigs section in values.yaml
Timeouts for DT and ingestion can be found under databricks section in values.yaml
kubernetes.io/proxy-body-size can be found in nginx.ingress section in values.yaml
Step 3B: After editing the annotations, the values.yaml file should look as shown below:
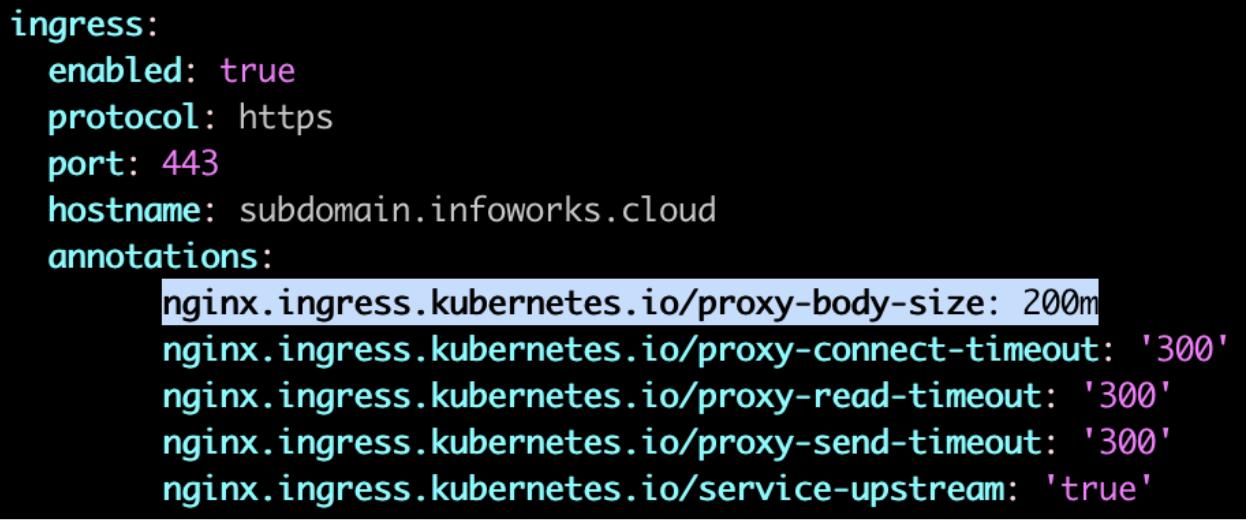
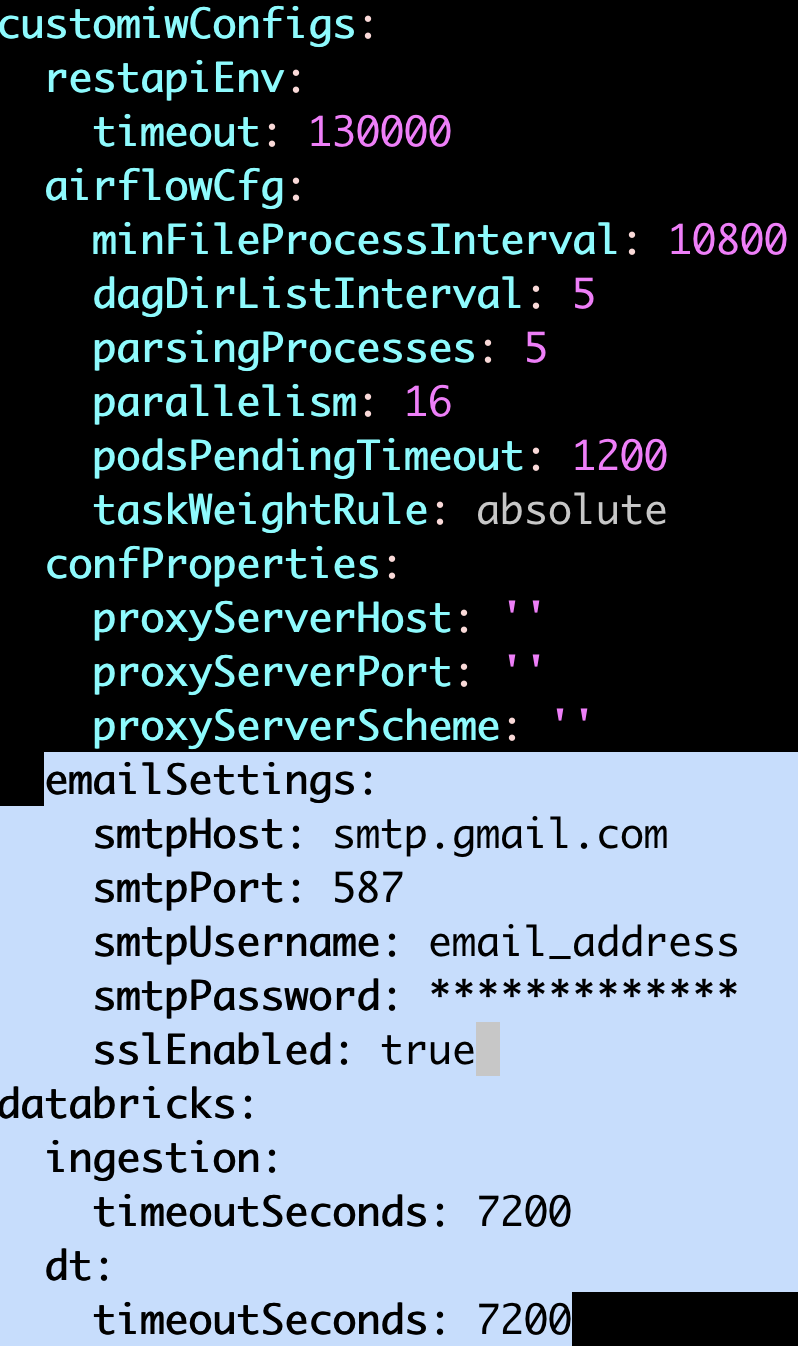
Update the values and save the file.
Step 3C: Navigate to the directory IW_HOME/iw-k8s-installer. And Run the iw_deploy script
NOTE During the above command's execution, when it prompts if we need to override, type y and press Enter.
Step 3D: Restart all the deployments
Step 4: (Applicable only for Databricks Persistent Clusters): A change in the Infoworks jar requires libraries being uninstalled and cluster restart. Without this step, there will be stale jars. Perform the following steps:
(i) Go to the Databricks workspace, navigate to the Compute page, and select the cluster that has stale jars.
(ii) In the Libraries tab, select all the Infoworks jars and click Uninstall.
(iii) From Infoworks UI or Databricks dashboard, select Restart Cluster.
Rollback
Prerequisites
Before executing the rollback script, ensure that IW_HOME variable is set.
Assuming Infoworks home directory is /opt/infoworks, run the below command to set the IW_HOME variable.
Validate that the version of the old chart is 5.5.1.2.
Ensure the current deployment’s chart is present in /opt/infoworks.
Execute the below command to check the appVersion.
Ensure to restore MongoDB Atlas and PostgresDB PaaS. In case you don't take the backup, jobs will fail after the restore operation. For more information, refer to the MongoDB Restore and PostgresDB Restore.
Rollback Instructions
NOTE Since IW_HOME has been exported in the Prerequisites section mentioned above, the following steps can be executed from any location for users with read/write access to the aforementioned IW_HOME.
Step 1: Download the rollback script.
Step 2: Place the Update script in the same directory as that of the existing iw-k8s-installer.
Step 3: Ensure you have permission to the $IW_HOME directory.
Step 4: Give executable permission to the rollback script using the below command.
Step 5: Run the script.
Step 6: You will receive the following prompt, "Enter N to skip running the above command to upgrade the helm deployment. (timeout: 30 seconds): ", type Y and press Enter.
NOTE If you want to run helm upgrade manually, then type N and press Enter.
NOTE There is a 30-second timeout set to abandon the deployment of the downgraded version. If no input is received within the timeout duration, the deployment is triggered.
v5.5.1.2 - Upgrade instructions for VM based deployment
Upgrade
Assuming IW_HOME variable is set to /opt/infoworks
Prerequisite
To support rollback after metadata migration, you need to take backup of metadata. Following are the steps:
Step 1: Install/Download MongoDB tool: mongodump. (if needed).
Step 2: Create a directory to store the database backup dump using the below command.
Step 3: Use the below command to take a dump (backup) of the databases from the mongodb server.
If MongoDB is hosted on Atlas
If MongoDB is installed with Infoworks on the same VM
Procedure
For upgrading from 5.5.1/5.5.1.x to 5.5.1.2, execute the following commands:
Step 1: Use the deployer to upgrade from 5.5.1 to 5.5.1.2.
Step 2: Go to $IW_HOME/scripts folder of the machine.
Step 3: To ensure that there is no pre-existing update script, execute the following command:
Step 4: Download the update_5.5.1.2.sh
wget https://iw-saas-setup.s3.us-west-2.amazonaws.com/5.5/update_5.5.1.2.sh
Step 5: Give update.sh executable permission
chmod +x update_5.5.1.2.sh
Step 6 (Optional): If the patch requires Mongo Metadata to be migrated, run export METADB_MIGRATION=Y. This ensures that the metadata will be migrated, else run export METADB_MIGRATION=N.
Alternatively, you can enter it in the prompt while running the script.
Step 7: Update the package to the hotfix
You will receive a "Please select whether metadb migration needs to be done([Y]/N)" message. If you need to perform metadb migration, enter Y, else, enter N.
Step 8: Copy the new Snowflake JDBC jar and delete the old Snowflake JDBC jar files.
Verify that only the new Snowflake JDBC jar (version 3.16) is present in the two directories and also, verify the checksum.
Rollback
Prerequisite
To rollback the migrated metadata:
Step 1: Install/Download MongoDB tool: mongorestore. (if needed)
Step 2: Switch to the directory where the backup is saved on the local system.
Step 3: Use the below command to restore the dump (backup) of the databases to the Mongodb Server.
If MongoDB is hosted on Atlas
If MongoDB is installed with Infoworks on the same VM
Procedure
To go back to previous checkpoint version:
Step 1: In a web browser, go to your Infoworks system, scroll-down to the bottom, and click the Infoworks icon.
Step 2: The Infoworks Manifest Information page opens in a new tab. Scroll down and check the Last Checkpoint Version.
Step 3: ssh to Infoworks VM and switch to {{IW_USER}}.
Step 4: Initialise the variables in the bash shell.
Step 5: Download the required deployer for the current applied patch.
https://iw-saas-setup.s3-us-west-2.amazonaws.com/${major_version}/deploy_${full_version}.tar.gz
Step 6: Execute the SCP command for the above mentioned files to the following path.
NOTE Remove the previously downloaded copy of deploy_${full_version}.tar.gz file in ${IW_HOME}/scripts/ directory.
${IW_HOME}/scripts/.
Step 7: Extract the deployed tar file in case it does not exist.
Step 8: Initialise the environment variables.
Step 9: Run the Rollback command.