
Setup Postgres Service on Azure Portal
An Azure Database for PostgreSQL server is created with a configured set of compute and storage resources. The server is created within an Azure resource group.
Prerequisites
The following prerequisites are necessary for setting up Postgres Database on Azure.
A Microsoft account is required to work with Azure Cloud Platform. Sign up for a Microsoft account, if you do not have one.
Ensure that you have an Azure subscription with a billing account.
PostgreSQL Database
Azure Database for PostgreSQL is a managed service that you use to run, manage, and scale highly available PostgreSQL databases in the cloud. To set up Postgres Database, refer to the official Azure Documentation.
Setup Postgres
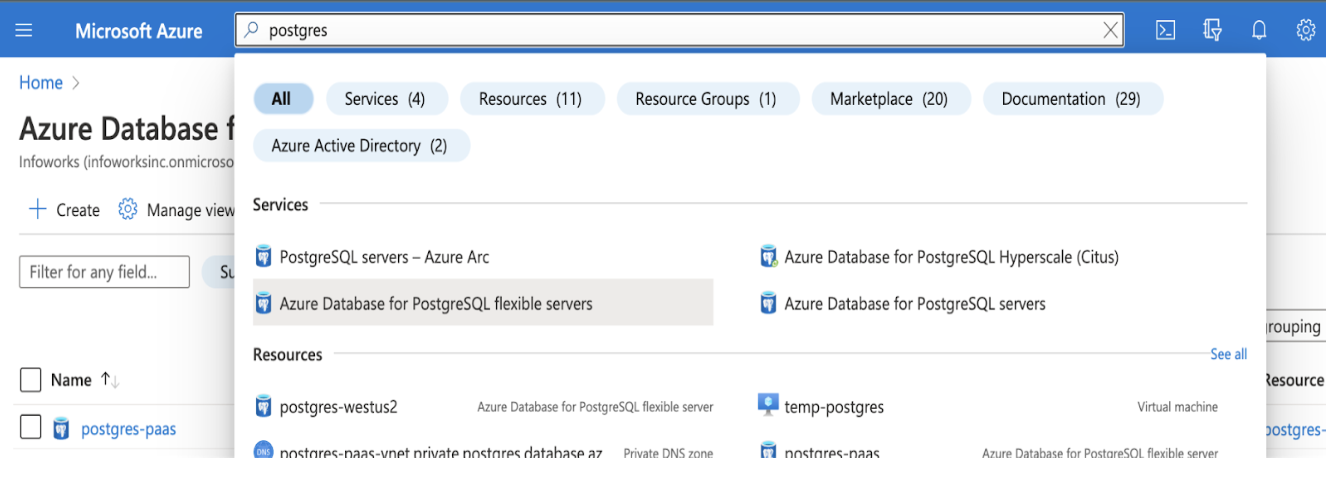
Step 1: To set up Postgres, navigate to Azure Console, search for Azure Database for PostgreSQL flexible servers, and click it.
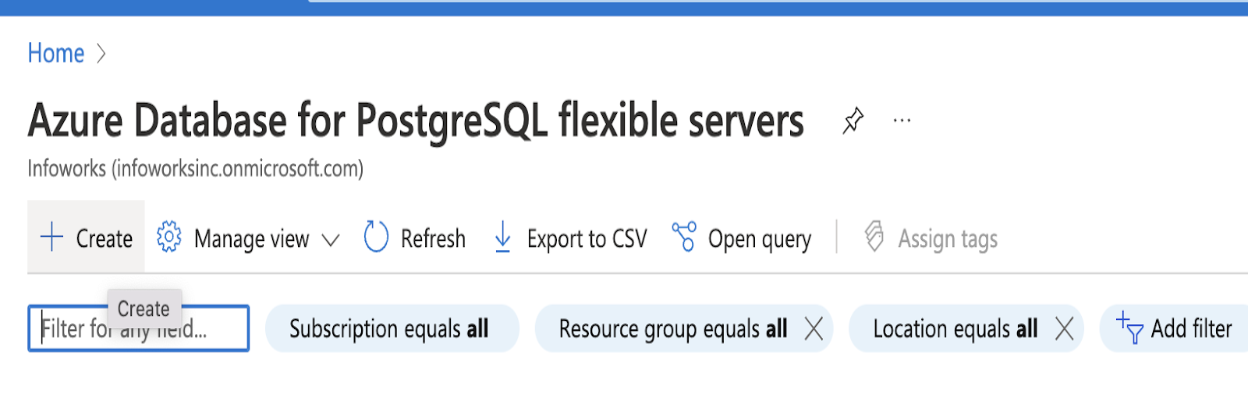
Step 2: Click Create.
PostgreSQL Basics
This section provides basic information about your Postgres database
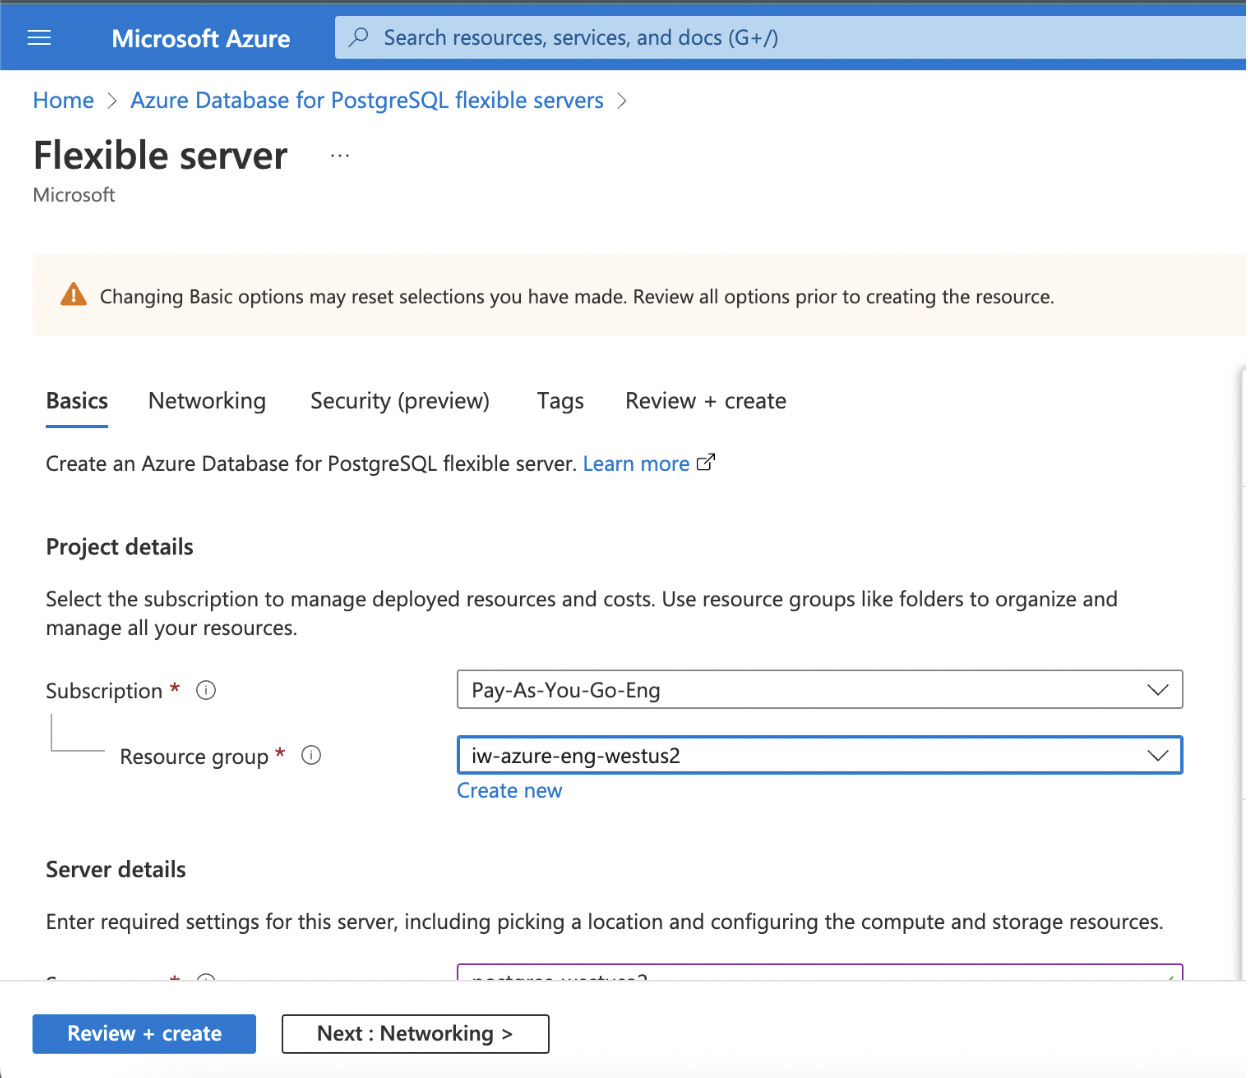
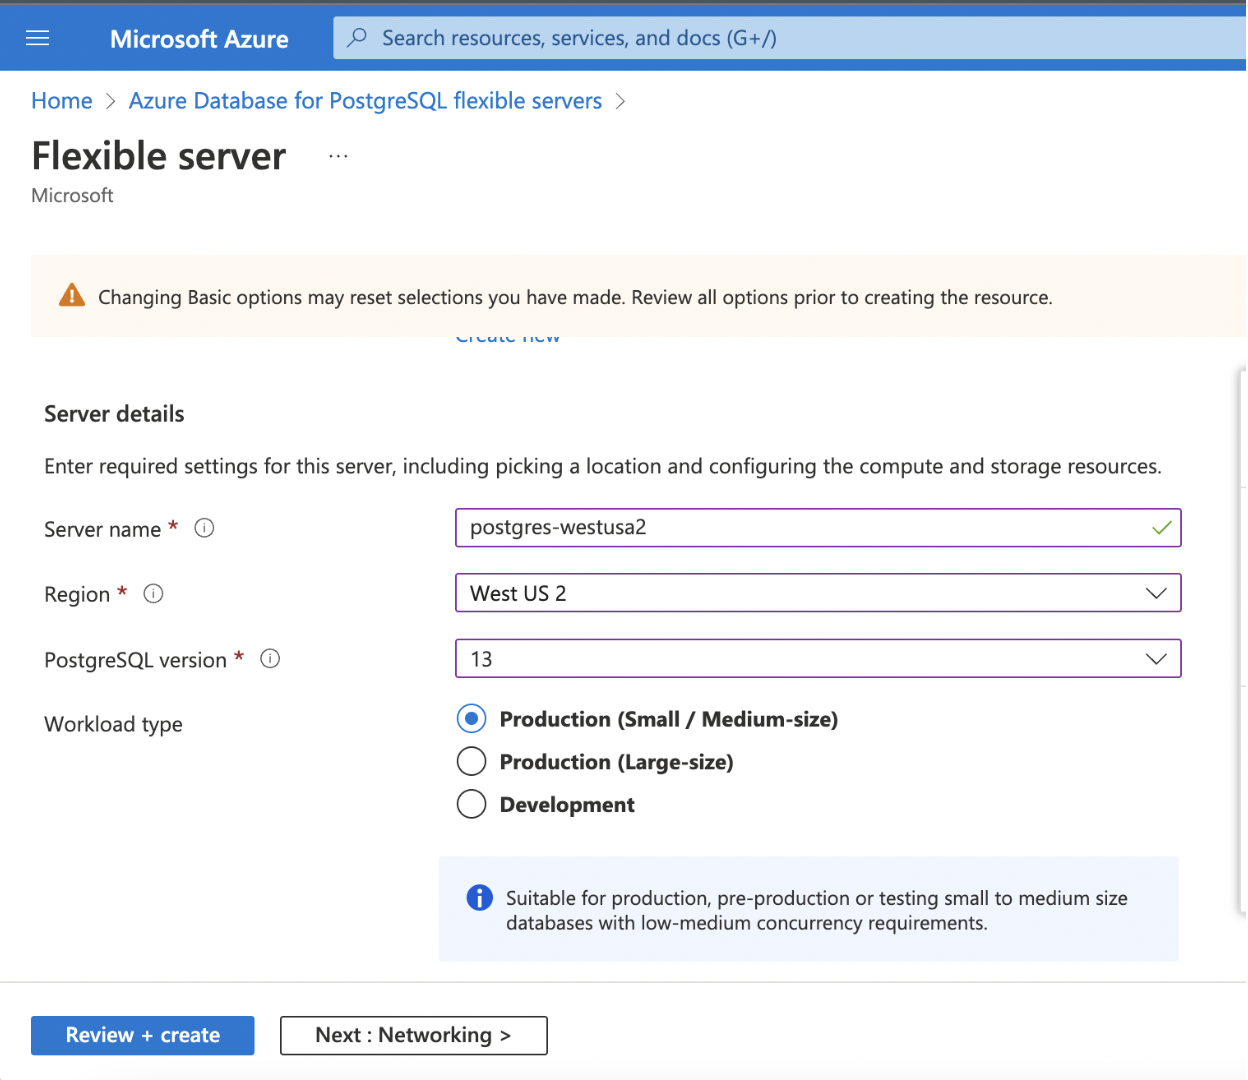
Step 1: Enter the required details for the following mandatory fields.
Subscription
Resource Group
Server Name
Region
PostgreSQL Version
Admin Username
Password
Confirm Password
(contd.)
(contd.)
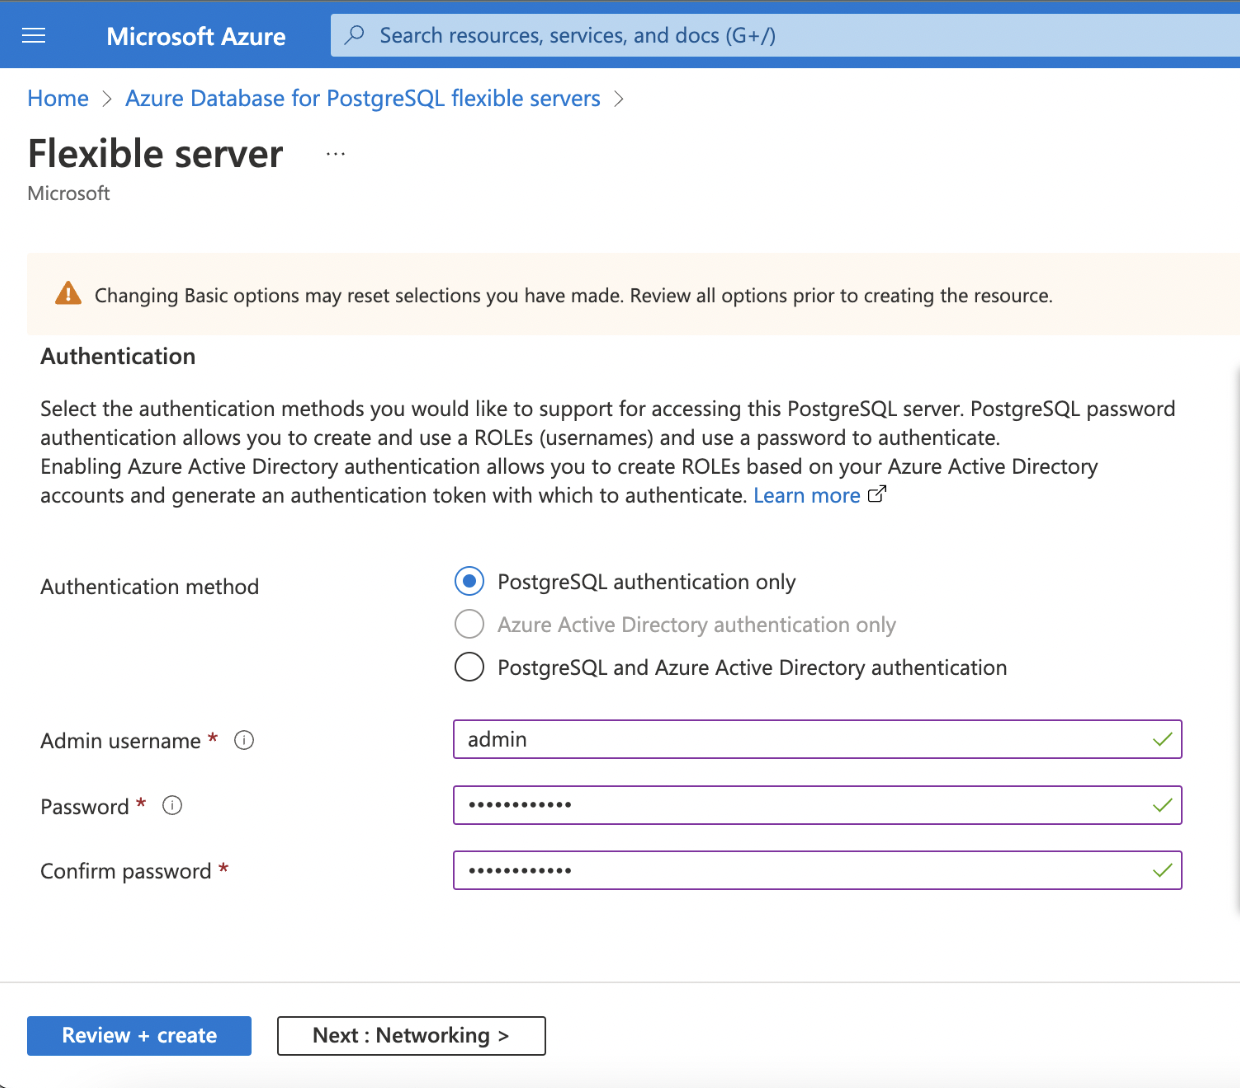
Category | Description |
|---|---|
Subscription | The name of your Subscription(Account) in which the PostgreSQL database is to be set up. |
Resource Group | Name of the Group under which the PostgreSQL database should be available |
Server Name | A unique name that identifies your Azure Database for PostgreSQL server. |
Region | Name of the Region in which the cluster is to be setup. |
PostgreSQL Version | Infoworks recommends using PostgreSQL Version 13. |
Workload Type | Select the environment (Development or Production) for your Postgres DB, whichever it will be used for. If the database instance is set up for a critical application, depending upon the usage and the size of data which will be ingested, select the appropriate Size (Small/Medium or Large). |
Authentication Method | Select the type of Authentication you want to set up. Infoworks supports PostgreSQL authentication only. |
Admin Username/ Password | Your own login account to use when you connect to the server. The admin login name can't be azure_superuser, azure_pg_admin, admin, administrator, root, guest, or public. It can't start with pg_. Set a strong password using uppercase letters, English lowercase letters, numbers, and non-alphanumeric characters |
Step 2: Click Next: Networking>.
Networking
Networking in the below mentioned scenario describes securing the database and accessing it privately without exposing it to the outside world.
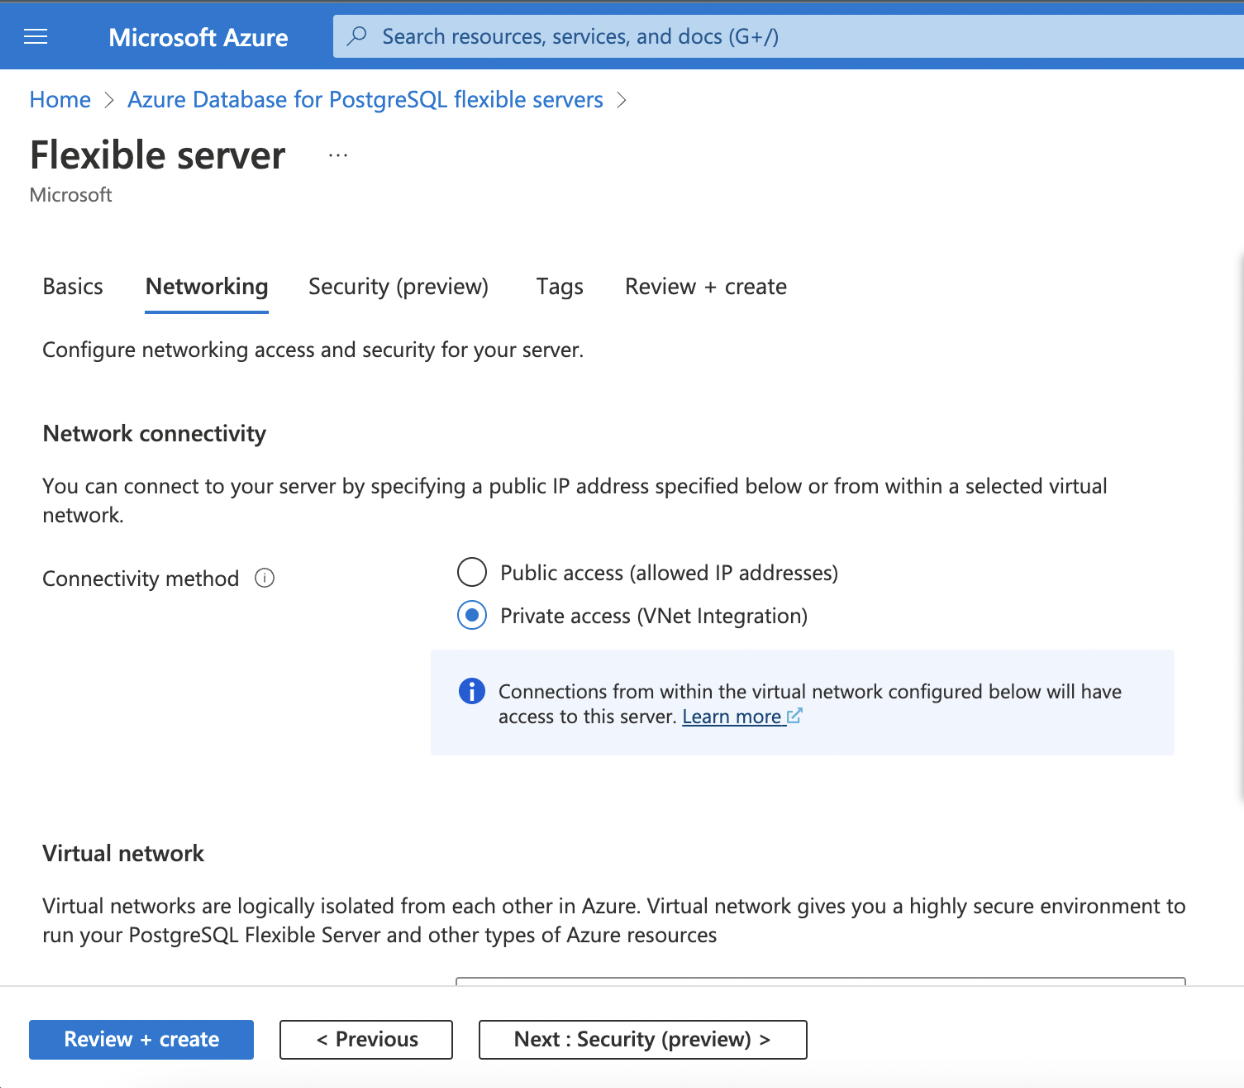
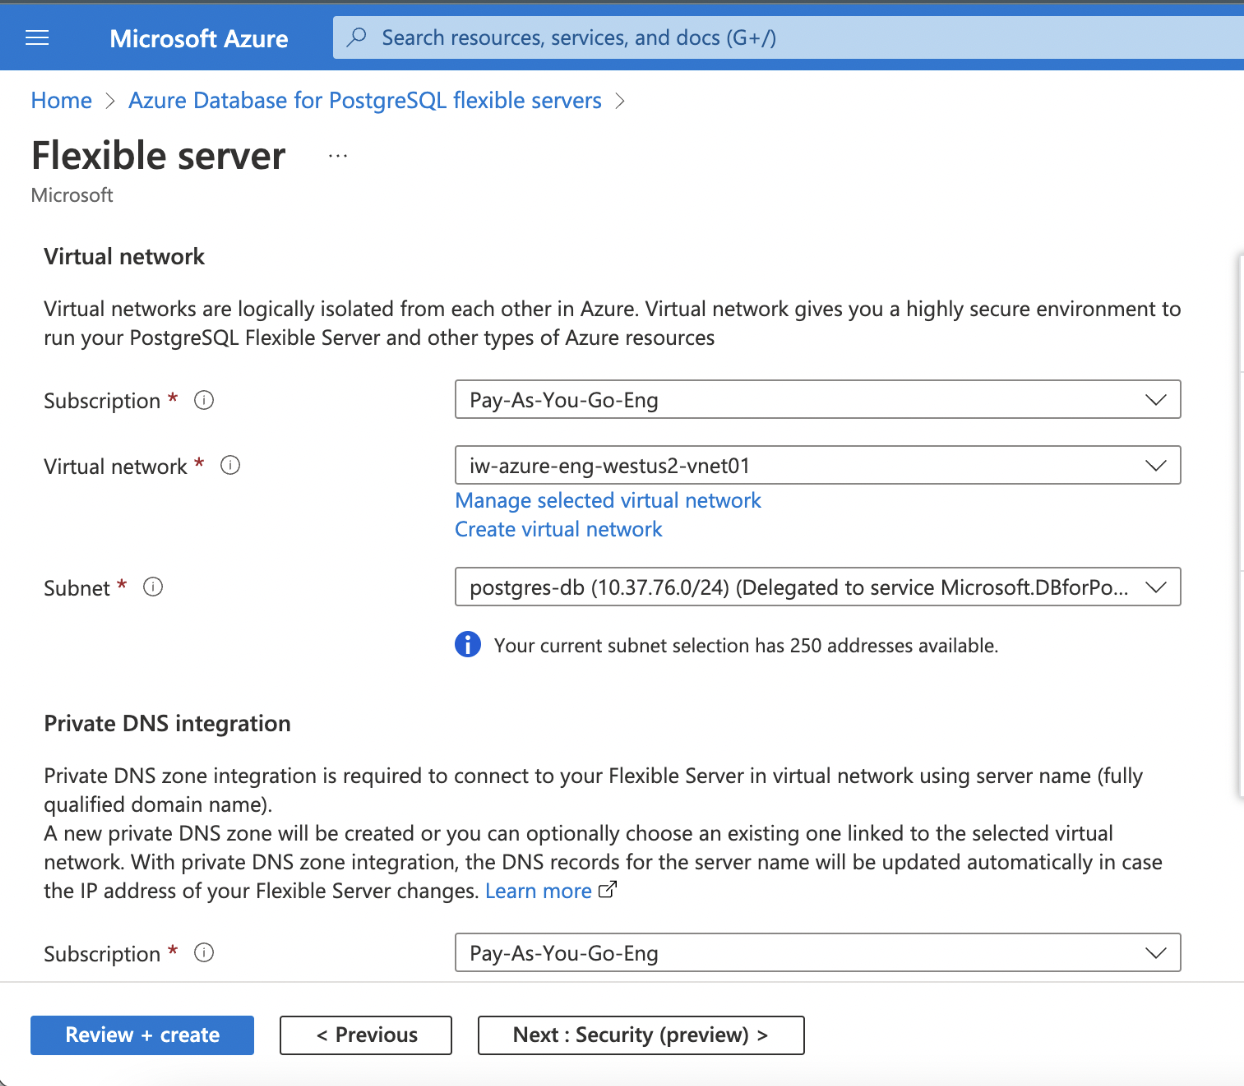
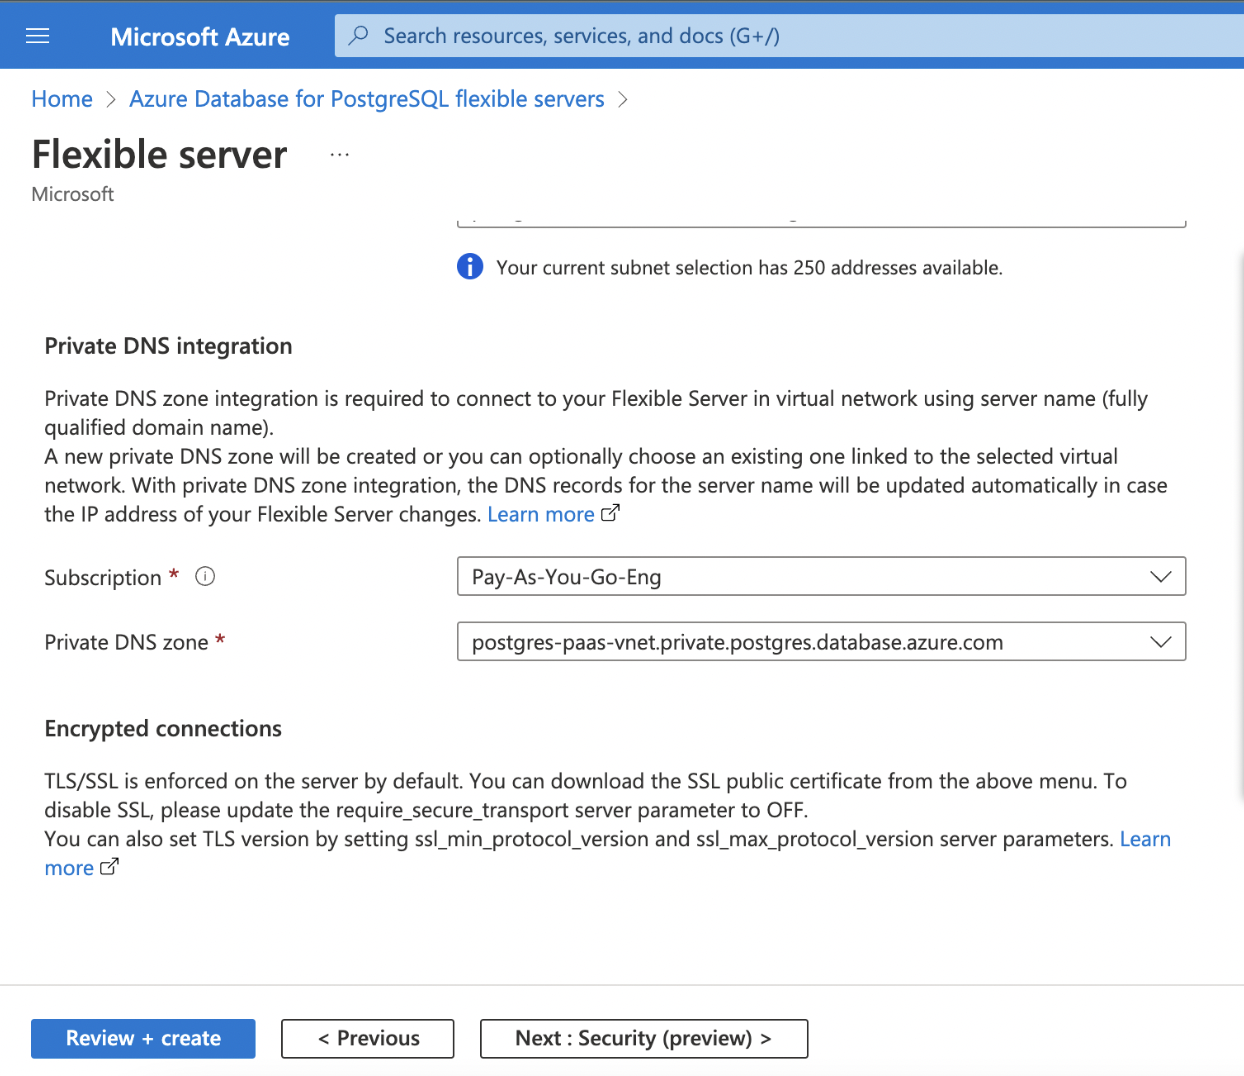
Step 1: Fill the required details for setting up the networking.
Connectivity Method
Subscription
Virtual Network
Subnet
Private DNS Zone
(contd.)
(contd.)
Category | Description |
|---|---|
Connectivity Method | Choose whether the database should be accessible over a public or private network. Infoworks recommends to set up connectivity over private network |
Subscription | The name of your Subscription (account) in which the PostgreSQL database is to be set up. |
Virtual Network | Select the Virtual Network to be associated with the database |
Subnet | Select the appropriate subnet within the VNet. |
Private DNS Zone | Create a new Zone or select an existing DNS Zone. This will create a FQDN for the Postgres database. |
Step 2: Click Next: Security (preview).
Security Preview
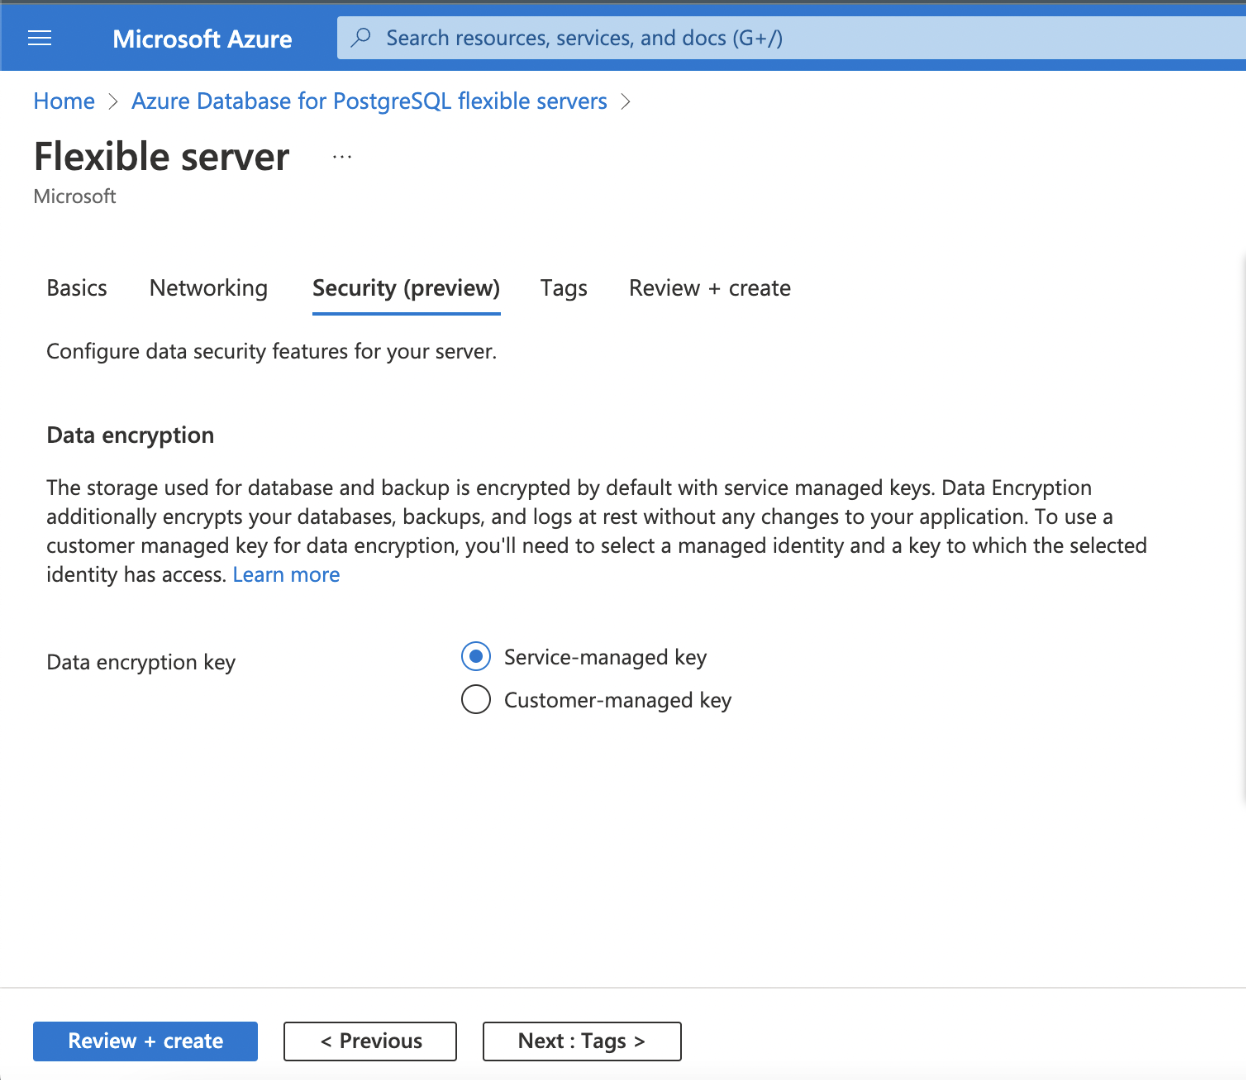
The storage used for database and backup is encrypted by default with service managed keys. Data Encryption additionally encrypts your databases, backups, and logs at rest without any changes to your application.
Step 1: Keep the default settings and click Next: Tags >.
Tags
Tags are name/value pairs that enable you to categorize resources and view consolidated billing by applying the same tag to multiple resources and resource groups.
Step 1: Add the tags as per your organization standards.
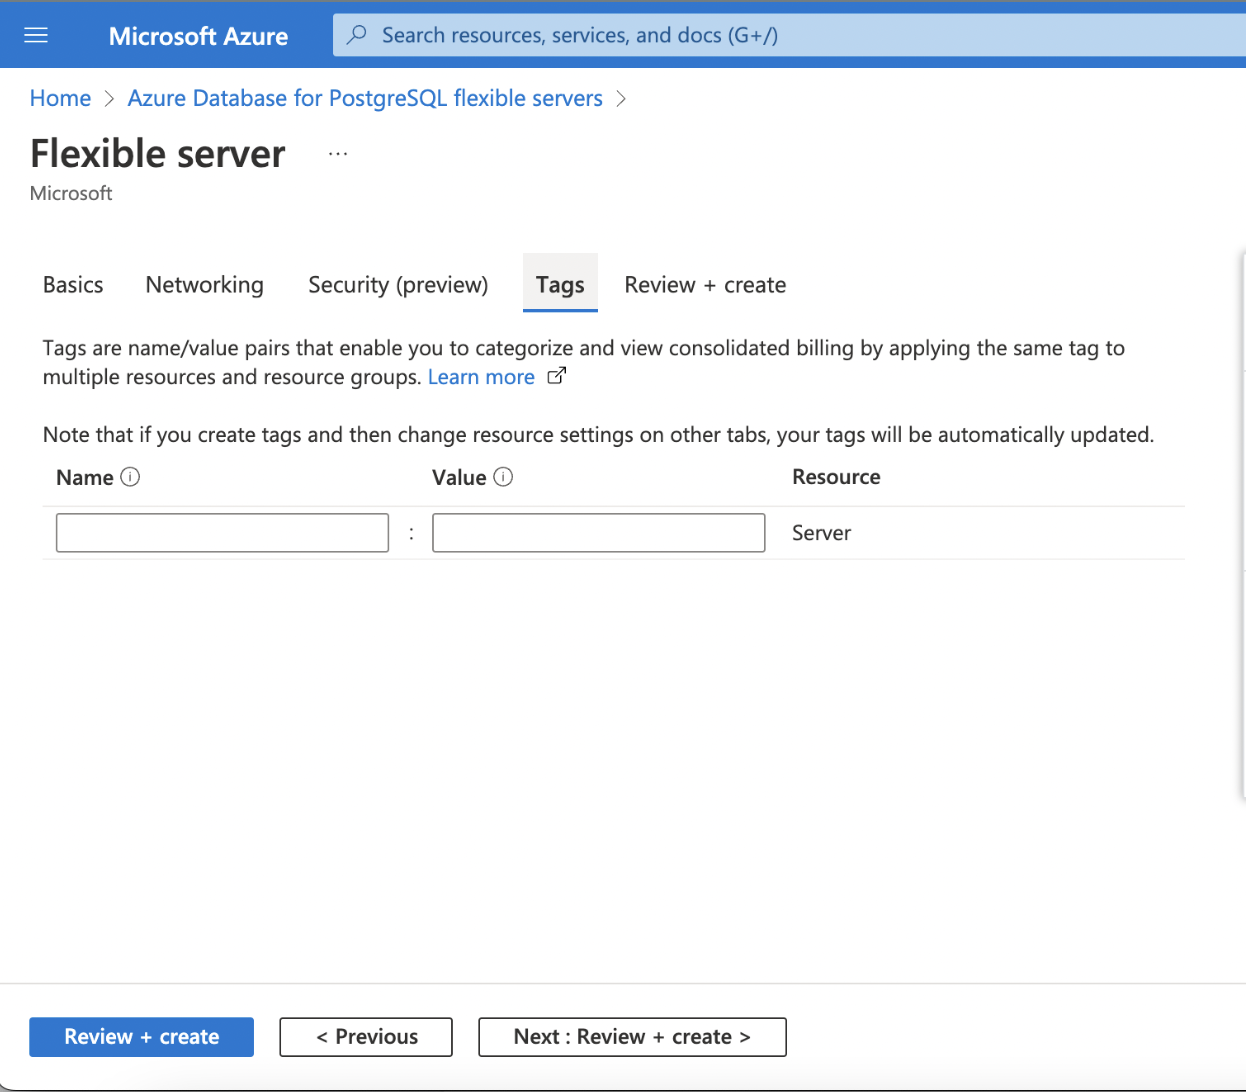
Step 2: Click Next: Review + Create >.
Review + Create
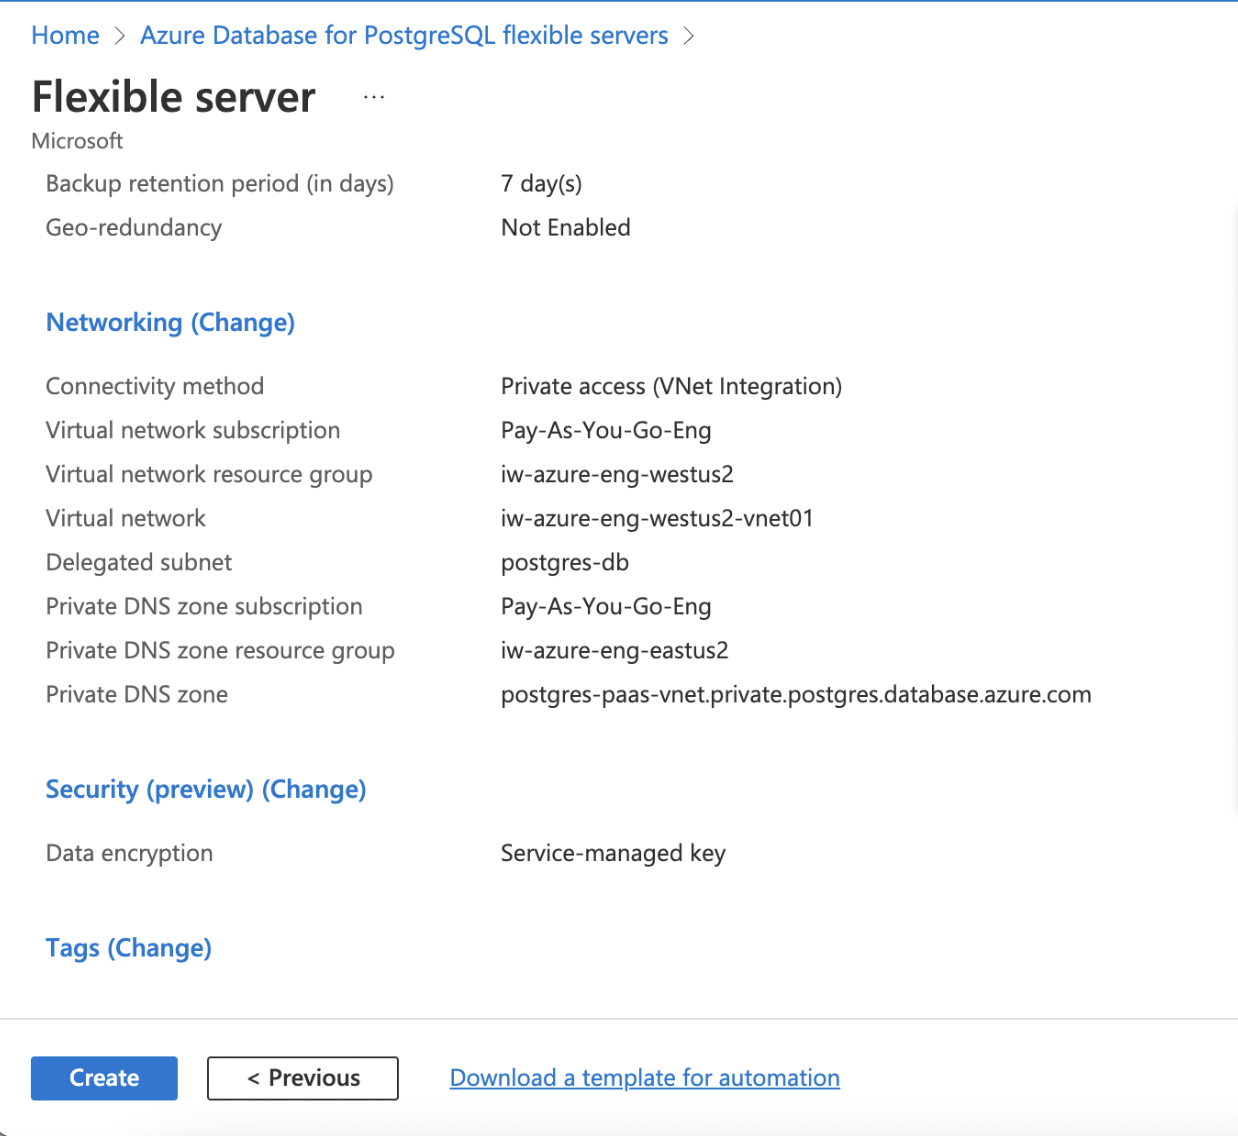
Verify the details and click Review + Create to complete the configurations and deploy the PostgreSQL Database.
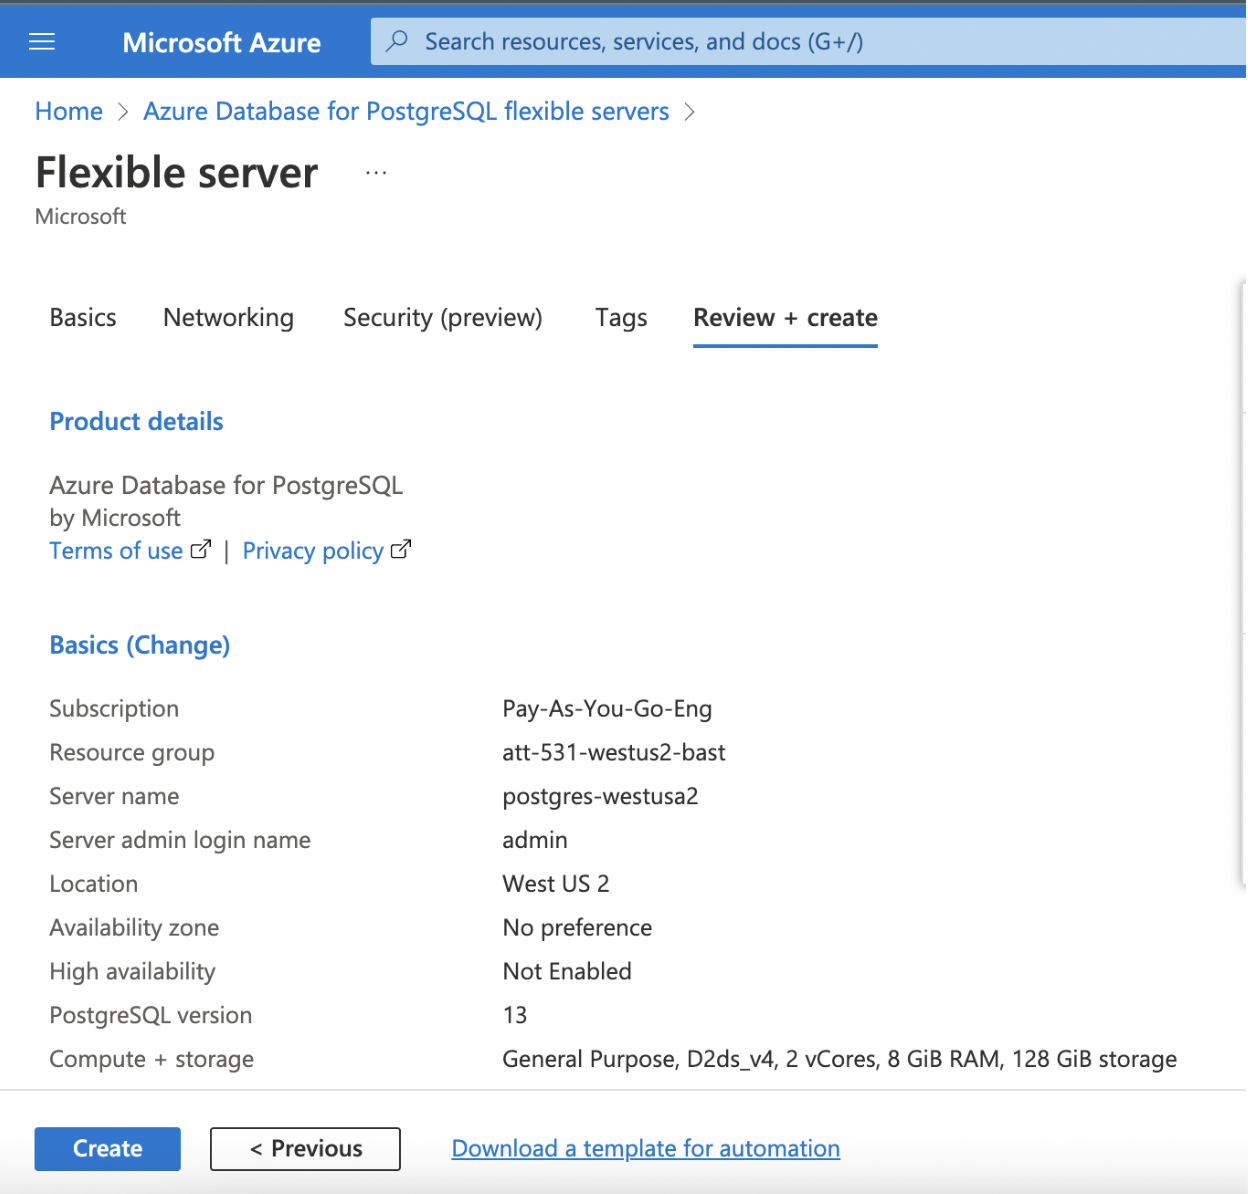
(contd.)
High Availability
High Availability makes sure that the database service is always available and connectivity remains intact even in a scenario where one instance of the database is down or unavailable.
Infoworks recommends enabling High Availability to avoid downtime in case of an outage on the Postgres Machines.
Enabling High Availability
Enabling High Availability for a New Instance
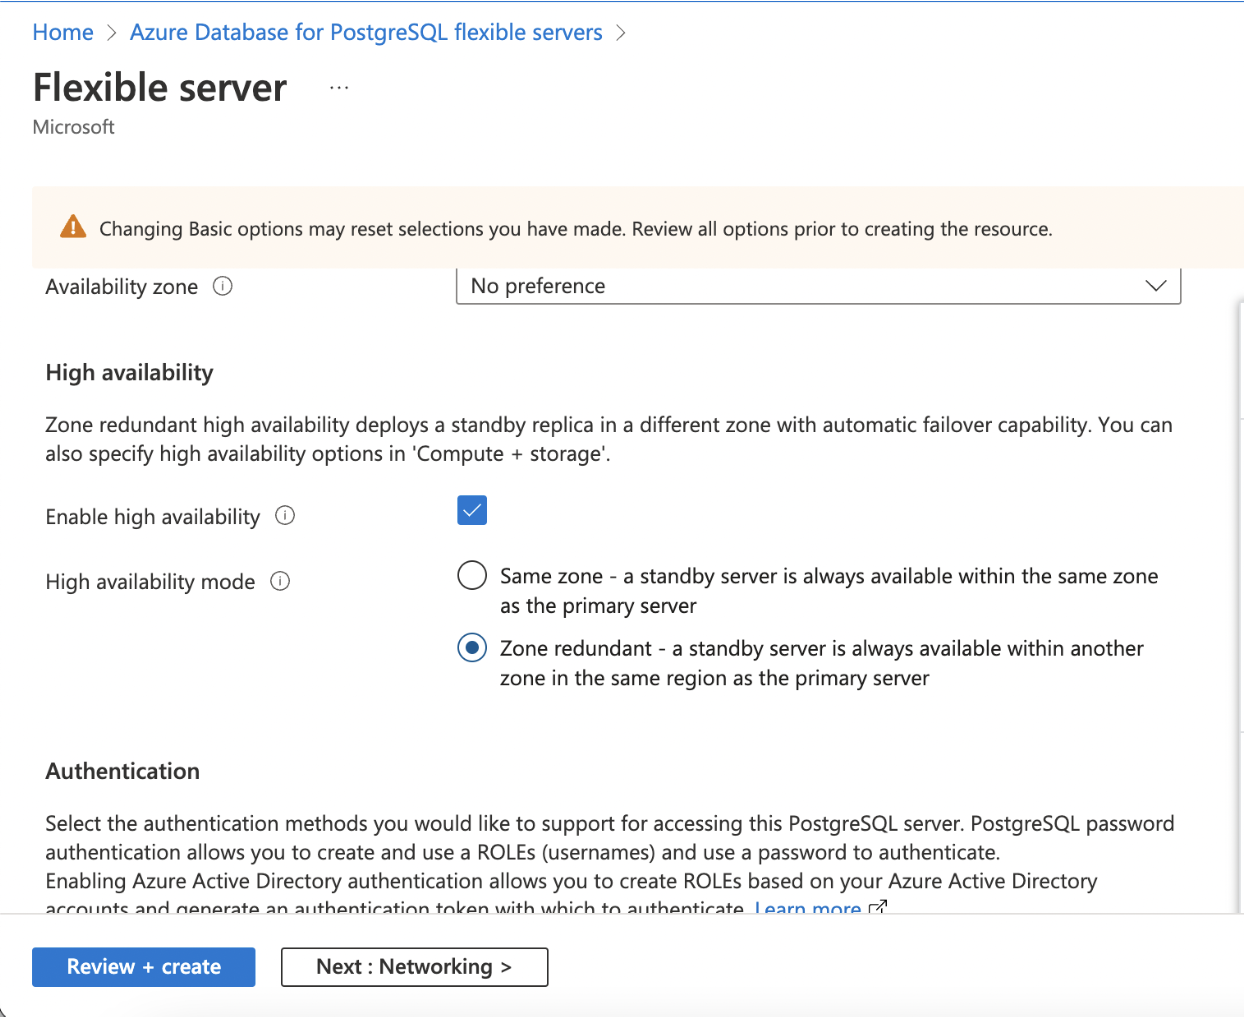
Step 1: To enable High Availability for a new instance of PostgreSQL, navigate to Azure Console, search for Azure Database for PostgreSQL flexible servers, and click it.
Step 2: Click Create.
Step 3: Under the Basics tab, click Enable High Availability checkbox.
Enabling High Availability for an Existing Instance
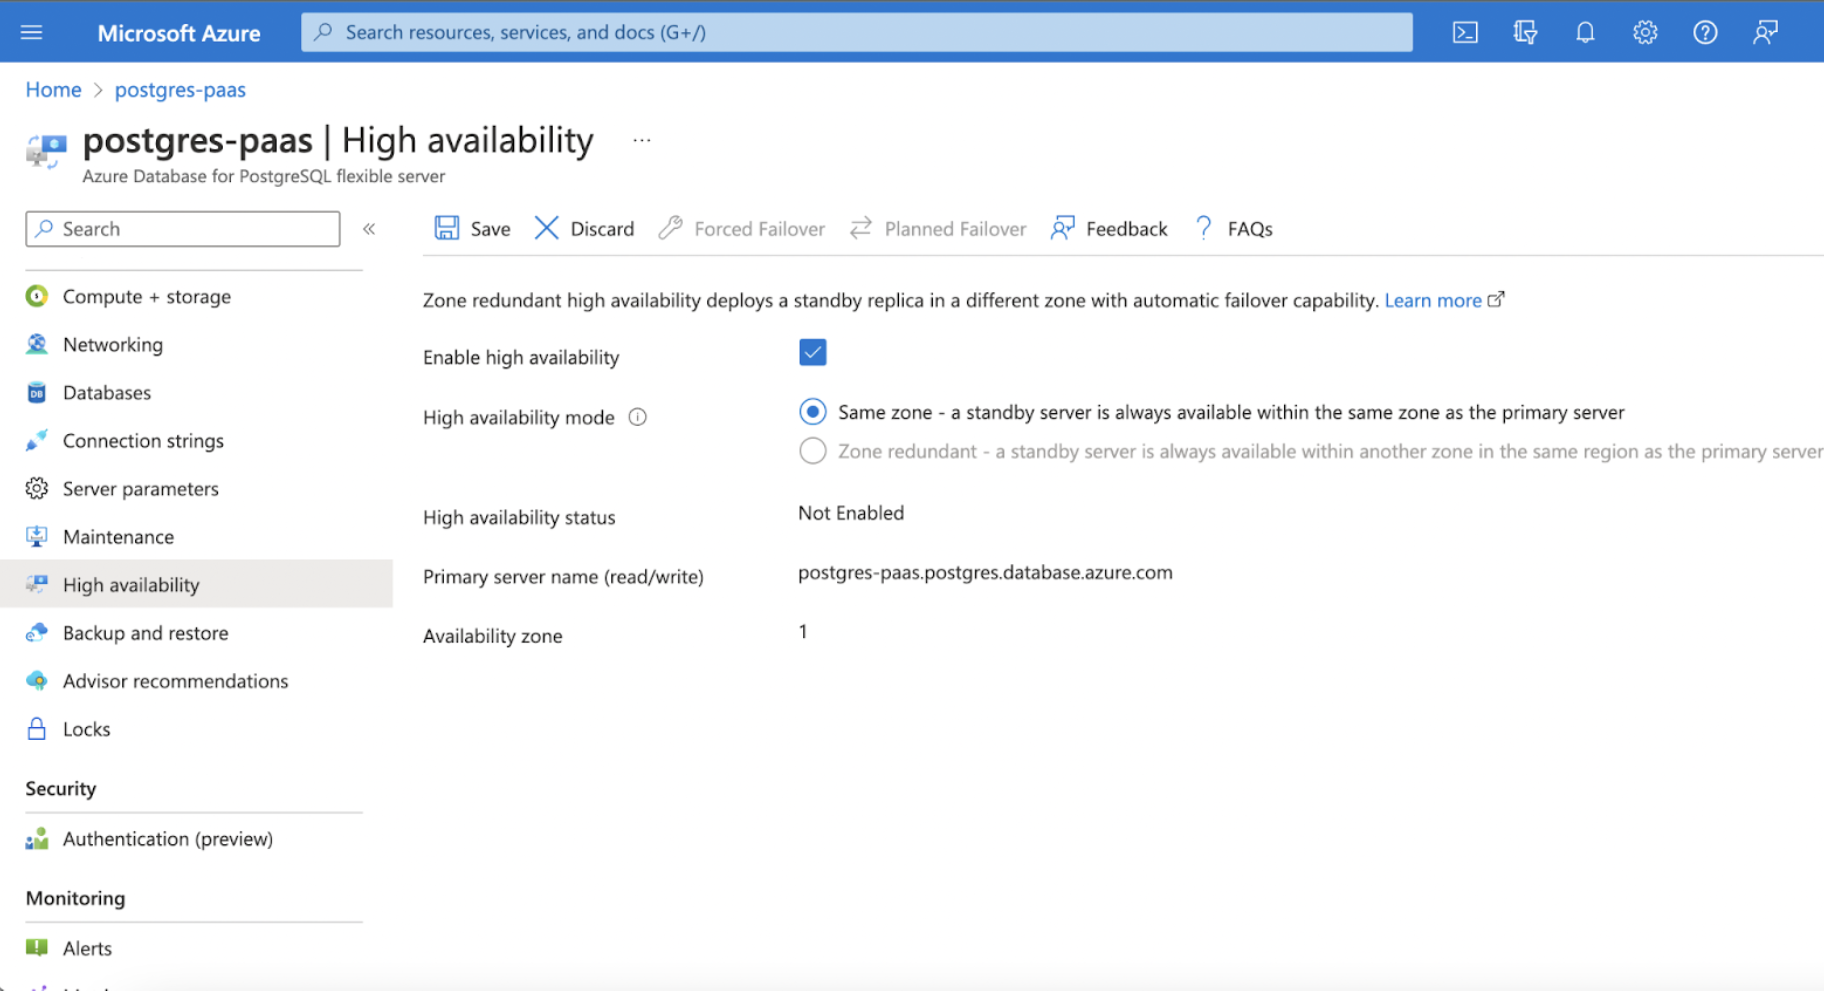
Step 1: To enable High Availability for an existing instance of PostgreSQL, open an existing Postgres instance from the Azure portal,
Step 2: Under the Settings section, click High Availability, and click it.
Step 3: Select Enable High Availability checkbox.
User Permissions
For Infoworks to use Postgres PaaS, considering the variables set during the installation, the given Postgres user (set in POSTGRESDB_USERNAME) needs to have the LOGIN Role. It must also have all privileges on a given database (set in INFOWORKS_POSTGRESDB_DATABASE_NAME). For more information, refer to Infoworks Installation on Azure Kubernetes Service (AKS).
To set the privileges:
Verifying Connection from PostgresDB to Infoworks
Verify that applications can access the PostgreSQL DB from Infoworks AKS cluster.
Use the following procedure as a reference only.
Step 1: Log in to your Bastion host where Kubernetes cluster is accessible.
Step 2: Create a pod with PostgreSQL image in the respective namespace.
Step 3: Run the exec command to run bash command inside the pod.
Step 4: Get the connection string from PostgreSQL DB. For example, consider the below given command.
Step 5: Provide the password.
The PostgreSQL DB and Infoworks are successfully connected. In case of any errors, refer to official Postgres Documentation.
Step 6: Once the connection between Postgres and Infoworks is successful. If you wish to delete Postgres pod, execute the following command.
PostgresDB PaaS Backup and Restore
PostgresDB Backup and Restore are necessary steps to support rollback, since the airflow engine specific to the Infoworks Version has been upgraded. Therefore, the PostgresDB data gets upgraded to support the newer Airflow version, leaving the data incompatible with the older versioned Airflow and by association Infoworks.
Backup
PostgresDB backup may either be saved as Azure supported scheduled backup or through the pg_dump binary.
First Method: Using Azure-provided Backup Options
Azure provides an automated, scheduled backup option with a defined retention period. For more information, refer to Backup and restore in Azure Database for PostgreSQL - Flexible Server.
However, this method has the following limitations:
Limitations
This option takes a backup of the entire Server and not only of a specific Database inside the project.
Currently, there is no on-demand backup available. Therefore any postgres data changes after a backup and before the upgrade will be lost.
The retention period of these backups ranges from 7 to 35 days. Therefore any backup older that the user-defined retention period is lost.
Second Method: Using pg_dump commands for Backup
To avoid the limitations of the Cloud-based approach, Postgres data backup can be done through the following pod template, which uses the pg_dump command to backup Postgres data.
Limitation Postgres password has to be provided either as an environment variable mounted to the ephemeral pod, or to the backup script.
Step 1: It is assumed that the environment variable IW_HOME is set to /opt/infoworks, which is the path where your current 5.4.0 charts are stored. In case it is not set, execute the following command:
Step 2: Export the following Environment Variables.
For more details, refer to the Infoworks Installation on Azure Kubernetes Service (AKS) section.
NOTE The password provided as POSTGRES_PLAINTEXT_PASSWORD is plain text, and not encrypted.
NOTE All of the above values can be found in $IW_HOME/iw-k8s-installer/configure.sh file.
Step 3: Create a directory to store the database backup dump using the below command
Step 4: Clear any existing pods with the same name.
Step 5: Run the commands to create the required pod on the same namespace as the Kubernetes installation.
Step 6: Once the postgres-backup is up, run the following command to get logs
After some time, you will receive the following message on your command prompt.
Step 7: Copy the generated artifacts to your machine.
This should create the following files in the directory postgres _backup, $(date -I) being the current timestamp. To view the list of directories, execute the following command:
Keep these files safe for backup later.
Restore
PostgresDB Restore is a necessary step to support rollback since the airflow engine specific to the Infoworks version has been upgraded. Therefore, the PostgresDB data gets upgraded to support the newer Airflow version, leaving the data incompatible with the older versioned Airflow and by association Infoworks.
PostgresDB backup may either be restored through the cloud-supported scheduled backup or manually restoring the data, as picked by the user during Backup.
First Method: Using Azure-provided Backup Options
Azure provides an automated, scheduled backup option with a defined retention period. For more information, refer to Backup and restore in Azure Database for PostgreSQL - Flexible Server.
Limitations
This option takes a backup of the entire project and not only of a specific Database inside the project.
Currently, there is no on-demand backup available. Therefore any postgres data changes after a backup and before the upgrade will be lost.
The retention period of these backups ranges from 7 to 35 days. Therefore any backup older than the user-defined retention period is lost.
Second Method: Using PSQL commands for Restore
To avoid the limitations of the Cloud-based approach, postgres data restore can be done through the following pod template, which uses the PSQL command to restore Postgres data.
Limitation Postgres Password has to be provided either as an environment variable mounted to the ephemeral pod or to the backup script.
Step 1: It is assumed that the environment variable IW_HOME is set to /opt/infoworks, which is the path where your current 5.4.0 charts are stored. In case it is not set, execute the following command
Step 2: Export the following environment variables.
For more details regarding the above mentioned commands, refer to Infoworks Installation on Azure Kubernetes Service (AKS).
NOTE The password provided as POSTGRES_PLAINTEXT_PASSWORD is plain text and not encrypted.
NOTE All of the above values can be found in $IW_HOME/iw-k8s-installer/configure.sh file.
It is recommended to take a backup of the current PostgresDB, by exporting the following variable. This requires the given user to have permission to create a new database. The pod will fail in case the backup fails, therefore do not export it to skip the backup.
This will attempt to DROP the given $INFOWORKS_POSTGRESDB_BACKUP_DATABASE_NAME to create a new one.
Step 3: Switch to the directory where PostgresDB backups were stored.
NOTE Assuming the backups were stored in ${IW_HOME}/postgres_backup as per the Backup section.
Step 4: Clear any existing pods with the same name.
Step 5: Run the commands to create the required pod on the same namespace as the Kubernetes installation.
Step 6: Once the pod is running, run the following command to copy the backup to the pod.
After copying the above file, the restore script will automatically restore from the backup files supplied.