Prerequisites
| Package Installer | Version Used |
|---|---|
| Kubernetes | 1.27.x or above |
| Kubectl | 1.27.x or above |
| Helm | 3.14.x |
| Ingress-Controller | 4.10.x |
| Python | 3.8 or above |
If you are using MAC OS to deploy Infoworks on to cluster, you must install the following package:
| Package Installer | Version Used |
|---|---|
| GNU-SED | 4.8 or more |
Ensure that AKS Kubernetes cluster is connected to internet.
Set up AKS Kubernetes cluster. For more information, refer to the Azure Docs.
Ensure that Kubernetes version should be 1.27.x or above.
Infoworks recommends creating the AKS Kubernetes cluster with private access and a VM as a Bastion host with Linux-based OS should be created within the VPC.
To use an external Azure Container Registry (ACR) for pulling the images for Infoworks setup, ensure that all the required images are pushed to the the specified external registry and it is integrated with AKS. This is applicable if
IW_HOSTED_REGISTRYis set to false. To get the required container images, contact your Infoworks representative.If INGRESS_CONTROLLER_CLASS is set to nginx, then Infoworks recommends setting up ingress-controller externally with the required configuration. To set up nginx ingress-controller externally, refer to External Setup for Ingress Controller.
If KEDA_ENABLED is set to true, then Infoworks recommends setting up KEDA externally with the required configuration. To set up KEDA externally, refer to External KEDA Setup.
Install Azure CLI, Helm, and Kubectl on the Bastion host VM instance.
To install pip module, run
apt install python3-pipcommand.Ensure that the following Python packages are available on the server before starting the installation.
- pycryptodomex (version3.15.0)
- argparse
If the aforementioned packages are not available, execute the following command
xxxxxxxxxxpython3 -m pip install argparse pycryptodomex==3.15.0- Verify the following prerequisites
- Run
az versionto ensure that az is installed. - Run
helm versionto ensure that Helm is installed. - Run
kubectl versionto ensure that Kubectl is installed. - Run
python3 -Vto ensure that python3 is installed. - Run
python3 -m pipto ensure thatpipmodel is installed.
- Run
root@aks-dev-qa-bastion:~$ az version{ "azure-cli": "2.0.81", "azure-cli-core": "2.0.81", "azure-cli-telemetry": "1.0.4", "extensions": { "azure-devops": "0.17.0" }}root@bastion-host-devqa:$ helm versionversion.BuildInfo{Version:"v3.14.2", GitCommit:"c309b6f0ff63856811846ce18f3bdc93d2b4d54b", GitTreeState:"clean", GoVersion:"go1.21.7"}root@bastion-host-devqa:$ kubectl version --shortFlag --short has been deprecated, and will be removed in the future. The --short output will become the default.Client Version: v1.27.3Kustomize Version: v5.0.1root@aks-dev-qa-bastion:~# python3 -VPython 3.8.10root@aks-dev-qa-bastion:~# python3 -m pipUsage: /usr/bin/python3 -m pip <command> [options]- Set up Kubernetes Cluster in AKS for connection using
az
linkerd is the service mesh currently supported by Infoworks. At the time of setup, the Linkerd latest version is 2.12. To install Linkerd, refer to Linkerd documentation from step 0-3.
To improve stability of jobs, it is suggested to increase the linkerd init-proxy memory requests and limits to 30Mi. This can be done by passing the appropriate flags while running linkerd install/upgrade commands.
For example: linkerd upgrade --set proxyInit.resources.memory.limit=30Mi --set proxyInit.resources.memory.request=30Mi | kubectl apply -f -
Step 1: Execute az login.
root@aks-dev-qa-bastion:~$ az loginTo sign in, use a web browser to open the page https://microsoft.com/devicelogin and enter the code RS6X8HQZQ to authenticate.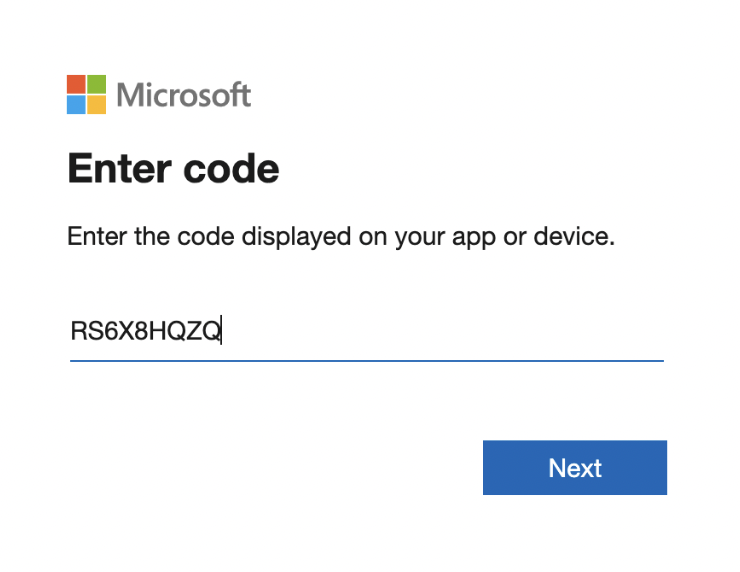
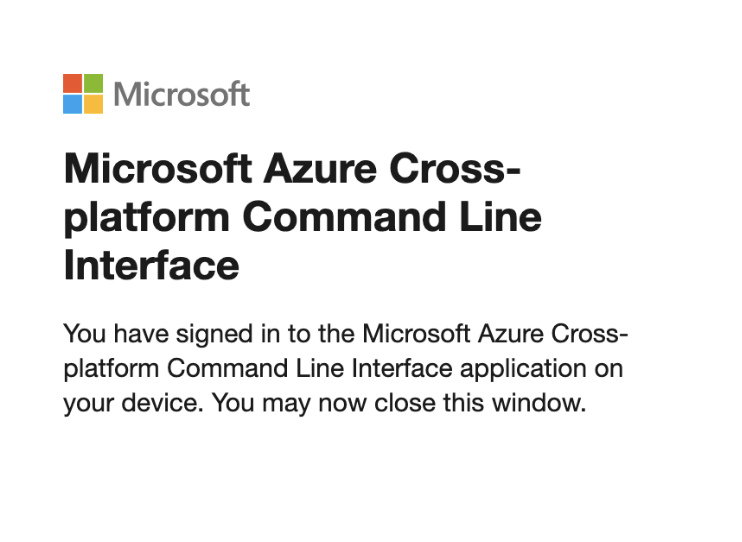
After successful verification, the following confirmation message appears.
xxxxxxxxxx[{"cloudName": "AzureCloud","id": "xxxxxxxx-xxxx-xxxx-xxxx-xxxxxxxx","isDefault": true,"name": "Subscription-Name","state": "Enabled","tenantId": "xxxxxxxx-xxxx-xxxx-xxxx-xxxxxxxx","user": {"name": "xxxxxxxxx@infoworks.domain","type": "user"}}Step 2: Identify the cluster name, zone/region, and project you want to connect to. Run the following command with these details:
xxxxxxxxxxaz aks get-credentials --resource-group <resourceGroupName> --name <AKSClusterName> --subscription <SubscriptionID>xxxxxxxxxxMerged "<AKSClusterName>" as current context in /home/infoworks/.kube/configPersistent Storages
Persistence ensures to persist the data even if a pod restarts or fails due to various reasons. Infoworks needs the following persistent storages to be configured:
- Databases (MongoDB and Postgres) and RabbitMQ
- Infoworks Job Logs and Uploads
Run the following command to fetch the storage classes:
xxxxxxxxxxkubectl get storageclass --no-headersxxxxxxxxxxAzurefile file.csi.azure.com azurefile-csi file.csi.azure.com azurefile-csi-premium file.csi.azure.com azurefile-premium file.csi.azure.com default (default) disk.csi.azure.com managed disk.csi.azure.com managed-csi disk.csi.azure.com managed-csi-premium disk.csi.azure.com managed-premium disk.csi.azure.com| Storage Class Category | Comments |
|---|---|
| azurefile-premium | It comes along with the cluster. It is recommended for NFS (logs, uploads, etc.). |
| azurefile-csi & azurefile-csi-premium | It comes along with the cluster if CSI driver is enabled. |
| managed-premium | It comes along with the cluster. It is recommended for databases. |
| managed-csi & managed-csi-premium | It comes along with the cluster if CSI driver is enabled. |
Installing Infoworks on Kubernetes
Take a backup of values.yaml file before every upgrade.
/opt/infoworks.
Step 1: Create Infoworks directory under /opt.
sudo mkdir -p /opt/infoworks
Step 2: Change permissions of /opt/infoworks directory
sudo chown -R <user>:<group/user> /opt/infoworks
Step 3: Change the directory path to /opt/infoworks.
cd /opt/infoworks
Step 4: To download Infoworks Kubernetes template, execute the following command:
xxxxxxxxxxwget https://iw-saas-setup.s3.us-west-2.amazonaws.com/6.1/iwx_installer_k8s_6.1.3.tar.gzStep 5: Extract the downloaded file.
xxxxxxxxxxtar xzf iwx_installer_k8s_6.1.3.tar.gzStep 6: Navigate to the extracted directory iw-k8s-installer.
Step 7: Open configure.sh file in the directory.
Step 8: Configure the following parameters as described in the table, and then save the file
Generic Configuration
| Field | Description | Details |
|---|---|---|
| IW_NAMESPACE | Namespace of Infoworks Deployment | This field is autofilled. However, you can also customize the namespace as per your requirement. |
| IW_RELEASE_NAME | Release Name of Infoworks Deployment | This field is autofilled. However, you can also customize the release name as per your requirement. |
| IW_CLOUD_PROVIDER | Name of the cloud provider of Kubernetes cluster | Enter azure. |
| NFS_STORAGECLASS_NAME | Name of the NFS storage class | Enter a valid Storage class name. Ex: azurefile-premium . |
| DB_STORAGECLASS_NAME | Name of the Database Storage Class | Enter a valid Storage class name. Ex: managed-csi |
| INGRESS_ENABLED | This field indicates enabling Ingress for Infoworks Deployment | Select true or false. Default: true. Infoworks requires you to select true. |
| INGRESS_CONTROLLER_CLASS | Name of the ingress controller class | Default value: nginx. |
| INGRESS_TYPE | Name of the ingress type | Two values: external and internal. Default value: internal. external: Infoworks app is exposed to internet. internal: Infoworks app is restricted to internal network. |
| INGRESS_AUTO_PROVISIONER | This field indicates installing ingress controller provisioner | Select true or false. Default: true. If ingress-controller is already installed, set this as false. |
| IW_DNS_NAME | DNS hostname of the Infoworks deployment | Enter a valid DNS name. |
| IW_SSL_PORT | This field enables port and protocol for SSL communication | Select true or false. Default: true |
| IW_HA | This field enables high-availability of Infoworks deployment. | Select true or false. Default value: true. Infoworks recommendation: true i.e. enabling HA. |
| USE_GCP_REGISTRY | This field enables separate registry for cloud. GCR is being used by Infoworks by default. To override cloud specific registry images, provide input "false". | Select true or false. Default value: true. |
Autoscaling Configuration
| Field | Description | Details |
|---|---|---|
| KEDA_ENABLED | This field enables to configure autoscaling to Infoworks deployment using KEDA. | Select true or false. Default value: false. |
| KEDA_AUTO_PROVISIONER | This field enables installing KEDA Kubernetes deployment automatically by Infoworks deployment | Select true or false. Default value: false. |
num_executors in conf.properties. If the number of Hangman instances changes due to autoscaling, then the total number of jobs Infoworks handles also changes. To fix the total number of concurrent Infoworks jobs, you must disable the autoscaling on the Hangman service and set the number of Hangman replicas manually as described in the Enabling Scalability section.
External Container Registry Configuration
The following table lists the External Container Registry Configuration for Infoworks Setup. These configurations should be set only if the Container Registry used to pull the images is different from the one hosted by Infoworks.
| Field | Description | Details |
|---|---|---|
| IW_HOSTED_REGISTRY | This field indicates if the Container Registry hosted by Infoworks. | Select true/false. If the registry is different from the one hosted by Infoworks, set the value to false. |
The following fields are valid if IW_HOSTED_REGISTRY set to false
| Field | Description | Details |
|---|---|---|
| IMAGES_BASE_REGISTRY | The field is about Container Registry Server URL hosted by the user. | Provide the Container Registry Server URL. |
| IMAGES_SECRET_NAME | Provide the image secret | Provide the name of the secret created to authorize and authenticate (if any) to access all the Infoworks Images. If Container Registry is integrated with the AKS cluster, then no authorization is required and you should keep the value for this field empty. |
Service Mesh Configuration for Security
| Field | Description | Details |
|---|---|---|
| SERVICE_MESH_ENABLED | This field enables to configure service mesh to Infoworks deployment | Select true or false. Default value: false. |
| SERVICE_MESH_NAME | This field is the name of the service mesh. | Provide the name of the service mesh. Default value: linkerd |
Keyvault and Keyvault Authentication Configuration
| Field | Description | Details |
|---|---|---|
| KEYVAULT_GLOBAL_ENABLED | The flag indicates whether all secrets like Databricks Tokens will always be stored on an External Keyvault | Enter "true" if Infoworks forces all secret keys to be stored on an External Keyvault Enter "false" if the user will be given the option to store them in encrypted form in the MetaDB |
| KEYVAULT_ENABLED | This flag indicates whether a default Keyvault to store external MongoDB and PostgresDB Credentials will be given | Only Applicable if either or both of the Databases are external Enter "true" if a default keyvault to store external DB credentials will be used Enter "false" if all DB credentials will be stored natively, i.e. as part of Kubernetes Secrets and Pod Environment Variables |
| AZURE_KEYVAULT_URI | The URI of the Azure Keyvault containing any External DB Credentials | Only Applicable if KEYVAULT_ENABLED="true" The URI of the Azure Keyvault which will store the DB credentials, generally following the format - |
| FLAG_AZURE_KEYVAULT_AUTH_SP | This flag indicates whether the aforementioned Keyvault is to be accessed through a service principal | Only Applicable if KEYVAULT_ENABLED="true" Enter Y if Infoworks uses a Service Principal to authenticated to the Keyvault, and proceed to provide SP details. Enter false if the Nodes have been granted User or System Managed Identity to Authenticate |
| AZURE_SERVICE_PRINCIPAL_TENANT_ID | The ID of the Service Principal Tenant | Only Applicable if FLAG_AZURE_KEYVAULT_AUTH_SP=”true” Enter the Azure Object ID/Tenant ID of the Service Principal. |
| AZURE_SERVICE_PRINCIPAL_SUBSCRIPTION_ID | The ID of the Subscription the Service Principal Exists In | Only Applicable if FLAG_AZURE_KEYVAULT_AUTH_SP=true Enter the Azure Object ID of the Service Principal |
| AZURE_SERVICE_PRINCIPAL_CLIENT_ID | The Client ID of the Service Principal | Only Applicable if FLAG_AZURE_KEYVAULT_AUTH_SP=true Enter the Azure Client ID of the Service Principal |
| AZURE_SERVICE_PRINCIPAL_CLIENT_SECRET | The Encrypted Client Secret of the Service Principal | Only Applicable if FLAG_AZURE_KEYVAULT_AUTH_SP=true Keep it empty if not sure. During Installation Client Secret prompt will be displayed and then Infoworks encrypts the password on the fly. |
| AZURE_MI_TYPE_IS_USER | Flag whether the Managed Identity use to authenticate to keyvault is System Assigned or User-Managed | Only Applicable if FLAG_AZURE_KEYVAULT_AUTH_SP=false Enter true if Managed Identity used is User Assigned, and proceed to enter ID in next input Enter false if the Nodes have been granted System Managed Identity to Authenticate (default is N) |
| AZURE_USER_MI_CLIENT_ID | The Client ID of the User-assigned Managed Identity attached to the nodes | Only Applicable if AZURE_MI_TYPE_IS_USER=true |
MongoDB Configuration
| Field | Description | Details |
|---|---|---|
| EXTERNAL_MONGO | This field enables external mongoDB support for Infoworks deployment | Select true or false. Default value: false. |
The following fields are applicable if EXTERNAL_MONGO= true.
Keyvault Configuration for MongoDB
The following fields are applicable if EXTERNAL_MONGO= true and KEYVAULT_ENABLED=true.
| Field | Description | Details |
|---|---|---|
| KEYVAULT_FLAG_METADB_HOST | This flag indicates whether to use the default Keyvault to store external Mongo Host | Only Applicable if KEYVAULT_GLOBAL_ENABLED=false and KEYVAULT_ENABLED=true |
| KEYVAULT_FLAG_METADB_USER | This flag indicates whether to use the default Keyvault to store external Mongo User | Only Applicable if KEYVAULT_GLOBAL_ENABLED=false and KEYVAULT_ENABLED=true |
| Fields | Description | Details |
|---|---|---|
| MONGO_SRV | This field enables DNS connection string for MongoDB Atlas | Select true or false. Default value: true (If external MongoDB Atlas is enabled) |
| MONGODB_HOSTNAME | The Mongo Host URL to connect to | Enter the Mongo Server or Seed DNS hostname (without prefix) If KEYVAULT_FLAG_METADB_HOST=true Enter the Secret Name on the Keyvault (defaults to METADBHOST) If KEYVAULT_FLAG_METADB_HOST=false Enter the plaintext value |
| MONGODB_USERNAME | The Mongo User to authenticate as. | Enter a user that has at least read/write permissions over the databases mentioned. If KEYVAULT_FLAG_METADB_USER=true Enter the Secret Name on the Keyvault (defaults to METADBUSER) If KEYVAULT_FLAG_METADB_USER=false Enter the plaintext value (defaults to Infoworks) |
| MONGODB_USE_SECRET_PASSWORD | This field enables user to configure MongoDB password in the secrets before installing Infoworks. Steps will be documented | Select true or false. Default Value: false. If value is false then we need ENCRYPTED_PASSWORD field to be filled, else secret name is required. (Optional value). |
| MONGODB_SECRET_NAME | This is the name of the MongoDB encrypted password stored in secrets. (Manual Creation) | User will create the secret and has to provide the name of the secret. (Optional value) Keep it empty if not sure. For more information, refer to the "For MongoDB" section mentioned below. |
| MONGODB_ENCRYPTED_PASSWORD | The Password of the aforementioned MONGODB_USERNAME | Enter the Password of the MONGO_USER If KEYVAULT_ENABLED=true Enter the Secret Name on the Keyvault (defaults to METADBPASS) If KEYVAULT_ENABLED=false Enter the plaintext value (defaults to the default Infoworks password) |
| MONGO_FORCE_DROP | This field delete all the data in the MongoDB Atlas and initialize the data freshly. | Select true or false. Default value: false. Infoworks recommends to keep the value to false always. |
| INFOWORKS_MONGODB_DATABASE_NAME | This field indicates the name of the Infoworks MongoDB database in Atlas. | Provide the name of the database for Infoworks setup. |
| INFOWORKS_SCHEDULER_MONGODB_DATABASE_NAME | This field indicates the name of the Infoworks scheduler MongoDB database in Atlas | Provide the name of the scheduler database for Infoworks setup. |
PostgresDB Configuration
| Field | Description | Details |
|---|---|---|
| EXTERNAL_POSTGRESDB | This field enables external PostgresDB support for Infoworks deployment | Select true or false. Default value: false. |
The following fields are applicable if EXTERNAL_POSTGRESDB= true
Keyvault Configuration for PostgresDB
The following fields are applicable if EXTERNAL_POSTGRESDB=true and KEYVAULT_ENABLED=true.
| Field | Description | Details |
|---|---|---|
| KEYVAULT_FLAG_POSTGRESDB_HOST | This flag indicates whether to use the default Keyvault to store external PostgresDB Host | Only Applicable if KEYVAULT_GLOBAL_ENABLED=false and KEYVAULT_ENABLED=true |
| KEYVAULT_FLAG_POSTGRESDB_USER | This flag indicates whether to use the default Keyvault to store external PostgresDB User | Only Applicable if KEYVAULT_GLOBAL_ENABLED=false and KEYVAULT_ENABLED=true |
| Field | Description | Details |
|---|---|---|
| POSTGRESDB_HOSTNAME | The PostgresDB Host URL to connect to | Enter the PostgresDB Server hostname (without prefix) If KEYVAULT_FLAG_POSTGRESDB_HOST=true Enter the Secret Name on the Keyvault (defaults to POSTGRESDBHOST) If KEYVAULT_FLAG_POSTGRESDB_HOST=false Enter the plaintext value |
| POSTGRESDB_USERNAME | The PostgresDB User to authenticate as. | Enter a user that has at least read/write permissions over the databases mentioned. If KEYVAULT_FLAG_POSTGRESDB_USER=true Enter the Secret Name on the Keyvault (defaults to POSTGRESDBUSER) If KEYVAULT_FLAG_POSTGRESDB_USER=false Enter the plaintext value (defaults to infoworks-user) |
| POSTGRESDB_USE_SECRET_PASSWORD | This field enables user to configure Postgres password in the secrets before installing Infoworks. Steps will be documented | Select true or false. Default Value: false. If value is false then we need ENCRYPTED_PASSWORD field to be filled, else secret name is required. (Optional value). |
| POSTGRESDB_SECRET_NAME | This is the name of the Postgres encrypted password stored in secrets. (Manual Creation) | User will create the secret and has to provide the name of the secret. (Optional value) Keep it empty if not sure. For more information, refer to the "For Postgres" section mentioned below. |
| POSTGRESDB_ENCRYPTED_PASSWORD | The Password of the aforementioned POSTGRESDB_USERNAME | Enter the Password of the POSTGRESDB_USER If KEYVAULT_ENABLED=true Enter the Secret Name on the Keyvault (defaults to POSTGRESDBPASS) If KEYVAULT_ENABLED=false Enter the plaintext value (defaults to the default Infoworks password) |
| INFOWORKS_POSTGRESDB_DATABASE_NAME | This field indicates the name of the Infoworks Postgres database in the Postgres server. | Provide the name of the database for Infoworks setup. |
Step 9 (Optional): Enable NodeSelector/Toleration and Custom annotations etc. by editing values.yaml file manually before deploying Infoworks deployment.
Step 10 (Optional): To run Infoworks jobs on separate workloads, edit values.yaml file under infoworks folder. Specifically, you need to edit jobnodeSelector and jobtolerations fields based on the node pool you created in the Node Pools.
nodeSelector and tolerations fields.
xxxxxxxxxxnodeSelector: {}tolerations: []jobnodeSelector: group: developmentjobtolerations: - key: "dedicated" operator: "Equal" value: "iwjobs" effect: "NoSchedule"Step 11 (Optional): To define the PaaS passwords, there are two methods:
First method
The password must be put in pre-existing secrets in the same namespace.
For MongoDB
(i) Set MONGODB_USE_SECRET_PASSWORD=true
(ii) To create the custom secret resource, run the following commands from the iw-k8s-installer directory.
$ encrypted_mongo_password=$(./infoworks_security/infoworks_security.sh --encrypt -p "<mongo-password>" | xargs echo -n | base64 -w 0)$ IW_NAMESPACE=<IW_NAMESPACE> $ MONGODB_SECRET_NAME=<MONGODB_SECRET_NAME>$ kubectl create ns ${IW_NAMESPACE}$ kubectl apply -f - <<EOFapiVersion: v1kind: Secretmetadata: name: ${MONGODB_SECRET_NAME} namespace: ${IW_NAMESPACE}data: MONGO_PASS: ${encrypted_mongo_password}type: OpaqueEOFMONGODB_SECRET_NAME and IW_NAMESPACE according to the inputs given to the automated script. <mongo-password> is the plaintext password.
For Postgres
(i) Set POSTGRESDB_USE_SECRET_PASSWORD=true
(ii) To create the custom secret resource, run the following commands from the iw-k8s-installer directory.
$ encrypted_postgres_password=$(./infoworks_security/infoworks_security.sh --encrypt -p "<postgres-password>" | xargs echo -n | base64 -w 0)$ IW_NAMESPACE=<IW_NAMESPACE> $ POSTGRESDB_SECRET_NAME=<POSTGRESDB_SECRET_NAME>$ kubectl create ns ${IW_NAMESPACE}$ kubectl apply -f - <<EOFapiVersion: v1kind: Secretmetadata: name: ${POSTGRESDB_SECRET_NAME} namespace: ${IW_NAMESPACE}data: POSTGRES_PASS: ${encrypted_postgres_password}type: OpaqueEOFPOSTGRESDB_SECRET_NAME and IW_NAMESPACE according to the inputs given to the automated script. postgres-password is the plaintext password.
Second Method
You can give the password to the Automated Script, which will encrypt it to store it in the templates.
Step 12 (Optional): Enable NodeSelector/Toleration and Custom annotations etc. by editing values.yaml file manually before deploying Infoworks deployment.
Step 13: To run the script, you must provide execute permission beforehand by running the following command.
xxxxxxxxxxchmod 755 iw_deploy.shStep 14: Run the script
xxxxxxxxxx./iw_deploy.shNOTE: (Optional) Enable NodeSelector/Toleration and Custom annotations etc., by editing values.yaml file manually before deploying infoworks app Checking for basic Prerequisites.Found HELMv3Found KUBECTLTesting Kubernetes basic cluster connectionValidation is done: Kubernetes Cluster is Authorized Enter kubernetes namespace to deploy Infoworksv1Enter release name for infoworks v1Creating v1 namespace on kubernetes cluster namespace/v1 created Input the Kubernetes Cluster Cloud Provider Environment- aws/gcp/azure azure List of available StorageClass in Kubernetes Cluster azurefileazurefile-csiazurefile-csi-premiumazurefile-premiumdefaultmanagedmanaged-csimanaged-csi-premiummanaged-premiumINFO: NFS and Database (Disk) persistance is recommended and always set to True Enter NFS StorageClass: Select StorageClass from listazurefileGCR is being used by Infoworks by default, to override cloud specific azure registry input "false" Default: "true"trueEnter DATABASE StorageClass: Select StorageClass from listmanagedENABLE INGRESS: true or false Default: "true"trueSelect Ingress Controller Class: cloud native "cloud" or external "nginx" Default: "nginx"nginxSelect Ingress type: internal or external Default: "internal"externalProvisioning Nginx Ingress controller automatically.NOTE: If the Ingress-Nginx is already provisioned manually skip this by selecting 'N' Do you want to continue y/n? Default: "y"nEnter DNS Hostname to access Infoworks: for example: iwapp.infoworks.local sample.infoworks.technologyENABLE SSL for the Infoworks Ingress deployment (This enables port and protocol only): true or false Default: "true"trueENABLE HA for Infoworks Setup: true or false Default: "true"falseSelect whether all Secrets will be stored on an External Secret Store (enabling with any External DB Options requires enabling keyvault in the following steps) Default: "false"falseSelect whether using a default keyvault for storing External MongoDB or PostgresDB details: true or false Default: "false"trueEnter the uri for the Azure Keyvault. Example: https://keyvault.vault.azure.net https://example.vault.azure.netEnter whether using Service Principal to authenticate to the keyvault. : true or false Default: "false"true Enter the Service Principal Object ID11111111-2222-3333-4444-555555555555Enter the Service Principal Subscription ID11111111-2222-3333-4444-555555555555Enter the Service Principal Client ID11111111-2222-3333-4444-555555555555Enter the Service Principal Client Secret. Infoworks will encrypt the secret.ENABLE external MongoDB access for Infoworks Setup: true or false Default: "false"trueENABLE SRV connection string for MongoDB access for Infoworks Setup: true or false, MongoDB Atlas default is true Default: "true"trueSelect whether the Mongo Host is stored on Keyvault: true or false Default: "false" Defaulting to falseInput MongoDB DNS connection string for Infoworks Setup: Private link ex - {DB_DEPLOYMENT_NAME}-pl-0.{RANDOM}.mongodb.net mongo-pl-0.1234.mongodb.netSelect whether the Mongo User is stored on Keyvault: true or false Default: "false"trueEnter the Keyvault Key for the Mongo Username. default: METADBUSERMETADBUSERSelect whether the Mongo Pass is stored on Keyvault: true or false Default: "false"trueEnter the Keyvault Key for the Mongo Password. default: METADBPASSMETADBPASSInput the database name of MongoDB for Infoworks Setup. default: infoworks-db infoworks-newInput the scheduler database name of MongoDB for Infoworks Setup. default: quartzio quartzioENABLE external PostgresDB access for Infoworks Setup: true or false Default: "false"trueSelect whether the Postgres Host is stored on Keyvault: true or false Default: "false"trueEnter the Keyvault Key for the Postgresdb Host. default: POSTGRESDBHOSTPOSTGRESDBHOSTSelect whether the Postgres User is stored on Keyvault: true or false Default: "false" Defaulting to falseInput postgresDB Username for Infoworks Setup. Assuming the user have permissions to create databases if doesn't exist. infoworksSelect whether the Postgres Pass is stored on Keyvault: true or false Default: "false" Defaulting to falseInput the Postgres user password for Infoworks database Setup. Infoworks will encrypt the Postgres password. Input the database name of Postgres for Infoworks Setup. default: airflow airflowENABLE Service mesh for Infoworks Setup, Only Linkerd supported: true or false Default: "false"trueInput service mesh name for Infoworks Setup: Defaults to linkerd linkerd helm upgrade -i v1 ./infoworks -n v1 -f ./infoworks/values.yamlSince the above installation was configured for ingress-controller, run the following command to get the domain mapping done.
xxxxxxxxxxNAME: intrueLAST DEPLOYED: Fri Jul 2 17:25:20 2021NAMESPACE: intrueSTATUS: deployedREVISION: 1xxxxxxxxxxkubectl get ingress --namespace samplexxxxxxxxxxNAME CLASS HOSTS ADDRESS PORTS AGEv1-ingress <none> sample.infoworks.technology 43.13.121.142 80 3m43sGet the application URL by running these commands: http://sample.infoworks.technology
Log Archival Configuration
| Field | Description | Details |
|---|---|---|
| IW_LOG_ARCHIVAL | This field automatic log archival mechanism for Infoworks job logs and service logs. | Select true or false. Default value: true. |
The following field is applicable if IW_LOG_ARCHIVAL= true
| Field | Description | Details |
|---|---|---|
| IW_JOB_LOGS_MAX_AGE | The number of days after which Infoworks job logs logs are moved to an archive. Logs older than this threshold are automatically archived into a tar.gz file. | Enter a number of days (integer) Default: 30 |
Users will also be able to further customise archival and retention periods, set maximum log sizes, and the schedule of the archival operation. Please refer to Custom Infoworks Configurations.
Enabling Linkerd Service Mesh for Ingress Controller
To enable the communication between the ingress controller and the infoworks pods via linkerd service mesh, perform the following steps:
There are two options to enable the communication which depends on the method by which ingress controller was set up.
Option 1 - Infoworks deployed the ingress controller.
If INGRESS_AUTO_PROVISIONER is set to true during installation, no additional configuration is required.
Option 2 - User deployed the Ingress Controller
If INGRESS_AUTO_PROVISIONER is set to false during installation, refer to the official Linkerd documentation to enable service mesh for your corresponding ingress controller.
Enabling SSL
If you set INGRESS_CONTROLLER_CLASS to nginx, add SSL Termination in the TLS section of values.yaml file either before running the automated script or after the deployment.
Step 1: Log in to Linux machine on the latest Debian-based OS.
Step 2: Ensure libssl-dev package is installed.
Step 3: Provide DNS Name for Infoworks deployment
Generating Self-Signed SSL Certificate:
To generate SSL, run the following commands:
xxxxxxxxxxmkdir certificatesxxxxxxxxxxcd certificatesxxxxxxxxxxopenssl genrsa -out ca.key 2048 # Creates a RSA keyopenssl req -new -x509 -days 365 -key ca.key -subj "/C=CN/ST=CA/L=US/O=Infoworks, Inc./CN=Infoworks Root CA" -out ca.crtopenssl req -newkey rsa:2048 -nodes -keyout server.key -subj "/C=CN/ST=CA/L=US/O=Infoworks, Inc./CN=*.infoworks.domain" -out server.csropenssl x509 -req -extfile <(printf "subjectAltName=DNS:infoworks.domain,DNS:subdomain.infoworks.domain") -days 365 -in server.csr -CA ca.crt -CAkey ca.key -CAcreateserial -out server.crtKeep a note of server.crt and server.key files for self-signed certificates for Nginx SSL Termination and provide the valid values for ingress_tls_secret_name and namespace_of_infoworks.
Run the following command to add the tls certificates to the Kubernetes cluster.
xxxxxxxxxxkubectl create secret tls <ingress_tls_secret_name> --cert=server.crt --key=server.key -n <namespace_of_infoworks>Edit values.yaml file to look similar to the following sample file.
xxxxxxxxxxingress: enabled: true protocol: https port: 443 hostname: subdomain.infoworks.cloud ingressClassName: "nginx" annotations: nginx.ingress.kubernetes.io/proxy-body-size: 10m nginx.ingress.kubernetes.io/proxy-connect-timeout: "300" nginx.ingress.kubernetes.io/proxy-read-timeout: "300" nginx.ingress.kubernetes.io/proxy-send-timeout: "300" tls: - hosts: - subdomain.infoworks.cloud secretName: <ingress_tls_secret_name>It is suggested to make changes in the values.yaml file and add the below parameters as annotations in the ingress block, replacing <URL> to the DNS of your deployment, as defined in IW_DNS_NAME.
nginx.ingress.kubernetes.io/enable-cors: "true"nginx.ingress.kubernetes.io/configuration-snippet: | proxy_hide_header Access-Control-Allow-Origin; add_header "Access-Control-Allow-Origin" "<URL>" always; add_header "Access-Control-Allow-Methods" "GET, PUT, POST, OPTIONS" always; add_header "Access-Control-Allow-Headers" "DNT,X-CustomHeader,Keep-Alive,User-Agent,X-Requested-With,If-Modified-Since,Cache-Control,Content-Type,Authorization" always; add_header "Access-Control-Expose-Headers" "Content-Length,Content-Range" always;nginx.ingress.kubernetes.io/cors-allow-credentials: "true"After adding the annotations, the values.yaml file should look as shown below.
ingress: enabled: true protocol: https port: 443 hostname: subdomain.infoworks.cloud ingressClassName: "nginx" annotations: nginx.ingress.kubernetes.io/proxy-body-size: 10m nginx.ingress.kubernetes.io/proxy-connect-timeout: "300" nginx.ingress.kubernetes.io/proxy-read-timeout: "300" nginx.ingress.kubernetes.io/proxy-send-timeout: "300" nginx.ingress.kubernetes.io/enable-cors: "true" nginx.ingress.kubernetes.io/configuration-snippet: | proxy_hide_header Access-Control-Allow-Origin; add_header "Access-Control-Allow-Origin" "subdomain.infoworks.cloud" always; add_header "Access-Control-Allow-Methods" "GET, PUT, POST, OPTIONS" always; add_header "Access-Control-Allow-Headers" "DNT,X-CustomHeader,Keep-Alive,User-Agent,X-Requested-With,If-Modified-Since,Cache-Control,Content-Type,Authorization" always; add_header "Access-Control-Expose-Headers" "Content-Length,Content-Range" always; nginx.ingress.kubernetes.io/cors-allow-credentials: "true" tls: - hosts: - subdomain.infoworks.cloud secretName: <ingress_tls_secret_name>Configuring Network Policy Rules
- Network policies are enabled by default for additional security. Please refer here for detailed documentation on network policies and for whitelisting additional namespaces.
- Navigate to the directory
IW_HOME/iw-k8s-installer. And Run theiw_deploy script.
xxxxxxxxxx./iw_deploy.shCustom Infoworks Configurations
Email Configuration
The following table lists the Custom Email Configuration for Infoworks Setup using custom email attributes.
| Name | Description | Default Values |
|---|---|---|
| smtpHost | The SMTP host URL to connect to | smtp.gmail.com |
| smtpPort | SMTP port | 587 |
| smtpUsername | The SMTP User to authenticate as | email address |
| smtpPassword | The Password for the SMTP user | Encrypted password |
| ttlsEnabled | The TTLS Flag | false |
| sslEnabled | The SSL flag | true |
| sslPort | The SSL Port | 465 |
| fromAddress | Visible Sender Email | infoworks_user@gmail.com |
| fromName | Visible Sender Name | infoworks_user |
Step 1: Update Email Configs as necessary.
- Navigate to the directory
IW_HOME/iw-k8s-installer/infoworks. - Edit the
values.yamlfile. - Email configurations can be found under
customiwConfigssection followed byemailSettingssub-section in values.yaml
Step 2: The structure and indentation of your values.yaml file should mirror the example provided below. Note that the actual values and entries may vary.
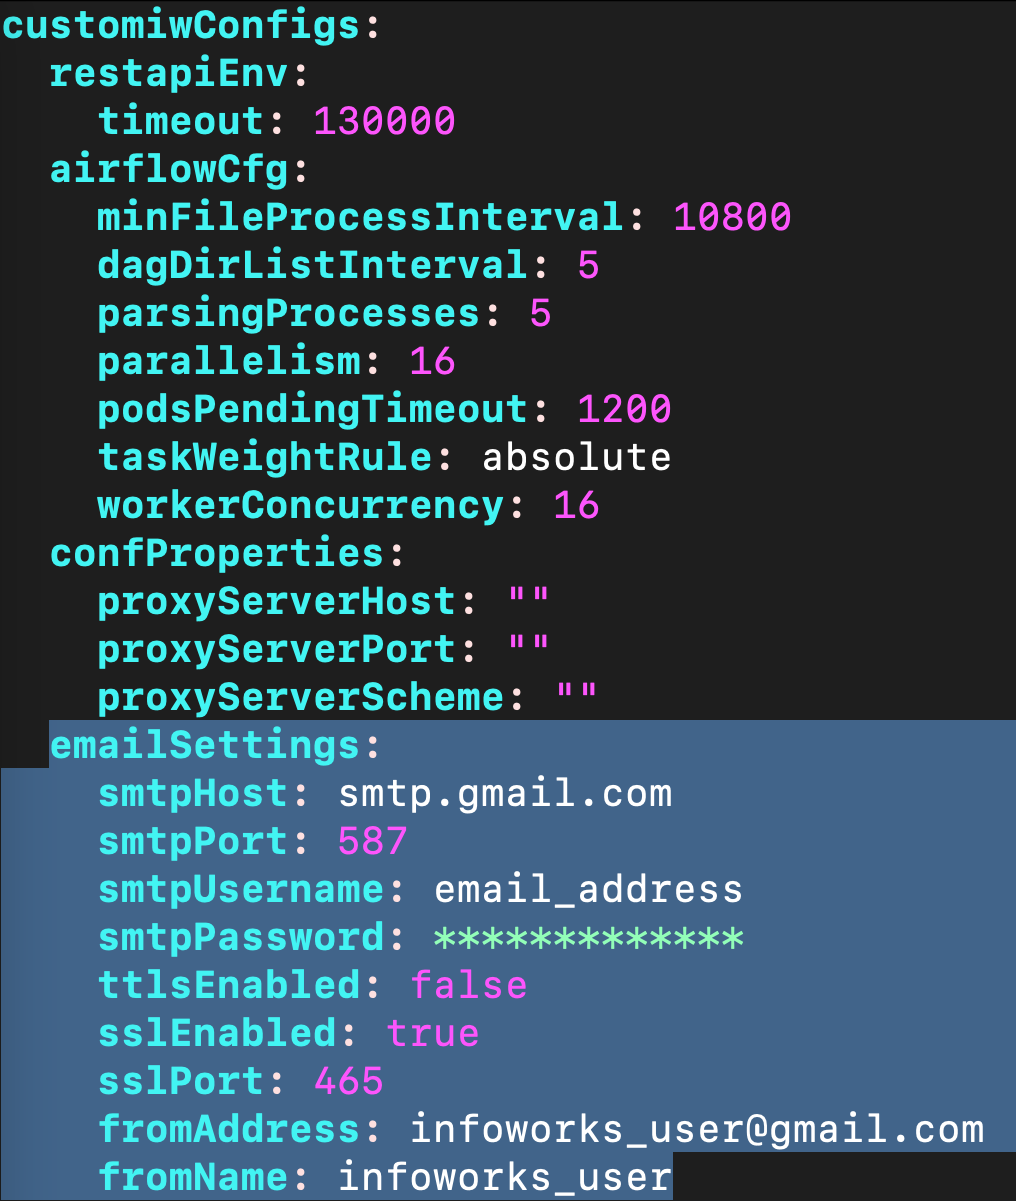
Update the values and save the file.
Step 3: Navigate to the directory IW_HOME/iw-k8s-installer. And Run the iw_deploy script.
xxxxxxxxxx./iw_deploy.shStep 4: Restart all the deployments
xxxxxxxxxxkubectl rollout restart deployment -n <namespace>Airflow Configurations
The following table lists the airflow configurations for Infoworks setup. Follow below instructions to update them as necessary.
| Name | Description | Default Values |
|---|---|---|
| minFileProcessInterval | The number of seconds after which a DAG file is parsed. The DAG file is parsed every min_file_process_interval number of seconds | 10800 |
| dagDirListInterval | How often (in seconds) to scan the DAGs directory for new files | 5 |
| parsingProcesses | The number of processes the Airflow scheduler can use for parsing DAG files | 5 |
| parallelism | Parallelism is the maximum number of tasks across all the workers and DAGs | 16 |
| podsPendingTimeout | Seconds scheduler waits before killing pods stuck in pending state | 1200 |
| taskWeightRule | default priority assignment of tasks based on the position of the task in dag (ie number of dependencies of task) | absolute |
Step 1: Update Airflow Configs as necessary.
- Navigate to the directory
IW_HOME/iw-k8s-installer/infoworks. - Edit the
values.yamlfile. - Airflow configurations can be found under
customiwConfigssection followed byairflowCfgsub-section in values.yaml
Step 2: The structure and indentation of your values.yaml file should mirror the example provided below. Note that the actual values and entries may vary.
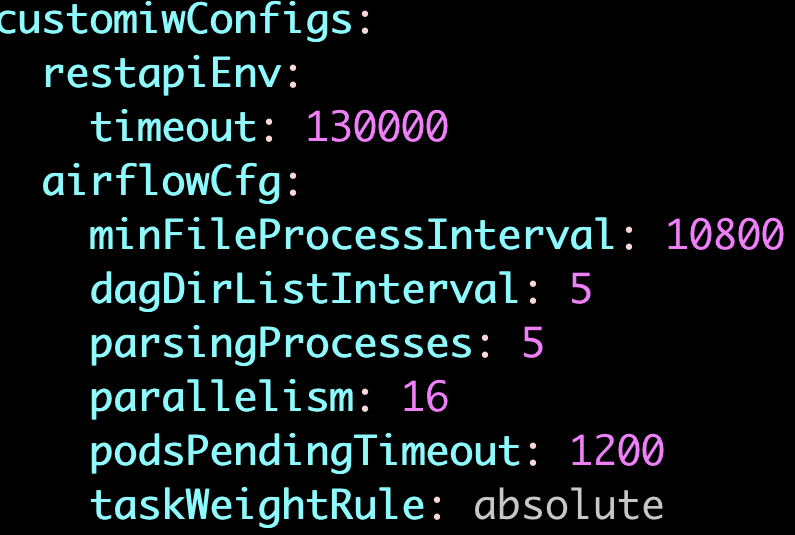
Update the values and save the file.
Step 3: Navigate to the directory IW_HOME/iw-k8s-installer. And Run the iw_deploy script.
xxxxxxxxxx./iw_deploy.shStep 4: Restart all the deployments
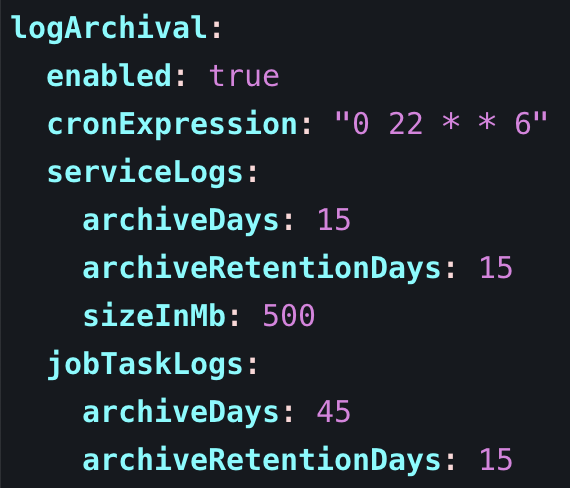
Log Archival Configurations
The following table lists the global Log Archival configurations for Infoworks setup. Follow below instructions to update them as necessary.
| Name | Description | Default Values |
|---|---|---|
| cronExpression | Cron schedule expression which will be used for scheduling log archival job. | 0 22 * * 6 |
| serviceLogs.archiveDays | The number of days after which logs are moved to an archive. Logs older than this threshold are automatically archived into a tar.gz file. Applies only for Infoworks service logs. | 15 |
| serviceLogs.archiveRetentionDays | The number of days for which archived logs are retained before deletion. This setting ensures that archived tar.gz files are kept for a specific period for reference or compliance purposes and then systematically purged. Applies only for Infoworks service logs. | 10 |
| serviceLogs.sizeInMb | If there is a log file not older than archiveDays exceeding this limit at the time of the archival process, then the log is rotated (archived and emptied). Applies only for Infoworks service logs. | 500 |
| jobTaskLogs.archiveDays | Specify archiveDays for Infoworks job logs and task logs. | 15 |
| jobTaskLogs.archiveRetentionDays | Specify archiveRetentionDays for Infoworks job logs and task logs. | 10 |
Step 1: Update Log Archival Configs as necessary.
- Navigate to the directory
IW_HOME/iw-k8s-installer/infoworks. - Edit the
values.yamlfile. - Log Archival configurations can be found under
logArchivalsection in values.yaml
Step 2: The structure and indentation of your values.yaml file should mirror the example provided below. Note that the actual values and entries may vary.
Step 3: Navigate to the directory IW_HOME/iw-k8s-installer. And Run the iw_deploy script.
Enabling High-Availability and Scalability
Enabling High-Availability
Infoworks installation enables high-availability configuration while setting up Infoworks in Kubernetes. You can enable high-availability by editing the helm file called values.yaml.
Step 1: To edit values.yaml file, perform the action given in the following snippet.
Step 2: Run HELM upgrade command.
This enables the high availability for Infoworks.
Enabling Scalability
Infoworks installation supports auto-scaling of pods.
For a scalable solution:
- There must be a minimum of two replicas, if HA is enabled.
- They can be scaled to any number based on available resources (CPU and memory).
- Infoworks supports scalability of source, pipeline, and workflow jobs out of the box. Ensure that there are available resources in the Kubernetes cluster.
Infoworks services will scale automatically based on the workloads and resource utilization for the running pods.
To modify any autoscaling configuration, edit the horizontalPodScaling sub-section under global section in the values.yaml file.
| Property | Details |
|---|---|
| hpaEnabled | By default, hpa is enabled for the install/upgrade. Set the value to false to disable hpa. |
| hpaMaxReplicas | This field indicates the number of maximum replicas the pod can scale out horizontally. |
| scalingUpWindowSeconds | This field indicates the duration a pod must wait before scaling out activity. |
| hpaScaleUpFreq | This field indicates the duration HPA must wait before scaling out. |
| scalingDownWindowSeconds | This field indicates the duration a pod should wait before scaling in the activity. |
However, there are three pods which require manual scaling based on workload increase, namely platform-dispatcher, hangman, and orchestrator-scheduler.
There are two ways to enable scalability:
1. By editing the values.yaml file.
Step 1: Edit the values.yaml file.
platform-dispatcher, hangman, or orchestrator-scheduler with actual name.
For example:
Step 2: To increase the scalability manually, run HELM upgrade command:
2. Using Kubectl
For example:
Optional Configuration
For setting up Pod Disruption Budget
A Pod Disruption Budget (PDB) defines the budget for voluntary disruption. In essence, a human operator is letting the cluster be aware of a minimum threshold in terms of available pods that the cluster needs to guarantee in order to ensure a baseline availability or performance. For more information, refer to the PDB documentation.
To set up PDB:
Step 1: Navigate to the directory IW_HOME/iw-k8s-installer .
Step 2: Edit the values.yaml file.
Step 3: Under the global section and pdb sub-section, set the enabled field to true.
Step 4: Run HELM upgrade command.
For setting up PodAntiAffinity
If the anti-affinity requirements specified by this field are not met at the scheduling time, the pod will not be scheduled onto the node. If the anti-affinity requirements specified by this field cease to be met at some point during pod execution (e.g. due to a pod label update), the system may or may not try to eventually evict the pod from its node. For more information, refer to the PodAntiAffinity documentation.
To set up PodAntiAffinity:
Step 1: Navigate to the directory IW_HOME/iw-k8s-installer .
Step 2: Edit the values.yaml file.
Step 3: Under the global section, set the podAntiAffinity field to true.
Step 4: Run HELM upgrade command.
Increasing the Size of PVCs
To scale the size of PVCs attached to the pods:
Step 1: Note the storage class of the PVCs to be scaled.
Step 2: Ensure allowVolumeExpansion is set to true in the storageClass.
Step 3: Delete the managing statefulset without deleting the pods.
Step 4: For each PVC, upscale the size (ensure all PVCs attached managed by a single statefulset have the same size. For example, all Postgres managed PVCs must have the same size).
Step 5: Navigate to the helm chart used for Infoworks deployment.
Step 6: Edit the values.yaml file to update the size of the corresponding database to the new value.
Step 7: Run the helm upgrade command.
Above upgrade command will recreate all pods with the same PVCs.
Updating the MongoDB and PostgresDB Credentials
To update the MongoDB and/or PostgresDB credentials in the Infoworks deployment, follow the below given procedure.
Updating the MongoDB Credentials
Updating Encrypted Passwords Stored in values.yaml
There are two methods to update password:
Method 1
To update MongoDB encrypted passwords that are stored in values.yaml file, with the existing configure.sh file, use the IW_DEPLOY script to populate values.yaml:
Step 1: Download and untar the Infoworks kubernetes template, if not already present, according to the iwx-version in your existing deployment.
Step 2: If a new template was downloaded, replace the iw-k8s-installer/configure.sh as well as iw-k8s-installer/infoworks/values.yaml with the older file.
Step 3: Change the directory path to iw-k8s-installer.
Step 4: Replace the following values with a blank string in the configure.sh file.
Step 5: Run iw_deploy.sh. Once you receive "Seems like you have already configured Infoworks once. Do you want to override? y/n Default: n", enter “Y”. This will prompt the user to provide input for the values that were blank in the previous step. The script will then replace the infoworks/values.yaml file with the updated values.
Step 6: Run the following command to upgrade by specifying your namespace and helm release name according to the values given in the configure.sh file.
Method 2
To update MongoDB encrypted passwords, you can directly modify the values.yaml file.
Step 1: Download and untar the Infoworks Kubernetes Template, if not already present, according to the iwx-version in your existing deployment.
Step 2: If a new template was downloaded, replace the iw-k8s-installer/infoworks/values.yaml with the older file.
Step 3: Change the directory path to iw-k8s-installer directory.
Step 4: Generate the encrypted passwords as needed. To generate any encrypted string, execute the following command.
This generates your passwords in a secure encrypted format, which has to be provided in the following steps.
Step 5: Replace the following yaml keys with the new values in the infoworks/values.yaml file, if needed.
Step 6: Run the following command to upgrade by specifying your namespace and helm release name according to the installed kubernetes deployment specifications.
Updating Encrypted Passwords Stored as a Separate Secret
To update the MongoDB password:
Step 1: Run the following commands from the iw-k8s-installer directory.
Step 2: Restart all pods except the databases.
Updating the PostgresDB Credentials
Updating Encrypted Passwords Stored in values.yaml
There are two methods to update password:
Method 1
To update PostgresDB passwords that are stored in values.yaml file, with the existing configure.sh file, use the IW_DEPLOY script to populate values.yaml.
Step 1: Download and untar the Infoworks Kubernetes Template, if not already present, according to the iwx-version in your existing deployment.
Step 2: If a new template was downloaded, replace the iw-k8s-installer/configure.sh as well as iw-k8s-installer/infoworks/values.yaml with the older file.
Step 3: Change the directory path to iw-k8s-installer.
Step 4: Replace the following values with a blank string in the configure.sh file.
Step 5: Run iw_deploy.sh. Once you receive "Seems like you have already configured Infoworks once. Do you want to override? y/n Default: n", enter “Y”. This will prompt the user to provide input for the values that were blank in the previous step. The script will then replace the infoworks/values.yaml file with the updated values.
Step 6: Run the following command to upgrade by specifying your namespace and helm release name according to the values given in the configure.sh file.
Method 2
To update PostgresDB encrypted passwords, you can directly modify the values.yaml file.
Step 1: Download and untar the Infoworks Kubernetes Template, if not already present, according to the iwx-version in your existing deployment.
Step 2: If a new template was downloaded, replace the iw-k8s-installer/infoworks/values.yaml with the older file.
Step 3: Change the directory path to iw-k8s-installer.
Step 4: Generate the encrypted passwords as needed. To generate any encrypted string, execute the following command.
This generates your passwords in a secure encrypted format, which has to be provided in the following steps.
Step 5: Replace the following yaml keys with the new values in the infoworks/values.yaml file, if needed.
Step 6: Run the following command to upgrade by specifying your namespace and helm release name according to the installed kubernetes deployment specifications.
Updating Encrypted Passwords Stored as a Separate Secret
To update the PostgresDB password:
Step 1: Run the following commands from the iw-k8s-installer directory.
Step 2: Restart the orchestrator and orchestrator-scheduler pods.
Limitations
MongoDB Limitations
With HA enabled, scaling the pods from higher to lower has the following limitations:
- Pods need to be manually deleted from replication configuration.
- Disabling HA to Non-HA is not supported once HA is enabled.
Database Limitations
Applicable to PostgresDB, MongoDB, and RabbitMQ.
- PVC’s size can’t be decreased.
- Increasing a PVC’s size requires downtime.
- After downscaling pods, the extra PVCs needs to be manually deleted.
PostgresDB Limitations
In the current HA architecture, on Postgres connection disruption, airflow is unable to reconnect via new connection. Furthermore, the current Postgres proxy is too simplistic to handle connection pools. Hence, if a Postgres master goes down, all running workflows will fail.