Setting Up Postgres Service on Google Cloud
Prerequisites
Step 1: In the Google Cloud console, on the project selector page, select or create a Google Cloud project.
Step 2: Go to project selector.
Step 3: Make sure that billing is enabled for your Cloud project. Learn how to check if billing is enabled on a project.
Step 4: Install the Google Cloud CLI.
Step 5: To initialize the gcloud CLI, run the following command:
xxxxxxxxxxgcloud initStep 6: Make sure you have the Cloud SQL Admin and Compute Viewer roles on your user account.
Step 7: Go to the IAM page to learn more about roles and permissions.
PostgreSQL Database
Cloud SQL for PostgreSQL instance is a managed service that you use to run, manage, and scale highly available PostgreSQL databases in the cloud. To set up Postgres Database, refer to the official GCP Documentation.
Setup Postgres
Step 1: To set up Postgres, navigate to Google Cloud Console, search for SQL for SQL instances, and click it.
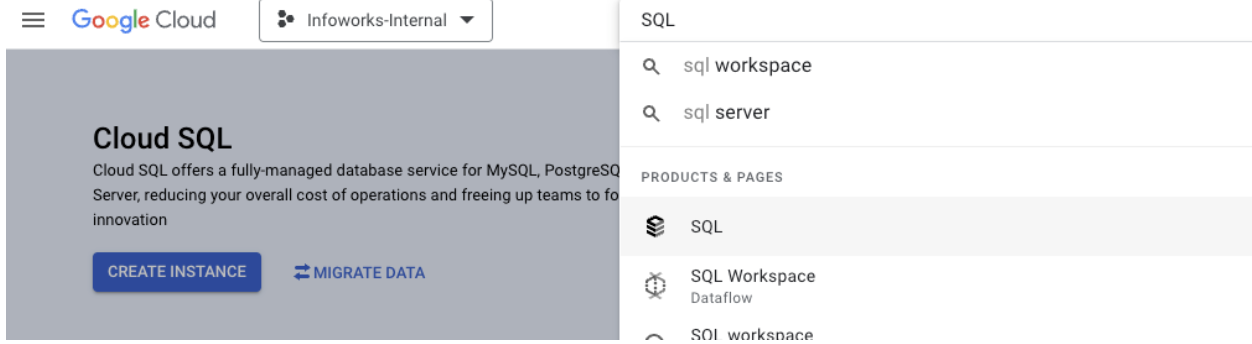
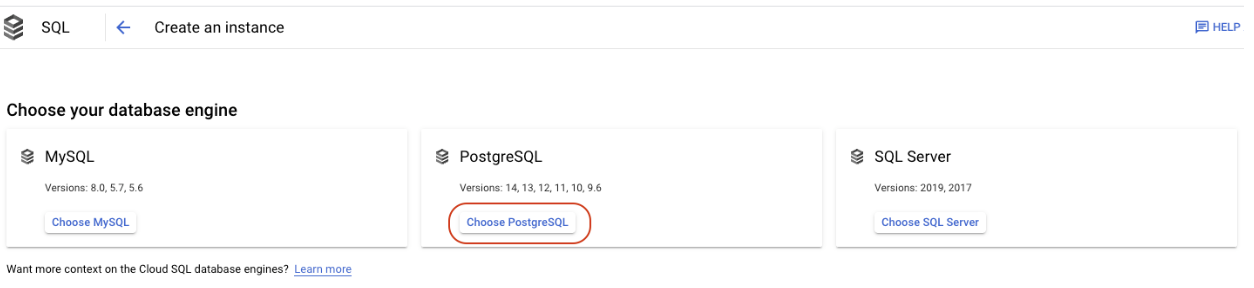
Step 2: Click Create, Choose PostgreSQL.
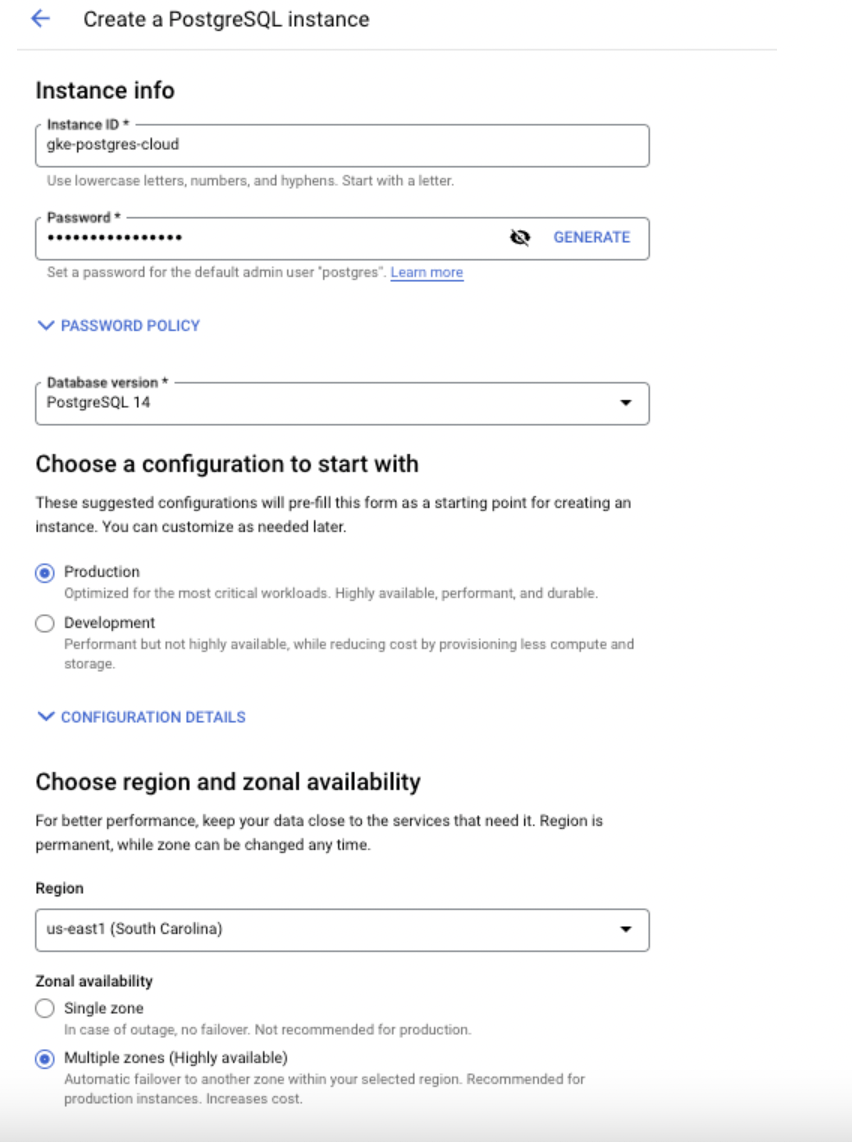
The top section provides basic information about your Postgres database
Step 3: Enter the required details for the following mandatory fields.
- Instance ID
- Password
- PostgreSQL Database Version
- Region and Zone
| Name | Description |
|---|---|
| Instance ID | In the Instance ID field of the Instance info pane, enter an ID for your instance. Don't include sensitive or personally identifiable information in your instance name; it's externally visible. |
| Password | Enter a password for the postgres user. To see the password in clear text, click the Show password icon.You can either enter the password manually or click Generate to have Cloud SQL create a password for you automatically. |
| PostgreSQL Database Version | Select the database version for your instance: PostgreSQL 14 (default), PostgreSQL 13. The database version can't be edited after the instance has been created. |
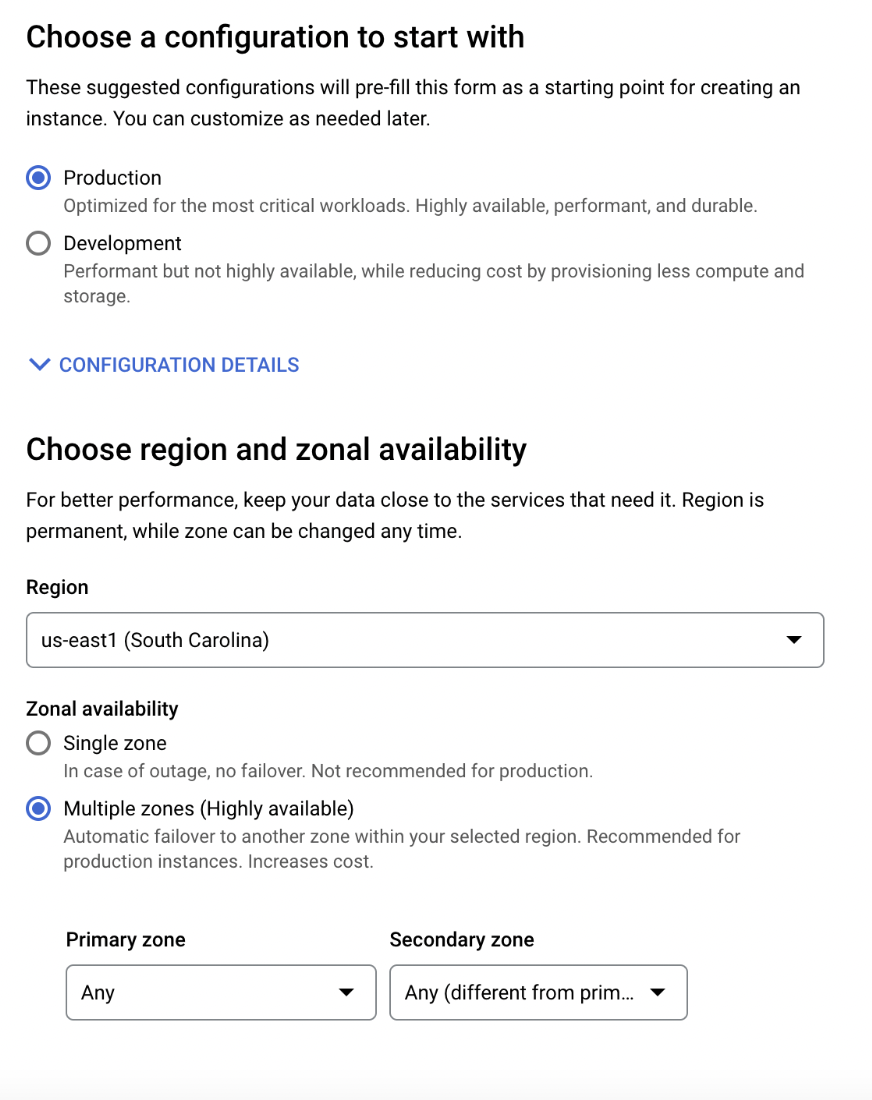
| Region and Zone | In the Choose region and zonal availability section, select the region and zone for your instance. Place your instance in the same region as the resources that access it. The region you select can't be modified in the future. In most cases, you don't need to specify a zone. If you are configuring your instance for high availability, you can select both a primary and secondary zone. |
Customize Instance
In the Customize your instance section, update the settings for your instance. Begin by clicking SHOW CONFIGURATION OPTIONS to display the groups of settings. Then, expand desired groups to review and customize settings. A Summary of all the options you select is shown on the right. Customizing these instance settings is optional. Defaults are assigned in every case where no customizations are made.
This section provides customization information about your Postgres database.
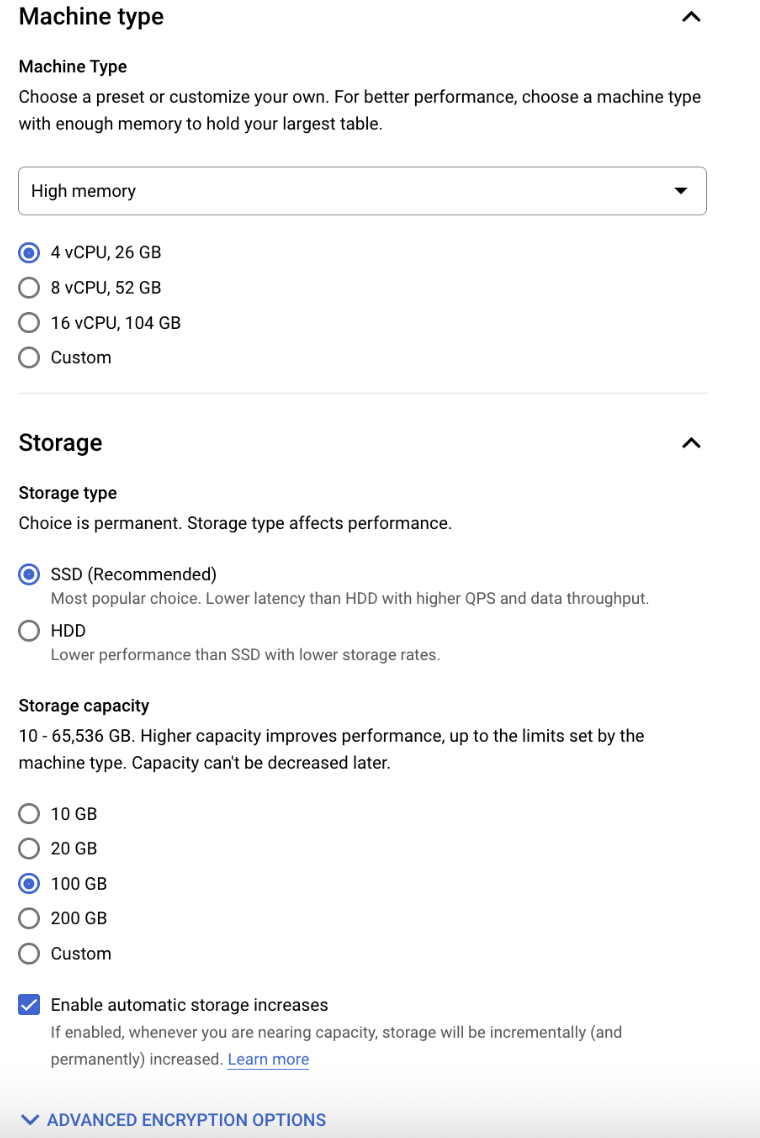
Step 4: Enter the required details for the following fields.
- Machine Type
- Storage
- Connections
- DataProtection
- Maintenance
- Flags (Optional)
- Query Insights (Optional)
- Labels (Optional)
| Name | Description |
|---|---|
| Machine Type | Select from Shared core, Lightweight, Standard (Most common), or High memory. Each machine type is classified by the number of CPUs (cores) and amount of memory for your instance. |
| Storage | Determines whether your instance uses SSD or HDD storage. The amount of storage provisioned for the instance. Note: Select a minimum of 20 GB with the SSD option and enable the automatic storage increase option for Cloud SQL automatically provides more storage for your instance when free space runs low. |
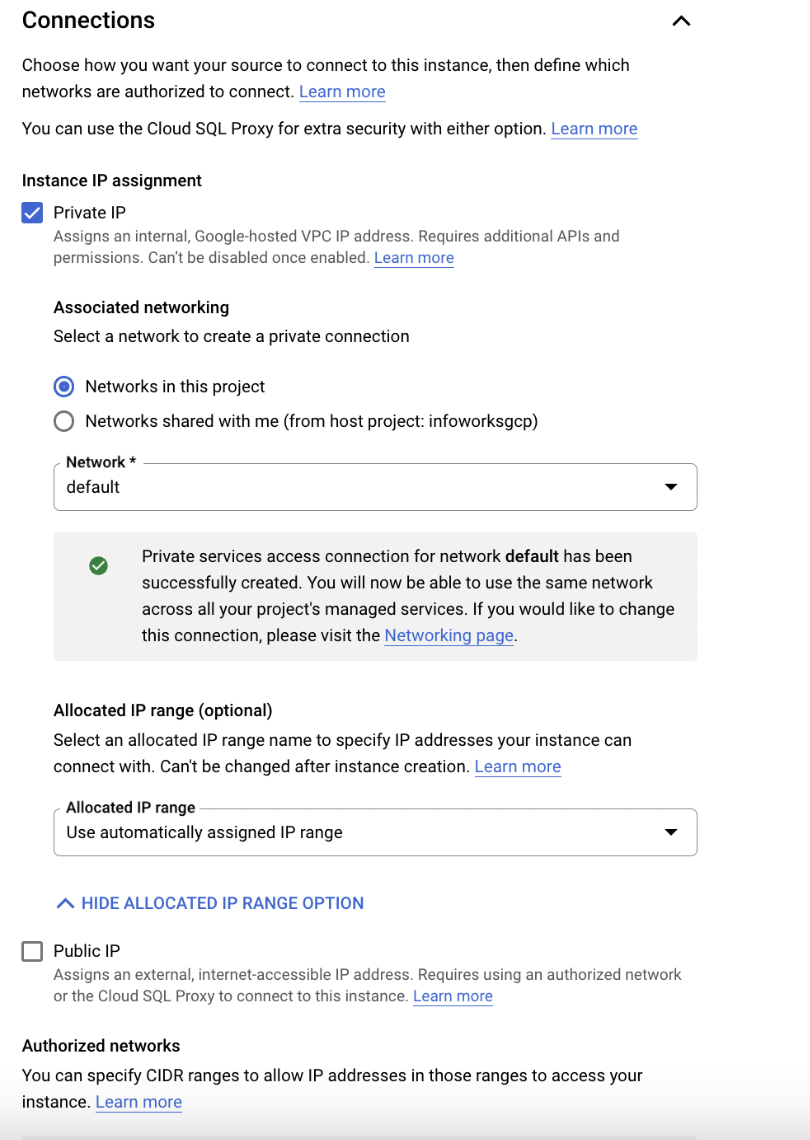
| Connections | Adds a private IP address for your instance. To enable connecting to the instance, additional configuration is required. Optionally, you can specify an allocated IP range for your instances to use for connections. Your instance can have both a public and a private IP address. Infoworks recommends setting up a private IP address.
|
| DataProtection | This field is about protecting data using automated schedule backups, enable point-in time recovery and delete protection of instance from any accidental deletion. This field is optional to Infoworks. |
| Maintenance | Determines a one-hour window when Cloud SQL can perform disruptive maintenance on your instance. If you do not set the window, then disruptive maintenance can be done at any time. This field is optional to Infoworks. |
| Flags | You can use database flags to control settings and parameters for your instance. Learn more. This field is optional to Infoworks. |
| Query Insights | Query insights helps you detect and diagnose performance issues in your instance by examining queries using both historical and near real-time data. This field is optional to Infoworks. |
| Labels | Add a key and value for each label that you add. You use labels to help organize your instances. This field is optional to Infoworks. |
Enter the Machine Type details
Enter the Network Connections details
Enter the Data Protection and Maintenance details

Click Create Instance.
High Availability
High Availability makes sure that the database service is always available and connectivity remains intact even in a scenario where one instance of the database is down or unavailable.
Infoworks recommends enabling High Availability to avoid downtime in case of an outage on the Postgres Machines.
Enabling High Availability
Enabling High Availability for a New Instance
Step 1: To enable High Availability for a new instance of PostgreSQL, navigate to Google Cloud Console, search for SQL, Create Instance, and choose PostgreSQL.
Step 2: Under the Configuration tab, Select Production.
Step 3: Under region and zonal availability, Enable Multiple Zones (highly available).
Enabling High Availability for an Existing Instance
Step 1: To enable High Availability for an existing instance of PostgreSQL, open an existing Postgres instance from the Google Cloud Console.
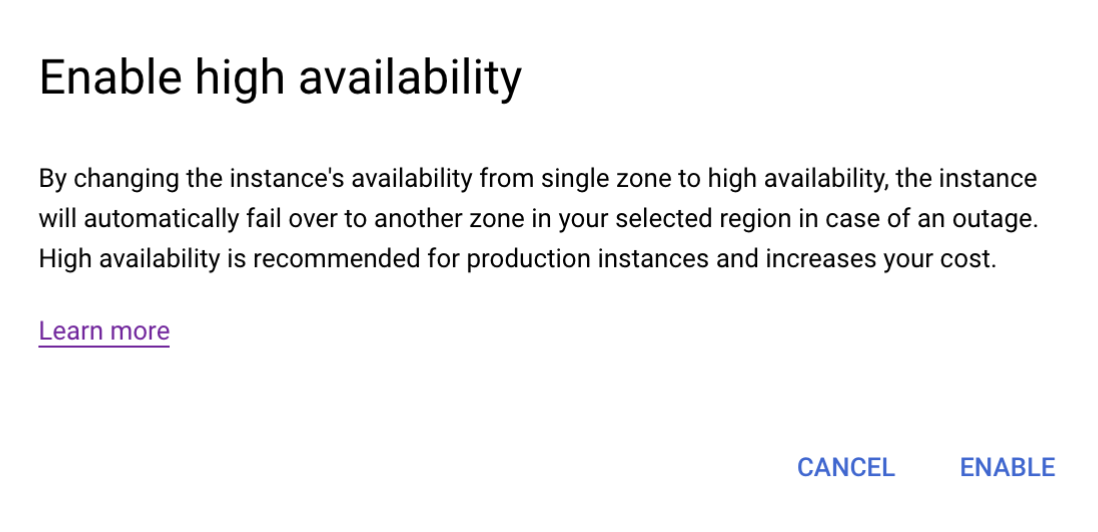
Step 2: Click ADD to enable High Availability.

Step 3: Select Enable High Availability.
User Permissions
For Infoworks to use Postgres PaaS, considering the variables set during the installation, the given Postgres user (set in POSTGRESDB_USERNAME) needs to have the LOGIN Role. It must also have all privileges on a given database (set in INFOWORKS_POSTGRESDB_DATABASE_NAME). For more information, refer to (Link Removed).
To set the privileges:
xxxxxxxxxxCREATE USER <POSTGRESDB_USERNAME>;GRANT ALL PRIVILEGES ON DATABASE <INFOWORKS_POSTGRESDB_DATABASE_NAME> TO <POSTGRESDB_USERNAME>;Verifying Connection from PostgresDB to Infoworks
Verify that applications can access the PostgreSQL DB from Infoworks AKS cluster.
Use the following procedure as a reference only.
Step 1: Log in to your Bastion host where Kubernetes cluster is accessible.
Step 2: Create a pod with PostgreSQL image in the respective namespace.
xxxxxxxxxxkubectl run postgres --image postgres --restart=Never --namespace <namespace> sleep 3000Step 3: Run the exec command to run bash command inside the pod.
xxxxxxxxxxkubectl exec -it postgres --namespace <namespace> -- bashStep 4: Get the connection string from PostgreSQL DB. For example, consider the below given command.
root@postgres:/# psql --host <postgres-db-name>.postgres.database.azure.com --port 5432 --username <username> --dbname <database_name>Step 5: Provide the password.
xxxxxxxxxxPassword for user <username>:psql (15.1 (Debian 15.1-1.pgdg110+1), server 13.7)SSL connection (protocol: TLSv1.3, cipher: TLS_AES_256_GCM_SHA384, compression: off)Type "help" for help. postgres=>The PostgreSQL DB and Infoworks are successfully connected. In case of any errors, refer to official Postgres Documentation.
Step 6: Once the connection between Postgres and Infoworks is successful. If you wish to delete Postgres pod, execute the following command.
xxxxxxxxxxkubectl delete pods postgres --namespace <namespace>PostgresDB PaaS Backup and Restore
PostgresDB Backup and Restore are necessary steps to support rollback, since the airflow engine specific to the Infoworks Version has been upgraded. Therefore, the PostgresDB data gets upgraded to support the newer Airflow version, leaving the data incompatible with the older versioned Airflow and by association Infoworks.
Backup
PostgresDB backup may either be saved as Azure supported scheduled backup or through the pg_dump binary.
First Method: Using GCP-provided Backup Options
Azure provides an automated, scheduled backup option with a defined retention period. For more information, refer to GCP Cloud SQL automated/on-demand backup solution.
However, this method has the following limitations:
- This option takes a backup of the entire Server and not only of a specific Database inside the project.
Second Method: Using pg_dump commands for Backup
To avoid the limitations of the Cloud-based approach, Postgres data backup can be done through the following pod template, which uses the pg_dump command to backup Postgres data.
Step 1: It is assumed that the environment variable IW_HOME is set to /opt/infoworks, which is the path where your current 5.4.0 charts are stored. In case it is not set, execute the following command:
xxxxxxxxxxexport IW_HOME=/opt/infoworksStep 2: Export the following Environment Variables.
xxxxxxxxxxexport IW_NAMESPACE="<your-infoworks-kubernetes-namespace>"export POSTGRESDB_HOSTNAME="<postgres-host>"export POSTGRESDB_USERNAME="<postgres-user>"export POSTGRES_PLAINTEXT_PASSWORD="<postgres-plaintext-password>"export INFOWORKS_POSTGRESDB_DATABASE_NAME="<postgres-database>"For more details, refer to the (Link Removed) section.
Step 3: Create a directory to store the database backup dump using the below command
xxxxxxxxxxmkdir -p ${IW_HOME}/postgres_backupcd ${IW_HOME}Step 4: Clear any existing pods with the same name.
xxxxxxxxxxkubectl -n ${IW_NAMESPACE} delete po postgres-backupStep 5: Run the commands to create the required pod on the same namespace as the Kubernetes installation.
xxxxxxxxxxkubectl apply -f - <<EOFapiVersion: v1kind: Podmetadata: name: postgres-backup namespace: ${IW_NAMESPACE}spec: containers: - name: postgres-backup env: - name: IW_NAMESPACE value: "${IW_NAMESPACE}" - name: POSTGRESDB_HOSTNAME value: "${POSTGRESDB_HOSTNAME}" - name: POSTGRESDB_USERNAME value: "${POSTGRESDB_USERNAME}" - name: POSTGRES_PLAINTEXT_PASSWORD value: "${POSTGRES_PLAINTEXT_PASSWORD}" - name: INFOWORKS_POSTGRESDB_DATABASE_NAME value: "${INFOWORKS_POSTGRESDB_DATABASE_NAME}" image: us-central1-docker.pkg.dev/iw-gcp-eng-dev/iwx-devops/infoworks-postgres-utils:psql-15 imagePullPolicy: Always command: [ "/bin/bash", "-c", "--" ] args: [ "/opt/infoworks/scripts/postgres_backup_and_restore.sh -d" ] restartPolicy: NeverEOFStep 6: Once the postgres-backup is up, run the following command to get logs
xxxxxxxxxxkubectl -n $IW_NAMESPACE logs postgres-backup -fAfter some time, you will receive the following message on your command prompt.
Taking Dump of PostgresTaking Postgres Dump - Enter the Parameters of the source PostgresDB ServerPG Data Dumped to postgres_backup/pg_dump_data.sqlRun kubectl -n aks-upgrade-540 cp postgres-backup:postgres_backup/pg_dump_data.sql postgres_backup/pg_dump_data.sql to copy to your localStep 7: Copy the generated artifacts to your machine.
xxxxxxxxxxdate_time=$(date "+%Y_%m_%d_%H_%M_%S") kubectl -n ${IW_NAMESPACE} cp postgres-backup:postgres_backup/pg_dump_data.sql postgres_backup/pg_dump_data.sql cp postgres_backup/pg_dump_data.sql postgres_backup/pg_dump_data_${date_time}.sqlThis should create the following files in the directory postgres _backup, $(date -I) being the current timestamp. To view the list of directories, execute the following command:
xxxxxxxxxxls postgres_backupxxxxxxxxxxpg_dump_data.sql pg_dump_data-${date_time}.sqlKeep these files safe for backup later.
Restore
PostgresDB Restore is a necessary step to support rollback since the airflow engine specific to the Infoworks version has been upgraded. Therefore, the PostgresDB data gets upgraded to support the newer Airflow version, leaving the data incompatible with the older versioned Airflow and by association Infoworks.
PostgresDB backup may either be restored through the cloud-supported scheduled backup or manually restoring the data, as picked by the user during Backup#backup.
First Method: Using GCP-provided Backup Options
GCP Cloud SQL provides an automated/on-demand backup solution. For more information, refer to Restoring an instance from a backup for Cloud SQL on GCP.
- This option takes a backup of the entire Server and not only of a specific Database inside the project.
Second Method: Using PSQL commands for Restore
To avoid the limitations of the Cloud-based approach, postgres data restore can be done through the following pod template, which uses the PSQL command to restore Postgres data.
Step 1: It is assumed that the environment variable IW_HOME is set to /opt/infoworks, which is the path where your current 5.4.0 charts are stored. In case it is not set, execute the following command
xxxxxxxxxxexport IW_HOME=/opt/infoworksStep 2: Export the following environment variables.
xxxxxxxxxxexport IW_NAMESPACE="<your-infoworks-kubernetes-namespace>"export POSTGRESDB_HOSTNAME="<postgres-host>"export POSTGRESDB_USERNAME="<postgres-user>"export POSTGRES_PLAINTEXT_PASSWORD="<postgres-plaintext-password>"export INFOWORKS_POSTGRESDB_DATABASE_NAME="<postgres-database>"For more details regarding the above mentioned commands, refer to Infoworks Installation on Google Kubernetes Engine (GKE).
It is recommended to take a backup of the current PostgresDB, by exporting the following variable. This requires the given user to have permission to create a new database. The pod will fail in case the backup fails, therefore do not export it to skip the backup.
This will attempt to DROP the given $INFOWORKS_POSTGRESDB_BACKUP_DATABASE_NAME to create a new one.
xxxxxxxxxxexport INFOWORKS_POSTGRESDB_BACKUP_DATABASE_NAME="<postgres-backup-database>"Step 3: Switch to the directory where PostgresDB backups were stored.
xxxxxxxxxxcd ${IW_HOME}Step 4: Clear any existing pods with the same name.
xxxxxxxxxxkubectl -n ${IW_NAMESPACE} delete po postgres-backupStep 5: Run the commands to create the required pod on the same namespace as the Kubernetes installation.
xxxxxxxxxxkubectl apply -f - <<EOFapiVersion: v1kind: Podmetadata: name: postgres-backup namespace: ${IW_NAMESPACE}spec: containers: - name: postgres-backup env: - name: IW_NAMESPACE value: "${IW_NAMESPACE}" - name: POSTGRESDB_HOSTNAME value: "${POSTGRESDB_HOSTNAME}" - name: POSTGRESDB_USERNAME value: "${POSTGRESDB_USERNAME}" - name: POSTGRES_PLAINTEXT_PASSWORD value: "${POSTGRES_PLAINTEXT_PASSWORD}" - name: INFOWORKS_POSTGRESDB_DATABASE_NAME value: "${INFOWORKS_POSTGRESDB_DATABASE_NAME}" - name: INFOWORKS_POSTGRESDB_BACKUP_DATABASE_NAME value: "${INFOWORKS_POSTGRESDB_BACKUP_DATABASE_NAME}" image: us-central1-docker.pkg.dev/iw-gcp-eng-dev/iwx-devops/infoworks-postgres-utils:psql-15 imagePullPolicy: Always command: [ "/bin/bash", "-c", "--" ] args: [ "/opt/infoworks/scripts/postgres_backup_and_restore.sh -r" ] restartPolicy: NeverEOFStep 6: Once the pod is running, run the following command to copy the backup to the pod.
xxxxxxxxxxkubectl -n ${IW_NAMESPACE} cp postgres_backup/pg_dump_data.sql postgres-backup:postgres_backup/pg_dump_data.sqlAfter copying the above file, the restore script will automatically restore from the backup files supplied.