Introduction
Infoworks automates onboarding data directly to Snowflake and supports data transformation and orchestration in Snowflake. To onboard data directly to Snowflake, you should configure a Snowflake environment that includes cloud storage and one or more Spark clusters. Cloud storage is used temporarily to stage data during ingestion and to store sample data.
Prerequisites
Ensure that the Snowflake database user has an active Snowflake account.
Ensure that the Snowflake database user has the following privileges. These privileges apply to the Snowflake tables.
User-Managed table: SELECT, INSERT, UPDATE, TRUNCATE, DELETE, and ALTER (if sync schema is enabled)
Infoworks-Managed table: OWNERSHIP
Ensure that the Snowflake database user has the following privileges. These privileges apply to the Snowflake schema.
User-Managed table (Target Schema): No additional permissions.
User-Managed table (Staging Schema): CREATE TABLE
Infoworks-Managed table (Target Schema): CREATE TABLE
Infoworks-Managed table (Staging Schema): CREATE TABLE
Infoworks requires access to an existing database on snowflake accounts which are configured with Infoworks to calculate billing information, By default, public database is used. No data will be stored under this database, this is needed for querying purpose only.
In case you are unable to create public database, configure an alternative database using
snowflake_billing_default_databaseconfig.Database name should not contain #.
Procedure
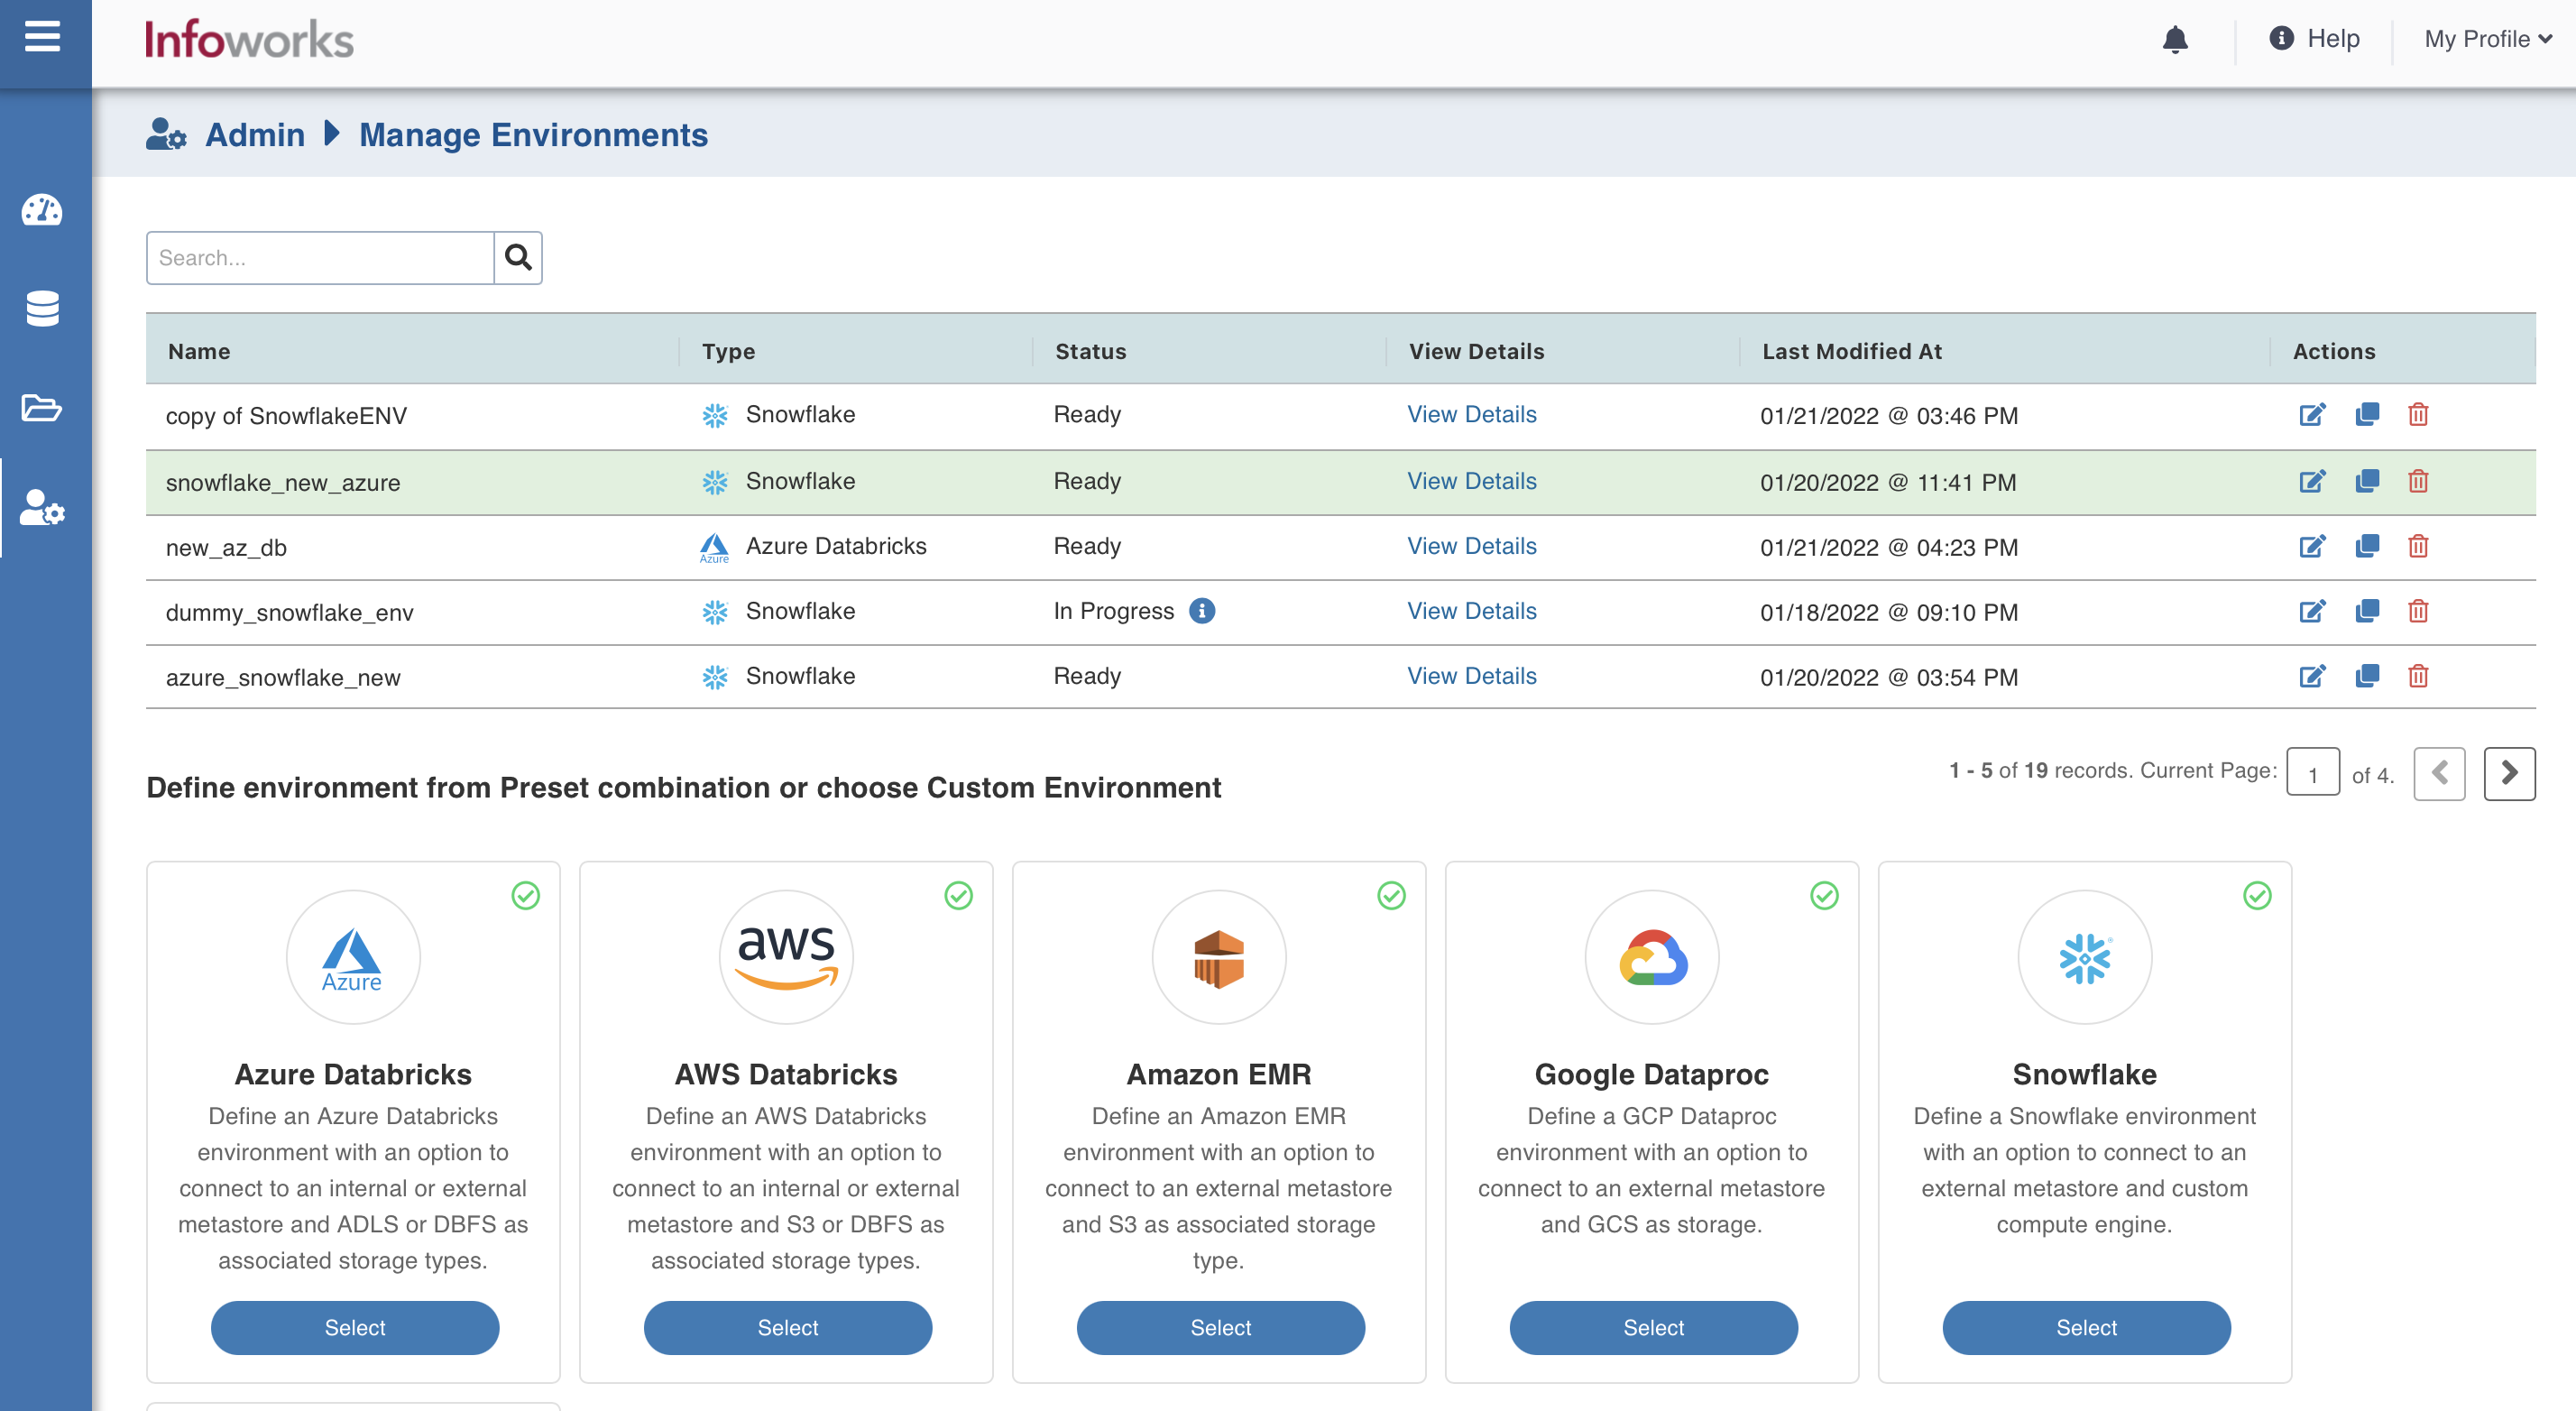
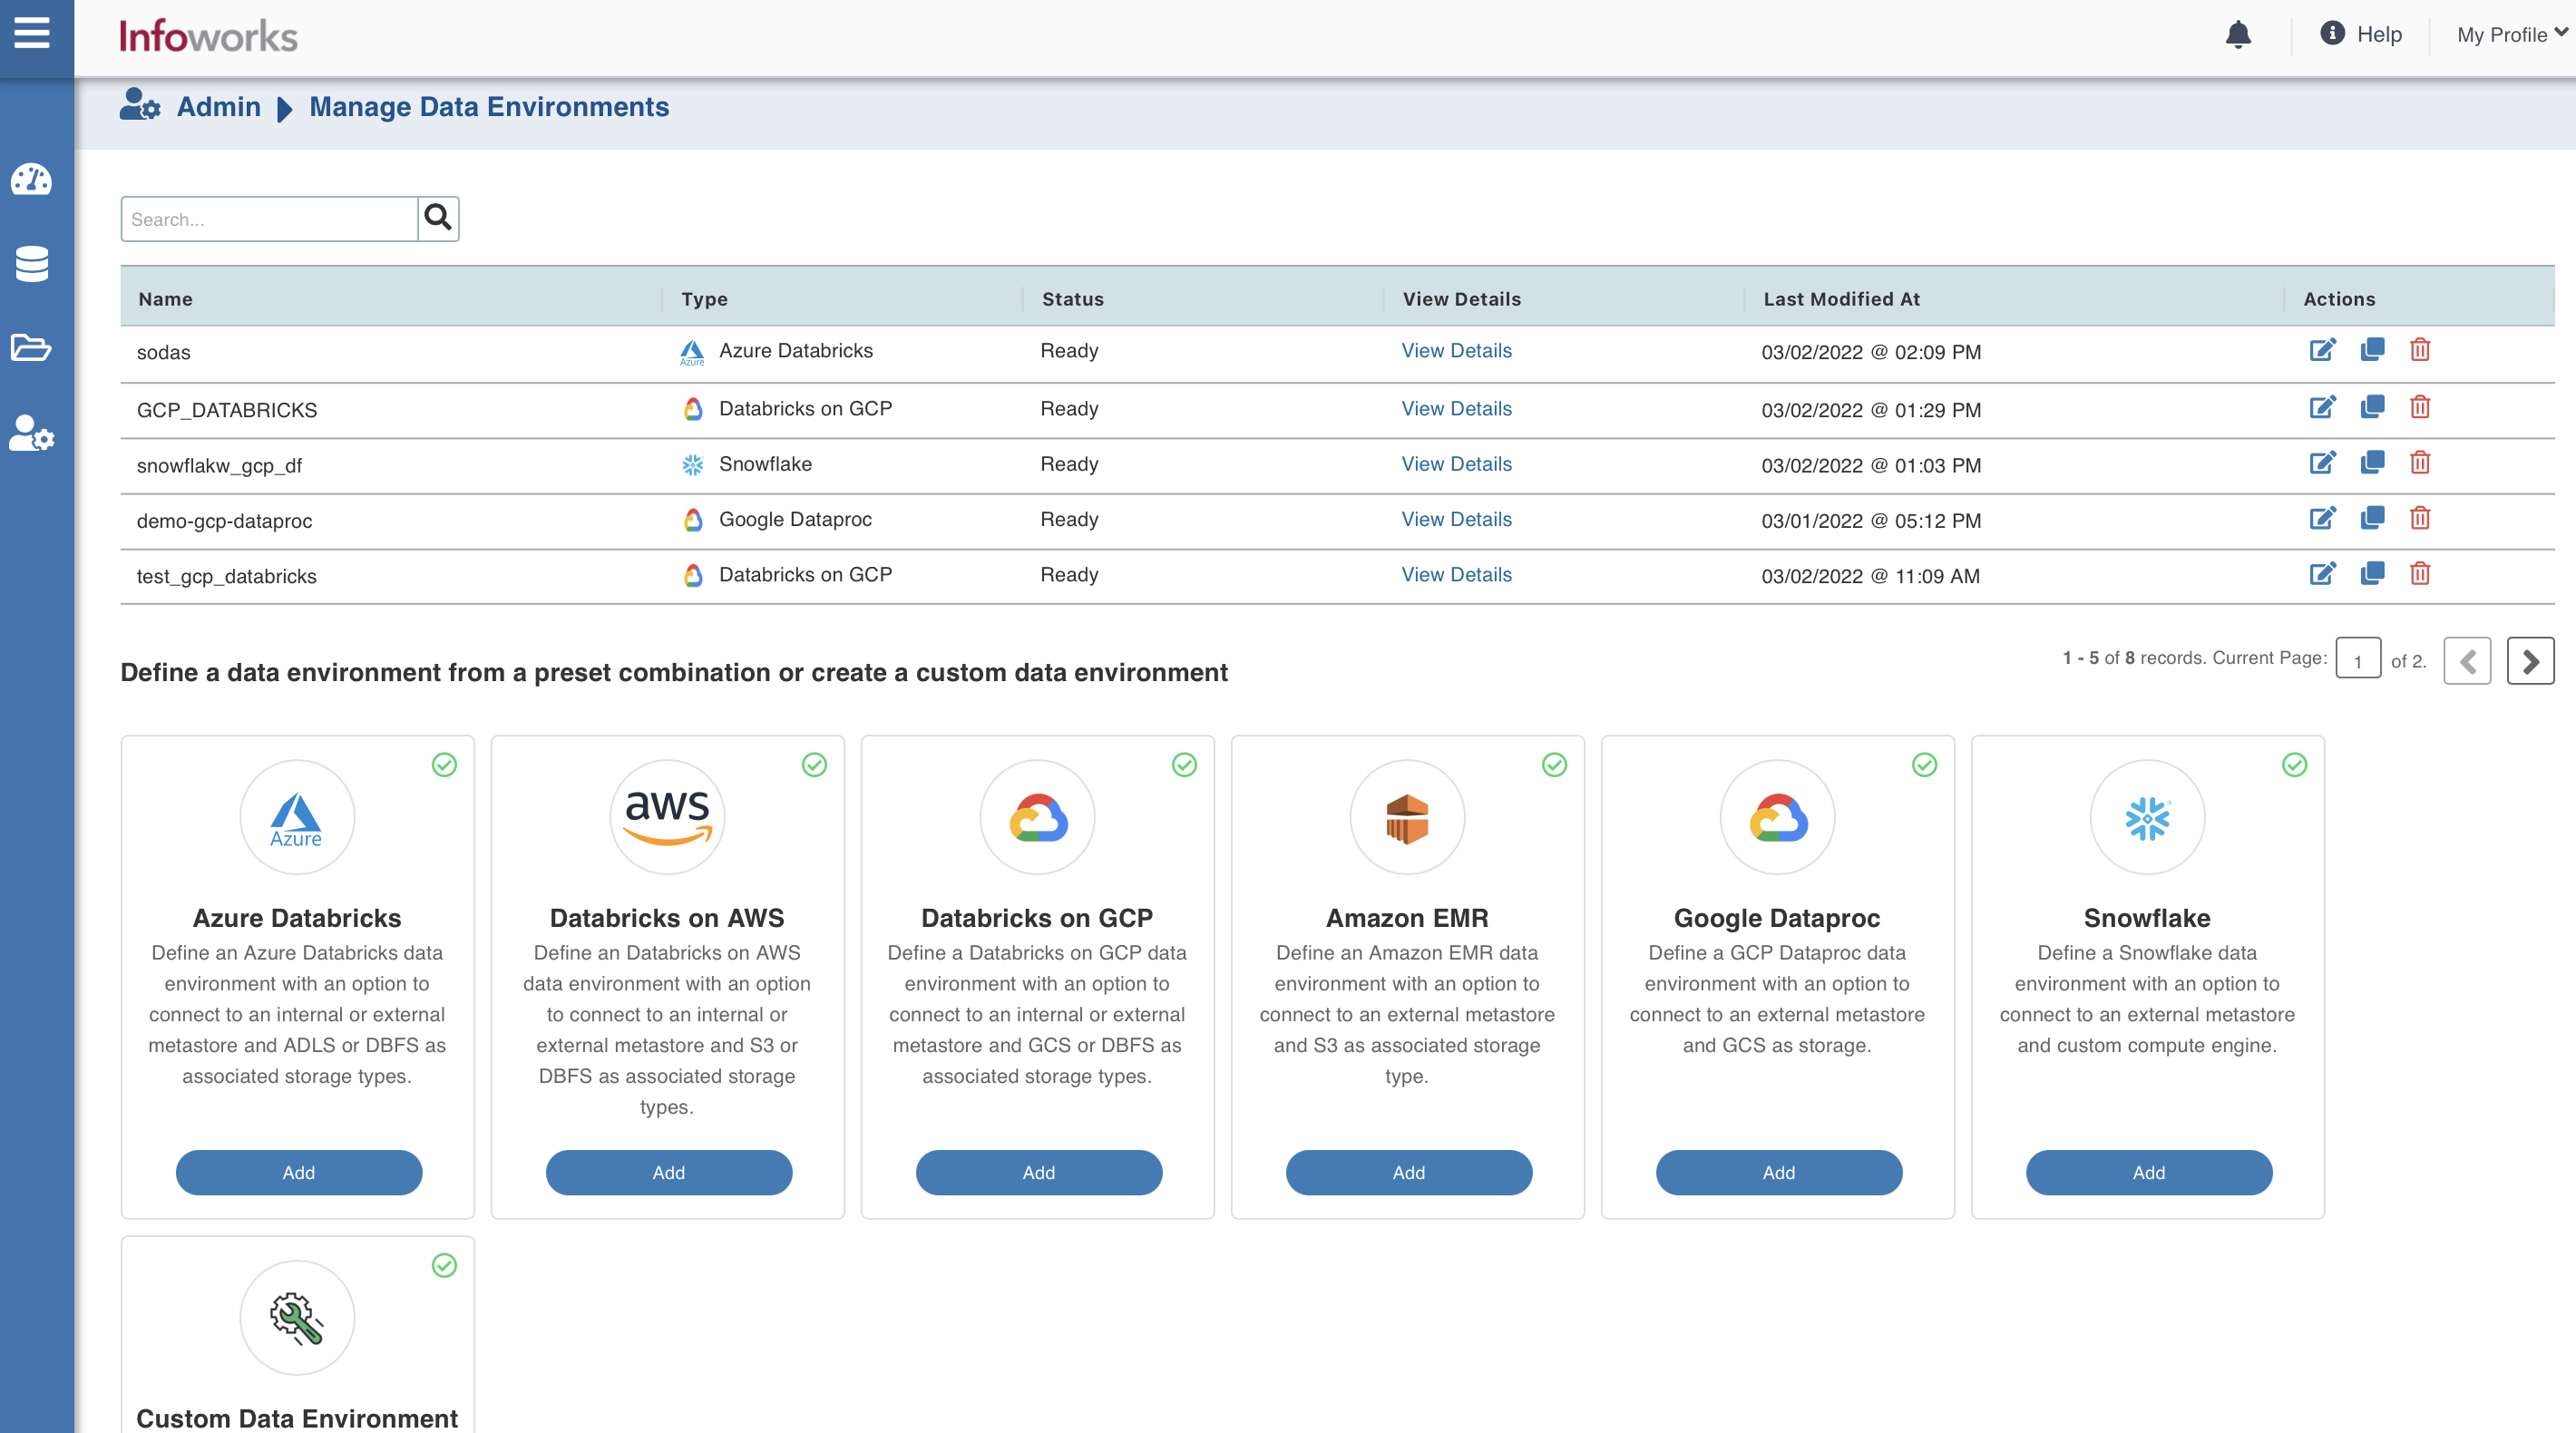
To configure and connect to the required Amazon EMR instance, navigate to Admin > Manage Data Environments, and then click Add button under the Snowflake option.
The following window appears:
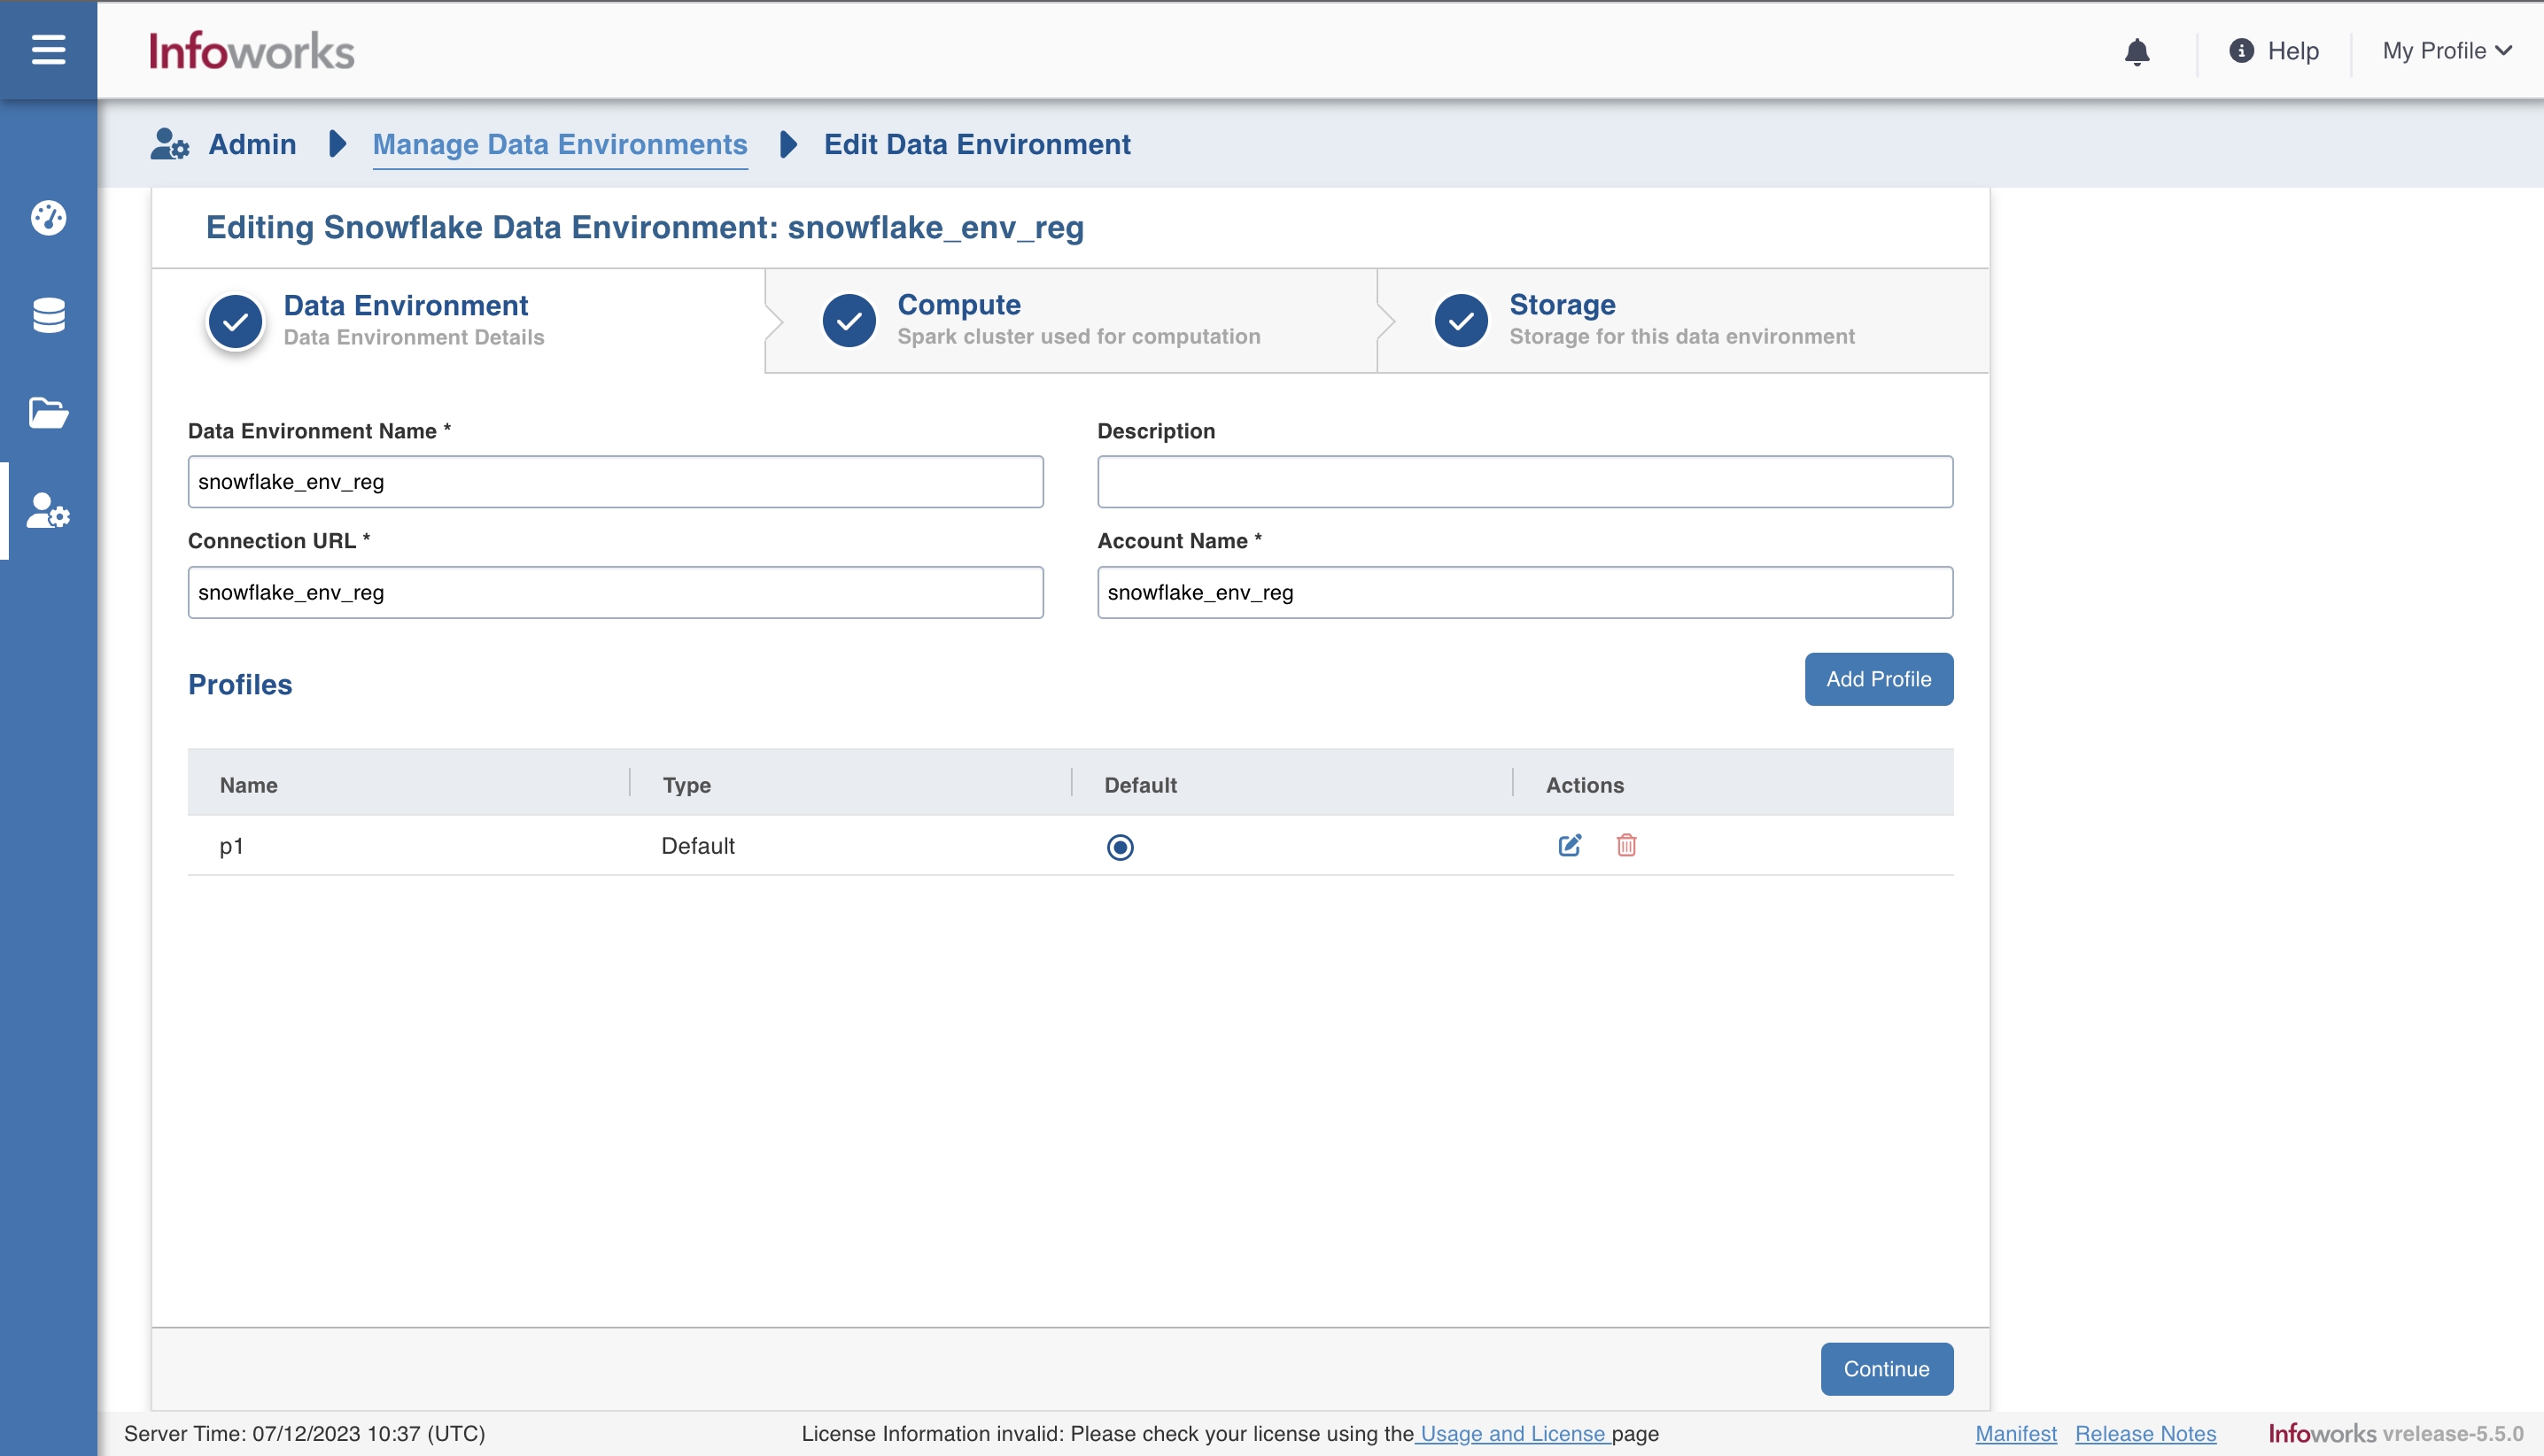
There are three tabs to be configured as follows:
Data Environment
To configure the data environment details, enter values in the following fields. This defines the environmental parameters, to allow Infoworks to be configured to the required Snowflake instance:
Field | Description | Details |
|---|---|---|
Data Environment Name | Environment defines where and how your data will be stored and accessed. Environment name must help the user to identify the environment being configured. | User-defined. Provide a meaningful name for the environment being configured. |
Description | Description for the environment being configured. | User-defined. Provide required description for the environment being configured. |
Connection URL | URL of the Snowflake account. | User-defined. Provide the required Snowflake account URL. |
Account Name | Name of Snowflake account. | Provide the required Snowflake account name. |
Field | Description | Details |
|---|---|---|
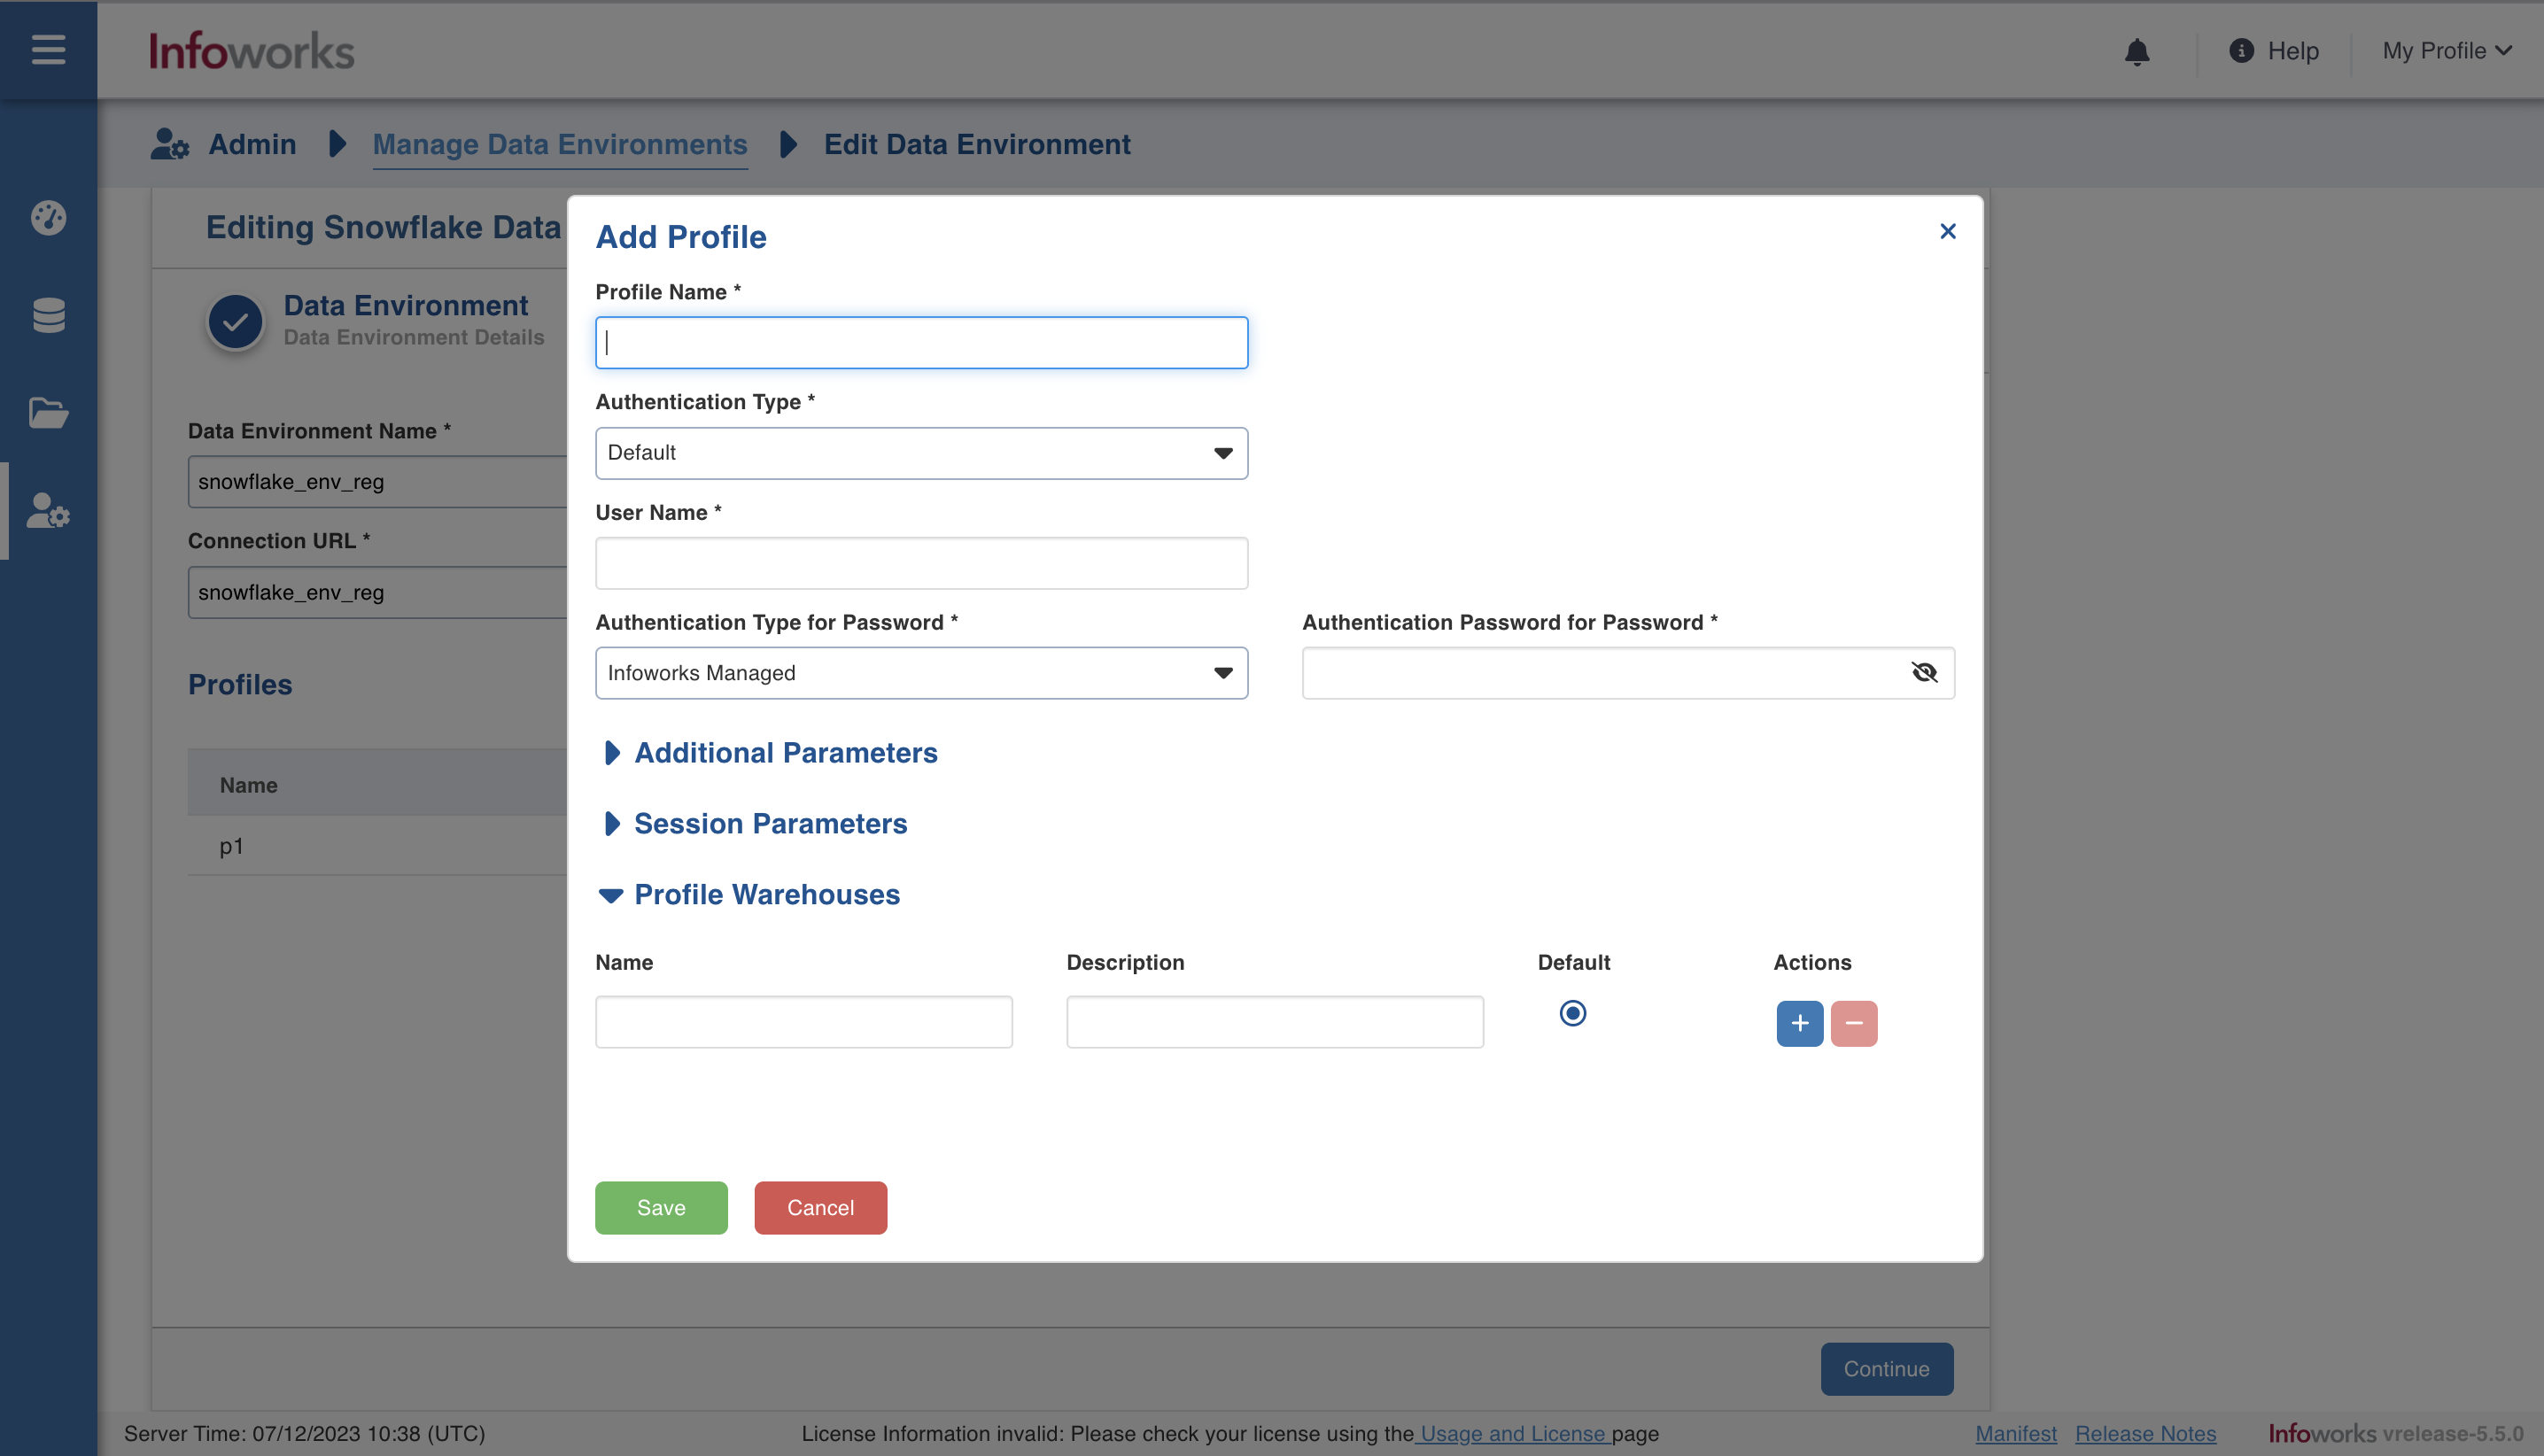
Profile Name | Unique Name to identify the profile. | This is a mandatory field. |
Authentication Type | Select the type of authentication. | This is a mandatory field. In the dropdown, select Default or OAuth. |
Username | Username of Snowflake account | Provide user's Snowflake username required to connect to Snowflake. This field appears only when the Authentication type is Default. |
Password | Password of Snowflake account | Provide user's Snowflake password required to connect to Snowflake. This field appears only when the Authentication type is Default. |
OAuth Service | Infoworks supports OAuth service provided by Snowflake and Azure AD as external authorization provider | Select the required OAuth service. Choose from Snowflake or Azure Ad. |
Client ID | In Azure AD: This is the ID for the application registered as Snowflake Client in Azure AD. In Snowflake: This is the public identifier for the security integration created in Snowflake. | Provide the application id as applicable. |
Client Secret | In Azure AD: The confidential secret for the application registered as Snowflake Client in Azure AD. In Snowflake: The confidential secret to connect to the Snowflake account. | Provide the secret corresponding to the client ID above. |
Scope | A scope is a way to limit the permitted actions to a particular set of resources as part of a role assignment. | Provide the scope as defined in Azure AD. This field appears when the OAuth Type selected is Azure AD |
Token End Point URL | End point to invoke for getting access token from the Azure AD. | Provide the end point url. |
Refresh Token | If included in the authorization URL, Snowflake presents the user with the option to consent to offline access. In this context, offline access refers to allowing the client to refresh access tokens when the user is not present. With user consent, the authorization server returns a refresh token in addition to an access token when redeeming the authorization code. | Provide a refresh token |
Section: Additional Parameters | Click the Add button to provide the parameters in key-value pair. | Provide additional parameters required to connect to Snowflake. It is non mandatory. |
Section: Session Parameters | Click the Add button to provide the parameters in key-value pair. | Provide session parameters required to connect to Snowflake. It is non mandatory. |
Warehouses | Click the icon to add the name and description of the warehouse(s). | This field is mandatory. More than one warehouse can be added, and one among then can be set as default. |
After entering all the required values, click Continue to move to the Compute tab.
Compute
A Compute template is the infrastructure used to execute a job. This compute infrastructure requires access to the metastore and storage that needs to be processed. To configure the compute details, enter values in the following fields. This defines the compute template parameters, to allow Infoworks to be configured to the required Snowflake instance.
You can select one of the clusters as the default cluster for running the jobs. However, this can be overwritten at job individual job level.
Infoworks supports creating multiple persistent clusters in an Snowflake environment, by clicking on Add Compute button.
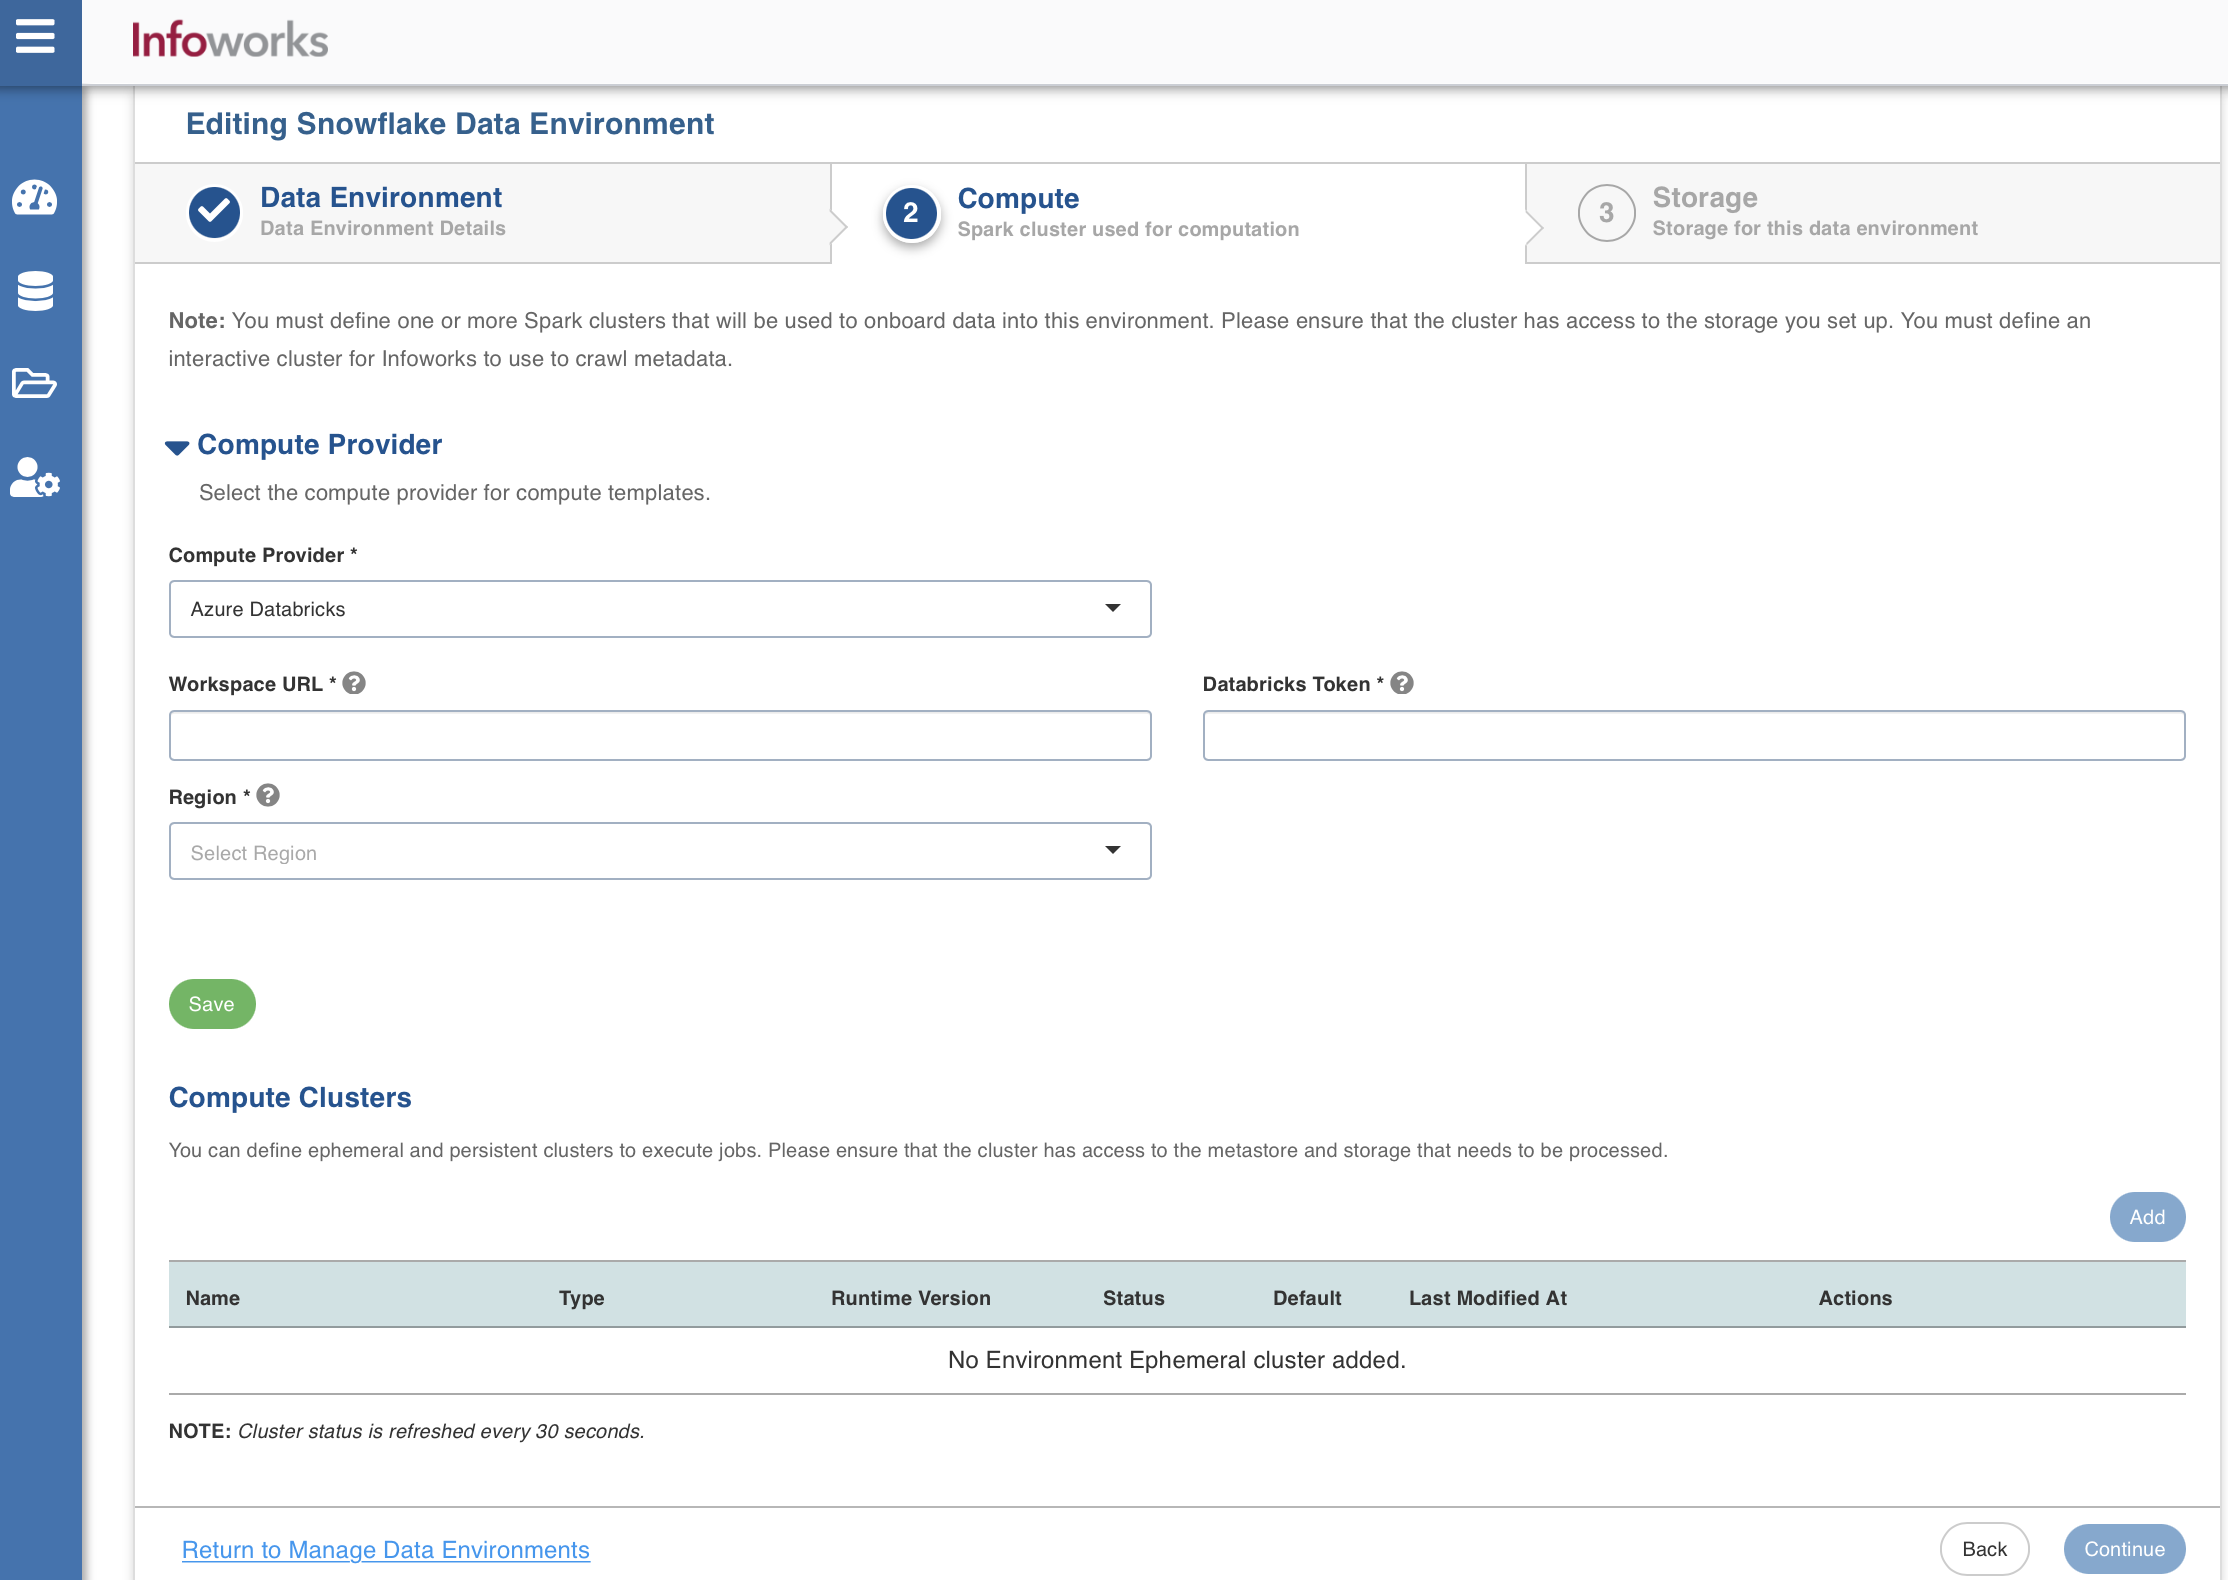
Enter the fields in the Compute section:
Field | Description | Details |
|---|---|---|
Compute Provider | ||
Compute Provider | The type of compute provider required for creating compute templates | Choose from the available options: Azure Databricks, Databricks on AWS, and Databricks on GCP |
Workspace Url | URL of the workspace that Infoworks must be attached to. | Provide the required workspace URL. |
Databricks Token | Databricks access token of the user who uses Infoworks. | Provide the required Databricks token. |
Region | Geographical location where you can host your resources. | Provide the required region. For example: East US. |
Compute Clusters | ||
Cluster Type | The type of compute cluster that you want to launch. | Choose from the available options: Persistent or Ephemeral. Jobs can be submitted on both Ephemeral as well as Persistent clusters. |
Name | Name required for the compute template that you want to use for the jobs. | User-defined. Provide a meaningful name for the compute template being configured. |
Description | Description required for the compute template. | User-defined. Provide required description for the compute template being configured. |
Runtime Version | Select the Runtime version of the compute cluster that is being used. | Select the Runtime version as 9.1 from the drop-down for Snowflake. If you have selected Azure Databricks from the Compute Provider dropdown, the following versions will appear from the Runtime Version dropdown: 9.1, 11.3, and 11.3_photon_enabled. You can select either of them. If you have selected either Databricks on AWS or Databricks on GCP from the Compute Provider dropdown, then 9.1 version will appear from the Runtime Version dropdown. |
Region | Geographical location where you can host your resources. | Provide the required region. For example: East US. |
Workspace URL | URL of the workspace that Infoworks must be attached to. | Provide the required workspace URL. |
Databricks Token | Databricks access token of the user who uses Infoworks. | Provide the required Databricks token. |
Allow single node instance | Option to run single node clusters. | A single node cluster is a cluster consisting of an apache spark driver and no spark workers. |
Use Instance Pool | Option to use a set of idle instances which optimizes cluster start and auto-scaling times. | If Use Instance pool check box is checked, provide the ID of the created instance pool in the additional field that appears. |
Worker Type | Worker type configured in the edge node. | This field appears only if Use Instance pool check box is unchecked. Provide the required worker type. For example: Standard_L4 |
Driver Type | Driver type configured in the edge node. | This field appears only if Use Instance pool check box is unchecked. Provide the required driver type. For example: Standard_L8 |
Max Allowed Worker Nodes | Maximum number of worker instances allowed. | Provide the maximum allowed limit of worker instances. |
Enable Autoscale | Option for the instances in the pool to dynamically acquire additional disk space when they are running low on disk space. | Select this option to enable autoscaling. |
Default Min Workers | Minimum number of workers that workspace maintains. | This field appears only if Enable Autoscale check box is checked. |
Default Max Workers | Maximum number of workers that workspace maintains. | This field appears only if Enable Autoscale check box is checked. This must be greater than or equal to Default Min Worker value. |
Number of Worker Nodes | Number of workers configured for availability. | This field appears only if Enable Autoscale check box is unchecked. |
Terminate after minutes of inactivity | Number of minutes after inactivity which the pool maintains before being terminated. | Provide the minimum number of minutes to be maintained before termination. |
NOTE If an admin edits the interactive cluster, the cluster restarts, and hence the job running on that cluster fails.
LIMITATIONS
You will encounter the following limitations while running batch jobs on Databricks Persistent Cluster:
Credential configuration issues: Overriding the configurations that are passed to Spark and Distributed File System on the cluster, during the job initialization is not supported in DBx persistent clusters, and could potentially lead to job failures where there are multiple environments with different credentials.
Limitations on running CDATA source: CDATA sources require RSD files to be passed to all the worker nodes during the initialization of the cluster. This is not supported in persistent clusters, as we submit the jobs to an already running cluster.
Limitations on number of parallel jobs: It depends on the number of resources available for a spark driver to run. Number of jobs utilizing resources of the driver can limit the driver performance as it is a single spark driver running on the cluster.
Switching jar between different versions: If the same jar with different versions is used, then the spark always picks the one that is installed first. There is no way for the jobs to pick the right version. This is a limitation from the product side.
Restart cluster after jar update: If a jar gets updated, then we need to restart the cluster for spark to pick the new updated jar. This is required in case of upgrades or patches.
Storage
To configure the storage details, enter values in the following fields. This defines the storage parameters, to allow Infoworks to be configured to the required Snowflake instance. After configuring a storage, you can choose to make it default storage for all jobs. However, this can be overwritten at job individual job level.
NOTE To configure a new storage after the first time configuration, click Add button on the UI.

Enter the following fields under the Storage section:
Field | Description | Details |
|---|---|---|
Name | Storage name must help the user to identify the storage credentials being configured. | User-defined. Provide a meaningful name for the storage set up being configured. |
Description | Description for the storage set up being configured. | User-defined. Provide required description for the environment being configured. |
Storage Type | Type of storage system where all the artifacts will be stored. This depends on the type of cloud/platform provider you choose in the Compute tab.
| Select the required storage type from the drop-down menu. |
Snowflake Integration | ||
Storage Integration Name | Name of the snowflake storage integration object used to authenticate between snowflake and the cloud storage | Provide the details |
Azure DataLake Storage(ADLS) Gen 1
On selecting Azure DataLake Storage(ADLS) Gen 1 as the storage type, the following fields appear:
Field | Description | Details |
|---|---|---|
Access Scheme | Scheme used to access ADLS Gen 1. | Select the available option: adl:// |
Authentication Mechanism | Mechanism using which the security information is stored. Available options are Service Principal and Access Key. | Select the required authentication mechanism from the drop-down menu. |
Storage Account Name | Name of the Azure Storage Account. | Provide the required storage account name. For example, my_data_acc. |
Application ID | ID that uniquely identifies the user application. | Provide the required application ID. |
Directory ID | ID that uniquely identifies the Azure AD instance. | Provide the required directory ID. |
Service Credentials | Credential that the application uses to prove its identity. | Provide the credential string value. |
Azure DataLake Storage(ADLS) Gen 2
On selecting Azure DataLake Storage (ADLS) Gen 2 as the storage type, the following fields appear:
Field | Description | Details |
|---|---|---|
Access Scheme | Scheme used to access ADLS Gen 2. Available options are abfs:// and abfss://. | Select the required access scheme from the drop-down menu. |
Authentication Mechanism | Mechanism using which the security information is stored. Available options are Service Principal and Access Key. | Select the required authentication mechanism from the drop-down menu. |
File System | File system where all the data of an artifact will be stored. | Provide the required file system parameter. |
Storage Account Name | Name of the Azure Storage Account. | Provide the required storage account name. For example, my_data_acc. |
Application ID | ID that uniquely identifies the user application. | Provide the required application ID. |
Directory ID | ID that uniquely identifies the Azure AD instance. | Provide the required directory ID. |
Service Credential | Credential that the application uses to prove its identity. | Provide the credential string value. |
WASB
On selecting WASB as the storage type, the following fields appear:
Field | Description | Details |
|---|---|---|
Access Scheme | Scheme used to access WASB. Available options are wasb:// and wasbs:// | Select the required access scheme from the drop-down menu. |
Container Name | Name of the WASB container. | Provide the WASB container name. |
Storage Account | Account name of WASB storage. | Provide the storage account name. |
Account Key | Access key of WASB storage. | Provide the required access key. |
S3
On selecting S3 as the storage type, the following fields appear:
Field | Description | Details |
|---|---|---|
Access Scheme | Scheme used to access S3. Available options are s3a://, s3n://, and s3://. | Select the required access scheme from the drop-down menu. |
Bucket Name | AWS bucket name is part of the domain in the URL. For example: http://bucket.s3.amazonaws.com. | Provide the required bucket name. This field is displayed only for S3 storage type. |
Access Key | Unique 20-character, alphanumeric string which identifies your AWS account. For example, AKIAIOSFODNN7EXAMPLE. | Provide the required access key. |
Secret Key | Unique 40-character string which allows you to send requests using the AWS account. For example, wJalrXUtnFEMI/K7MDENG/bPxRfiCYEXAMPLEKEY. | Provide the required secret key. |
GCS
On selecting GCS as the storage type, the following fields appear:
Field | Description | Details |
|---|---|---|
Access Scheme | Scheme used to access GCS. Available option is gs:// | Select gs:// from the drop-down menu. |
Bucket Name | Buckets are the basic containers that hold, organise, and control access to your data. | Provide the storage bucket key. Do not use gs:// for storage bucket. |
Authentication Mechanism | Includes the authentication mechanism to access the GCP storage. | The following authentication mechanisms are available: Use system role credentials: The default credentials of the instance to identify and authorize the application. Use environment level service account credentials: The IAM Service Account defined at the environment level to identify and authorize the application. Override environment authentication mechanism: Overrides the credentials provided for the environment. |
Service Credentials | Provide the credentials used to authenticate calls to Google Cloud APIs. | Upload File: Upload the file where the service credentials are stored. Enter File Location: Path of the file to be uploaded. You must enter the server file location. |
After entering all the required values, click Save. Click Return to Manage Environments to view and access the list of all the environments configured. Edit, Clone, and Delete actions are available on the UI, corresponding to every configured environment.