Configuring Infoworks with Amazon EMR
Introduction
Amazon EMR is a managed cluster platform that simplifies running big data frameworks, such as Apache Hadoop or Apache Spark, on AWS to process data for analytics purposes and business intelligence workloads.
The EMR role defines the allowable actions for Amazon EMR while provisioning resources. You can perform service-level tasks that are not performed in the context of an EC2 instance running within a cluster. For example, the service role is used to provision EC2 instances when a cluster launches.
To use this policy, you must:
- Pass the user tag for-use-with-amazon-emr-managed-policies = true when provisioning the cluster. The EMR automatically propagates the tags.
- Additionally, you must manually add a user tag to specific types of resources, such as EC2 security groups that are not created by EMR. For more information on tagging resources, refer to Tagging resources to use managed policies.
Prerequisites
- During installation, ensure that EMR default roles are present.
- Create access key and secret key for an IAM user with the AmazonElasticMapreduceFullAccess and ElasticMapreduceFullAccesspolicyV2 privileges and full access to the Staging Bucket, Warehouse Bucket, and Target Bucket. For providing access to the buckets, refer to Granting Permissions—Amazon Simple Storage Service.
- The cluster subnet must be whitelisted for 3000 port on the Edge node.
- Ensure that the EC2 Instance Profile used to create compute has access to AWS glue account.
- To use glue as a metastore in different AWS accounts, cross account access is required. Ensure that EC2 Instance Profile has appropriate glue permissions. For more details, refer to Granting Cross-Account Access.
- To use glue as a metastore in the same AWS account, add EC2 Instance Profile to IAM policy of AWS Glue.
Procedure
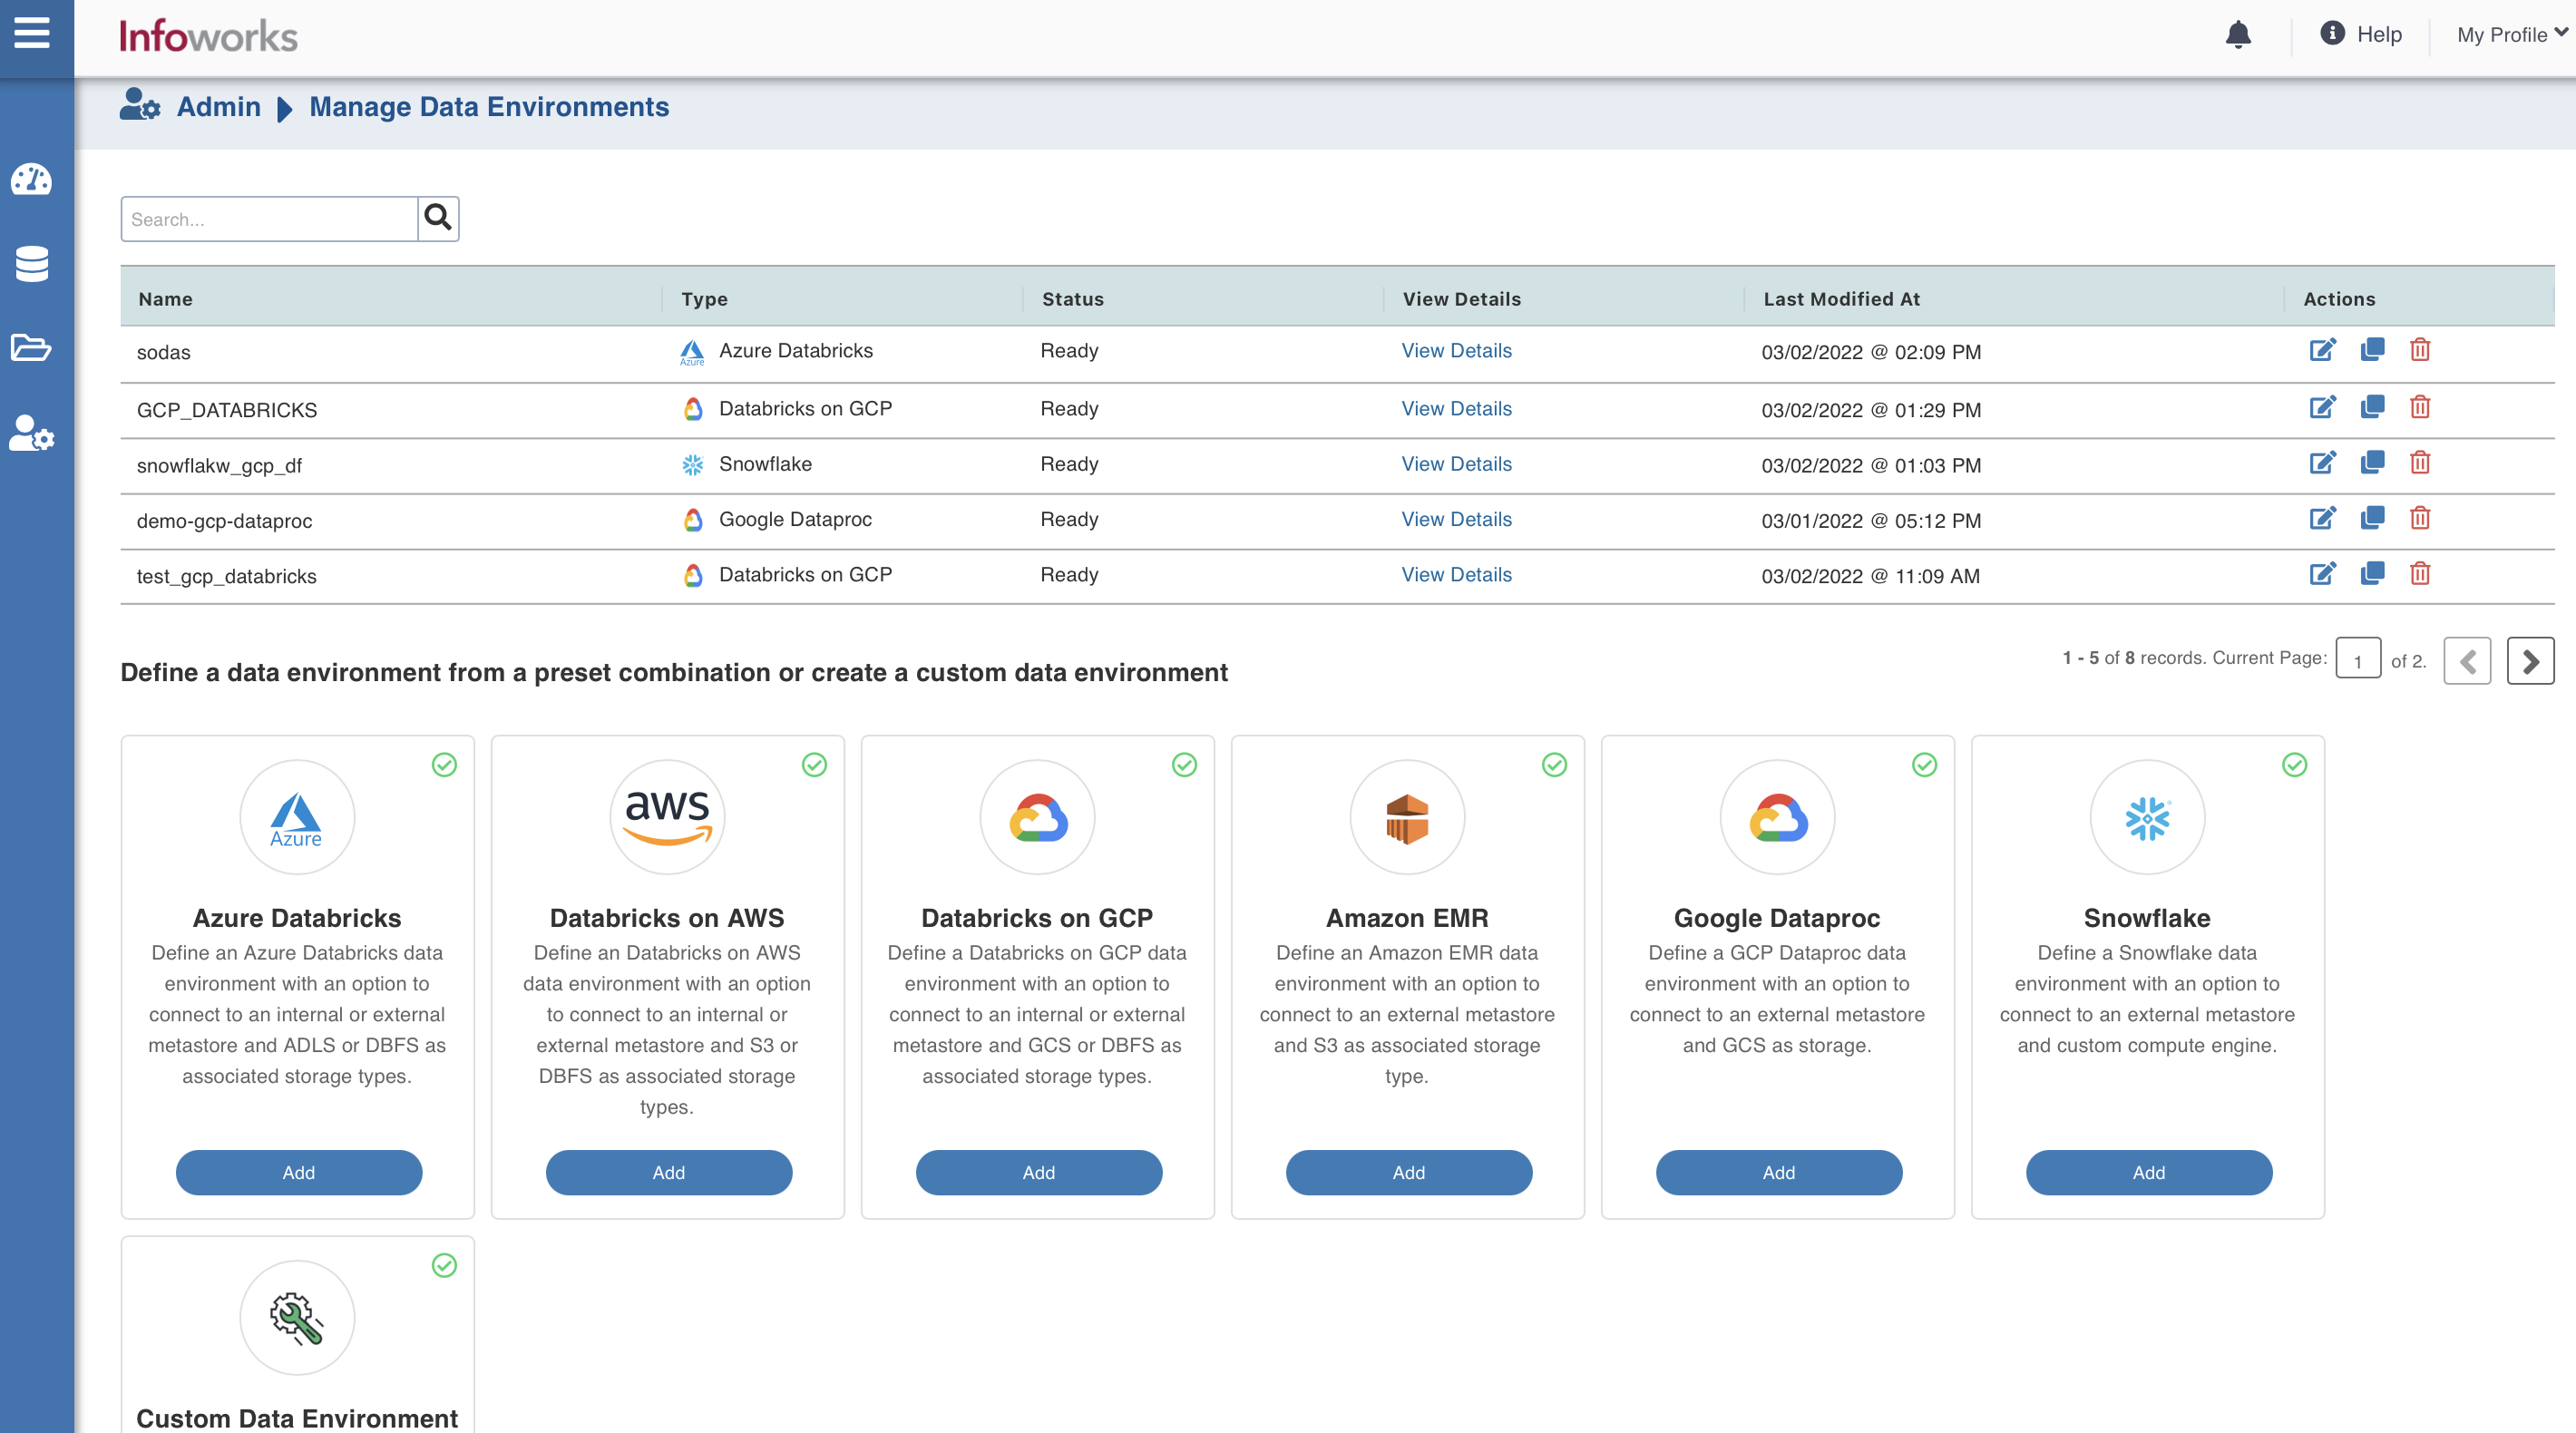
To configure and connect to the required Amazon EMR instance, navigate to Admin > Manage Data Environments, and then click Add button under the Amazon EMR option.
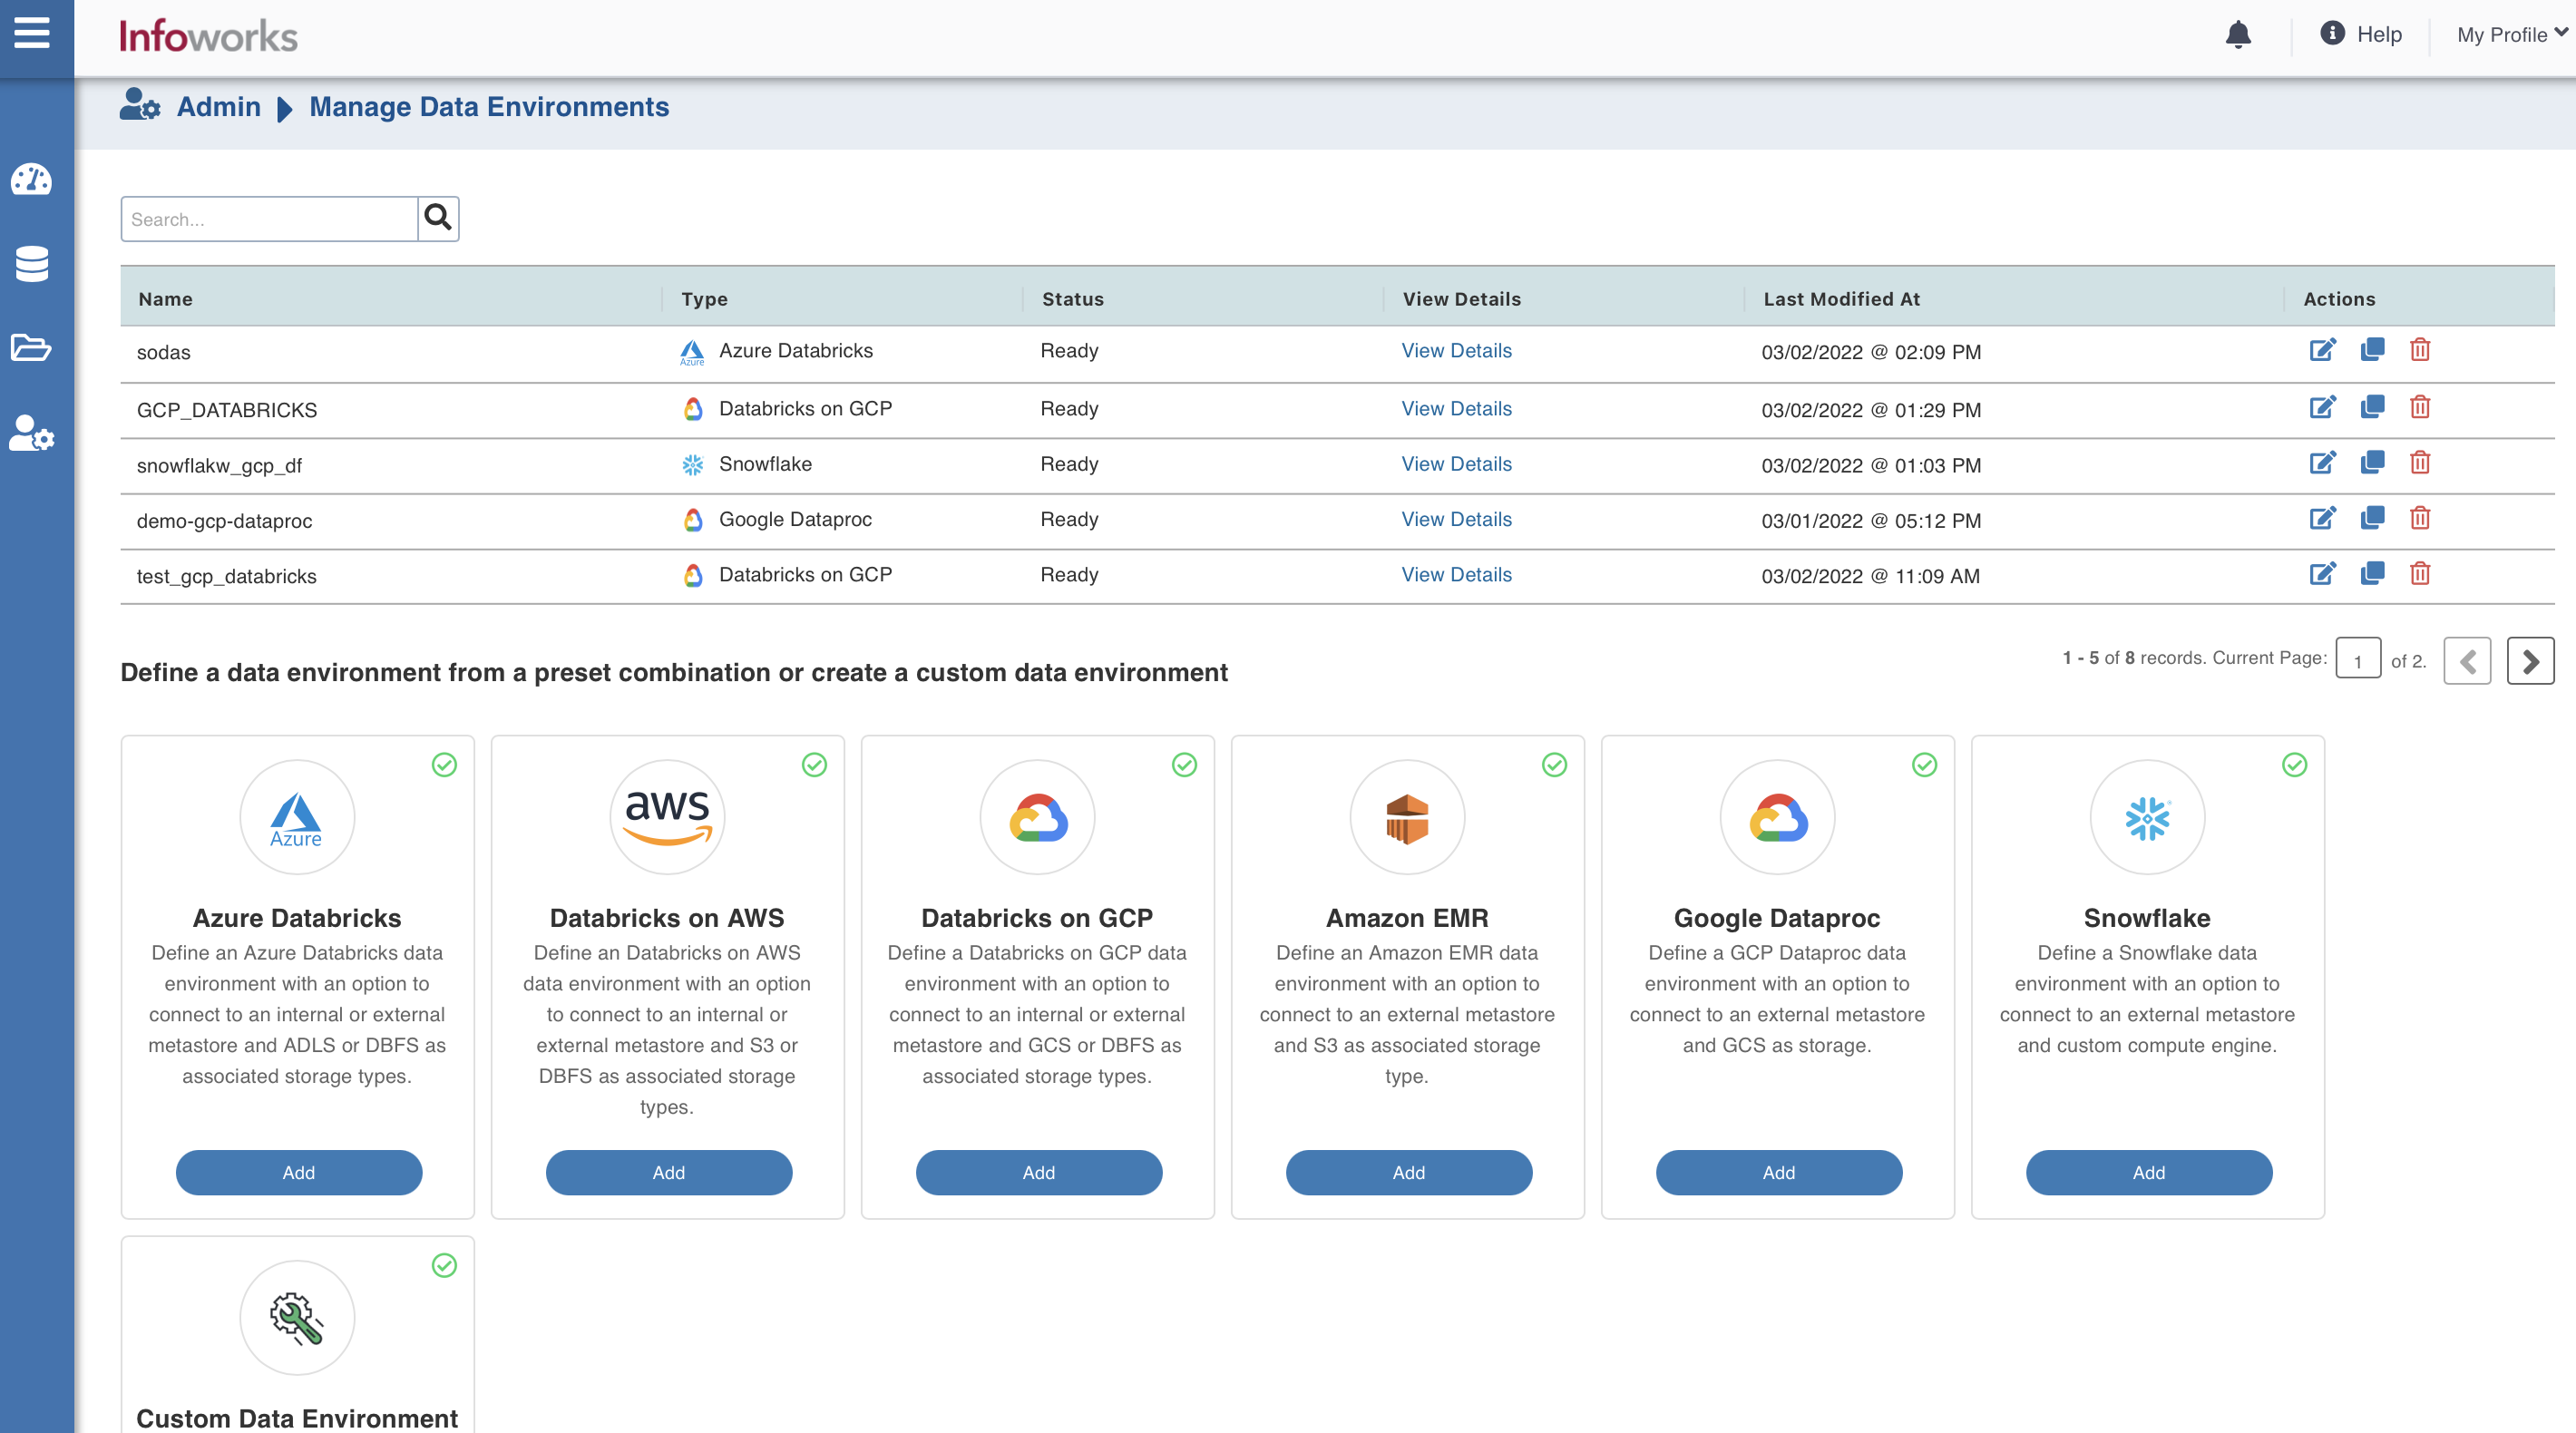
The following window appears:
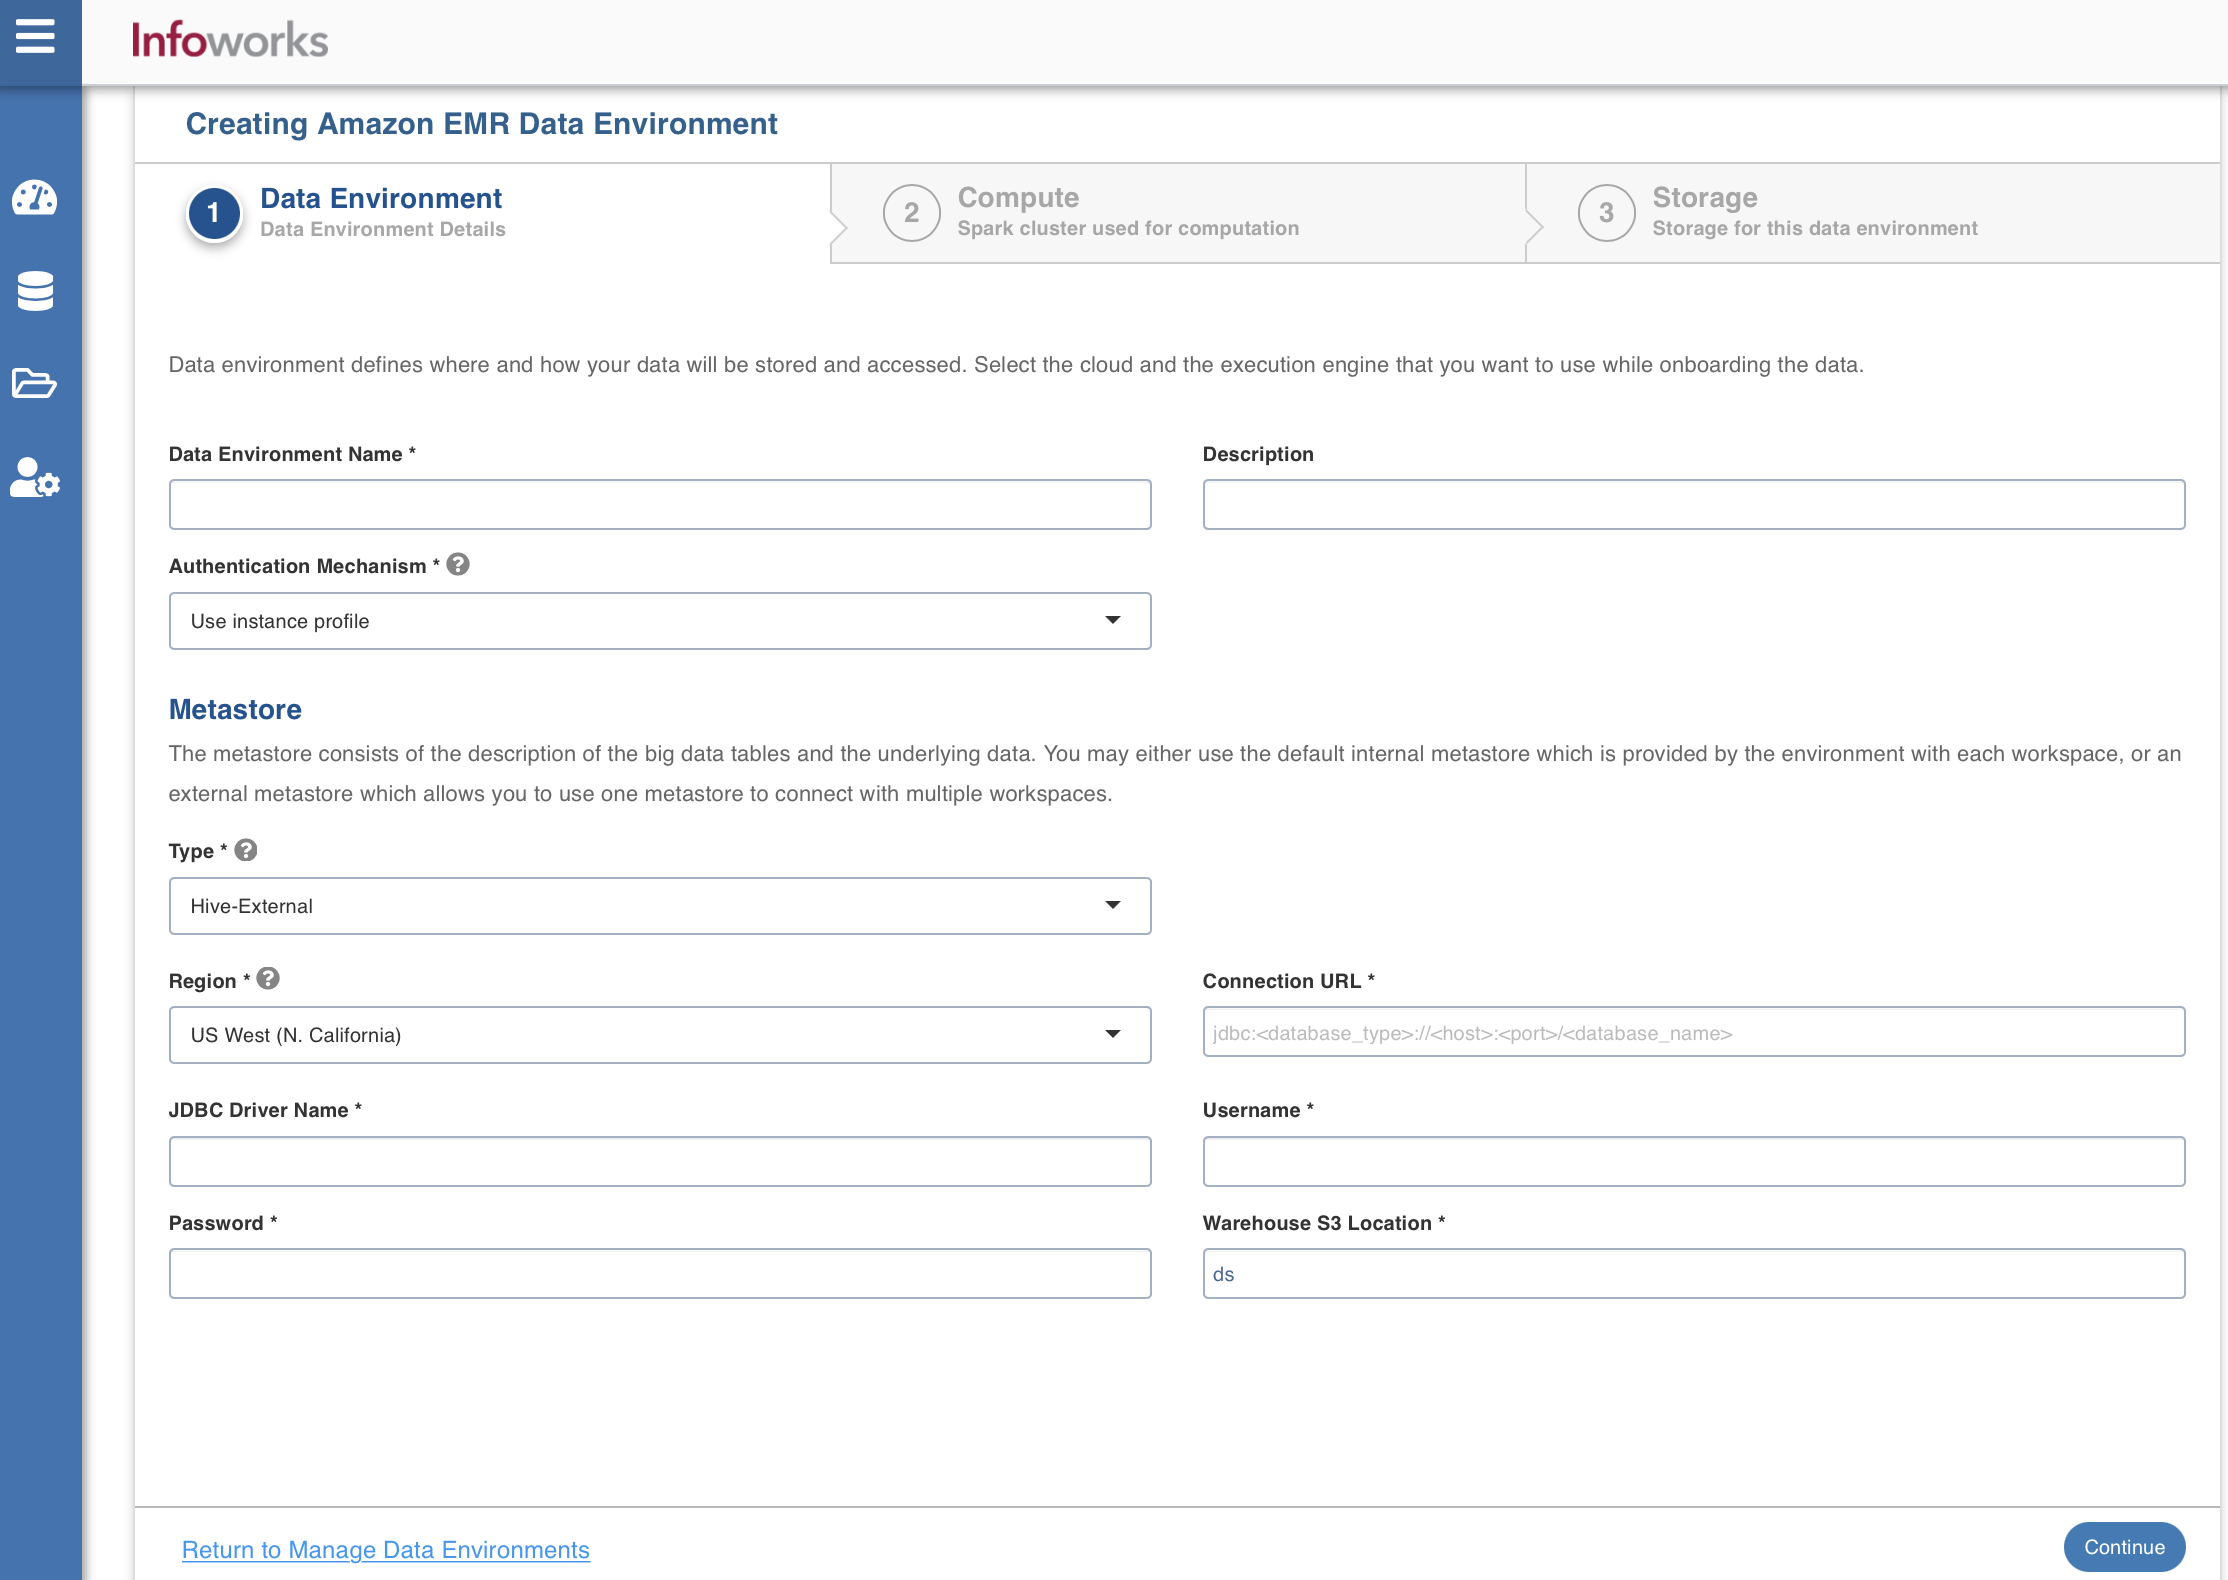
There are three tabs to be configured as follows:
Data Environment
To configure the data environment details, enter values in the following fields. This defines the environmental parameters, to allow Infoworks to be configured to the required Amazon EMR instance:
| Field | Description | Details |
|---|---|---|
| Data Environment Name | Environment defines where and how your data will be stored and accessed. Environment name must help the user to identify the environment being configured. | User-defined. Provide a meaningful name for the environment being configured. |
| Description | Description for the environment being configured. | User-defined. Provide required description for the environment being configured. |
| Authentication Mechanism | Authentication options to access the cloud resources. | Use instance profile: Select this option to use the EC2 instance to identify and authorize the application. The resources which are being accessed from AWS Infoworks VM uses the instance profile of the Infoworks VM. However, the resources which are being accessed from the data plane (EMR compute nodes) uses the instance profile of the compute nodes. Use access key credentials: Select this option to use the IAM Access key and secret key to identify and authorize the application. |
| Secret Key | Unique 40-character string which allows you to send requests using the AWS account. For example, wJalrXUtnFEMI/K7MDENG/bPxRfiCYEXAMPLEKEY. | Provide the required secret key. |
| Access Key | Unique 20-character, alphanumeric string which identifies your AWS account. For example, AKIAIOSFODNN7EXAMPLE. | Provide the required access key. |
| Section: Metastore | The metastore consists of the description of the big data tables and the underlying data. You may either use the default internal metastore which is provided by the environment with each workspace, or an external metastore which allows you to use one metastore to connect with multiple workspaces | Provide the required values for the following four fields listed in the rows below, corresponding to the metastore being configured. |
| Type | Type of the metastore. | Select Hive-External or AWS Glue. |
| Region | Geographical location where you can host your resources. | Provide the required region. For example: East US. |
| Connection URL | The JDBC URL for connecting to the metastore. | Provide the required JDBC URL for connectivity. |
| JDBC Driver Name | The JDBC driver class name to connect to the database. | Provide the required JDBC driver class name. For example: org.mariadb.jdbc.Driver |
| Username | MySQL username. | Provide user's MySQL username. |
| Password | MySQL password. | Provide user's MySQL password. |
| Warehouse S3 Location | Storage location for the metadata. | Provide the required storage location. |
| Use custom glue catalog account | Option to provide different AWS account Id with AWS Glue | Select this check box to provide another key account id. |
| Glue Catalog Account Id | 12 digit AWS account Id with AWS Glue | Provide the AWS account Id where the glue is present and configured for EMR account access. |
After entering all the required values, click Continue to move to the Compute tab.
Compute
A Compute template is the infrastructure used to execute a job. This compute infrastructure requires access to the metastore and storage that needs to be processed.To configure the compute details, enter values in the following fields. This defines the compute template parameters, to allow Infoworks to be configured to the required Amazon EMR instance.
Infoworks supports creating multiple persistent clusters in an Amazon EMR environment, by clicking on Add button.
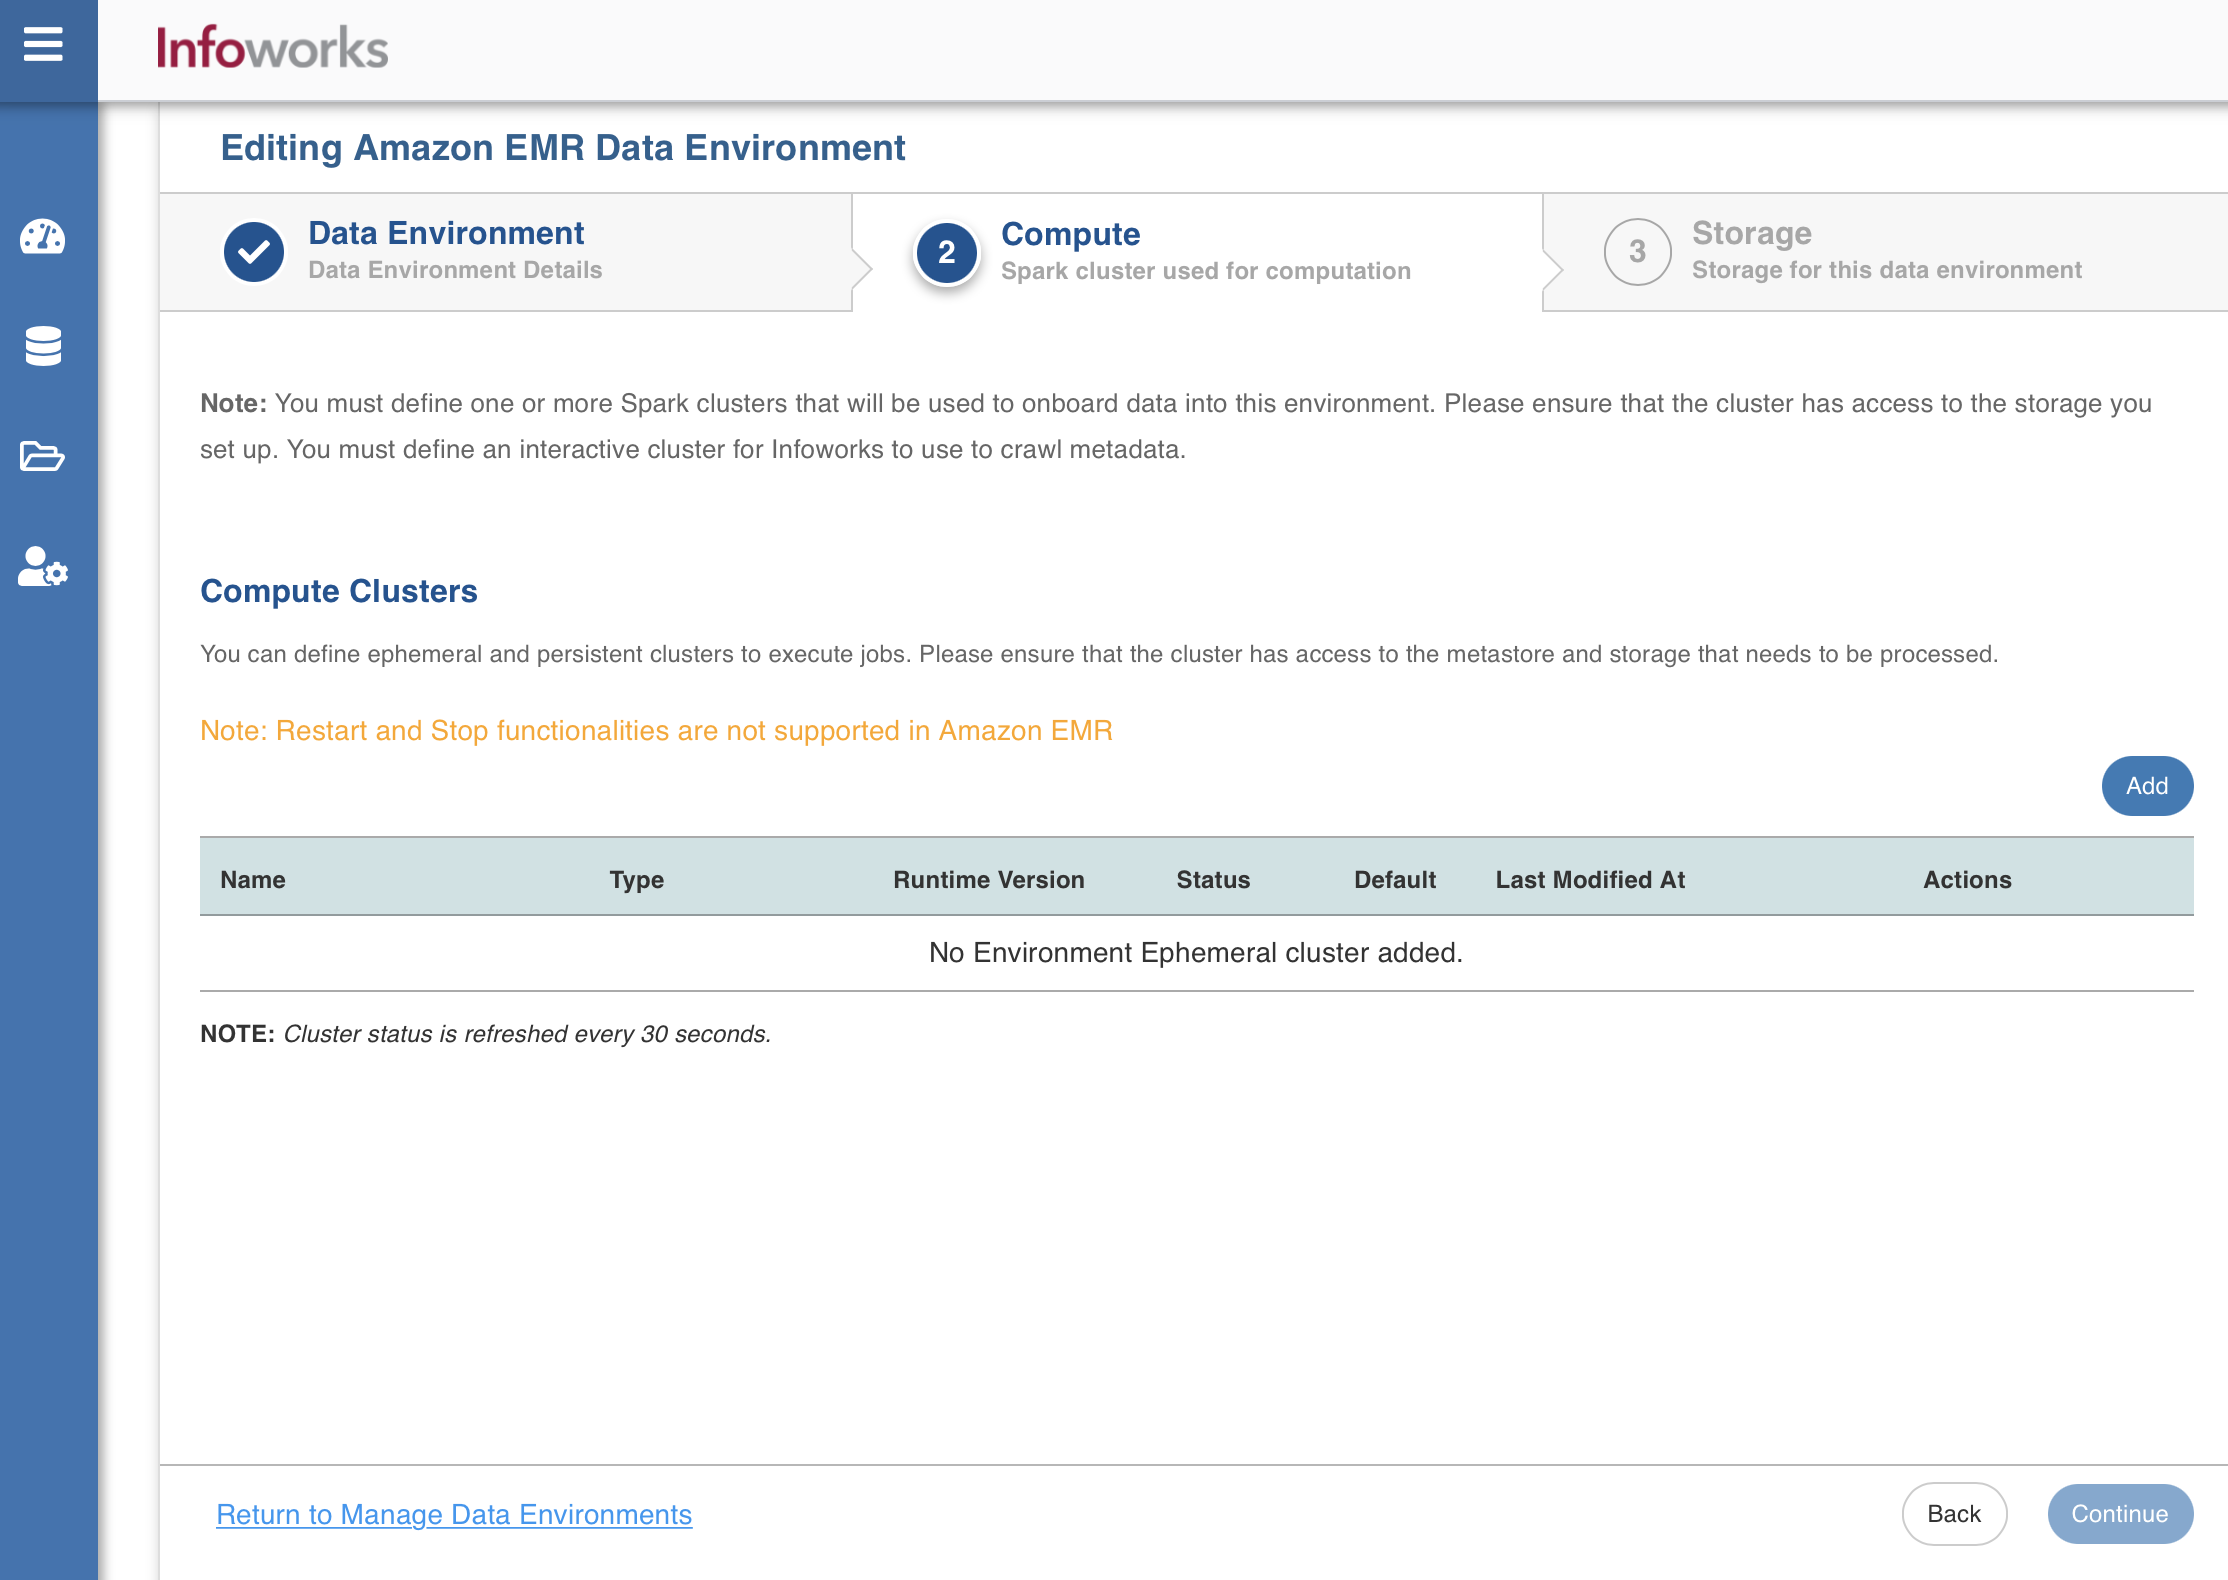
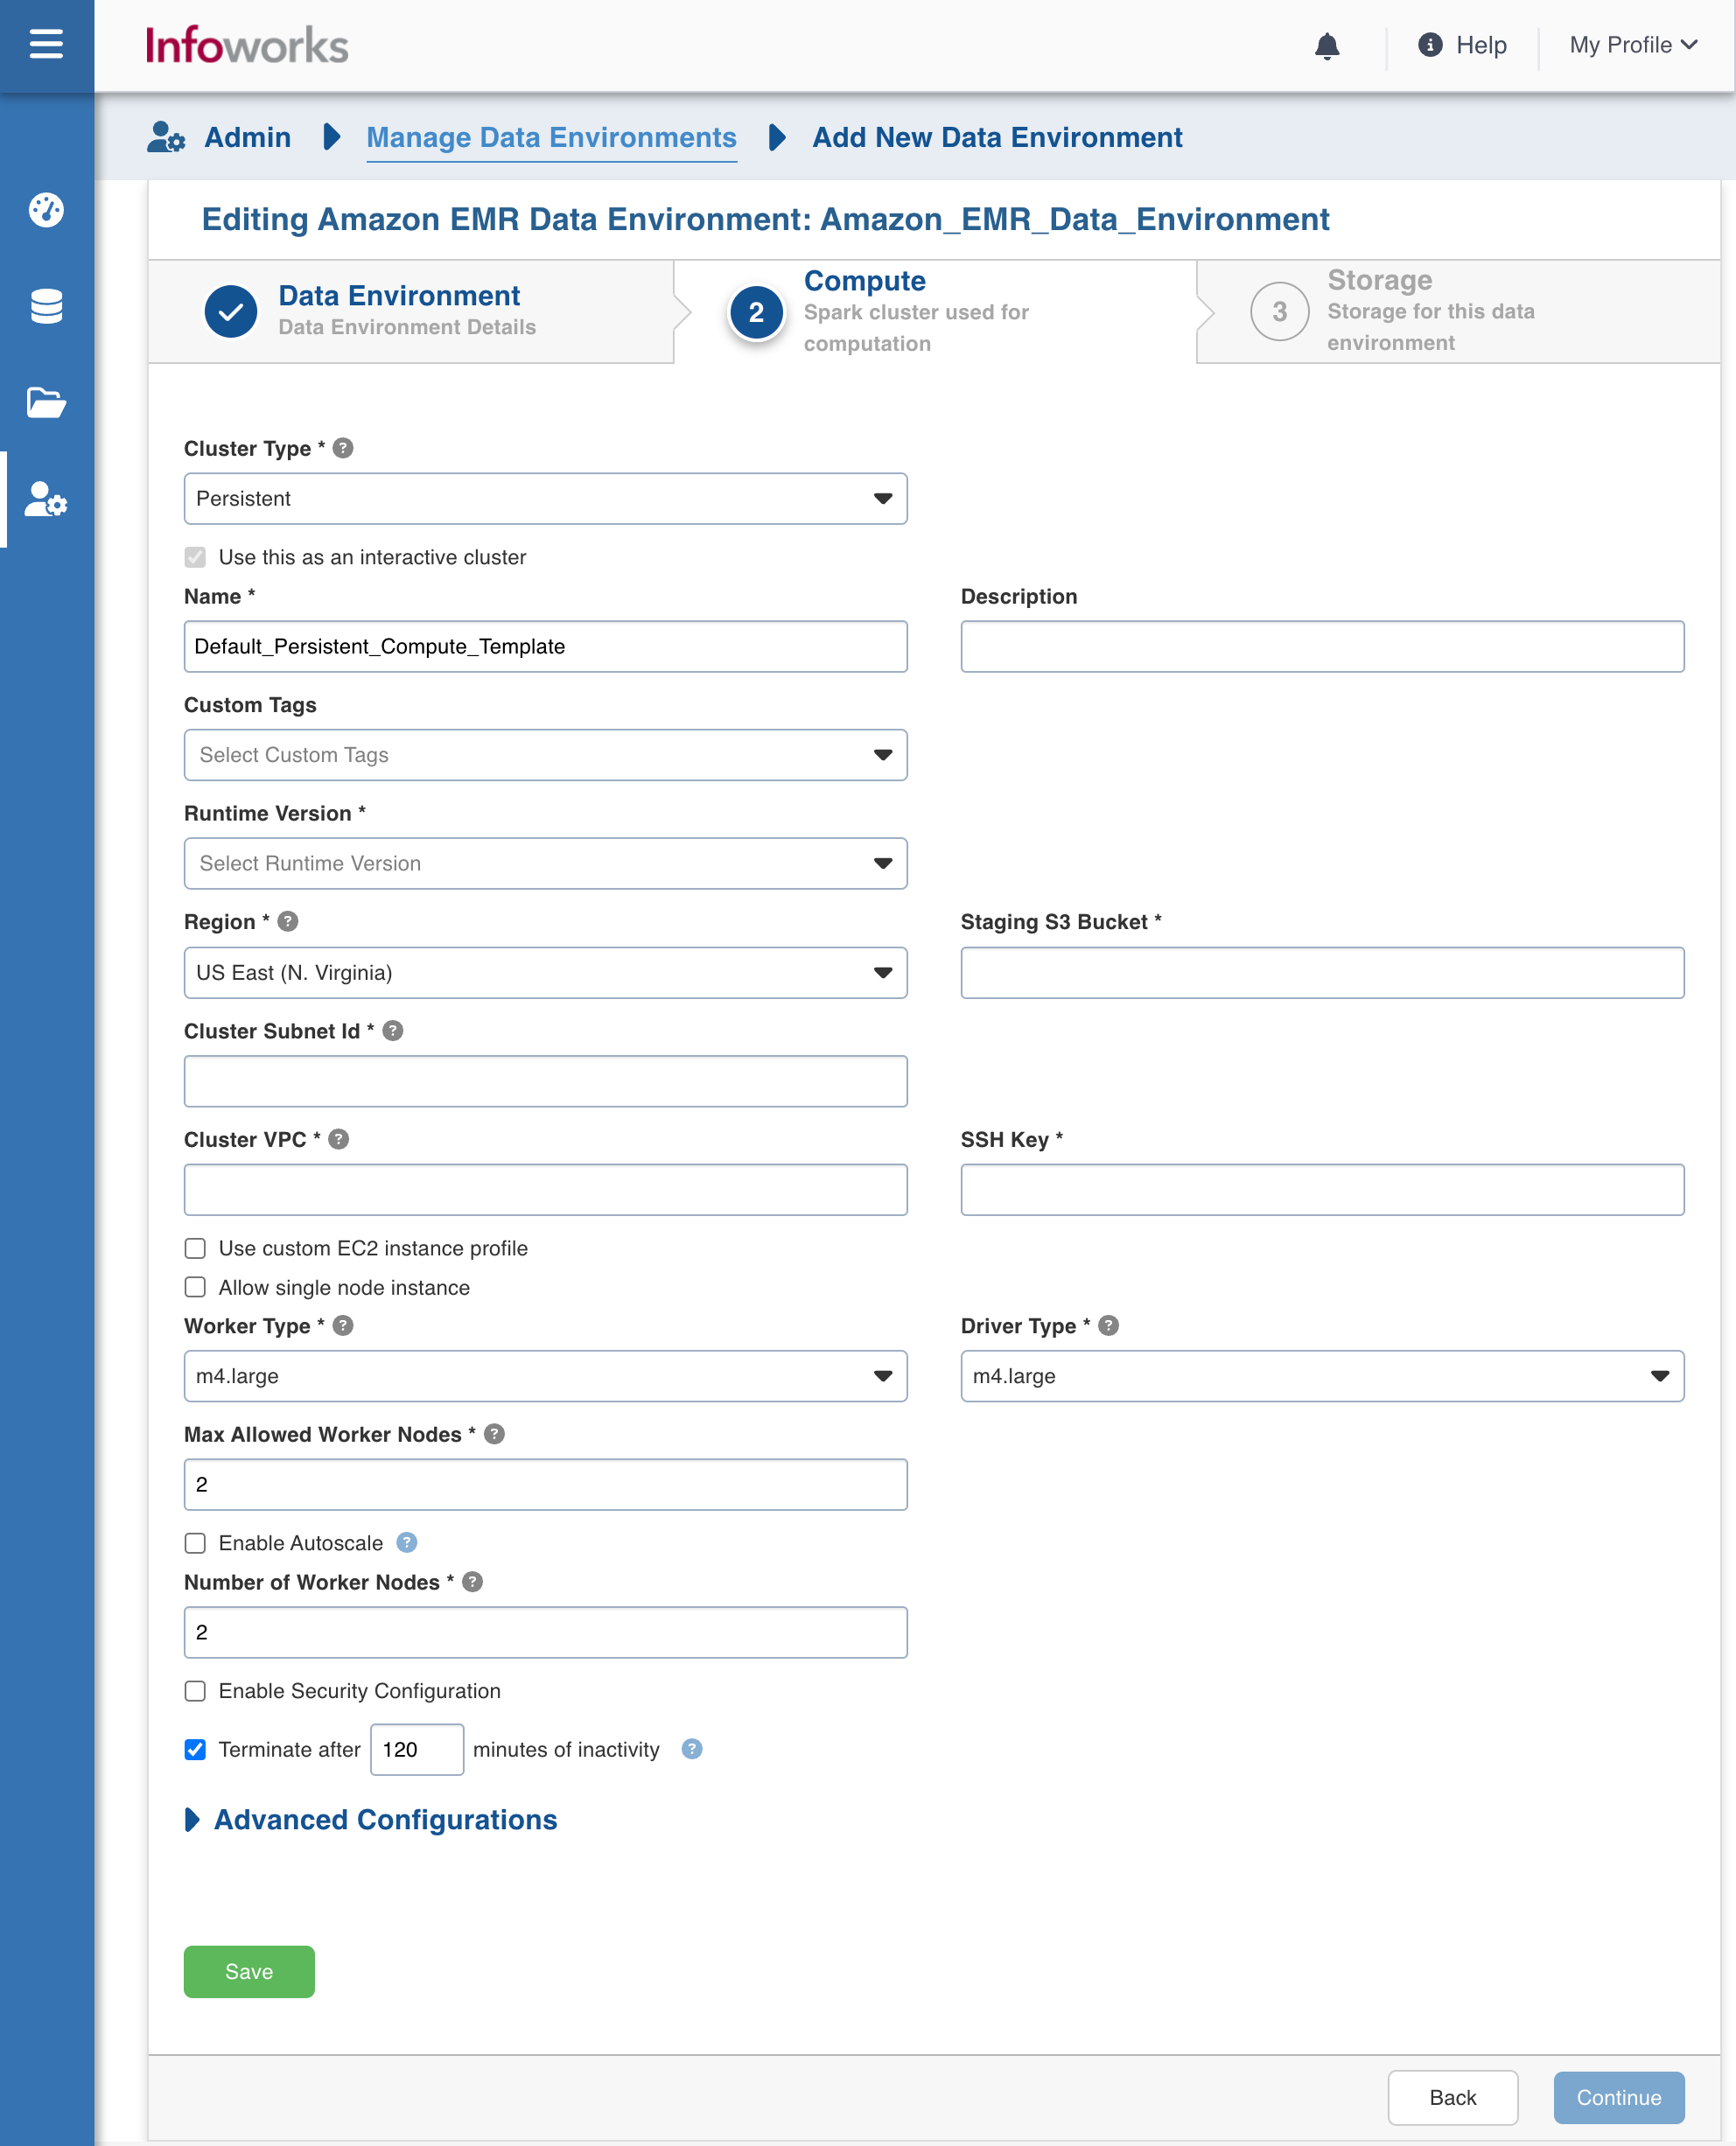
Enter the fields in the Compute section:
| Field | Description | Details |
|---|---|---|
| Cluster Type | The type of compute cluster that you want to launch. | Choose from the available options: Persistent or Ephemeral. Jobs can be submitted on both Ephemeral as well as Persistent clusters. |
| Use this as an Interactive Cluster | Option to designate a cluster to run interactive jobs. Interactive clusters allows you to perform various tasks such as displaying sample data for sources and pipelines. You must define only one Interactive cluster to be used by all the artifacts, at any given time. | Check this box to designate the cluster as an interactive cluster. |
| Name | Name required for the compute template that you want to use for the jobs. | User-defined. Provide a meaningful name for the compute template being configured. |
| Description | Description required for the compute template. | User-defined. Provide required description for the compute template being configured. |
| Type | EMR version | The default value is 6.15.0. |
| Runtime Version | Select the Runtime version of the compute cluster that is being used. | Select either of the following Runtime versions: 6.2.0, or 6.6.0 or 6.15.0 from the drop-down for Amazon EMR. |
| Region | Geographical location where you can host your resources. | Provide the required region. For example: East US. |
| Staging S3 Bucket | Name of the S3 staging bucket which stages cluster job dependencies, job driver output, and cluster config files. | Provide the required S3 staging bucket name. |
| Cluster Subnet Id | Subnetwork in which the cluster will be created | Provide the required cluster subnetwork Id. |
| Cluster VPC | The VPC in which the cluster will be created | Provide the required cluster VPC Id. |
| Use custom EC2 instance profile | The service account of the cluster. | Provide the custom service account through which the cluster is launched on the EC2 instance. The Custom Service Account specifies the user managed service account which uses VMs in a EMR Cluster for all data plane operations, such as reading and writing data from and to Cloud Storage and BigQuery. |
| Allow single node instance | The single node instance of the cluster that is launched. | Select this check box to allow the single node instance of the cluster. |
| SSH Key | SSH Key is to connect to the EC2 instance that is acting as the master node of the cluster. | Provide the required Amazon EC2 key. |
| Worker Type | Worker type configured in the edge node. | Provide the required worker type. For example: Standard_L4 |
| Driver Type | Driver type configured in the edge node. | Provide the required driver type. For example: Standard_L8 |
| Max Allowed Worker Nodes | Maximum number of worker instances allowed. | Provide the maximum allowed limit of worker instances. |
| Enable Autoscale | Option for the instances in the pool to dynamically acquire additional disk space when they are running low on disk space. | Select this option to enable autoscaling. |
| Min Worker Nodes | Minimum number of core nodes. Core nodes run the Data Node daemon to coordinate data storage for example spark executors. | This field appears only if Enable Autoscale check box is checked. |
| Max Worker Nodes | Maximum number of core nodes that autoscaling should support. | This field appears only if Enable Autoscale check box is checked. This must be greater than or equal to Default Min Worker value. |
| Enable Task Node Autoscale | Task nodes are used to add power to perform parallel computation tasks on data.<br>This option is to automatically add or reduce the number of task nodes. | Select this option to enable autoscaling. |
| Min Task Nodes | Minimum number of task nodes that autoscaling should support. | This field appears only if Enable Task NodeAutoscale check box is checked. |
| Max Task Nodes | Maximum number of task nodes that autoscaling should support. | Provide a number. |
| Number of Task Nodes | Number of Task Nodes that should be launched in the absence of autoscaling. | Default value is 1. Provide a number. |
| Enable Kerberos | Option to enable Kerberos authentication. | Select this option to enable Kerberos authentication. |
| Realm | The Key Management Server Location which will be used to encrypt the passwords and keys. | This field appears only if Enable Kerberos check box is checked. Provide the required KMS URI. |
| KDC Admin Password | S3 Location of the encrypted Kerberos root principal password. | This field appears only if Enable Kerberos check box is checked. Provide the required Root Principal Password URI . For example: gs://my-bucket/kerberos-root-principal-password.encrypted |
| Security Configuration Name | Location in Cloud Storage of the KMS-encrypted file containing the KDC database master key. | This field appears only if Enable Kerberos check box is checked. Provide the required KDCDB URI. For example: project/project-id/loc/glob/keyRings/mykeyring/cryptoKeys/my-key |
| Terminate after minutes of inactivity | Number of minutes after inactivity which the pool maintains before being terminated. | Provide the minimum number of minutes to be maintained before termination. |
After entering all the required values, click Continue to move to the Storage tab.
Storage
To configure the storage details, enter values in the following fields. This defines the storage parameters, to allow Infoworks to be configured to the required Amazon EMR instance:
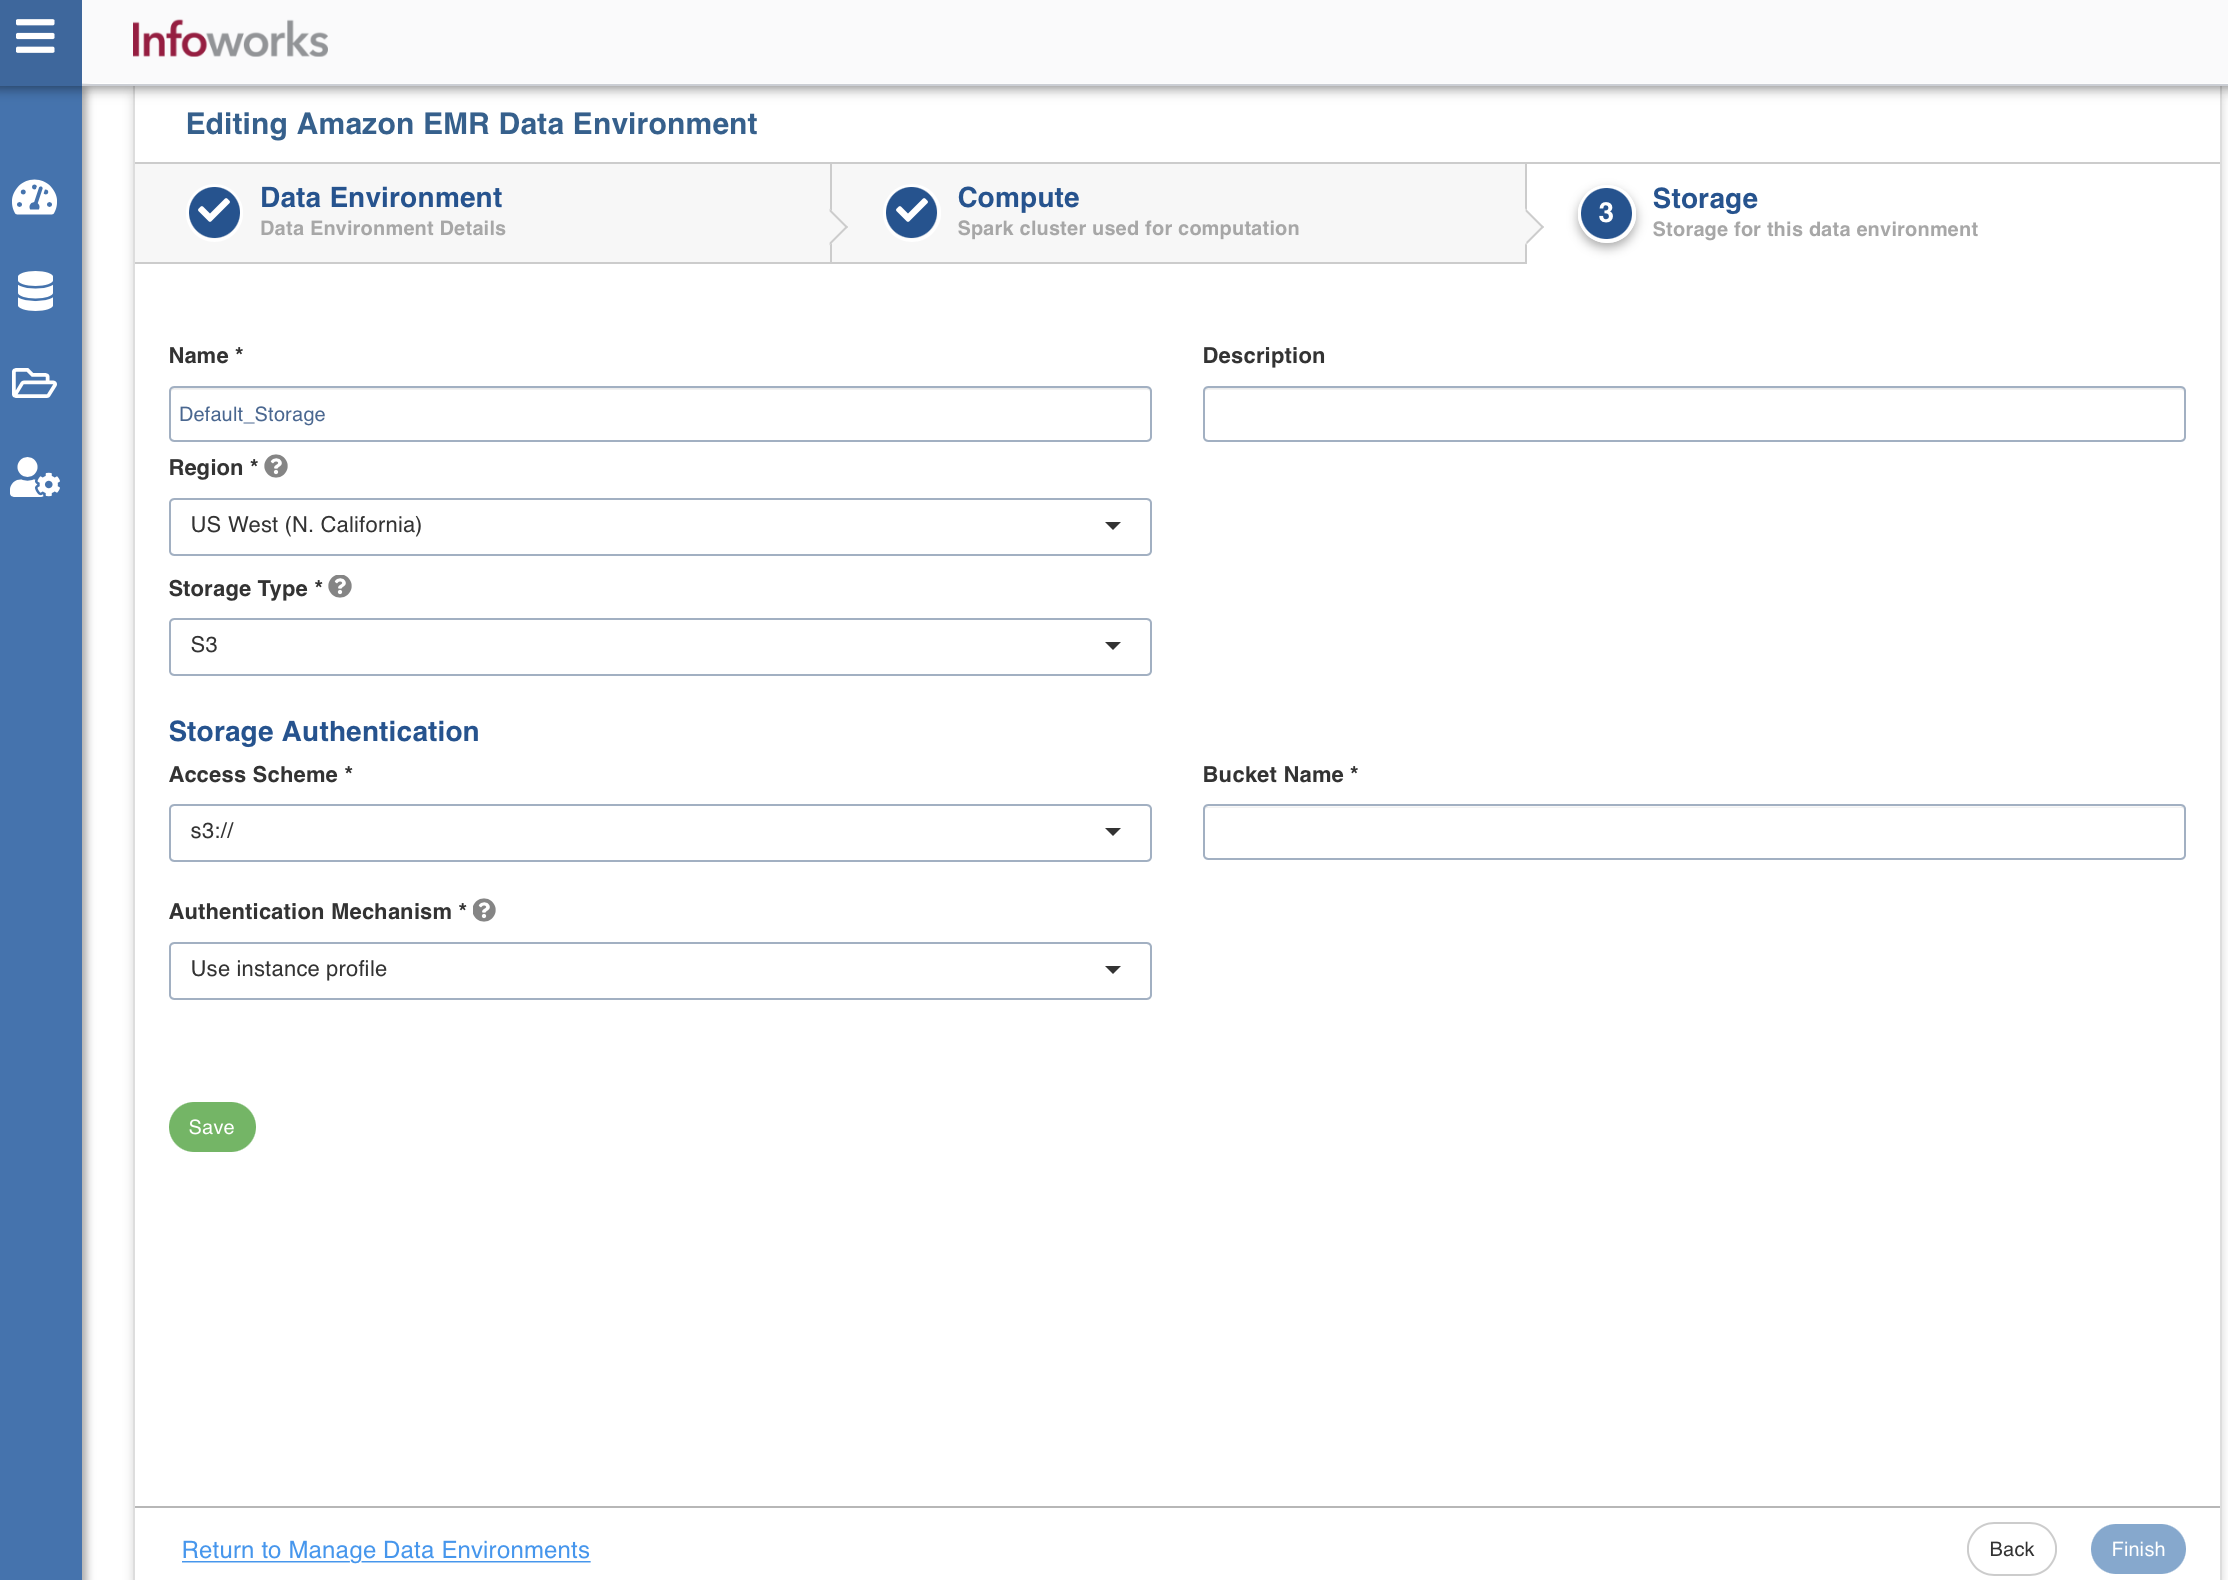
Enter the following fields under the Storage section:
| Field | Description | Details |
|---|---|---|
| Name | Storage name must help the user to identify the storage credentials being configured. | User-defined. Provide a meaningful name for the storage set up being configured. |
| Description | Description for the storage set up being configured. | User-defined. Provide required description for the environment being configured. |
| Region | Geographical location where you can host your resources. | Provide the required region. |
| Storage Type | Type of storage system where all the artifacts will be stored. The available option is s3. | Select s3 from the drop-down menu. |
| Access Scheme | Scheme used to access s3. Available options are s3a://, s3n://, and s3:// | Select the required access scheme from the drop-down menu. |
| Authentication Mechanism | Authentication options to access the S3 storages. | Select the required authentication mechanism from the drop-down menu: Use instance profile: Select this option to use the EC2 instance to identify and authorize the application. The Resources which are being accessed from AWS Infoworks VM will use the instance profile of the Infoworks VM. However, the resources which are being accessed from the data plane (EMR compute nodes) will use the instance profile of the compute nodes. Use environment level credentials: Select this option to use the credentials defined at the environment level to authorize the application. Override environment authentication mechansim: Overrides and uses IAM Access key and secret key to identify and authorize the application. |
| Bucket Name | Buckets are the basic containers that hold, organise, and control access to your data. AWS bucket name is part of the domain in the URL. For example: http://bucket.s3.amazonaws.com. | Provide the required bucket name. |
After entering all the required values, click Save. Click Finish to view and access the list of all the environments configured. Edit, Clone, and Delete actions are available on the UI, corresponding to every configured environment.
Add a New Runtime Version for Amazon EMR
To add a new runtime version for Amazon EMR, perform the following steps:
- SSH into Infoworks machine.
- Navigate to the path where Infoworks is installed. For example: IW_HOME, /opt/infoworks/
- Open conf/emr_defaults.json file.
- Under the Runtime version section, add the following.
xxxxxxxxxx1 {2 "label": "6.2.0",3 "runtime_version": "emr-6.2.0",4 "ml_runtime_version": "emr-6.2.0",5 "scala": "2.12",6 "spark": "3.0.1",7 "python": "3.8"8 }Else, the job will fail.
- Save and close the file.
- To view the limitations while using AWS Glue, refer to Considerations when using AWS Glue Data Catalog.
- To run the jobs on ephemeral clusters due to rate limits on AWS EMR: as per the AWS EMR documentation, there are specific limits for EMR APIs to work around the EMR rate limits. Infoworks uses a custom Job Submission Driver which works on the persistent cluster, but ephemeral cluster will still encounter rate limit related errors. This is a known limitation on EMR ephemeral clusters at higher submission rates.
- To avoid hitting the EMR API limit, the Infoworks job status will now be updated directly from the Spark application. However, if the Spark application is terminated outside of Infoworks, the job status in Infoworks will remain stuck in a "running" state. Therefore, users should cancel EMR jobs through Infoworks only.