Prerequisites
NOTE Before going through the below-mentioned prerequisites for this section, ensure that all the Prerequisites for Infoworks Installation on Azure Kubernetes Service (AKS) are validated.
NOTE Ensure that the helm version is 3.14 or above. This is mandatory from 5.5.1. You can install the latest helm client from here.
Follow the below steps to increase the limit of nginx proxy-body-size:
Navigate to the directory IW_HOME/iw-k8s-installer.
Edit the values.yaml file
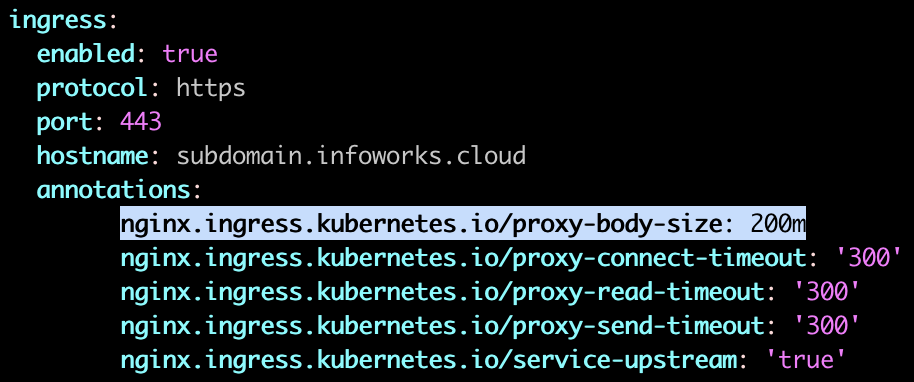
a. Go to ingress.annotations section and edit the nginx.ingress.kubernetes.io/proxy-body-size to 200m.
b. After editing the annotations, the values.yaml file should look as shown below:
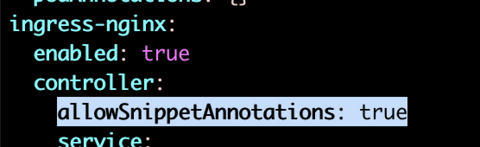
c. Go to ingress-nginx.controller section, add the below property
allowSnippetAnnotations: true
NOTE To check the supported version of MongoDB by Infoworks, refer to MongoDB Atlas Recommended Configuration.
Ensure that the following Python packages are available on the server before starting the upgrade activity of Infoworks environment.
PyYAML (version 6.0)
jsonmerge (version 1.9.0)
wheel
pycryptodomex (version3.15.0)
argparse
If the aforementioned packages are not available, execute the following command to install them.
Ensure the current deployment chart is present in /opt/infoworks.
Python 3.8 or above version with the pip module is installed in the Bastion VM.
Stable internet connectivity on the Bastion VM to download the required Python packages from the Python repository during installation/upgrades.
Validate that the version of the old chart is 5.5.0.6.
Ensure to take backup of MongoDB Atlas and PostgresDB PaaS. In case you don't take the backup, jobs will fail after the rollback operation. For more information, refer to the MongoDB Atlas Backup and PostgresDB PaaS Backup.
Upgrade Instructions
To upgrade Infoworks on Kubernetes:
ASSUMPTION It is assumed that the existing chart is placed in the /opt/infoworks directory and the user has the access permission.
Before selecting the type of upgrade execute the following commands.
Step 1: Create the required directories and change the path to that directory.
Internet-free Upgrade
NOTE If you are upgrading via the Internet-based procedure, skip to the next section.
Step 1: Download the upgrade tar files shared by the Infoworks team to the Bastion (Jump host) VM and place it under $IW_HOME/downloads.
Step 2: To configure Internet-free upgrade, execute the following command:
Internet-based Upgrade
Step 1: Download the Update script tar file.
Common Steps for both Internet-free and Internet-based
NOTE Once you have selected the type of upgrade, the below-mentioned steps are common for both Internet-free and Internet-based.
Step 1: Extract the iwx_updater_k8s_5.5.1.tar.gz under $IW_HOME/downloads.
Do not extract the tar file to /opt/infoworks/iw-k8s-installer as it would result in loss of data.
This should create two new files as follows - update-k8s.sh and configure.sh.
NOTE Execute step 2 only if the "export KEYVAULT_ENABLED" flag in the $IW_HOME/iw-k8s-installer/configure.sh file is set to false and you want to enable Keyvault in the upgraded deployment, else skip to step 3.
Step 2: Edit the configure.sh file present in the $IW_HOME/downloads/ directory and fill details as given below. For more information related to Keyvault details, refer to Keyvault and Keyvault Authentication Configuration.
Ensure all the above Keyvault fields are filled, otherwise the Keyvault setup will not work as expected.
NOTE Execute step 3 only if the “export IW_LOG_ARCHIVAL” flag in the $IW_HOME/iw-k8s-installer/configure.sh file is set to false or not present and you want to enable Log Archival in the upgraded deployment, else skip to step 4.
Step 3: Edit the configure.sh file present in the $IW_HOME/downloads/ directory and fill details as given below. For more information related to Log Archival, refer to Log Archival Configuration.
Step 4: Run the script.
NOTE At the end of the above command's execution, if you want to run helm upgrade manually, then type N and press Enter. There is a 30-second timeout set to abandon the deployment of the upgraded version. If no input is received within the timeout duration, the deployment is triggered.
Step 5: (Applicable only for Databricks Persistent Clusters):
A change in the Infoworks jar requires libraries being uninstalled and cluster restart. Without this step, there will be stale jars. Perform the following steps:
(i) Go to the Databricks workspace, navigate to the Compute page, and select the cluster that has stale jars.
(ii) In the Libraries tab, select all the Infoworks jars and click Uninstall.
(iii) From Infoworks UI or Databricks dashboard, select Restart Cluster.
Rollback
Prerequisites
Before executing the rollback script, ensure that IW_HOME variable is set.
Assuming Infoworks home directory is /opt/infoworks, run the below command to set the IW_HOME variable.
Validate that the version of the old chart is 5.5.1.
Ensure to restore MongoDB Atlas and PostgresDB PaaS. In case you don't take the backup, jobs will fail after the restore operation. For more information, refer to the MongoDB Atlas Restore and PostgresDB PaaS Restore .
Rollback Instructions
NOTE Since IW_HOME has been exported in the Prerequisites section mentioned above, the following steps can be executed from any location for users with read/write access to the aforementioned IW_HOME.
Step 1: Download the rollback script.
Step 2: Place the Update script in the same directory as that of the existing iw-k8s-installer.
Step 3: Ensure you have permission to the $IW_HOME directory.
Step 4: Give executable permission to the rollback script using the below command.
Step 5: Run the script.
Step 6: You will receive the following prompt. If you want to run helm upgrade manually, then type N and press Enter.
NOTE There is a 30-second timeout set to abandon the deployment of the downgraded version. If no input is received within the timeout duration, the deployment is triggered.