Prerequisites for Service Account Permissions
The the minimum permissions required for the service account being used in Infoworks.
Storage Permissions
The Storage permissions are as follows:
- Storage Admin
- Storage Object Admin
Dataproc API Permissions
The Dataproc API permissions include options for launch, edit, view, monitor the cluster.
- Compute Admin
- Compute Instance Admin (beta)
- Compute Instance Admin (v1)
- Compute Network User
- Cloud KMS CryptoKey Encrypter/Decrypter
- Dataproc Editor
VM Service Account Permissions
The VM Service account includes the following permissions:
- Dataproc Worker
- Service Account User
- Storage Admin
- Storage Object Admin
Metastore Permissions
The Metastore permissions include Cloud SQL Client.
VM Cloud API Access Scope (Infoworks on GCE VM)
The cloud-platform access allows full access to all Cloud APIs.
For more information, refer to Service Accounts Access Scope.
Prerequisites for Admin-level Accesses
Ensure that the GCP user has the required permissions to perform the below-mentioned steps. Infoworks recommends to check with your GCP admin to get the required permissions for performing the below steps.
The following are some of the Admin level accesses that might be required.
- Service Usage Admin
- Compute Network Admin
- compute.firewalls.create
- Cloud KMS Admin
- Cloud KMS CryptoKey Encrypter
- Storage Admin (Ensure this permission for the buckets created in Step 7).
- Cloud SQL Admin
| Procedural Steps |
|---|
| Step 1: Enable API for the DataProc, Compute Engine, Cloud SQL, and Cloud SQL Admin API. |
| Steps |
|---|
Step 2: Install Google Cloud SDK in your local environment to complete the prerequisites. For more details on environment specific instructions to install Google Cloud SDK , see Installing Google Cloud SDK.
Also, ensure that you run the following command: gcloud init |
Step 3: Run the following commands to create a Key and Keyring in Cloud Key Management Service (KMS) for GCP. NOTE: This is a one-time setup to create keys for encryption of passwords. gcloud kms keyrings create keyring_name --location global gcloud kms keys create key_name --location global --keyring keyring_name --purpose encryption NOTE: Ensure that the keyring created must have two different user permissions. For detailed steps on setting up user permissions, see Setting Up Keyring User Permissions |
Step 4: Run the following command to list the keyring, and save the output to use later: gcloud kms keys list --location global --keyring keyring_name |
Step 5: Copy the output which is displayed in the following format, and save the output to use later. projects/project_id/locations/global/keyRings/keyring_name/cryptoKeys/key_name |
Step 6: Encrypt passwords using the KMS Key Ring using the following steps: echo "MetastoreRoot_Password"| gcloud kms encrypt --location global --keyring [keyring_name] --key [key_name] --plaintext-file - --ciphertext-file MetastoreROOT.encrypted echo "MetastoreHive_Password" | gcloud kms encrypt --location global --keyring keyring_name --key key_name --plaintext-file - --ciphertext-file MetastoreHive.encrypted Run the following command, only if you want the deployment to be secure: echo "KRBROOT_Password"| gcloud kms encrypt --location global --keyring keyring_name --key key_name --plaintext-file - --ciphertext-file KRBROOT.encrypted NOTE: The value used as MetastoreRoot_Password in the above command, must be entered as the root password while configuring the MySQL instance in Step 10.3. Ensure to keep this handy for use. |
Step 7: Create two GCP storage buckets using the following command: gsutil mb -p < project_name > -c standard -l us -b on gs://temp_bucket_name gsutil mb -p < project_name > -c standard -l us -b on gs://staging_bucket_name Here, staging bucket is where the libraries for the job are staged, whereas temp buckets are used to store jobs or cluster logs. |
Step 8: Copy the encrypted password to the newly created GCP storage bucket using the following commands: Step 8.a: Step 8.b: Step 8.c: |
NOTE**** _** **_ _ _ : Kerberos root and KDC passwords must be same.
Step 9. Create a Cloud SQL Server: The prerequisites are as follows:
Step 9.1: Log in to Google Cloud Console, and select SQL from the Databases Section Menu.
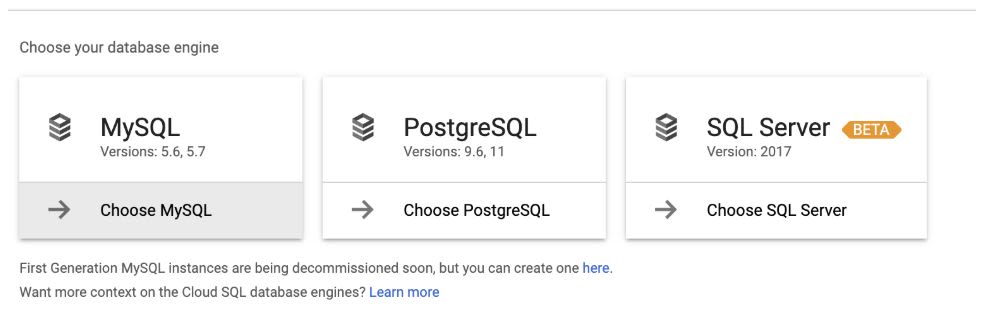
Step 9.2: Select Create Instance > Choose MySQL.

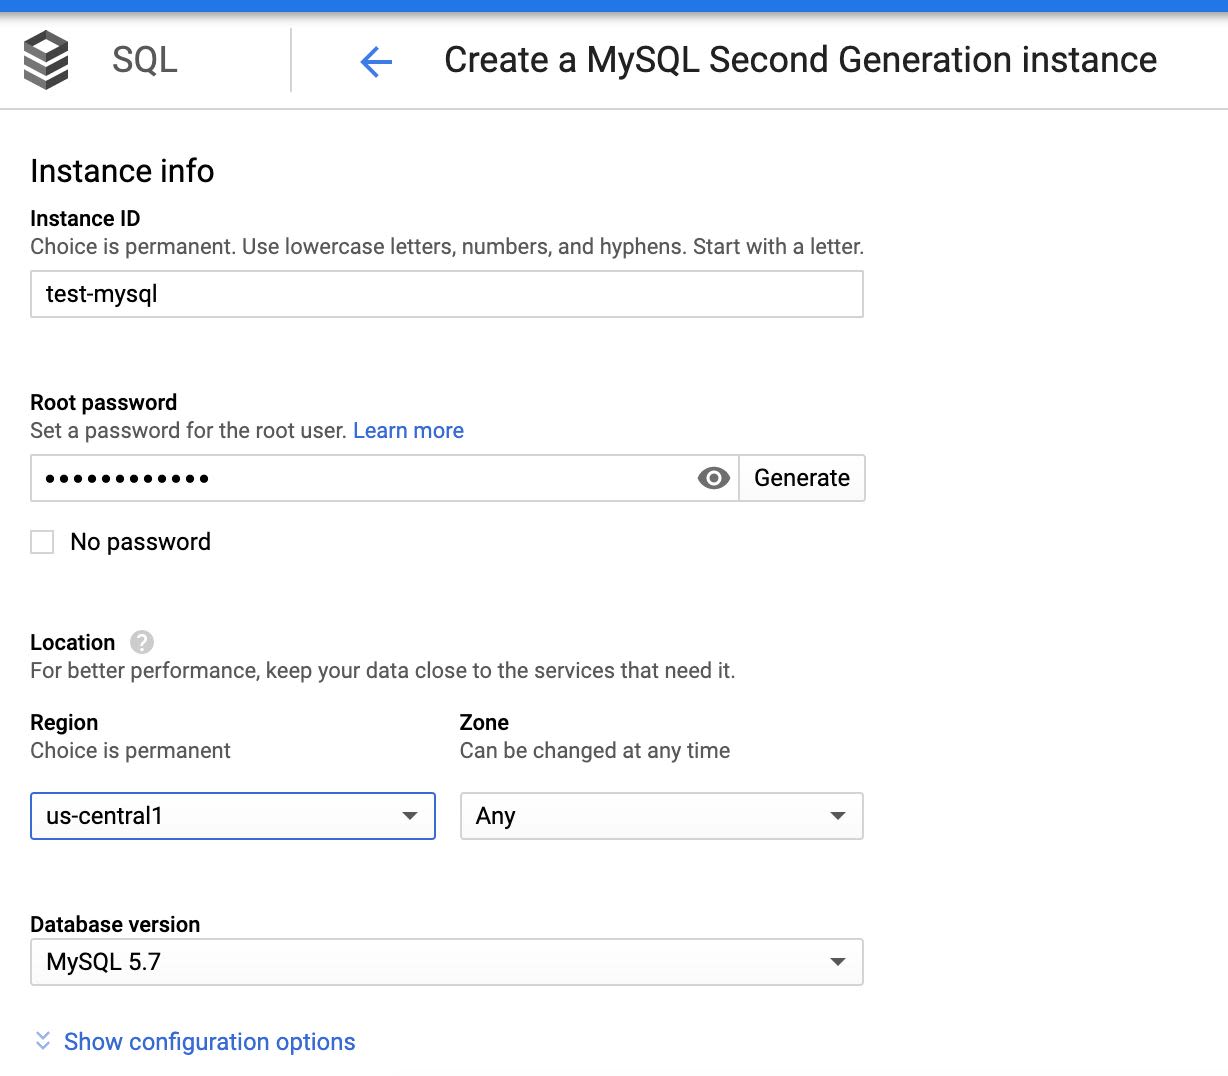
Step 9.3: Enter the following data: Instance ID, password (generated in the first section), required region, zone with respect to the Dataproc cluster, and so on. This creates the MySQL instance.
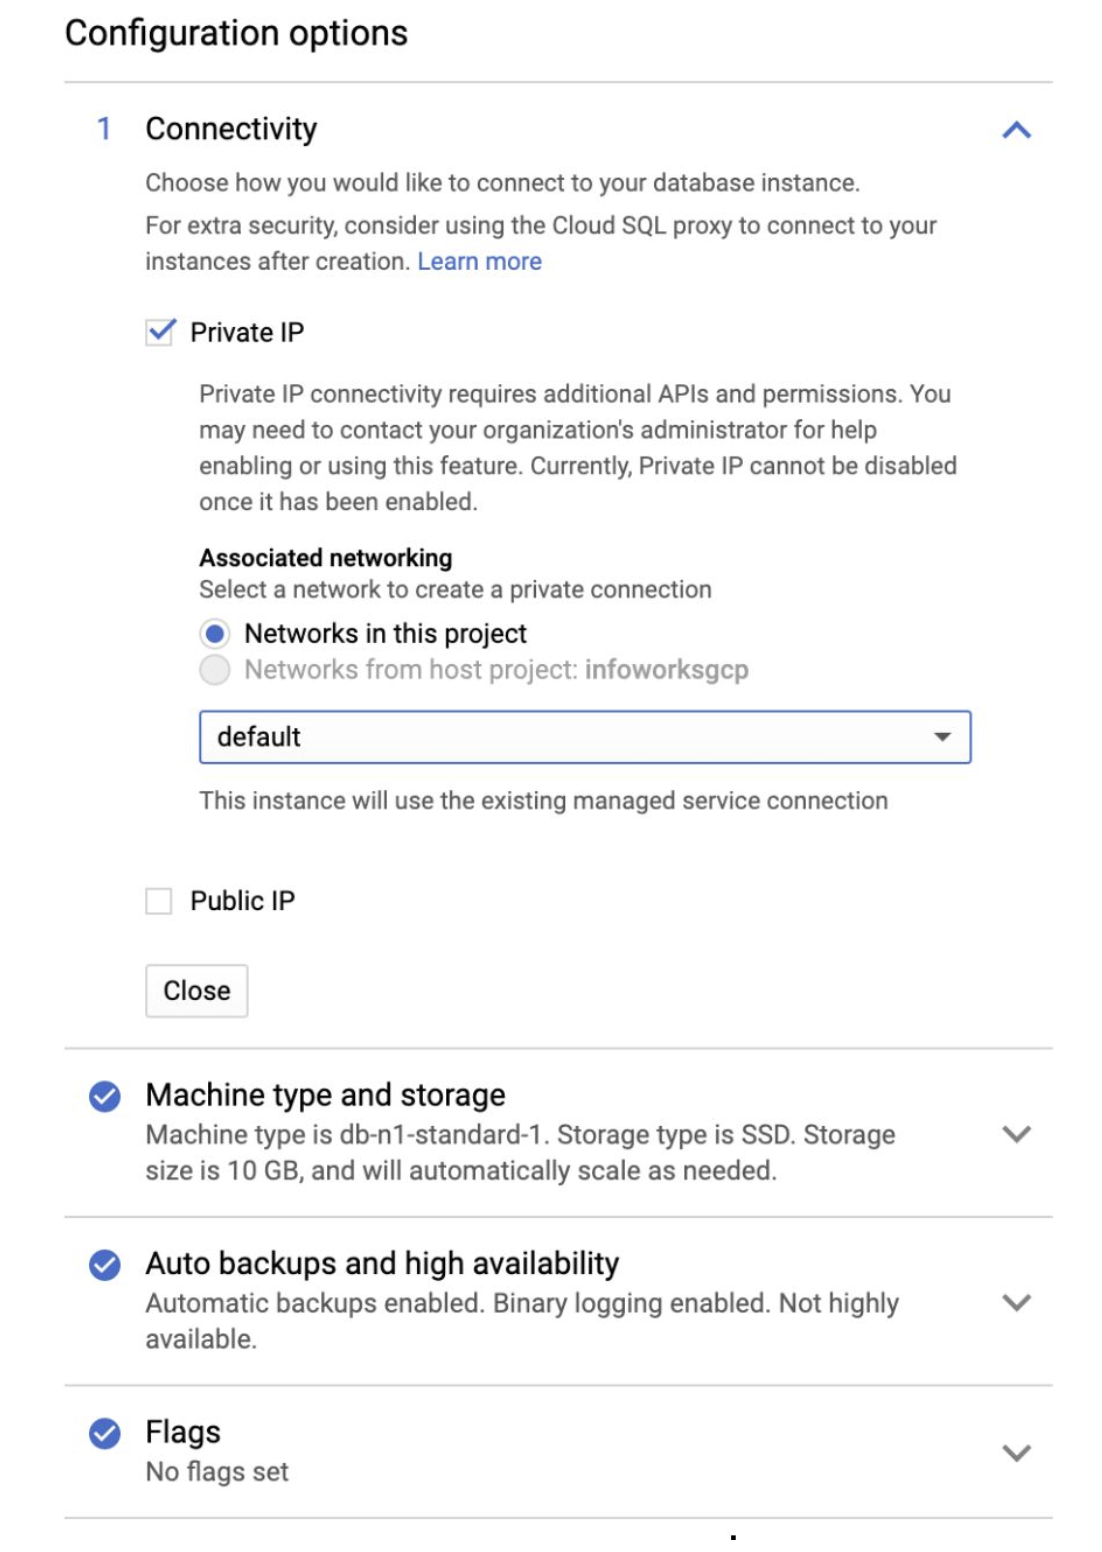
Step 9.4: In the Configuration options tab, check Private IP to connect privately.
The following table describes the parameters and their descriptions
| Field | Description |
|---|---|
| Instance ID | Name of the Metastore instance. This is a one-time choice. Syntax: Start with n alphabet. Use lowercase alphabet, numbers, and hyphens. |
| Root password | Allows you to generate a user defined password for the root user. |
| Region | Same Region as that of the Dataproc Cluster |
| Zone | Same zone as that of the Dataproc Cluster |
| Database version | MySQL 5.7 |
| CONFIGURATION OPTIONS | |
| Connectivity | Allows you to choose how you want connect to your database instance. |
| Private IP | Allows you to connect using Private access. This requires Cloud SQL Admin API enabled. Currently, Private IP cannot be disabled, if it is once enabled. This is the recommended setup. |
| Public IP | Allows you to connect SQL using Public IP. This authorizes external networks to connect to your Cloud SQL instance. |
| Machine type and storage | Allows you to select your machine type and storage. For better performance, choose a machine type with sufficient memory to support the largest database table in your system. |
| Auto backups and high availability | Supports scheduling automatic backup of your database, and enabling high availability. For development environments, high availability is optional. For production environments, schedule the auto backup span and enable high availability. |
| Flags | Database Flags. This is an optional field. |
| Maintenance | Supports maintenance. Maintenance typically takes place only once every few months. This requires the SQL instance to be restarted while updates are made, and thus disrupts service for a short time. This is an optional field. |
| Labels | Labels/Tags for the Cloud SQL. This is an optional field. |
If the key is missing, set it in conf.properties:
dataproc_job_submission_wait_on_cluster=true
This process is the default behavior.
If key is missing, set it in conf.properties:
dataproc_job_submission_wait_on_cluster=false
If the cluster creation fails, jobs are not submitted to the cluster.
Configuring Environment
To configure and connect to the required Google Dataproc instance, navigate to Admin > Manage Data Environments in the Infoworks UI, and then click Add button under the Google Dataproc option.
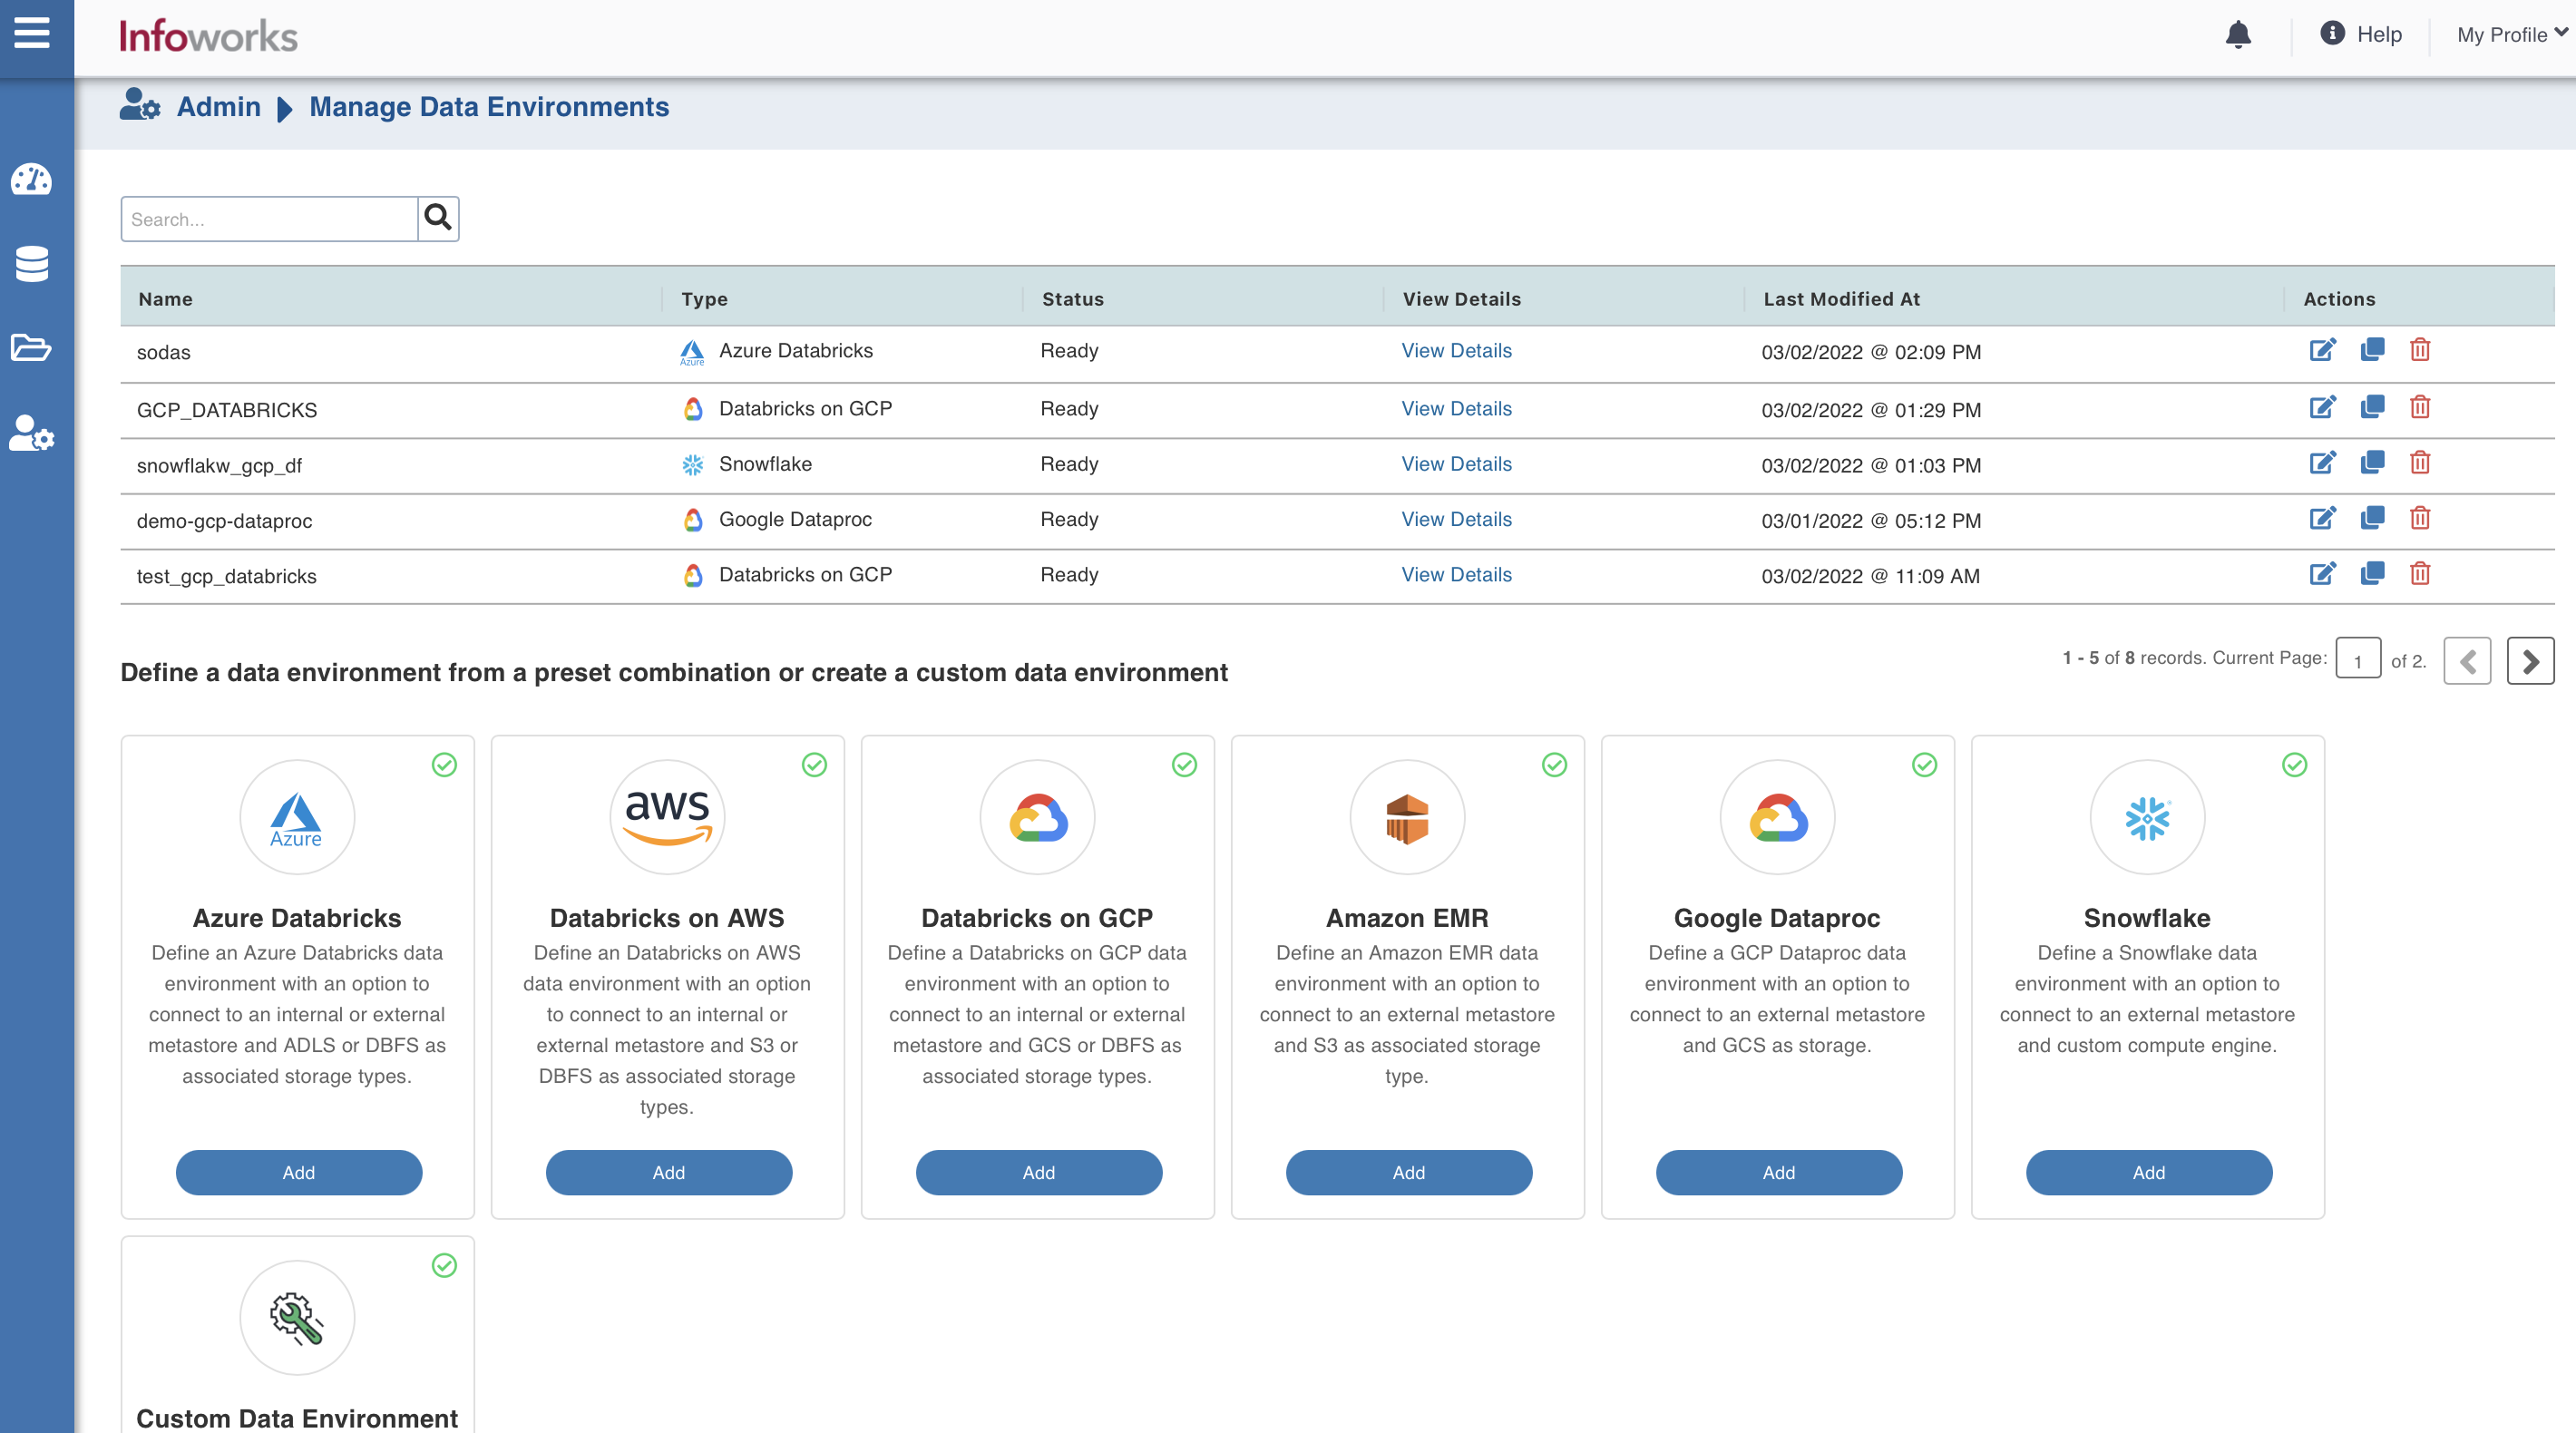
The following window appears.

There are three tabs to be configured as follows:
Data Environment
To configure the data environment details, enter values in the following fields. This defines the environmental parameters, to allow Infoworks to be configured to the required GCP Dataproc instance:
| Field | Description | Details |
|---|---|---|
| Data Environment Name | Environment defines where and how your data will be stored and accessed. Environment name must help the user to identify the environment being configured. | User-defined. Provide a meaningful name for the environment being configured. |
| Description | Description for the environment being configured. | User-defined. Provide required description for the environment being configured. |
| Authentication Mechanism | Specifies the authentication mechanism using which the security information is stored. Includes the following authentication mechanisms:
| The System role credentials option uses the default credentials of the instance to identify and authorize the application. The Service account credentials uses the IAM Service Account to identify and authorize the application. |
| Section: Metastore | Metastore consists of the description of the big data tables and the underlying data. The user may either use the default internal metastore which is provided by Databricks with each workspace, or an external metastore which allows you to use one metastore to connect with multiple workspaces. | Provide the required values for the following four fields listed in the rows below, corresponding to the metastore being configured. |
| Metastore Instance | Defines the metastore instance. The Metastore instance provides a fully managed, highly available, autohealing metastore service that simplifies technical metadata management. | The metastore instance format is projectID:region:instanceid. |
| Type | Type of the metastore.<br>The valid value is Hive-External. | Select the required value for the metastore type. |
| Region | Geographical location where you can host your resources. | Provide the required region. For example: East US. |
| Machine Tag | Tag added to the tags field of your resource. | Provide the required machine tag. |
| Service Credentials | Option to select the service credential which authenticate calls to Google Cloud APIs or other non-Google APIs. | Radio Button. Available options are Upload File or Enter Server Location. |
| Admin Password Location | GCS location of the encrypted Admin Password. | Provide the required admin password location. |
| Hive Password Location | GCS location of the encrypted Hive Password. | Provide the required Hive password location. |
| KMS Key URI | Unique URI of the KMS key. | Provide the required URI. |
| Warehouse GCS Location | Storage location for the metadata. | Provide the required storage location. |
| Use Private IP for metastore communication | Option to use Private IP for metastore communications. | Select this checkbox to allow using private IP for communication. |
After entering all the required values, click Continue to move to the Compute tab.
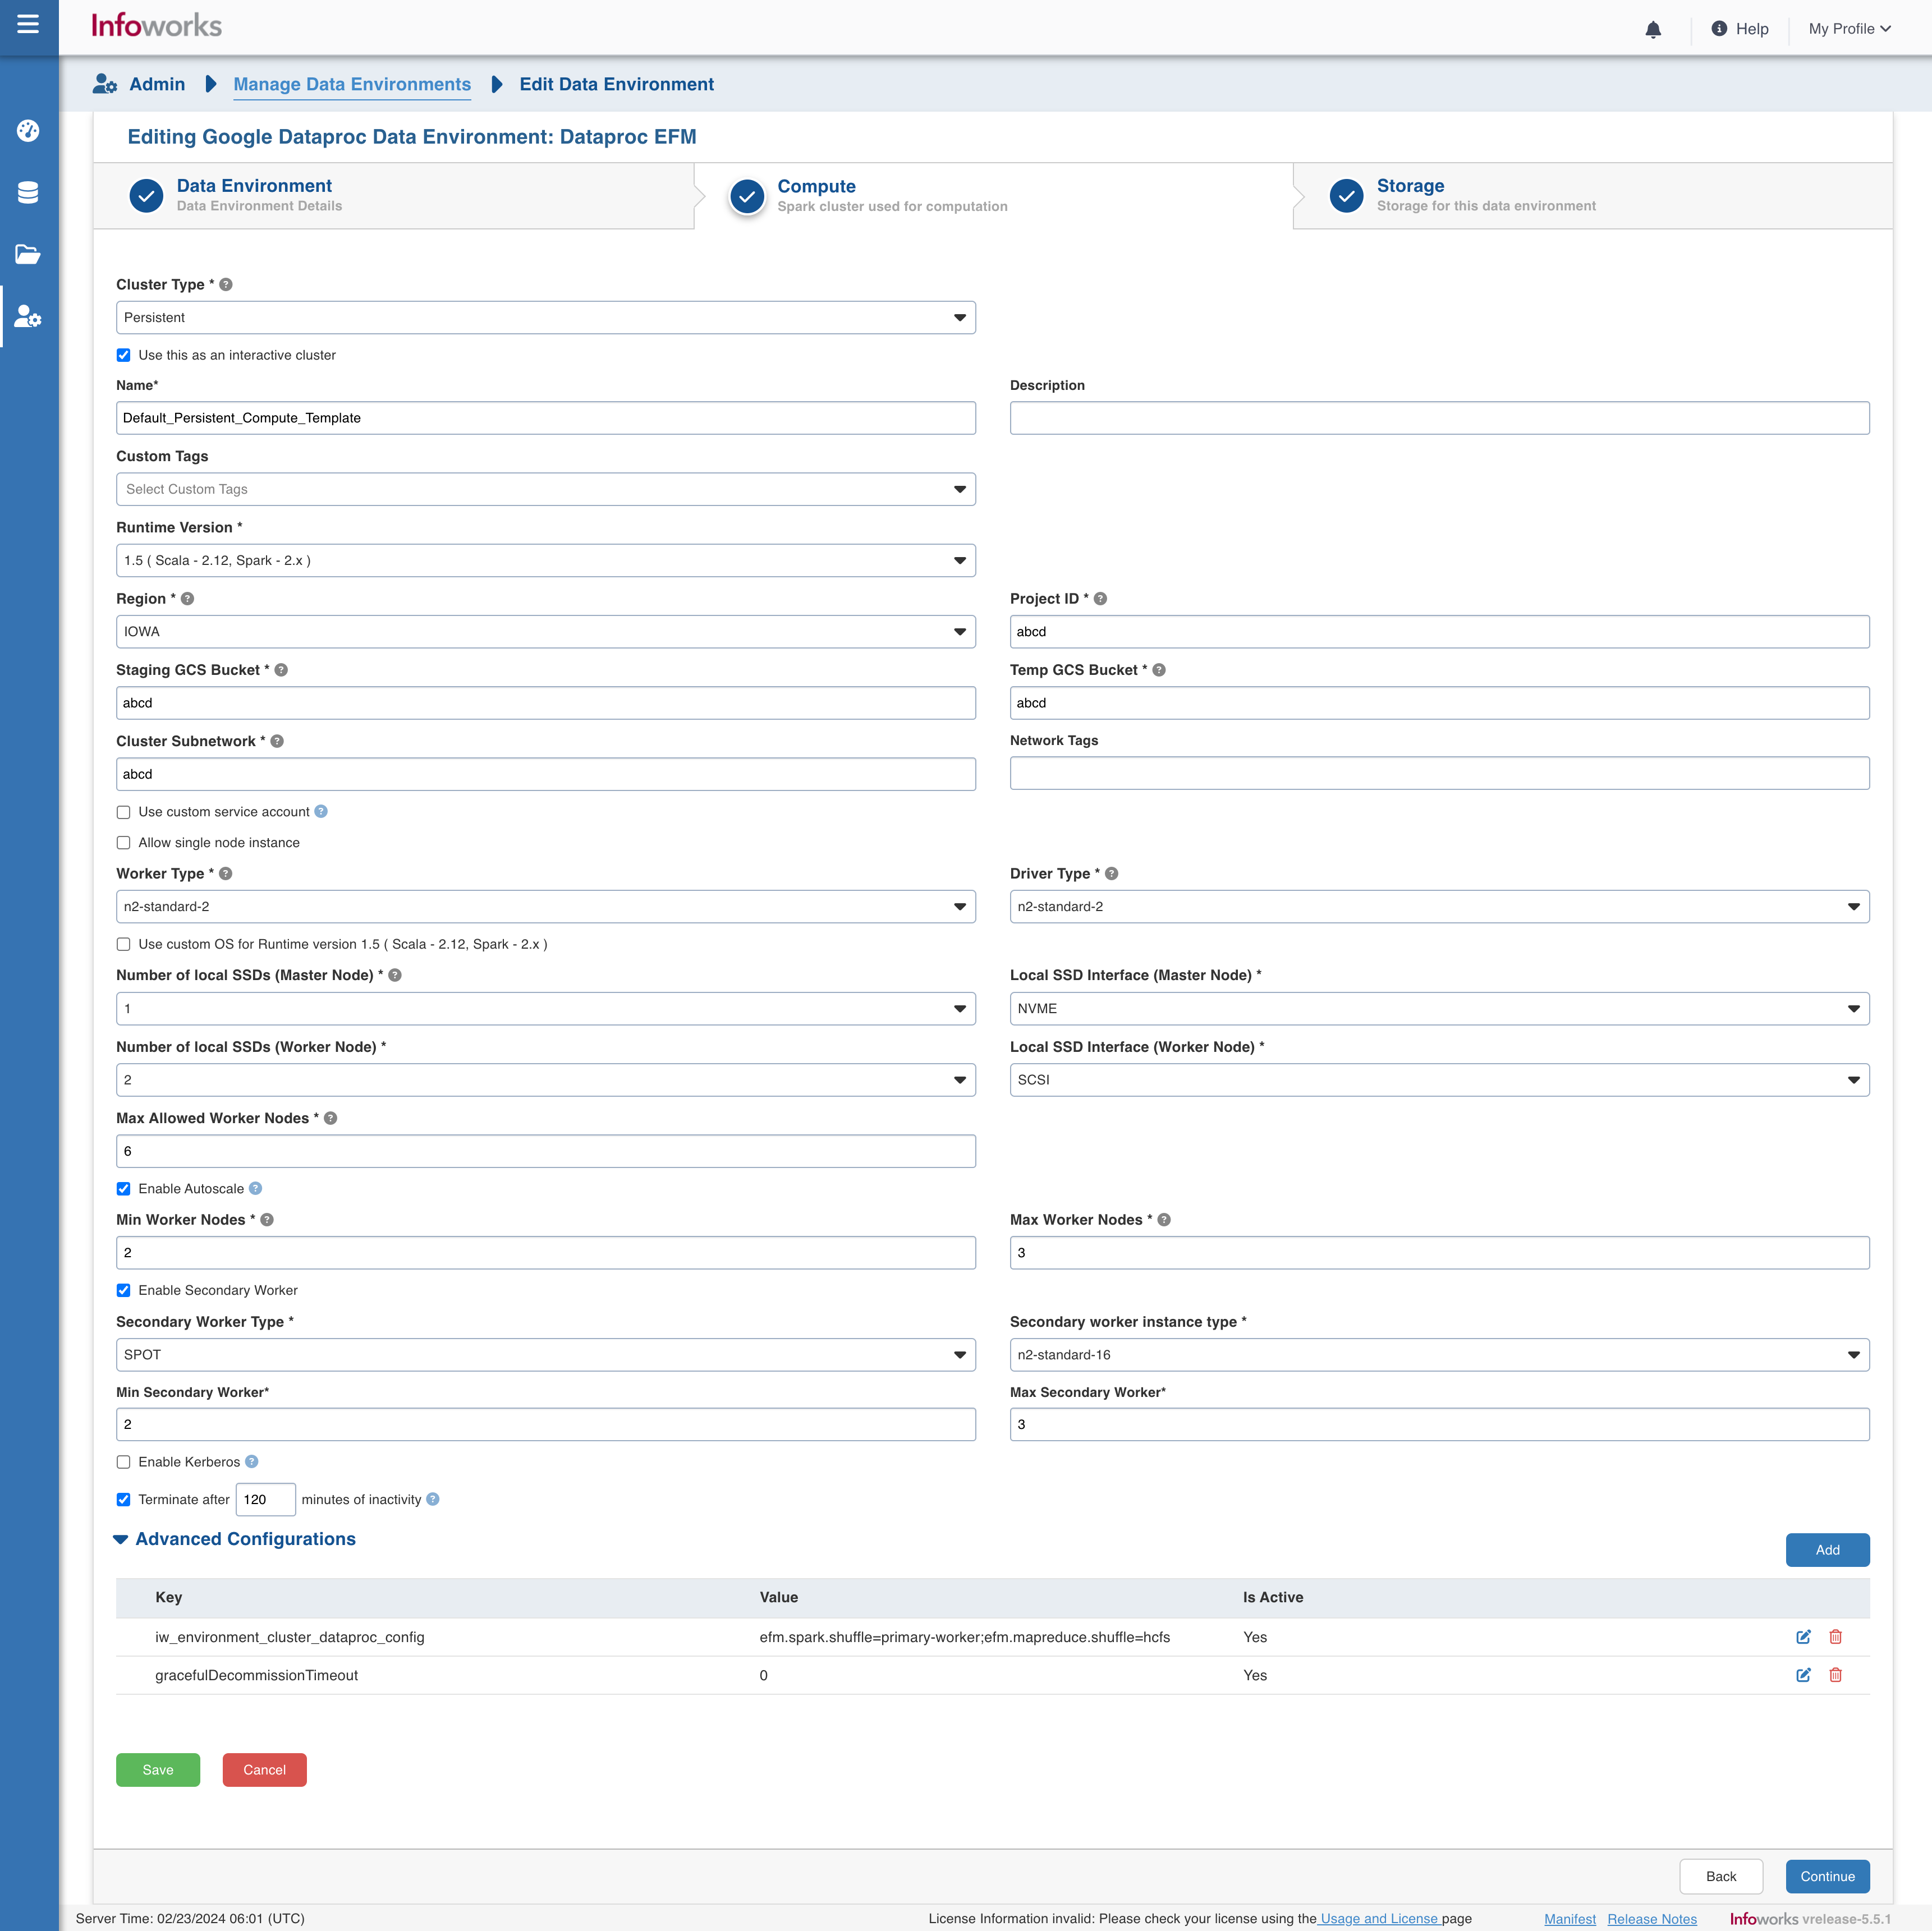
Compute
A Compute template is the infrastructure used to execute a job. This compute infrastructure requires access to the metastore and storage that needs to be processed.To configure the compute details, enter values in the following fields. This defines the compute template parameters, to allow Infoworks to be configured to the required GCP Dataproc instance.
Infoworks supports creating multiple persistent clusters in a GCP Dataproc environment, by clicking on Add button.
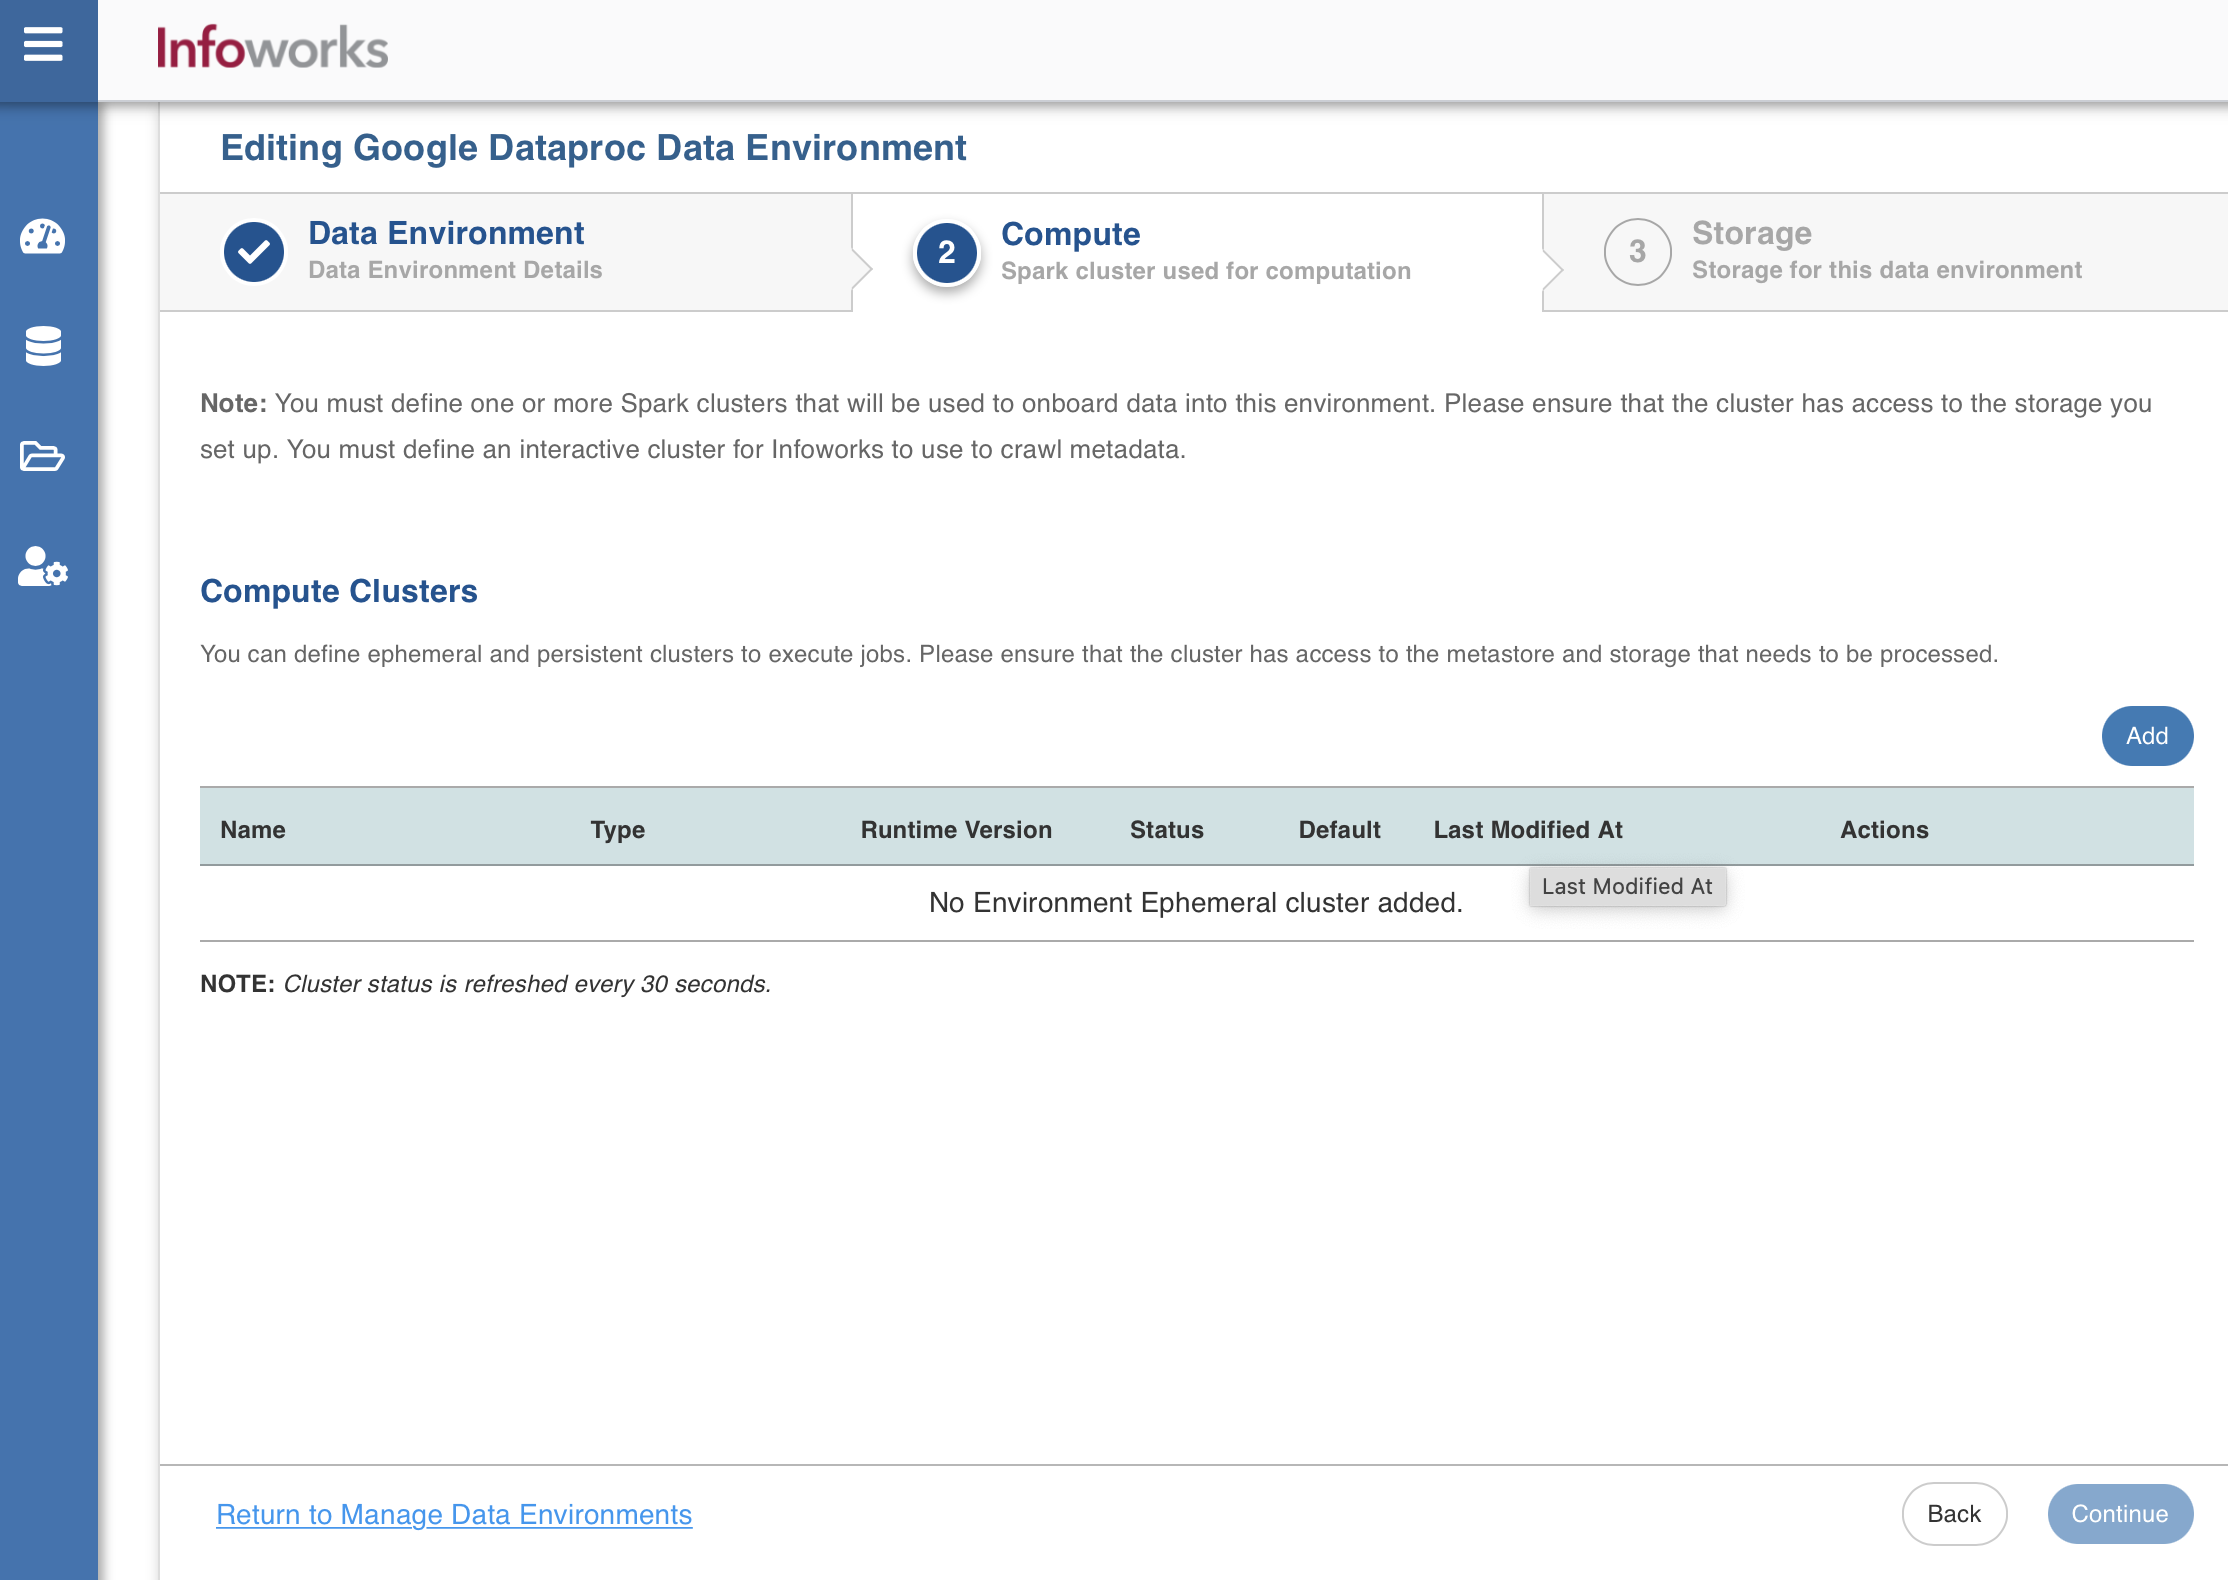
| Field | Description | Details |
|---|---|---|
| Cluster Type | The type of compute cluster that you want to launch. | Choose from the available options: Persistent or Ephemeral. Jobs can be submitted on both Ephemeral as well as Persistent clusters. |
| Use this as an Interactive Cluster | Option to designate a cluster to run interactive jobs. Interactive clusters allows you to perform various tasks such as displaying sample data for sources and pipelines. You must define only one Interactive cluster to be used by all the artifacts, at any given time. | Check this box to designate the cluster as an interactive cluster. |
| Name | Name required for the compute template that you want to use for the jobs. | User-defined. Provide a meaningful name for the compute template being configured. |
| Description | Description required for the compute template. | User-defined. Provide required description for the compute template being configured. |
| Runtime Version | Select the Runtime version of the compute cluster that is being used. | From the Runtime version dropdown, select either 1.5 or 2.0 for GCP Dataproc as per your requirement
|
| Region | Geographical location where you can host your resources. | Provide the required region. For example: Oregon. |
| Staging GCS Bucket | Name of the GCS staging bucket which stages cluster job dependencies, job driver output, and cluster config files. | Provide the required GCS staging bucket name. |
| Temp GCS Bucket | Name of the GCS staging bucket which stores ephemeral cluster and jobs data, such as Spark and MapReduce history files. | Provide the required GCS temp bucket name. |
| Cluster Subnetwork | Subnetwork in which the cluster will be created | Provide the required cluster subnetwork name. |
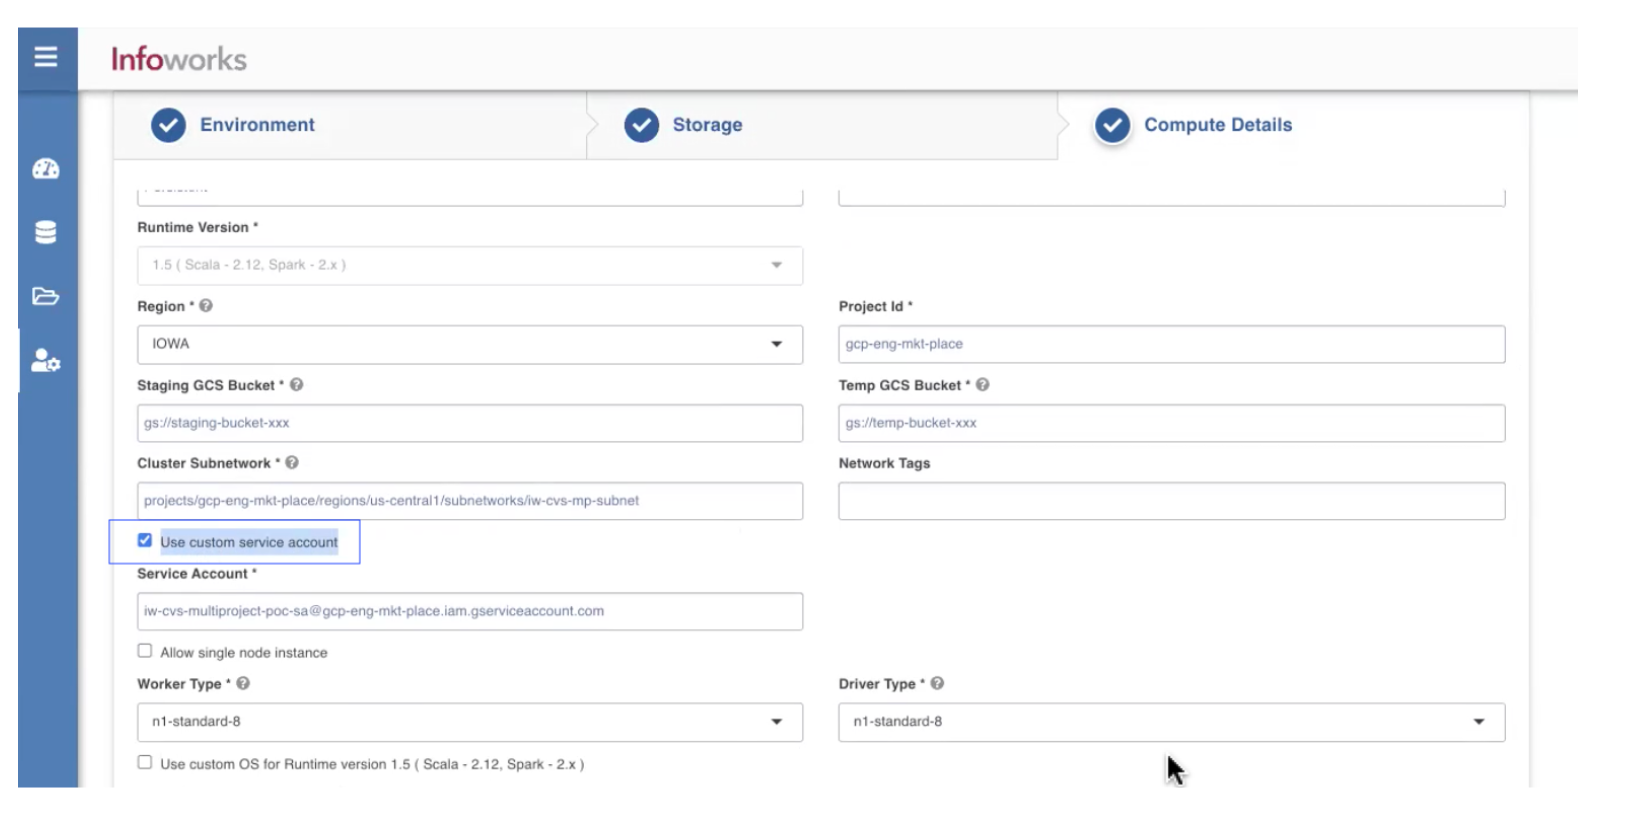
| Use custom service account | Specifies the user managed service account to attach to the cluster. The value has to be the service account e-mail address. | Provide the custom service account through which the cluster is launched. The Custom Service Account specifies the user managed service account which uses VMs in a Dataproc Cluster for all data plane operations, such as reading and writing data from and to Cloud Storage and BigQuery. |
| Allow single node instance | The single node instance of the cluster that is launched. | Select this check box to allow the single node instance of the cluster. |
| Network Tags | A character string added to a tags field in a resource, such as Compute Engine virtual machine (VM) instances or instance templates. | The network tags assigned to an instance apply to all of the instance’s network interfaces. A network tag is applicable to the VPC networks that are directly connected to the instance’s network interfaces. |
| Worker Type | Worker type configured in the edge node. | Provide the required worker type.For example: Standard_L4 |
| Driver Type | Driver type configured in the edge node. | Provide the required driver type. For example: Standard_L8 |
| Use custom OS | Dataproc clusters can be provisioned with a custom image that includes a user’s pre-installed packages | Check this box to provide image URI. |
| Number of local SSDs (Master Node) | Number of local SSDs for the master node | Provide the number of local SSDs for the master node. The allowed values for the number of SSDs might vary based on the selected Driver Type. |
| Local SSD Interface (Master Node) | Local SSD Interface for the master node | Provide the local SSD interface for the master node. For example - SCSI or NVMe. |
| Number of local SSDs (Worker Node) | Number of local SSDs for the worker nodes | Provide the number of local SSDs for the worker nodes. The allowed values for the number of SSDs might vary based on the selected Worker Type. |
| Local SSD Interface (Worker Node) | Local SSD Interface for the worker nodes | Provide the local SSD interface for the worker nodes. For example - SCSI or NVMe. |
| Image URI | URI of the image | The format needs to be projects/<project-id>/global/images/<custom-image-name> For Ephemeral clusters, you can change the value anytime. For Persistent clusters, you must restart the cluster after a change is made. |
| Max Allowed Worker Nodes | Maximum number of worker instances allowed. | Provide the maximum allowed limit of worker instances. |
| Enable Autoscale | Option for the instances in the pool to dynamically acquire additional disk space when they are running low on disk space. | Select this option to enable autoscaling. |
| Default Min Workers | Minimum number of workers that Databricks workspace maintains. | This field appears only if Enable Autoscale check box is checked. |
| Default Max Workers | Maximum number of workers that Databricks workspace maintains. | This field appears only if Enable Autoscale check box is checked. This must be greater than or equal to Default Min Worker value. |
| Number of Worker Nodes | Number of workers configured for availability. | This field appears only if Enable Autoscale check box is unchecked. |
| Enable Kerberos | Option to enable Kerberos authentication. | Select this option to enable Kerberos authentication. |
| KMS URI | The Key Management Server Location which will be used to encrypt the passwords and keys. | This field appears only if Enable Kerberos check box is checked. Provide the required KMS URI. |
| Root Principal Password URI | GCS Location of the encrypted Kerberos root principal password. | This field appears only if Enable Kerberos check box is checked. Provide the required Root Principal Password URI . For example: gs://my-bucket/kerberos-root-principal-password.encrypted |
| KDCDB URI | Location in Cloud Storage of the KMS-encrypted file containing the KDC database master key. | This field appears only if Enable Kerberos check box is checked. Provide the required KDCDB URI. For example: project/project-id/loc/glob/keyRings/mykeyring/cryptoKeys/my-key |
| Terminate after minutes of inactivity | Number of minutes after inactivity which the pool maintains before being terminated. | Provide the minimum number of minutes to be maintained before termination. |
| Enable Secondary Worker | Option for the instances to enable configuring secondary workers. | This field appears only if the Enable AutoScale check box is checked. |
| Secondary Worker Type | Type of secondary worker to be configured. | Provide the required secondary worker VM type. For example: SPOT. This field appears only if the Enable Secondary Worker check box is checked. The secondary worker type can be one of - spot VMs, standard preemptible VMs, or non-preemptible VMs. |
| Secondary Worker Instance Type | Worker type configured in the secondary worker node. | Provide the required worker type. For example, Standard_L4. This field appears only if the Enable Secondary Worker check box is checked. |
| Min Secondary Worker | The minimum number of worker. | This field appears only if the Enable Secondary Worker check box is checked. |
| Max Secondary Worker | The maximum number of workers that a DataProc secondary worker maintains. | This field appears only if the Enable Secondary Worker check box is checked. |
Key:
iw_environment_cluster_dataproc_configValue:
efm.spark.shuffle=primary-worker/hcfs;efm.mapreduce.shuffle=hcfsKey:
gracefulDecommissionTimeoutValue:
0 (zero)
Above configurations can also be applied to BigQuery with GCP Dataproc.
When autoscale is enabled and advanced configurations for EFM are set, the Secondary workers must be enabled, else cluster creation will fail. This is because Primary workers cannot be autoscaled when Spark primary worker shuffle is enabled.
Add Additional Properties to the Dataproc Cluster
You can add additional cluster properties while launching the Persistent or Ephemeral clusters in GCP Dataproc cluster. Ensure to add these properties before you click Save on the Compute Details page.
To add any additional properties to the cluster, perform the following steps:
- Navigate to $IW_HOME/conf/dataproc_defaults.json.
- Add any additional cluster properties under softwareConfig.properties.
After entering all the required values, click Continue to move to the Storage tab.
Storage
To configure the storage details, enter values in the following fields. This defines the storage parameters, to allow Infoworks to be configured to the required Google Dataproc instance:
| Field | Description | Details |
|---|---|---|
| Name | Storage name must help the user to identify the storage credentials being configured. | User-defined. Provide a meaningful name for the storage set up being configured. |
| Description | Description for the storage set up being configured. | User-defined. Provide required description for the environment being configured. |
| Region | Geographical location where you can host your resources. | Provide the required region. For example: OREGON. |
| Storage Type | Type of storage system where all the artifacts will be stored. The available option is GCS. | Select GCS from the drop-down menu. |
| Access Scheme | Scheme used to access GCS. Available option is gs:// | Select gs:// from the drop-down menu. |
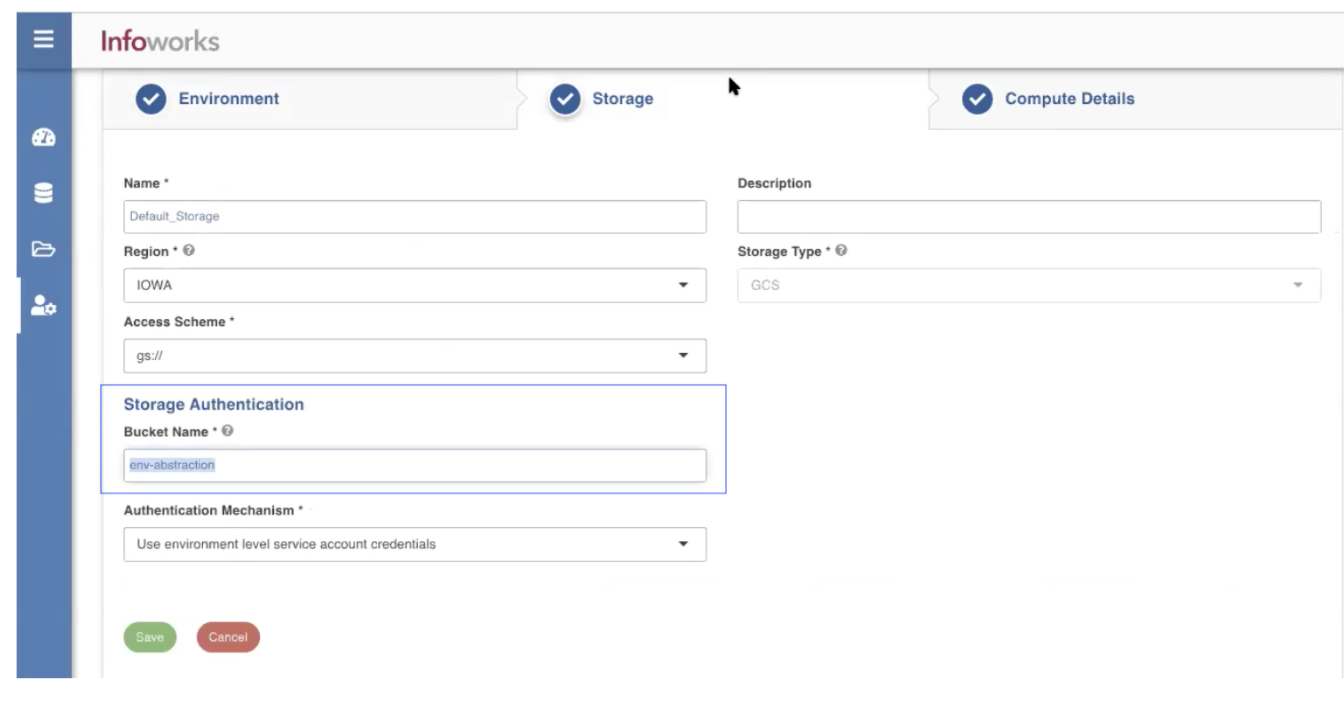
| Bucket Name | Buckets are the basic containers that hold, organise, and control access to your data. | Provide the storage bucket key. Do not use gs:// for storage bucket. |
| Authentication Mechanism | Includes the authentication mechanism to access the GCP storage. | The following authentication mechanisms are available: Use system role credentials: The default credentials of the instance to identify and authorize the application. Use environment level service account credentials: The IAM Service Account defined at the environment level to identify and authorize the application. Override environment authentication mechanism: Overrides the credentials provided for the environment. Resources which are being accessed from the data plane (Dataproc compute nodes) will use the service account of the compute nodes. |
| Service Credentials | Provide the credentials used to authenticate calls to Google Cloud APIs. | Upload File: Upload the file where the service credentials are stored. Enter File Location: Path of the file to be uploaded. You must enter the server file location. |
After entering all the required values, click Save. Click Finish to view and access the list of all the environments configured. Edit, Clone, and Delete actions are available on the UI, corresponding to every configured environment.

Setting Up Keyring User Permissions
Follow the steps below to set up user permissions:
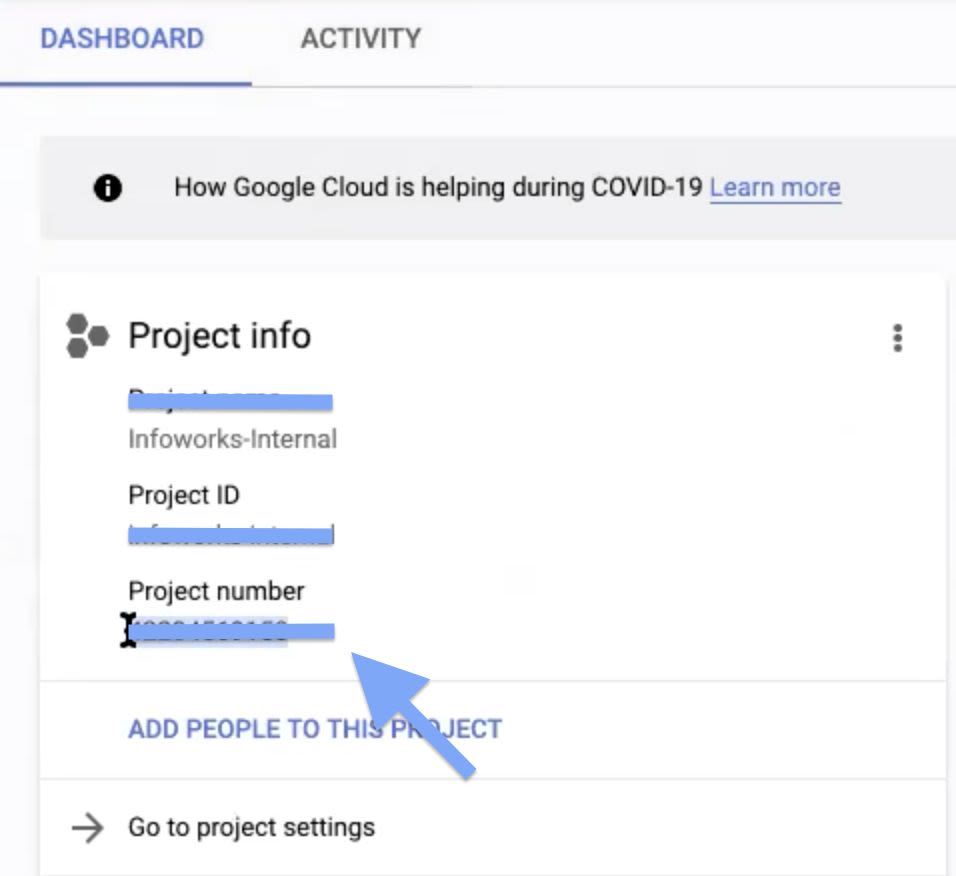
Step 1: In the Google Cloud Console, select your required project.
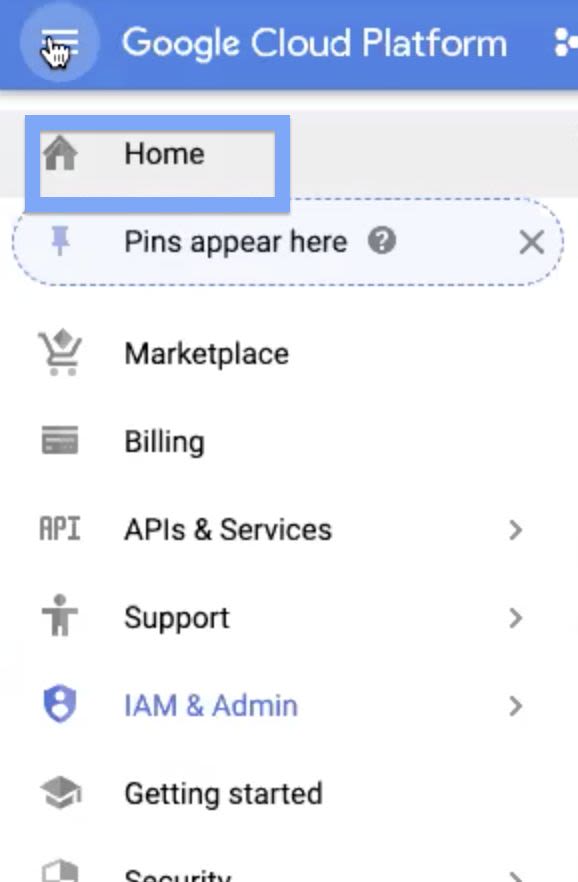
Step 2: Click the Navigation menu on the top left corner, and click Home.
Step 3: In the Dashboard Tab, copy the Project number, and save it for later.
Step 4: Navigate to Navigation menu > IAM & Admin > IAM.
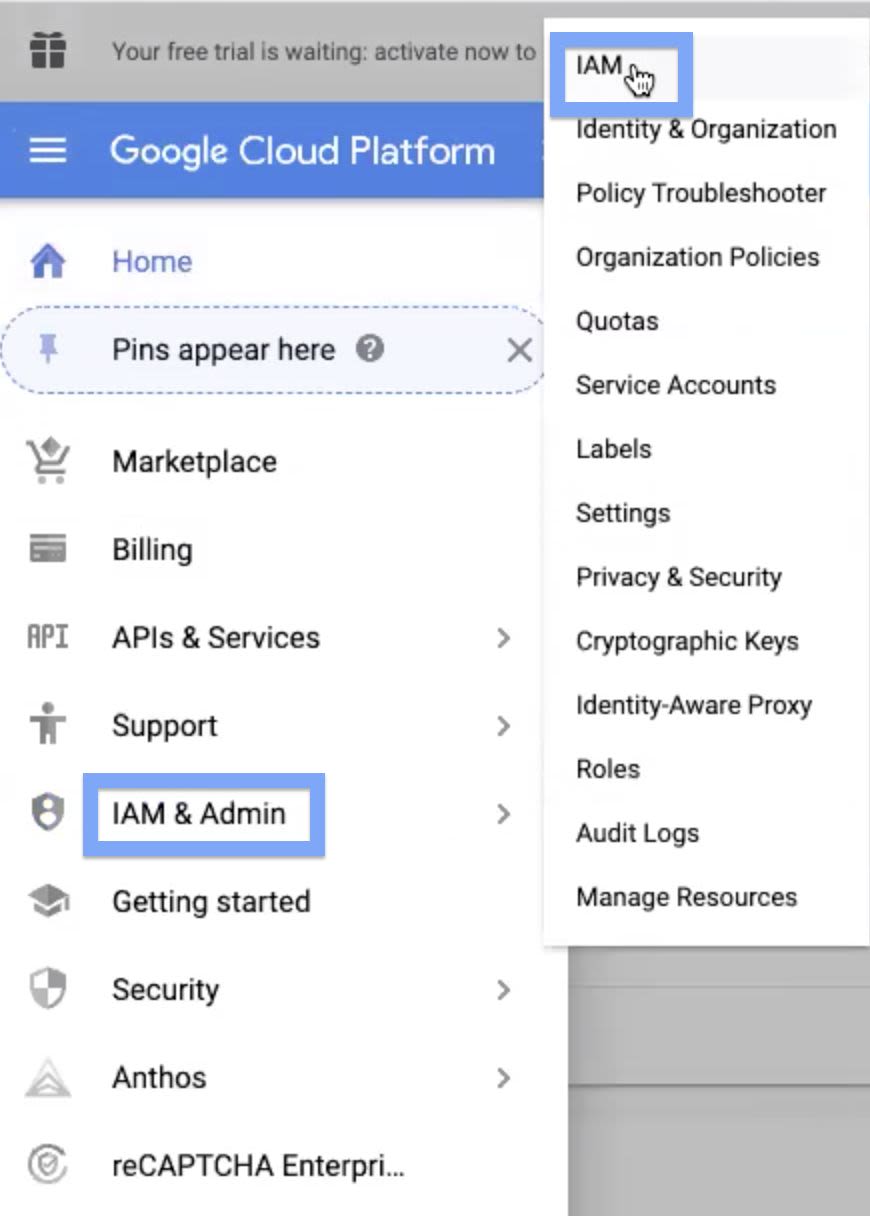
List of service account names are displayed. Copy the two names which are in the following syntaxes, and save it for later use:
compute@developer.gserviceaccount.com and @cloudservices.gserviceaccount.com.
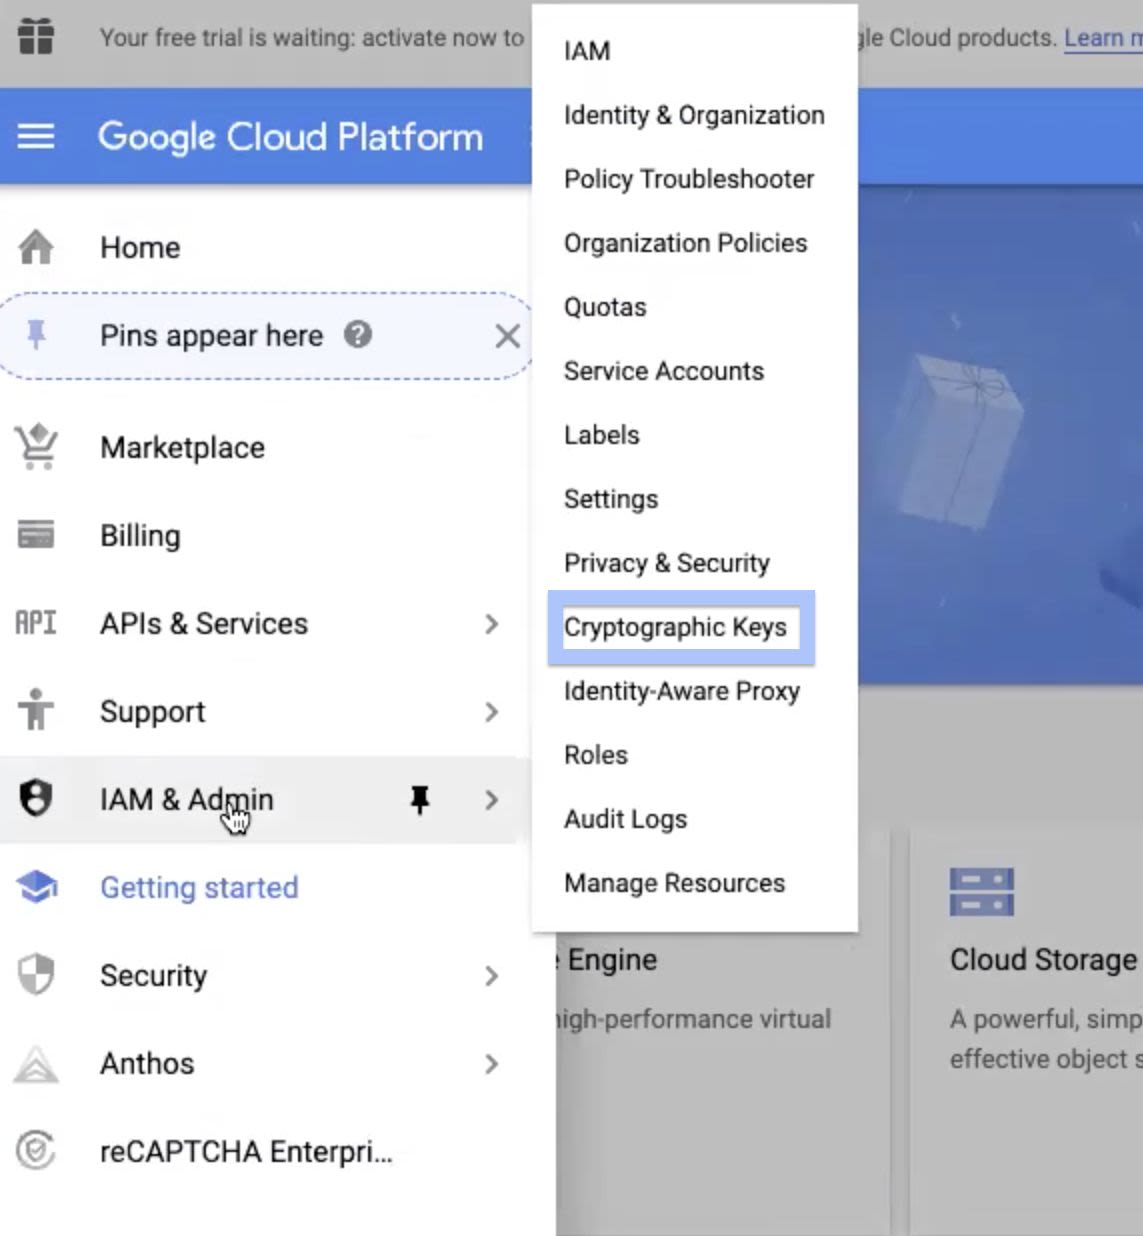
Step 5: Navigate to Navigation menu > IAM & Admin > Cryptographic Keys.
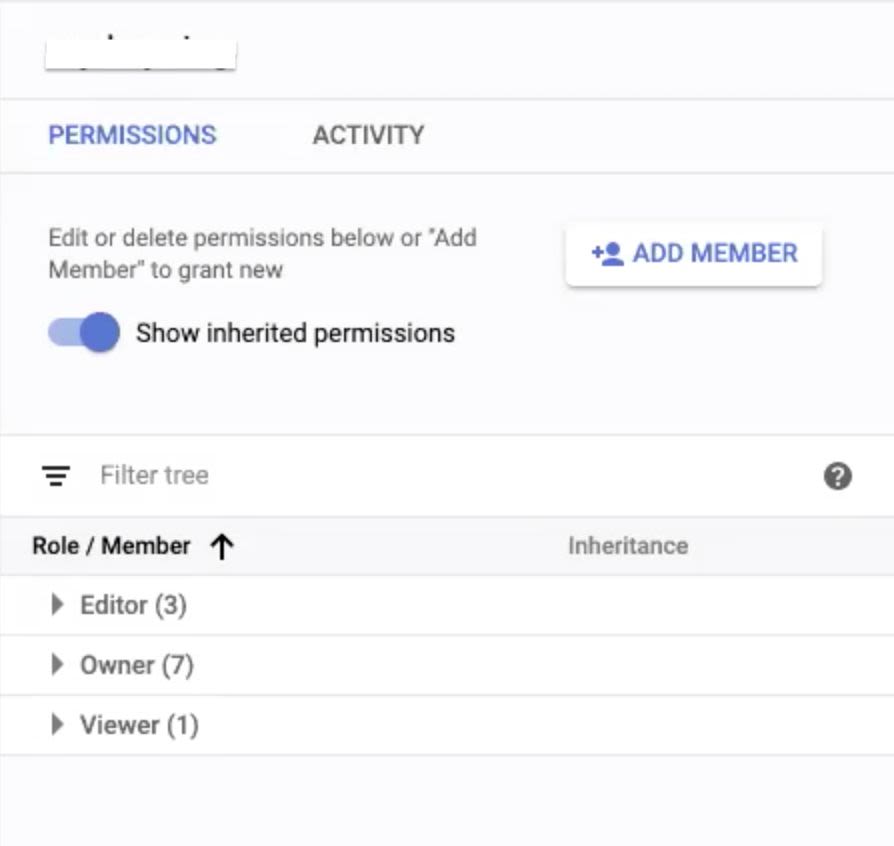
Step 6: In the list of keyring names, select the check box corresponding to the keyring you created. If the information panel is hidden, click SHOW INFO PANEL button. This displays the information panel of the corresponding keyring you selected.

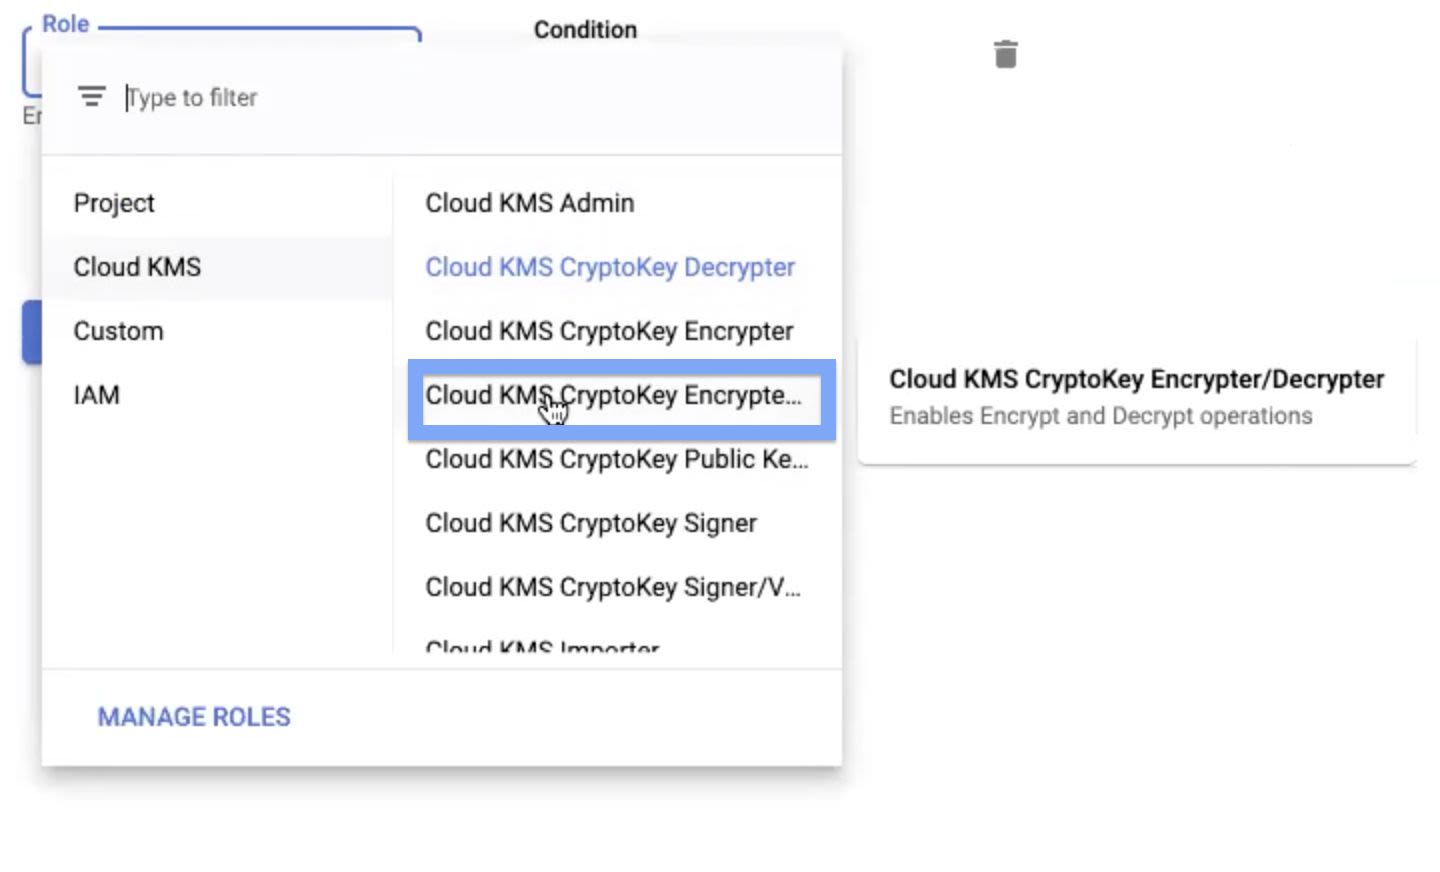
Step 7: The following Information panel is displayed. Click ADD MEMBER button.
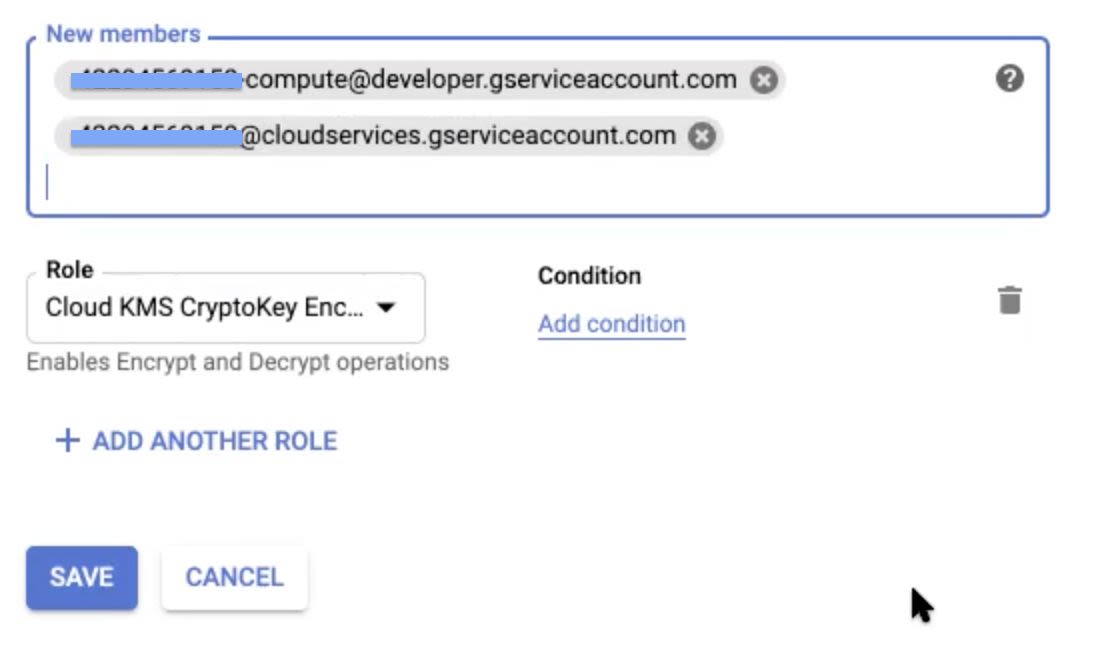
Step 8: In the New members field of the tab that displays, paste the service account names copied in Step 4 of the Setting Up Keyring User Permissions section. Ensure that, when you paste these names, select the items from the drop-down that appears to avoid errors.

Step 9: After you place both the service account names in the New Members field, select the Cloud KMS CryptoKey Encrypter/Decrypter option in the Role field.
Step 10: Click Save, to save your changes.
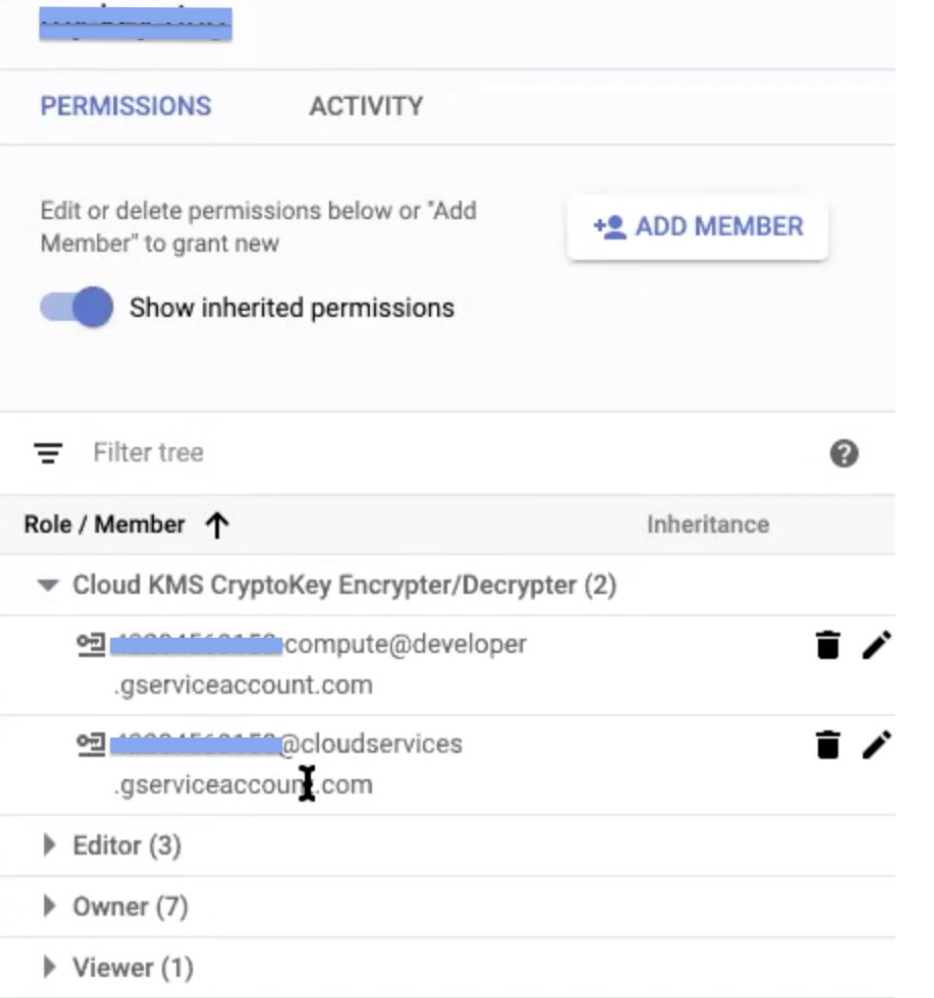
This displays the two new service account names added in the information panel.
Multi-tenant Configuration Support
The multi-tenant configuration feature allows you to define the service account credentials that are the same for metastore, compute, and storage buckets although these are available in different projects.
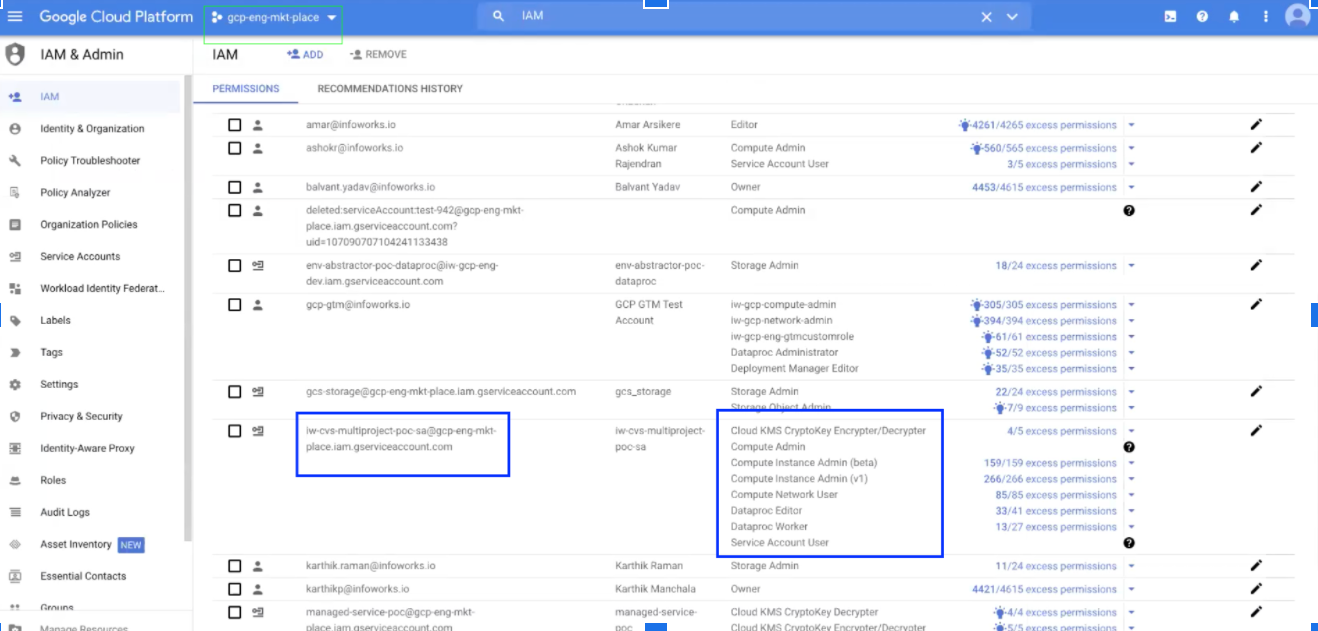
The service permissions for the project gcp-eng-market-place is displayed under the Permissions tab and are as follows:
The environment setup is as follows:
- Click Manage Environments from the left navigation panel.
- In the Environment tab, select Service account credentials from the Authentication mechanism.
- Upload the JSON file for the service account used, under the Service Credentials section.
- Under the Metastore section, enter the type of the Metastore.
- Enter the Metastore instance for the different project that you would like to associate with this same service account. For example, gcp-eng-dev.
- Under the Storage tab, enter the Bucket Name under the Storage Authentication section.
- Under the Compute Details tab, enter the Project ID that is the same as the Compute defined for the gcp-eng-mkt-place. You can also launch the compute in a different project.
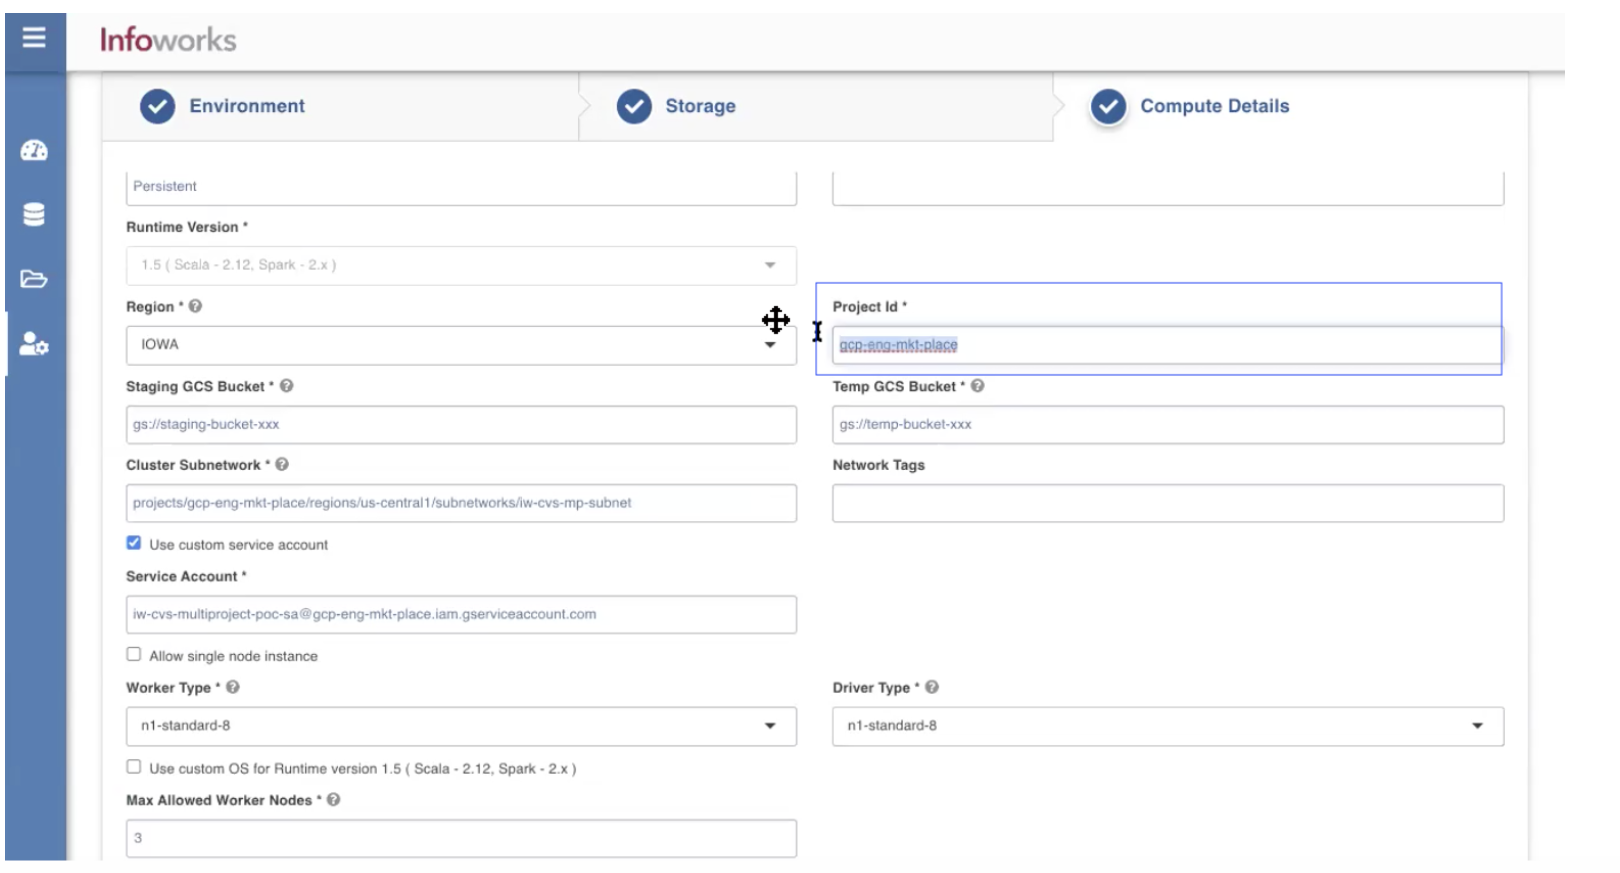
- Enter the Cluster subnetwork and select the check box *_Use custom service account *_to impersonate the permissions that can be used after the cluster is launched.
- Click Save to save the settings for Multi-tenant configuration.
Restart the Interactive Cluster on GCP Dataproc
You can drop and restart the persistent clusters including interactive clusters while refreshing the OS image of the Dataproc cluster.
You can perform the following procedures to restart the cluster:
- Check the Running Jobs on Dashboard
- Terminate the Cluster from Dashboard
- Create a New Cluster from the UI
Check the Running Jobs on Dashboard
Perform the following steps to safely terminate a cluster:
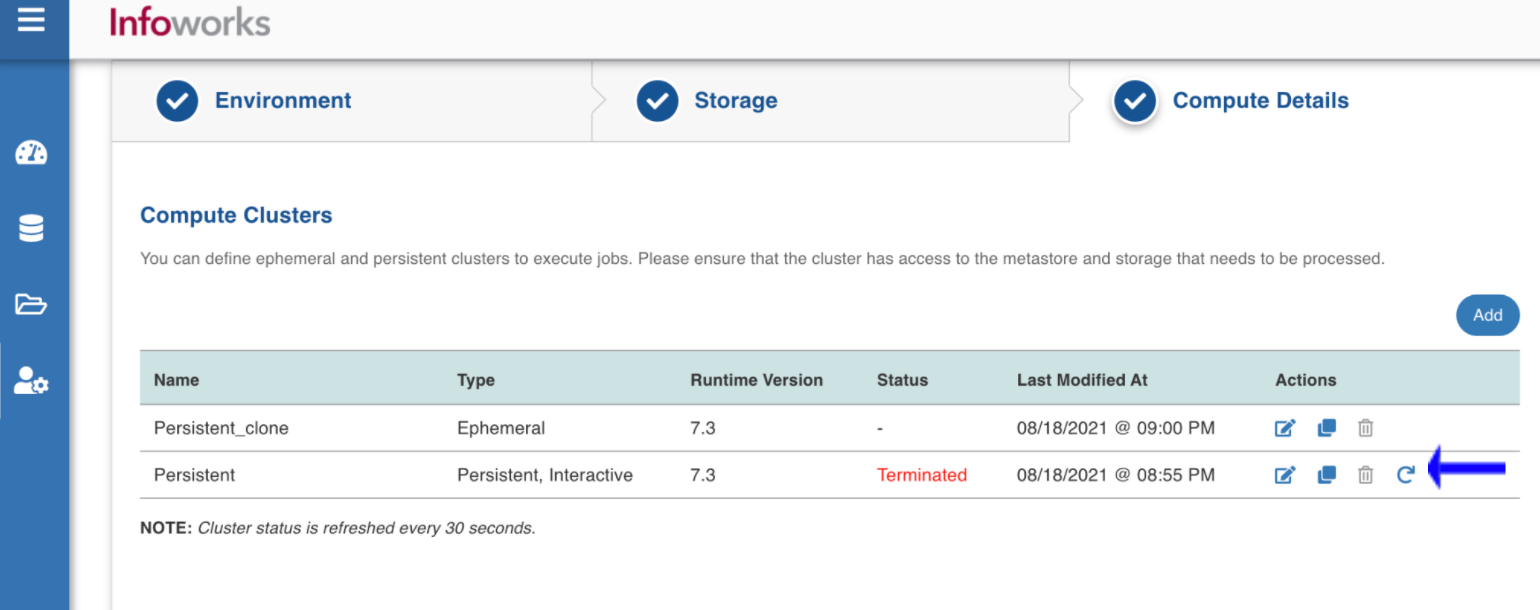
- Note the existing Cluster Id from IWX UI using the following steps:
- Navigate to Manage Environments on the left navigation panel.
- Locate the required environment template and click Edit.
- Navigate to the Compute Details tab and locate the required cluster. Then click Edit.
- Identify the Cluster ID on this page.

- Navigate to the relevant Cloud Provider (Dataproc/Databricks/EMR) dashboard and open the Clusters page.
- Search for the Cluster Id from Step 1 and open the page for that cluster.
- Identify if any jobs are running on the cluster:
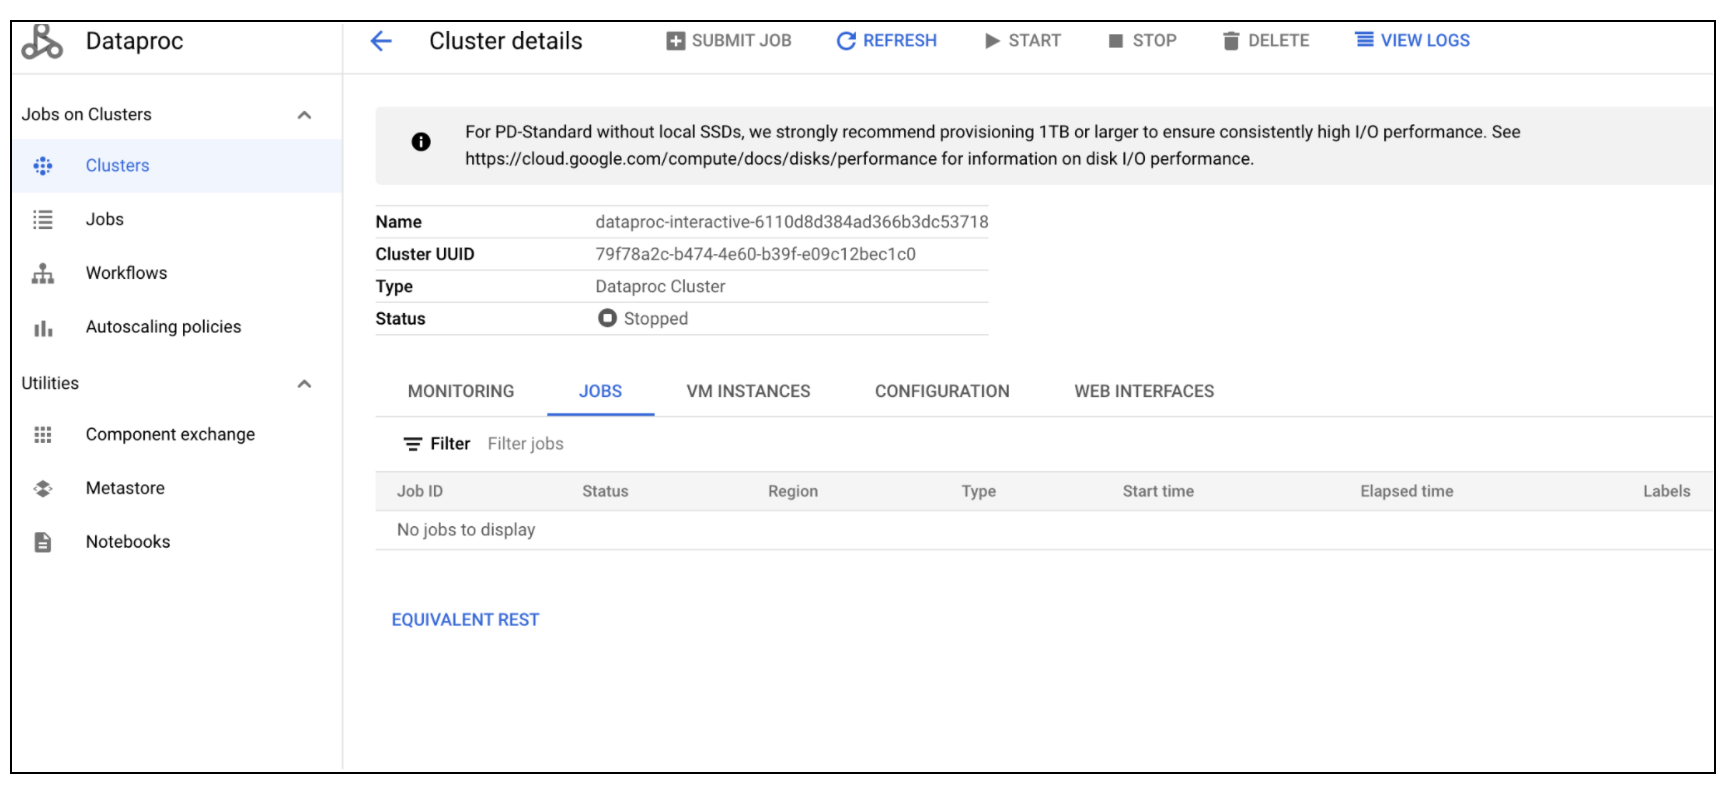
a. For GCP Dataproc: On the Cluster Details page, select the Jobs tab. Ensure that no jobs are running.
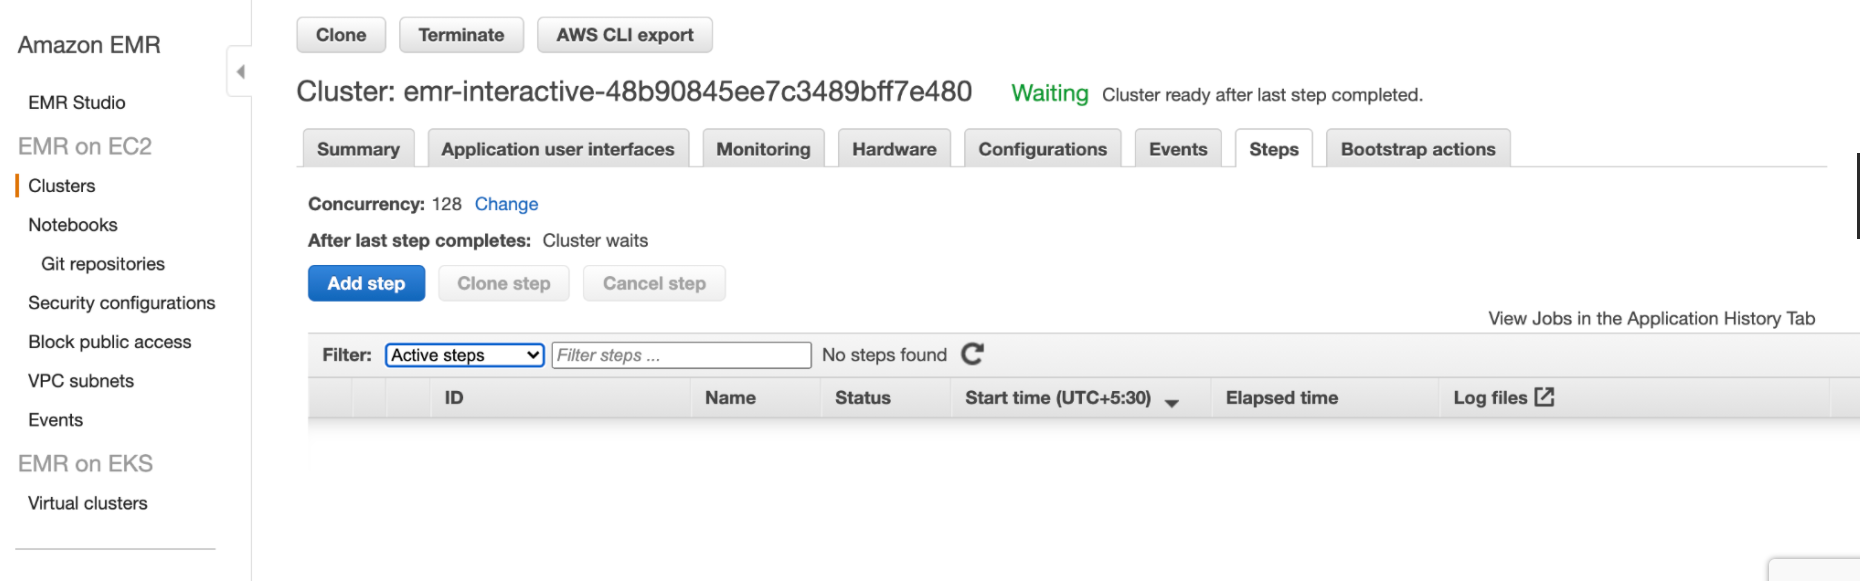
b. For AWS EMR: On the cluster page, select the Steps tab. Ensure that no steps are running.
In the Steps table, filter for Active Steps. Else, ensure that the cluster is not in the Running state.
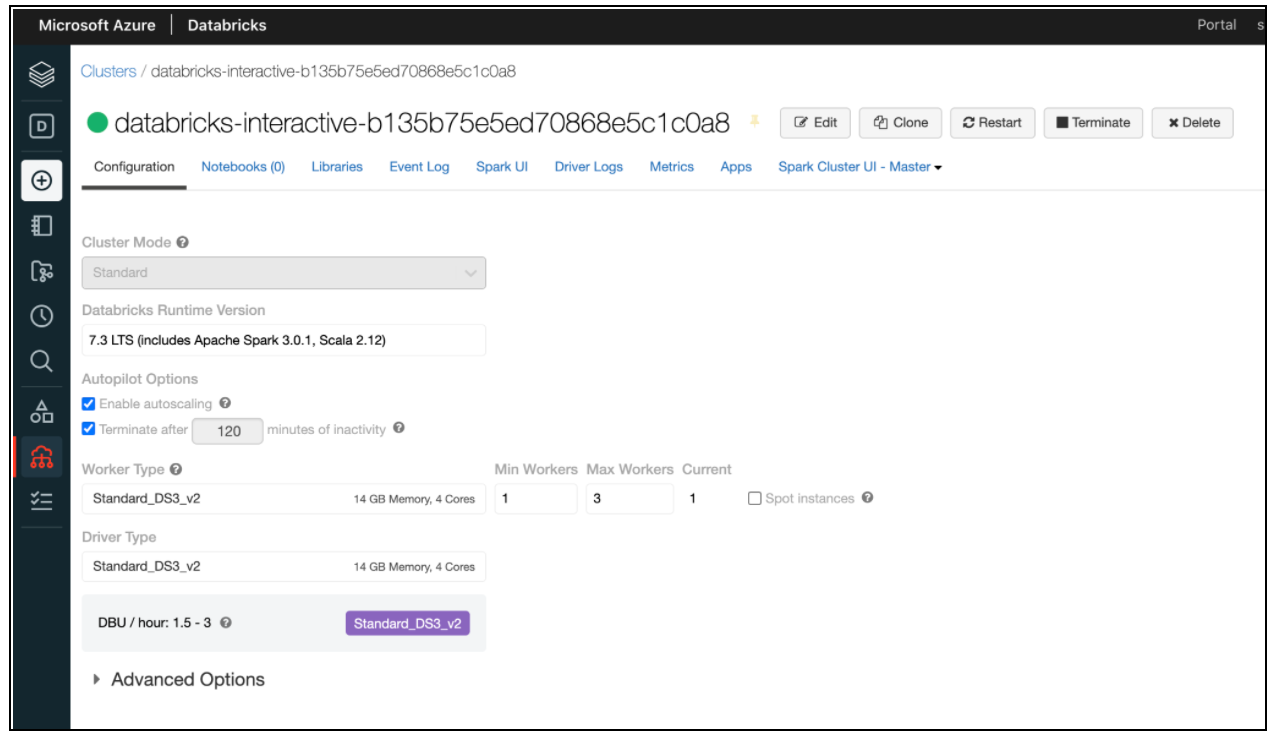
c. For Databricks: The following screen appears.
Terminate the Cluster from Dashboard
To terminate the cluster from the Dashboard, navigate to the Clusters page and perform the following steps:
- Click Terminate for Databricks and EMR. Or
- Click Delete for Dataproc.
Create a New Cluster from the UI
To create a new cluster from the Infoworks UI, perform the following steps:
- Load the Compute Details tab from Manage Environments and wait for a few seconds for the status to refresh.
- Once the cluster is in Terminated State or Error State, click the Create/Restart button that appears.
NOTE The Cluster will move to Creating state after this step is completed.
3. Wait for a few seconds for the cluster to enter into Running state before submitting jobs.