Prerequisites
A Google account is required to work with GCP. Sign up for a Google account, if you do not have one.
Log on to the Google Cloud Platform Console, and create a new project.
Ensure that the Quota limit for CPU cores is greater than 72 for the region that Infoworks is spinning up.
NOTE Ensure that the user has the project owner permissions, to provision Cloud KMS, Cloud SQL, Firewall Rules, Compute Engine, and GCS Buckets.
Enable API and Services for the DataProc, Compute Engine, Cloud KMS, Cloud SQL, and Cloud SQL Admin API, in the Google Cloud Console.
Installing Infoworks on GCP
Step 1: Ensure that you create a service account.
Step 2: Create the storage buckets and assign permissions to the Service Account (created in Step 1). These would further be required to configure environment templates.
The following are the roles/permissions required for the Service Account:
Storage
Storage Object Admin
Storage Object Viewer
Compute Network User
Dataproc Editor
BigQuery
BigQuery User
BigQuery Data Editor
BigQuery Data Viewer
Service Account User
Step 3: Create a Json key for the service account. Ensure to download and keep it handy for use.
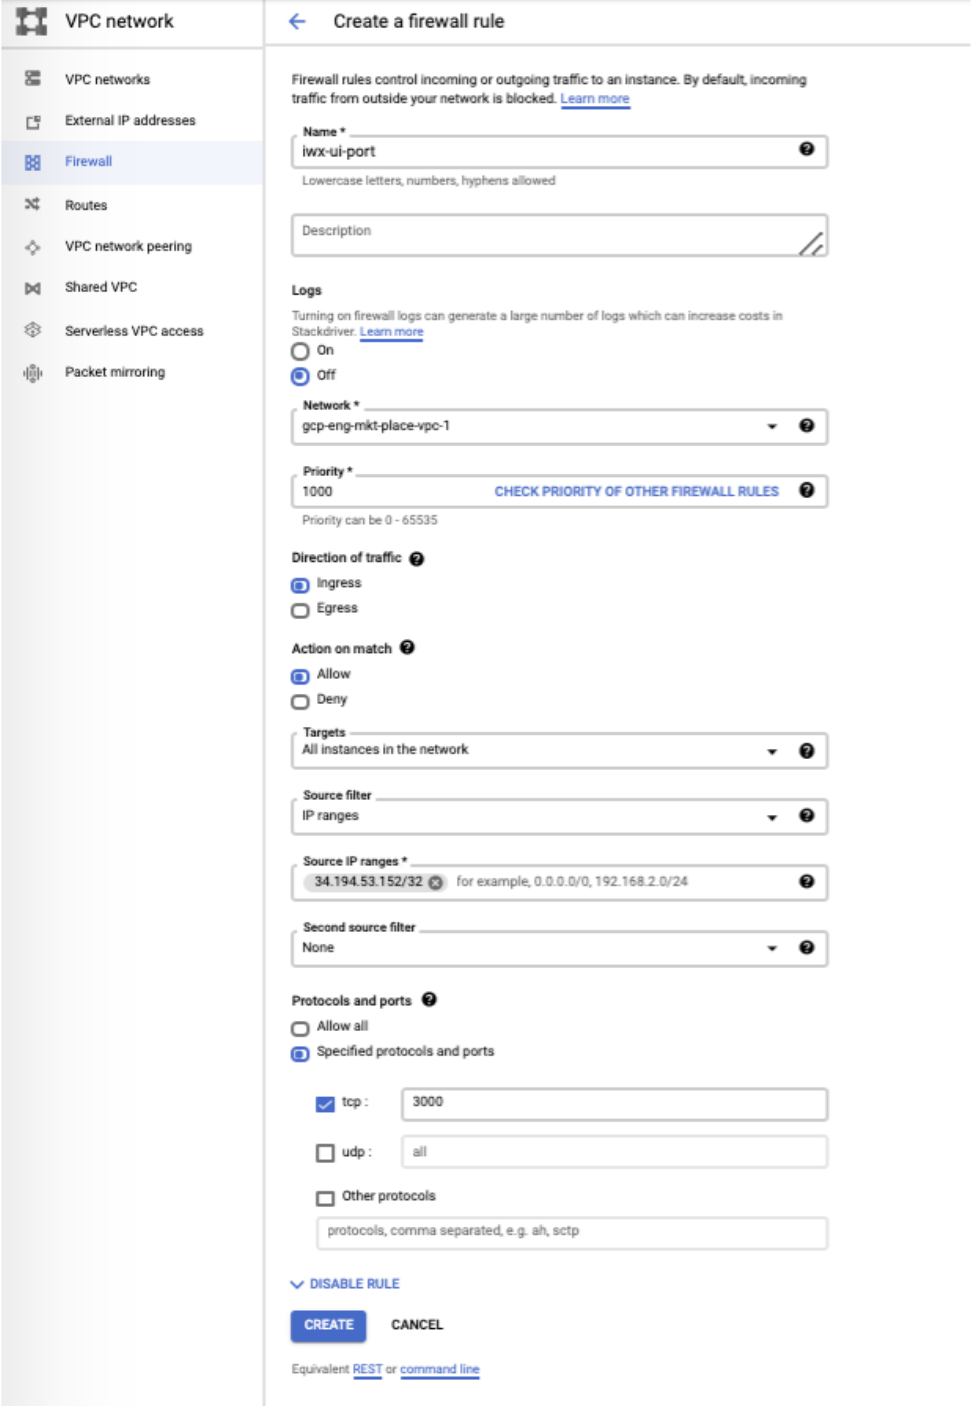
Step 4: Create a firewall rule to allow access to default port 3000 for your whitelisted IPs.
Step 5: Create a firewall rule to allow ingress traffic and establish communication within the VPC network.
Step 6: Create a firewall rule on default proxy port 3000 to allow ingress for data plane VPC/Subnet.
NOTE This step allows Datasource ports to be connected to data plane subnets. The firewall rule provides access for connecting data plane to control plane.
Optional: You can create VPC Peering between Infoworks VM subnet and Dataproc Subnet.
Step 7: Launch a new virtual machine (VM) with the following image: UbuntuServer 20.04-LTS. The recommended minimum hardware requirements are 64 GB RAM, 8 vCPUs, and 200 GB SSD disk space. Static IP is recommended for Infoworks VM.
Step 8: Log in to the launched instance using SSH.
Step 9: Ensure that the hostname alias set for the Infoworks Instance has less than 63 characters. Postgres database has a character limit on hostnames. Run the following command to verify the same on the Infoworks: hostname -A
Step 10: Switch to root user using the following command, before you perform the following steps:
sudo su -
Step 11: Switch the current working directory to /opt using the following command:
cd /opt
Step 12: Download the installation package by executing the following commands:
NOTE Switch to root user before you perform the following steps.
To use Ubuntu 20.04, execute the following command:
wget https://iw-saas-setup.s3.us-west-2.amazonaws.com/5.3/iwx_installer_ubuntu2004_5.3.0.tar.gz
To use RHEL 8, execute the following command:
wget https://iw-saas-setup.s3.us-west-2.amazonaws.com/5.3/iwx_installer_rhel8_5.3.0.tar.gz
Step 13: Untar the package by running the following command:
For Ubuntu 20.04, execute the following command:
tar xvf iwx_installer_ubuntu2004_5.3.0.tar.gz
For RHEL 8, execute the following command:
tar xvf iwx_installer_rhel8_5.3.0.tar.gz
NOTE Contact support@infoworks.io, if you face any difficulty in accessing any of these URLs.
Step 14: Open configure.sh file in the directory.
Step 15: Configure the following parameters as described in the table, and then save the file:
Field | Description | Details |
|---|---|---|
IW_USER | The Infoworks user name. The value is infoworks. | This field will be auto-filled. |
IW_PLATFORM | Name of the Infoworks platform. The value to be entered in this field is saas. | This field will be auto-filled. |
IW_HOME | Location where Infoworks will be installed. The value is /opt/infoworks. | This field will be auto-filled. |
IW_CLOUD_PROVIDER | Name of the cloud provider. | Enter gcp. |
IW_EDGENODE_IP | The IP address where Infoworks needs to be launched. | Provide the private IP of the virtual machine created. |
METADB_MANAGED | This flag indicates whether the Mongo Installation is managed by Infoworks | If managed by Infoworks, enter Y (default). If managed by an external mongo, enter N. NOTE This field is applicable only for MongoDB Atlas. |
METADB_USE_SRV | This flag indicated whether the MONGO_HOST corresponds to a DNS SRV record | Enter N (default) for No (prefix “mongodb://”), or Y for Yes (prefix “mongodb+srv://”) NOTE This field is applicable only for MongoDB Atlas. |
NOTE The fields mentioned in below given table under Step 16 apply only to MongoDB Atlas. If you are not using MongoDB Atlas, skip to Step 17.
Step 16: Configure the following parameters as described in the table, and then save the file:
Field | Description | Details |
|---|---|---|
METADB_FORCE_DROP | This flag indicates whether the Installer should overwrite any existing Databases | Enter N(default) for No(the provided databases must be empty), or Y to allow dropping of databases. |
MONGO_HOST | The Mongo Host URL to connect to. | Enter the Mongo Server or Seed DNS hostname (without prefix) |
MONGO_USER | The Mongo User to authenticate as. | Enter a user that has at least read/write permissions over the databases mentioned.(defaults to Infoworks) |
MONGO_PASS | The Password of the aforementioned MONGO_USER | Enter the Password of the MONGO_USER (defaults to Infoworks Mongo Password) |
MONGO_DB | The Database Name that will store Infoworks MetaData | Enter a valid database name. |
MONGO_QUARTZDB | The Database Name that will store Quartzio MetaData | Enter a valid database name. |
Step 17: Ensure that configure.sh and bootstrap.sh files have executable permissions. If the files do not have the permissions, run the following command: chmod u+x configure.sh bootstrap.sh
Step 18: Using command prompt execute the following commands as root user:
source configure.sh
./bootstrap.sh
Step 19: By default, the GCP Dataproc cluster is provisioned with public IP address where the internalIpOnly property is set to false. To provision the cluster with an internal IP address, you must modify the internalIpOnly property from false to true in the /opt/infoworks/conf/dataproc_defaults.json file. Also, ensure that you create a Cloud NAT, when you use private IP. For more information, see here.
This installs Infoworks in the required environment.
For details on how to navigate through Infoworks, see Navigating Infoworks.
NOTES
To access Infoworks user interface, go to http://IP-address:3000
The default credentials to access Infoworks are:
Username: admin@infoworks.io
Password: admin