Following are the steps to design a workflow:
- Click the new workflow created. The blank Preview page is displayed.
- Click Open Workflow Editor.
- Drag and drop the required tasks in the editor.
Other than running regular tasks like Ingestion, building of pipelines and cubes, you can execute Bash commands and Hive queries, send notifications and also use a Decision Branch to add flow control.
Following is a sample workflow:
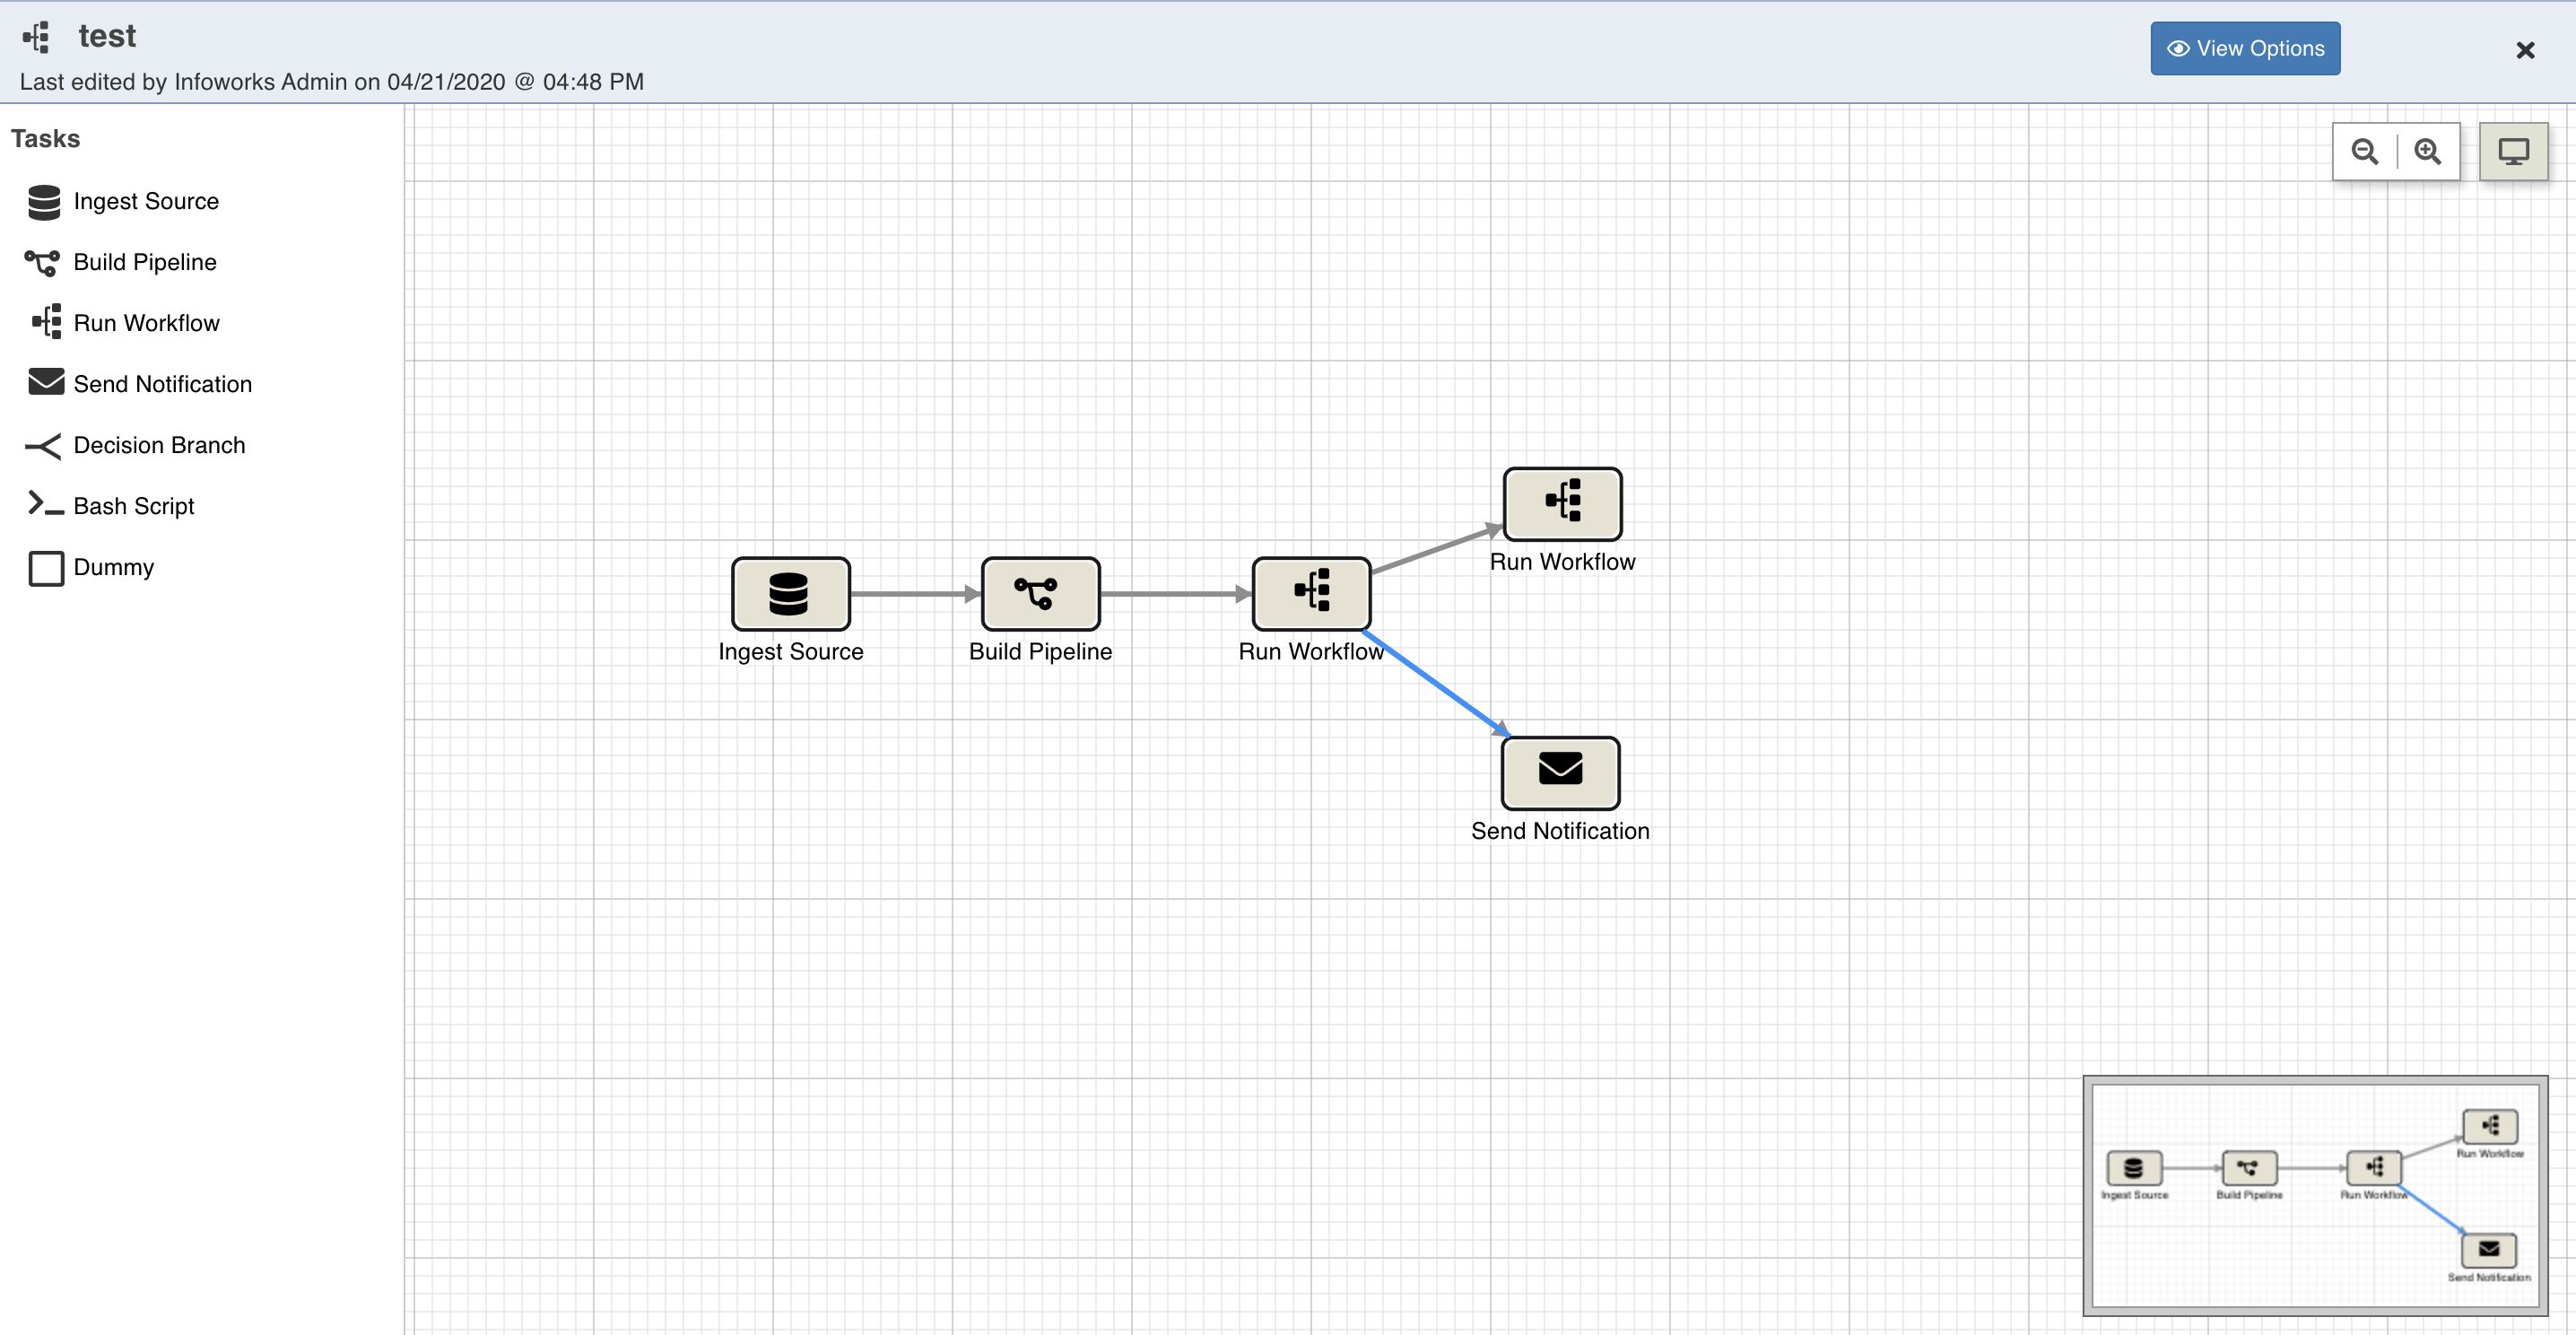
The following sections describe various options available on the Workflow Editor page.
Viewing Options
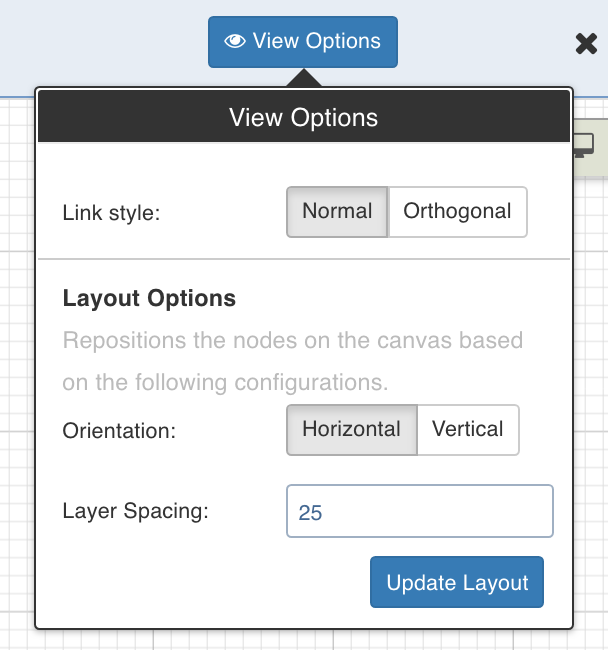
Click View Options, make the required changes and click Update Layout to select the way you want the workflow to display on the workflow editor page.
- Link Style: Normal - displays straight arrows connecting the nodes. Orthogonal - displays right-angular arrows connecting the nodes.
- Layout Options: Repositions the nodes on the canvas horizontally, vertically, or as per the layer spacing number provided.
Overview
The Overview option comes in handy if you are working on a complex workflow with many artifacts and tasks, and if the workflow exceeds the normal page view. The icon for the Overview option is represented as seen below:

Click the Overview option to open a pop-up window on the bottom right corner of the workflow editor page. Drag the cursor through the pop-up window to view a specific task/artifact or part of the workflow.
Search
The user can search for specific keywords in the node names. The nodes which match the node string will be highlighted in blue.

Auto populate node name
On saving the node details for the first time, the name automatically is saved in the format {task_name}-{entity_name}-{sub_entity_name}. This is only applicable to Ingest Source, Build Pipeline, Run Workflow and Sync to External Target.
Tasks
This section which appears as a left panel includes a list of all the tasks that can be added to the workflow. To view the properties of a task, drag and drop it to the editor and double-click it.
Following are the available tasks:
- Ingest Source
- Build Pipeline
- Run Workflow
- Send Notification
- Decision Branch
- Bash Script
- Bash Scripts in Kubernetes using Custom Images
- Manage Cluster Actions
- Sync to External Target
- Dummy
The Workflow Variables and Run Settings fields are same for all tasks except Manage Cluster Actions. These fields are explained below:
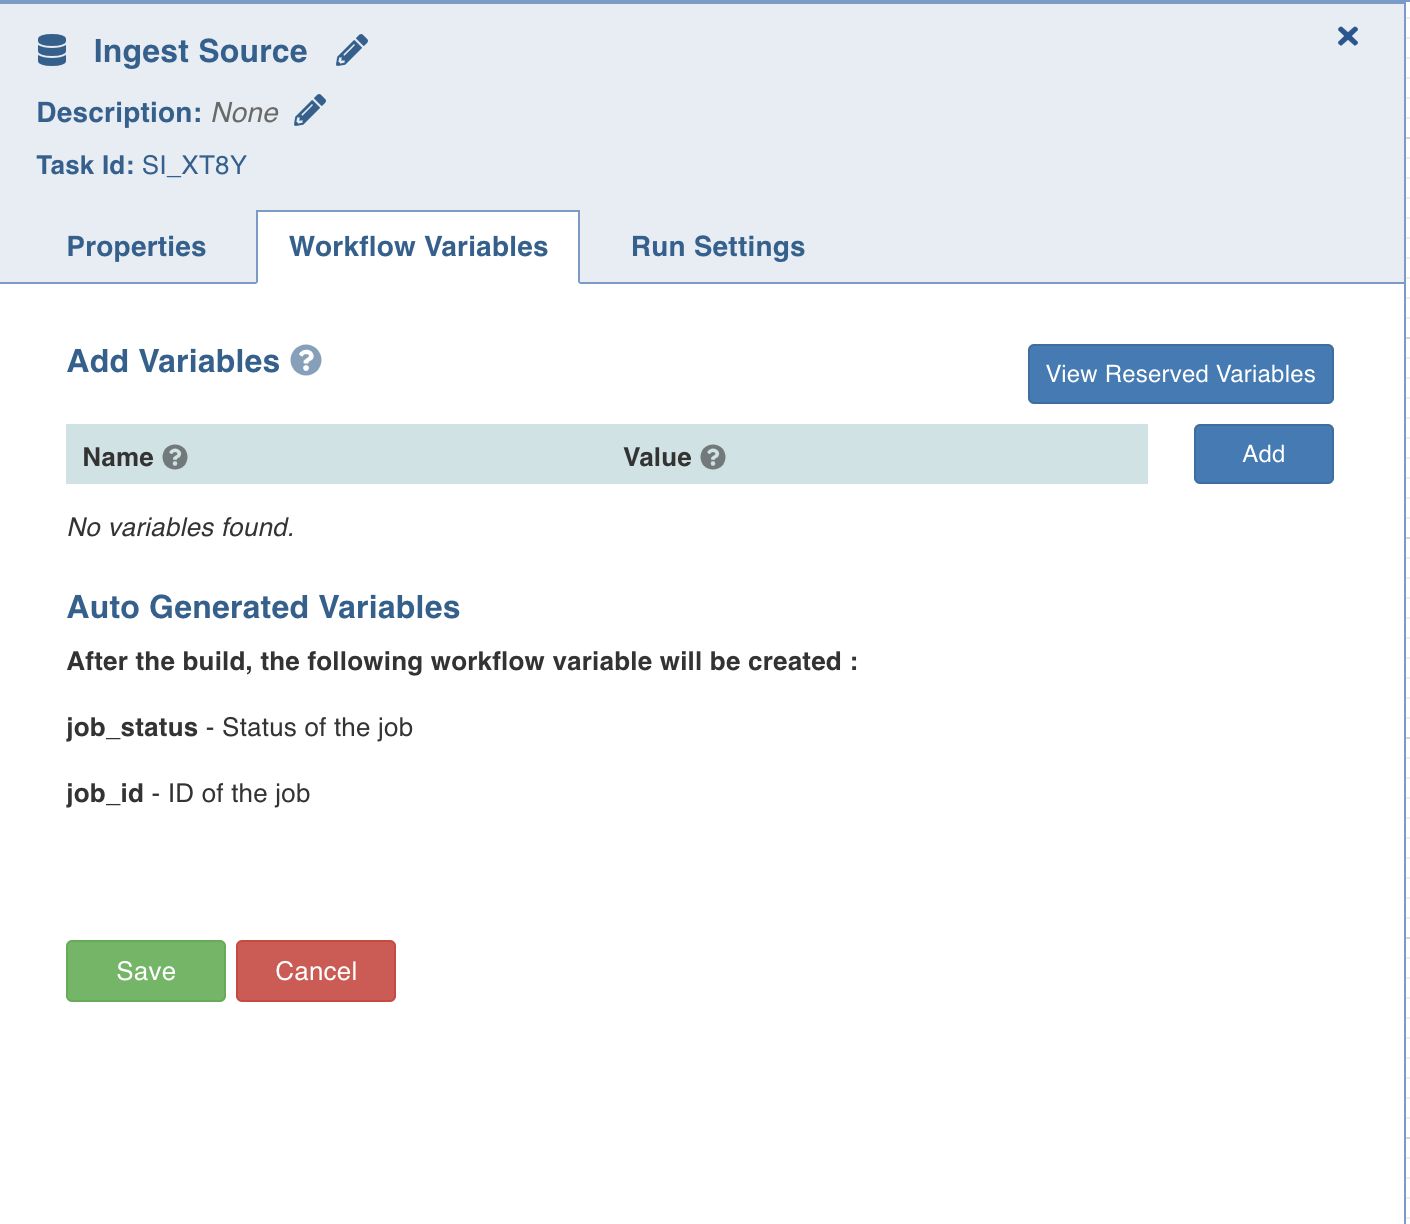
Setting Workflow Variables
Workflow variables are the static variables you can set to use in the downstream nodes. Following are the types of workflow variables:
- Auto-generated workflow variables: These are the auto-generated workflow variables that you can see in the Properties section of a task.
- User-defined workflow variables: These are the variables that you can set in the Workflow Variables section of a task.
- View Reserved Variables: This displays the list of auto-generated and user-defined variables available to be user for this task. Names of the variables listed are reserved, and cannot be reused in this or the downstream tasks.
On the Workflow Variables section, click Add Variables and enter the variable name and value. You can add as many variables as required. These variables will be applied to the downstream nodes and they will override any variable values that are set in the admin or domain configuration settings.
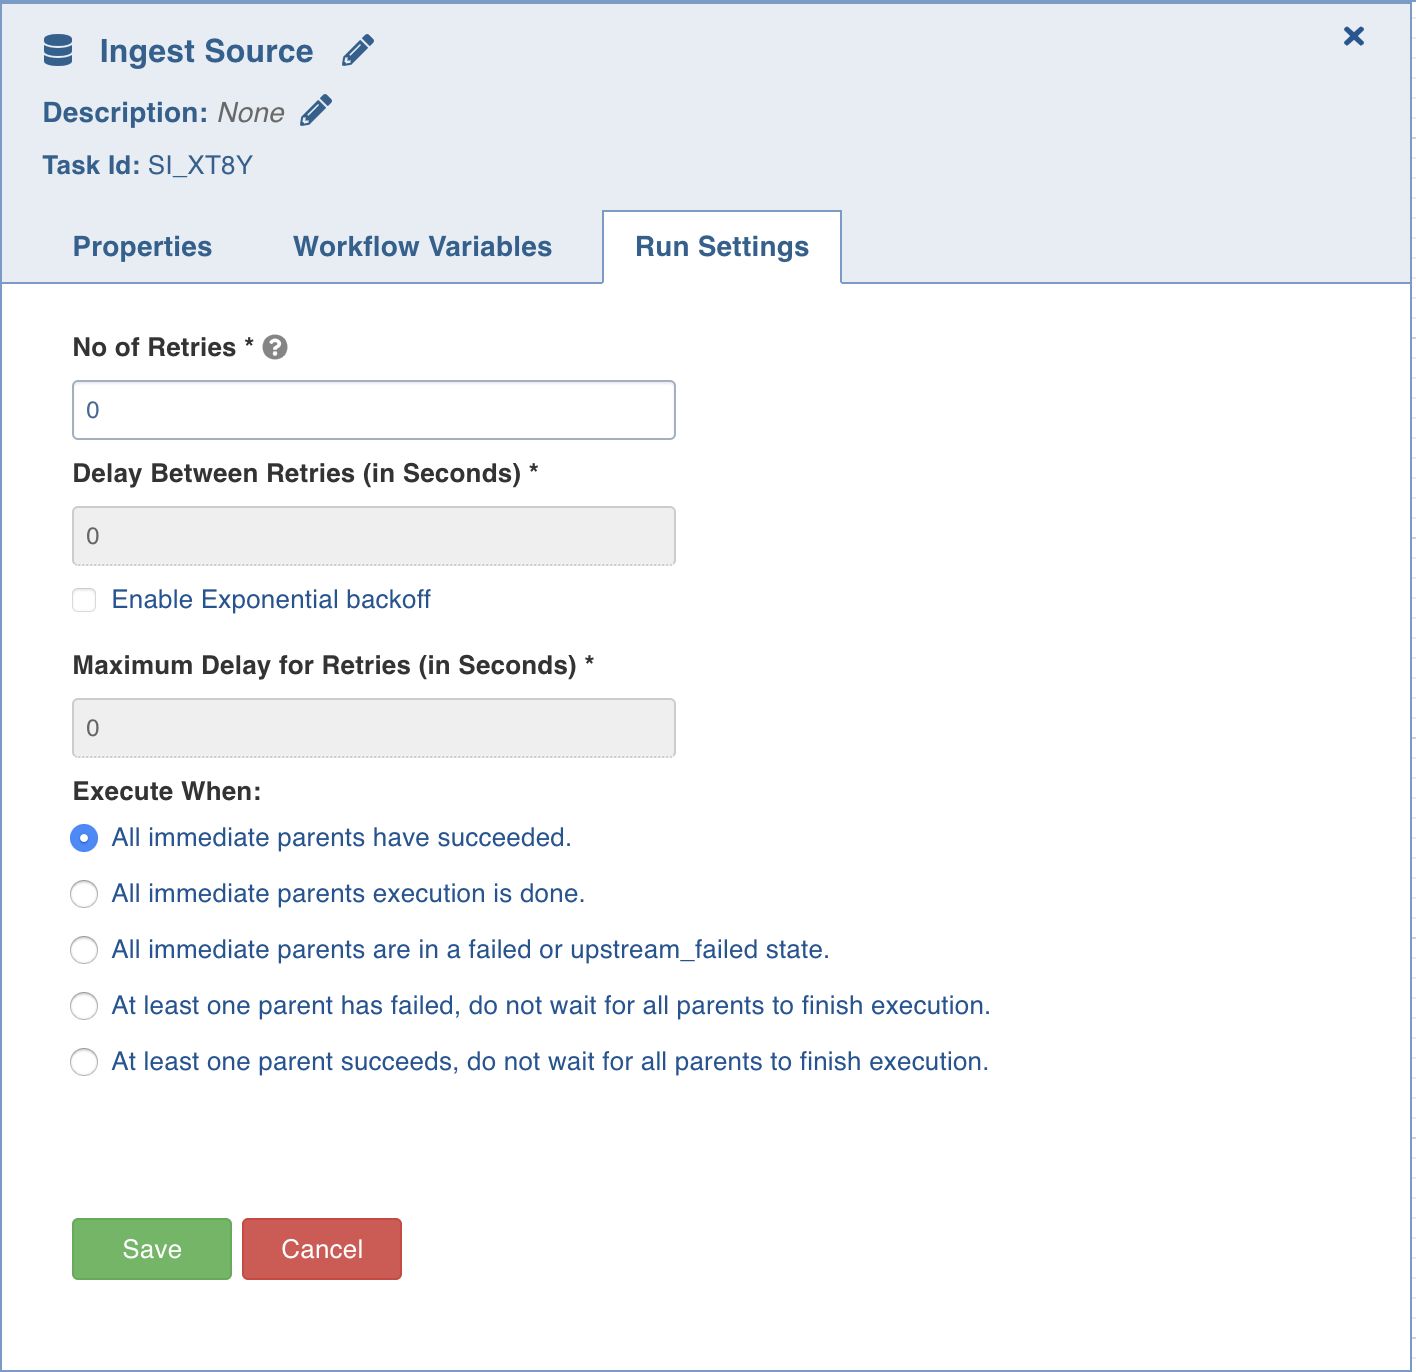
Run Settings
Run settings are the task level settings that control run time behaviour of the tasks in a workflow. Following are the options:
- No. of Retries: The number of times a task can be retried before stopping execution and failing. The default value is 0. When this value is set, the following options are enabled:
- Delay Between Retries: The delay between two retries. The default value is 300 seconds.
- Enable Exponential Backoff: Enabling this option backs off task exponentially after every failed attempt of execution. The retry delay is multiplied by 2 for every failed execution. This option is disabled by default.
- Maximum Delay for Retries: This option is displayed when the Enable Exponential Backoff option is selected. Indicates the maximum delay time. The task does not exceed this time while retrying. The default value is 1000 seconds.
- Execute when: The set of rules which define the scenario in which the task should be triggered.
Ingest Source
This option ingests the required source.
Double-click the Ingest Source Table task and enter the following properties:
- Title: Click the edit icon to change the default Ingest Source title.
- Description: Enter the required task description.
- Properties: Select the required Source name, Table group name, and Ingest Type.

- The ingest only failed tables flag from Run Settings is applicable only to the new run with a different run_id.
- When a table group is selected in the Ingest Source node, all parameters in the query tables will be displayed with an option to override them.
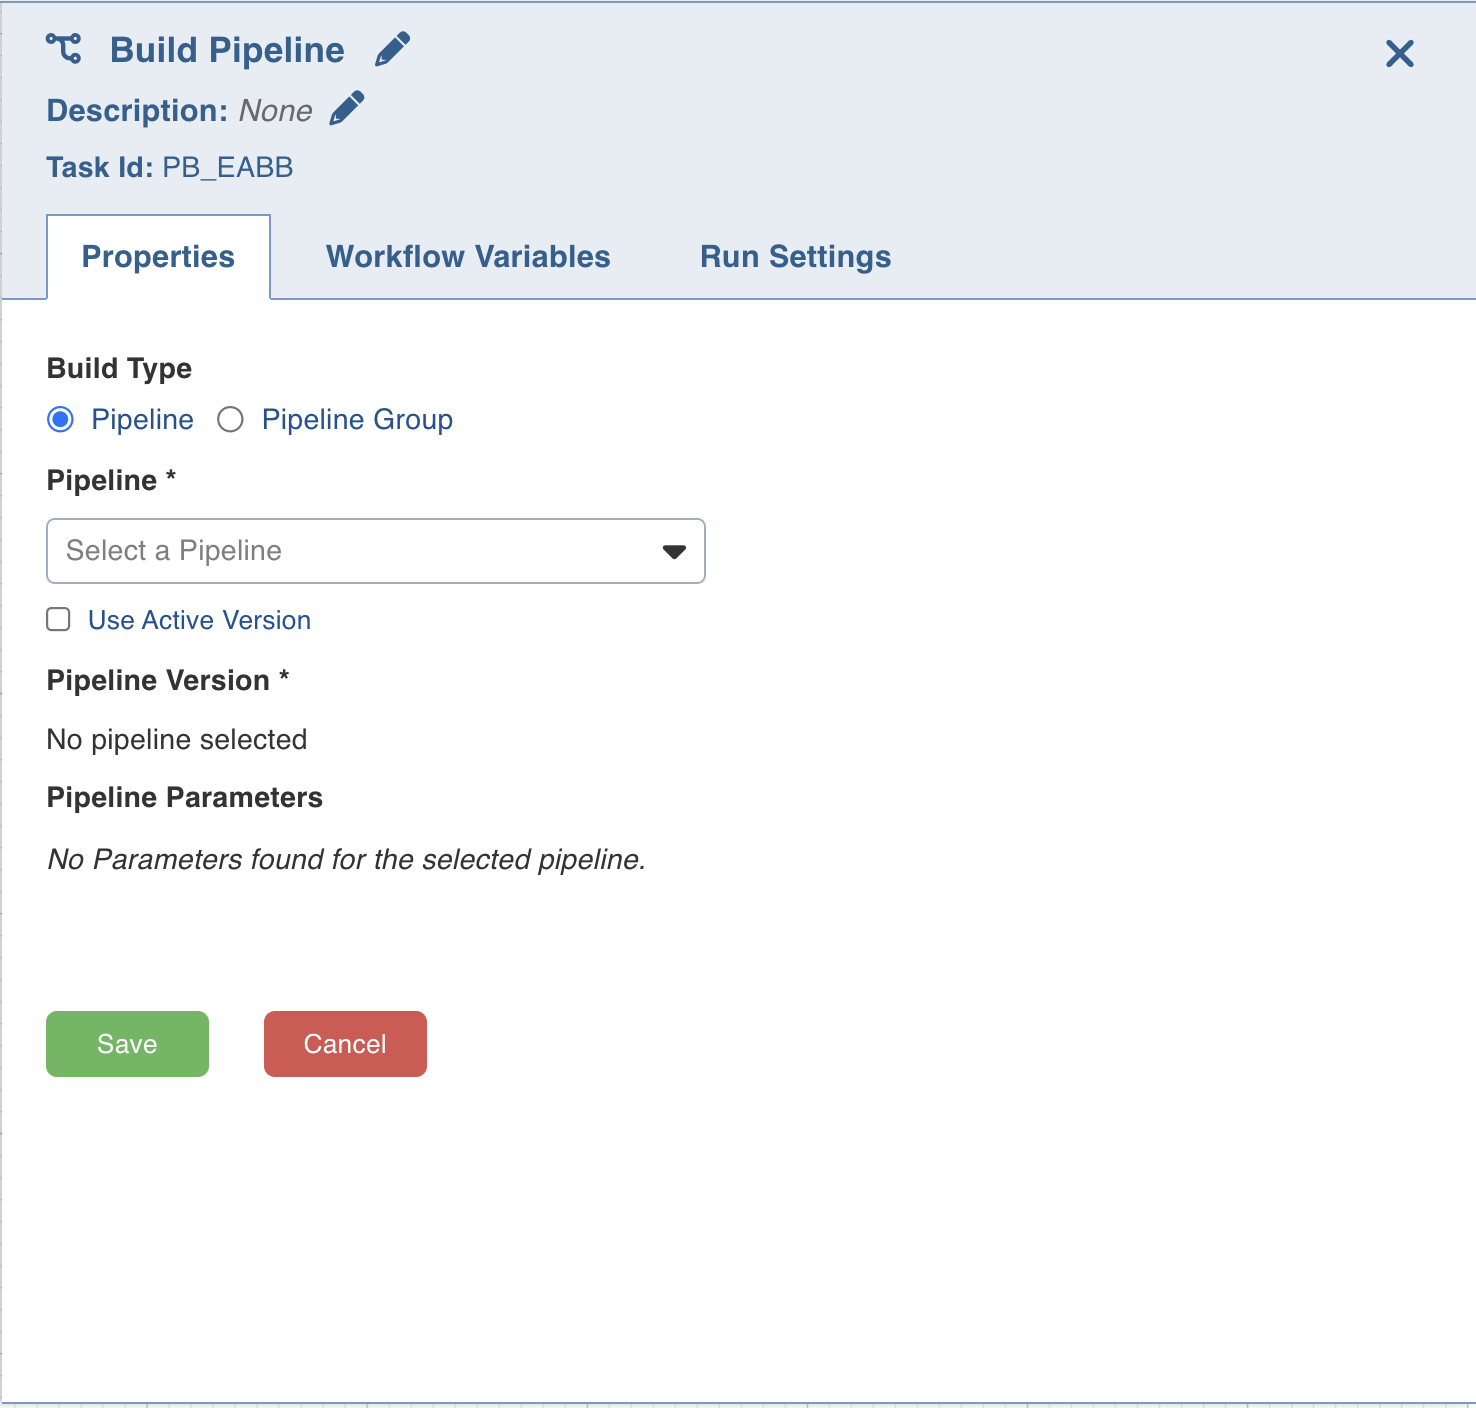
Build Pipeline
The Build Pipeline task, as the name suggests, builds a selected pipeline.
Double-click the Build Pipeline task and enter the following properties:
- Title: Double-click the default title Build Pipeline Task to change the title.
- Description: Enter the required task description.
- Pipeline: From the drop-down, select the required pipeline that you want to build.
- Pipeline Version: From the drop-down, select the required pipeline version that you want to build.
- Use Active Version: Enable this checkbox to always run the active version of the selected pipeline while triggering the workflow.
- Pipeline Parameters: The list of pipeline parameters for the selected pipeline.
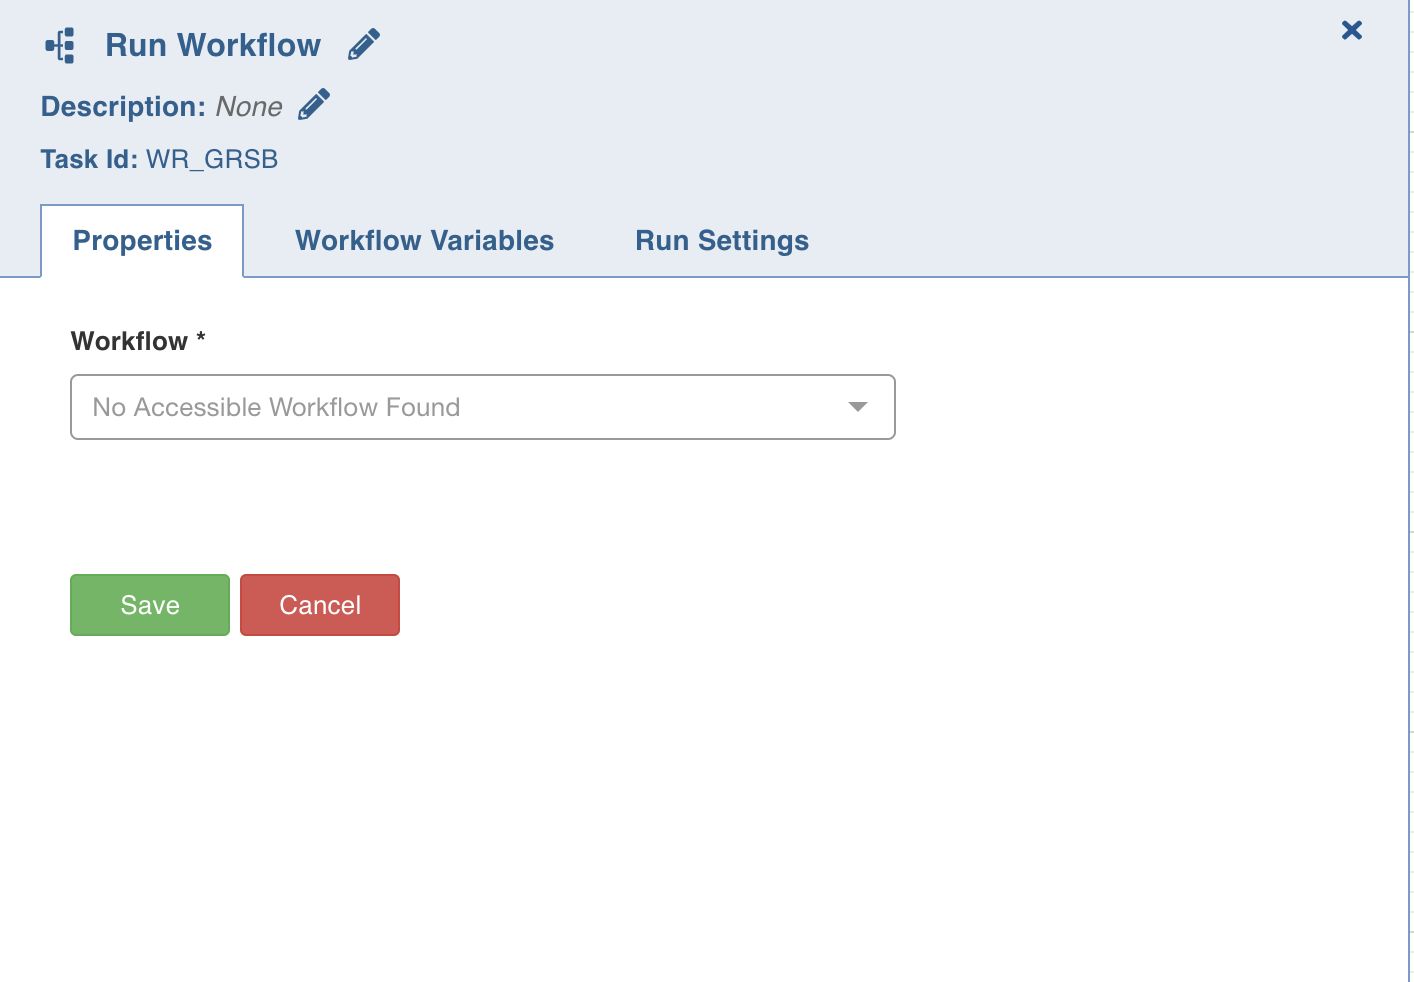
Run Workflow
This node allows you to trigger any workflow within a workflow.
Ensure the following:
- You have access to the workflow.
- The workflow does not cause a cyclic dependency, which means the workflow being triggered in the node is not an ancestor of the current workflow being edited.
Properties
Following are the Run Workflow properties:
- Title: Double-click the default title, Run Workflow, to change the title.
- Description: Enter the required task description.
- Properties
- Workflow: From the drop-down, select the required workflow to run. The lineage of the workflow will be displayed.
- View Workflow: You can click this option to directly navigate to the selected workflow.
- Lineage: Displays the hierarchy of all workflows in this task to be run.
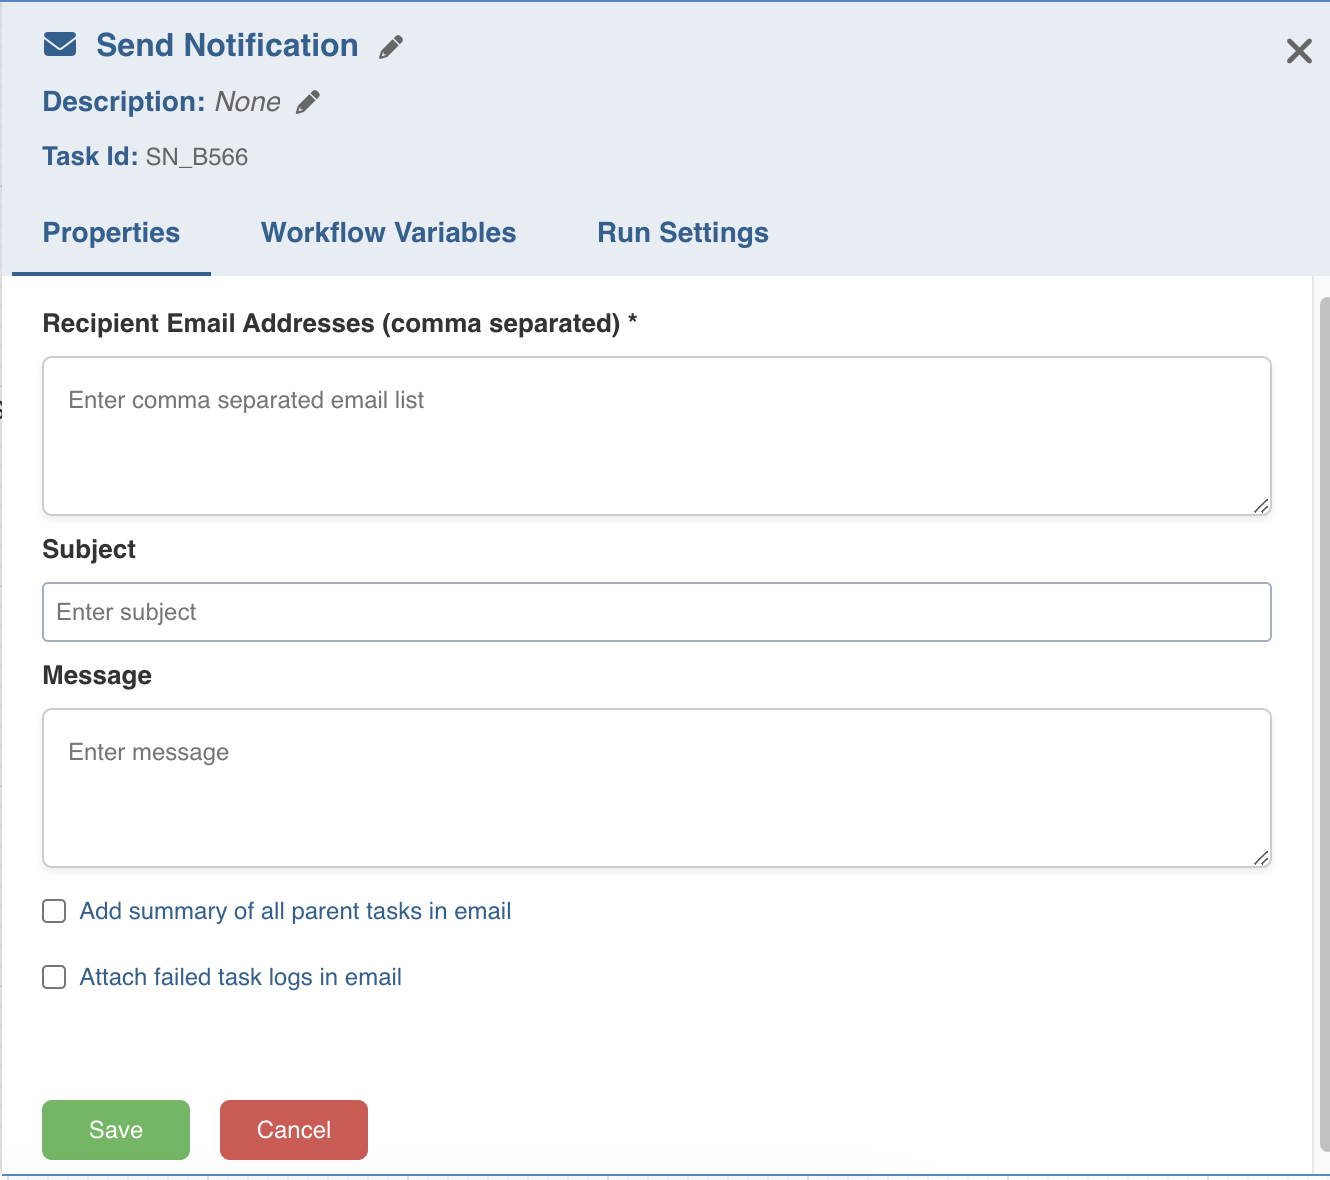
Send Notification
This task sends notification emails to the list of email IDs specified in the task Properties window.
Double-click the Send Notification task and enter the following properties:
- Recipient Email Addresses: The recipients to be notified.
- Subject: The subject of the mail.
- Message: The notification message.
- Add Summary: The summary of tasks that are ancestors of Send Notification task.
- Attach Failed Task Logs: Includes the task logs of all the failed tasks.
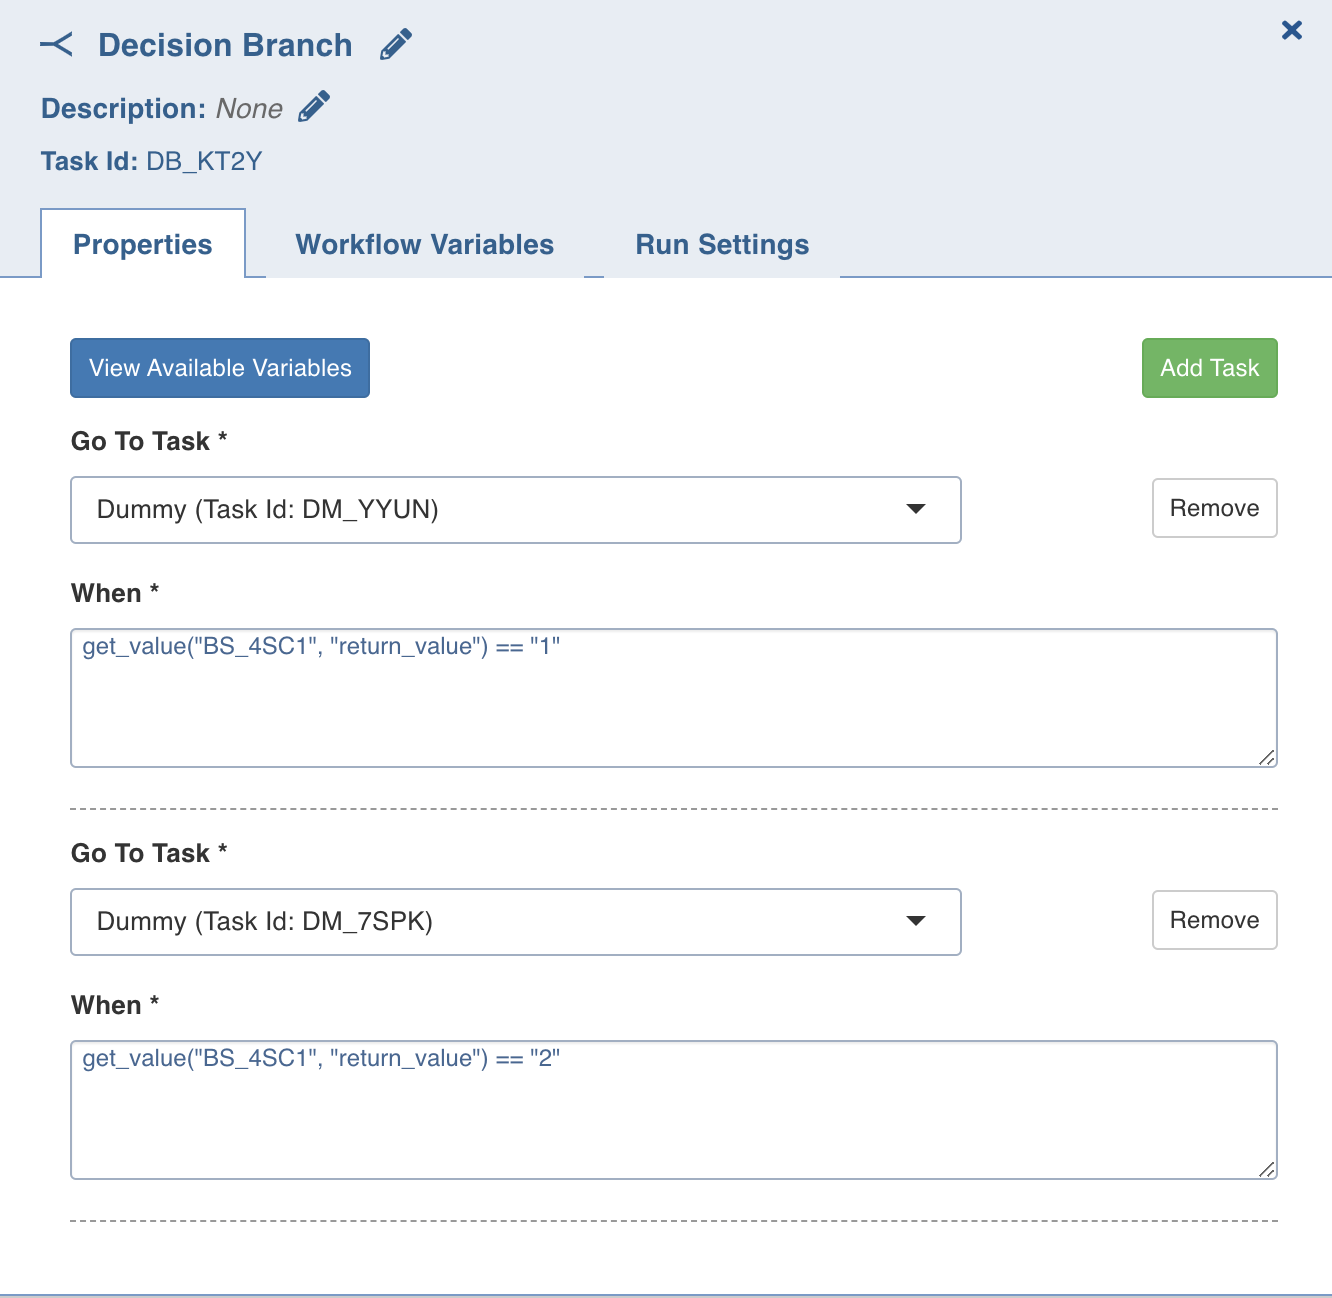
Decision Branch
This task allows you to add workflow control. The conditional logic defined in this task yields in two or more branches and switch paths to take based on the output values of the condition.
Double-click the Decision Branch task and enter the following properties:
- Title: Double-click the default title Decision Branch Task to change the title.
- Description: Enter the required task description.
- Go to Task: Depending on the value fetched from the following when query, select the task that the workflow should flow to.
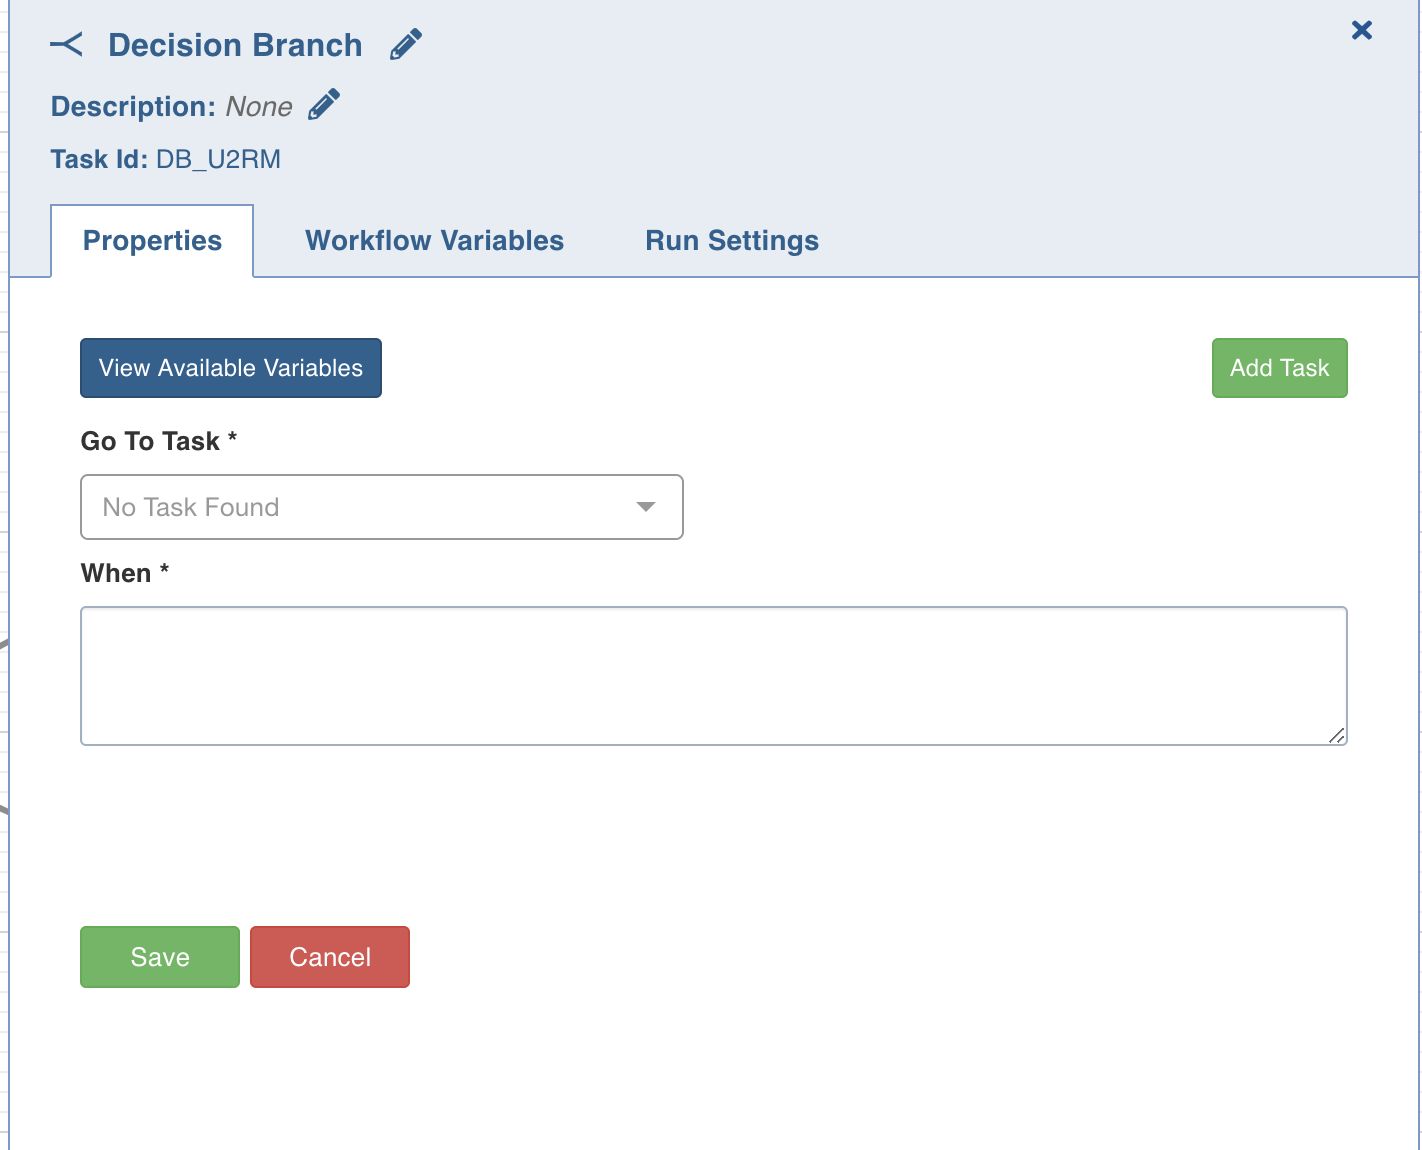
- When: Enter a query in the following syntax:
get_value("<task-ID>", "<variable-name>")== '<status>', where<task-ID> and <variable-name>are available in the View available variables option, and values for<status>are success or failed. This syntax is used to retrieve values from the upstream tasks in the same workflow.
For example, get_value("JOB_123", "job_status")=='success'
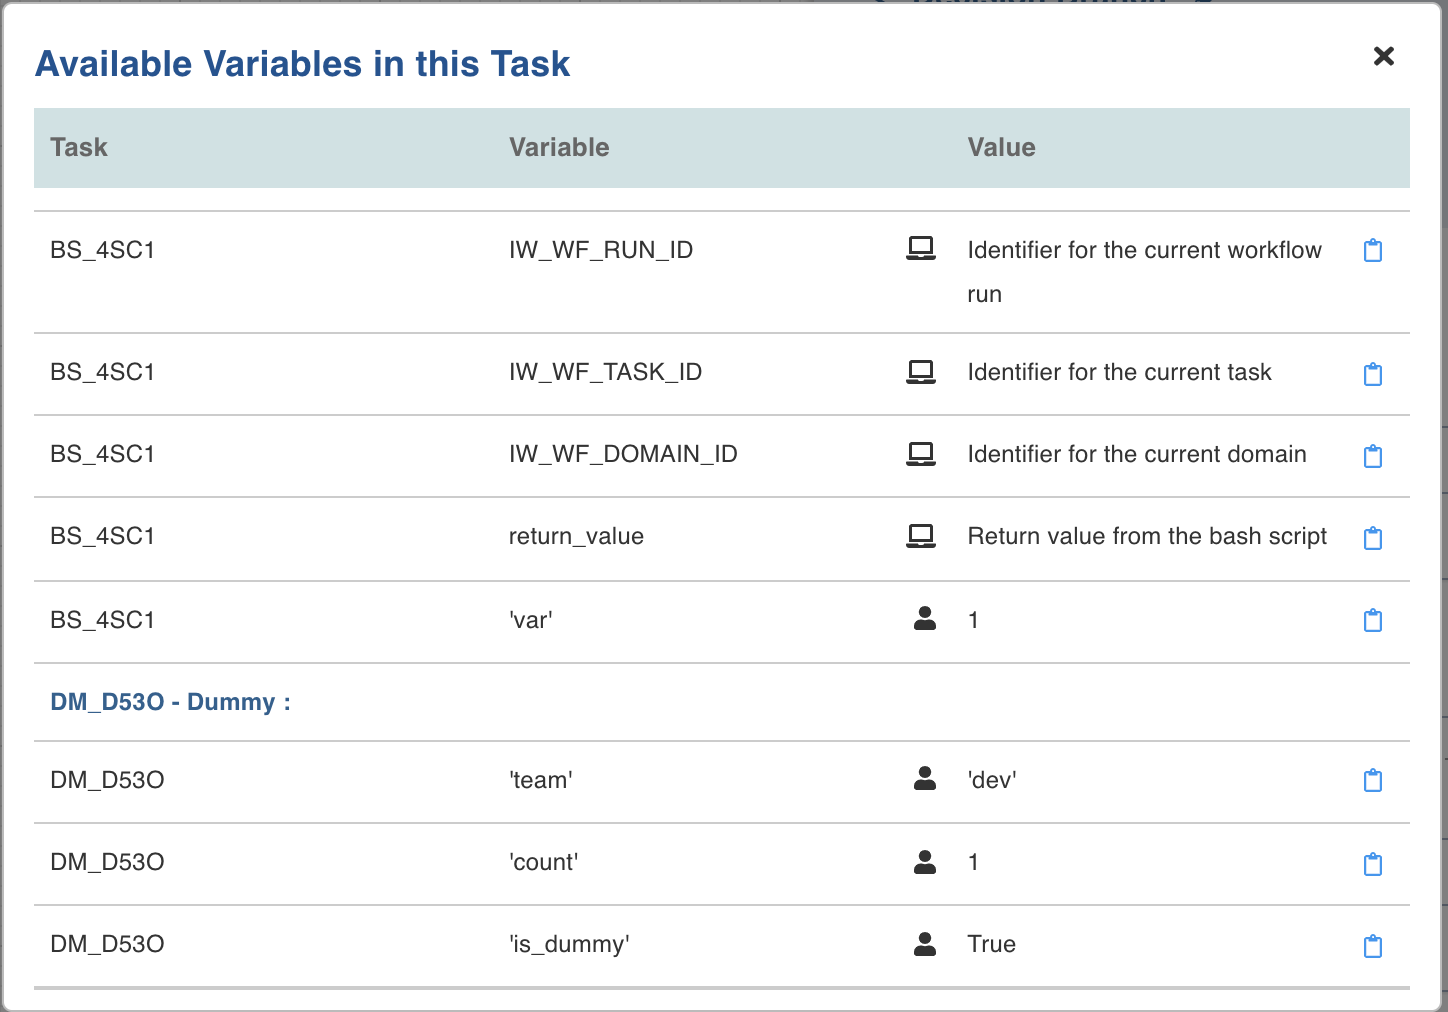
On clicking the View available variables option, the Available Variables in this Task window is displayed. You can copy the required query using the Copy to clipboard option corresponding to each task ID, and then append the required <status>value using the above described syntax.
- Go To Node: Depending on the value fetched from the When query, select the node that the workflow should flow to.
- Add case: You can click Add case option to add multiple cases.
- View available variables: This option displays if a task has another preceding task connected to it. When you click the option, a page with all the available variables from the upstream tasks displays.
To use a workflow parameter in a condition, use the following syntax:
=)key Example 1: ‘=)run_type’ == ‘prod’ If the key is “run_type” and the value for it is “prod” in the workflow run parameter, the above condition will be true, thus the corresponding task will be triggered. Example 2: '=){run_type}_=){id}' == 'prod_123' The braces are the delimiter for the parameter name when it does not have leading or trailing spaces. In the example, the value of the parameter "run_type" is concatenated with an underscore and the parameter "id" and then compared. Example 3: {{ params.runtime.run_type + '_' + params.runtime.id }} == 'prod_123' The same expression as above. Anything inside the double braces is executed as python code and all workflow parameters are available in the python dict: "params.runtime".Bash Script
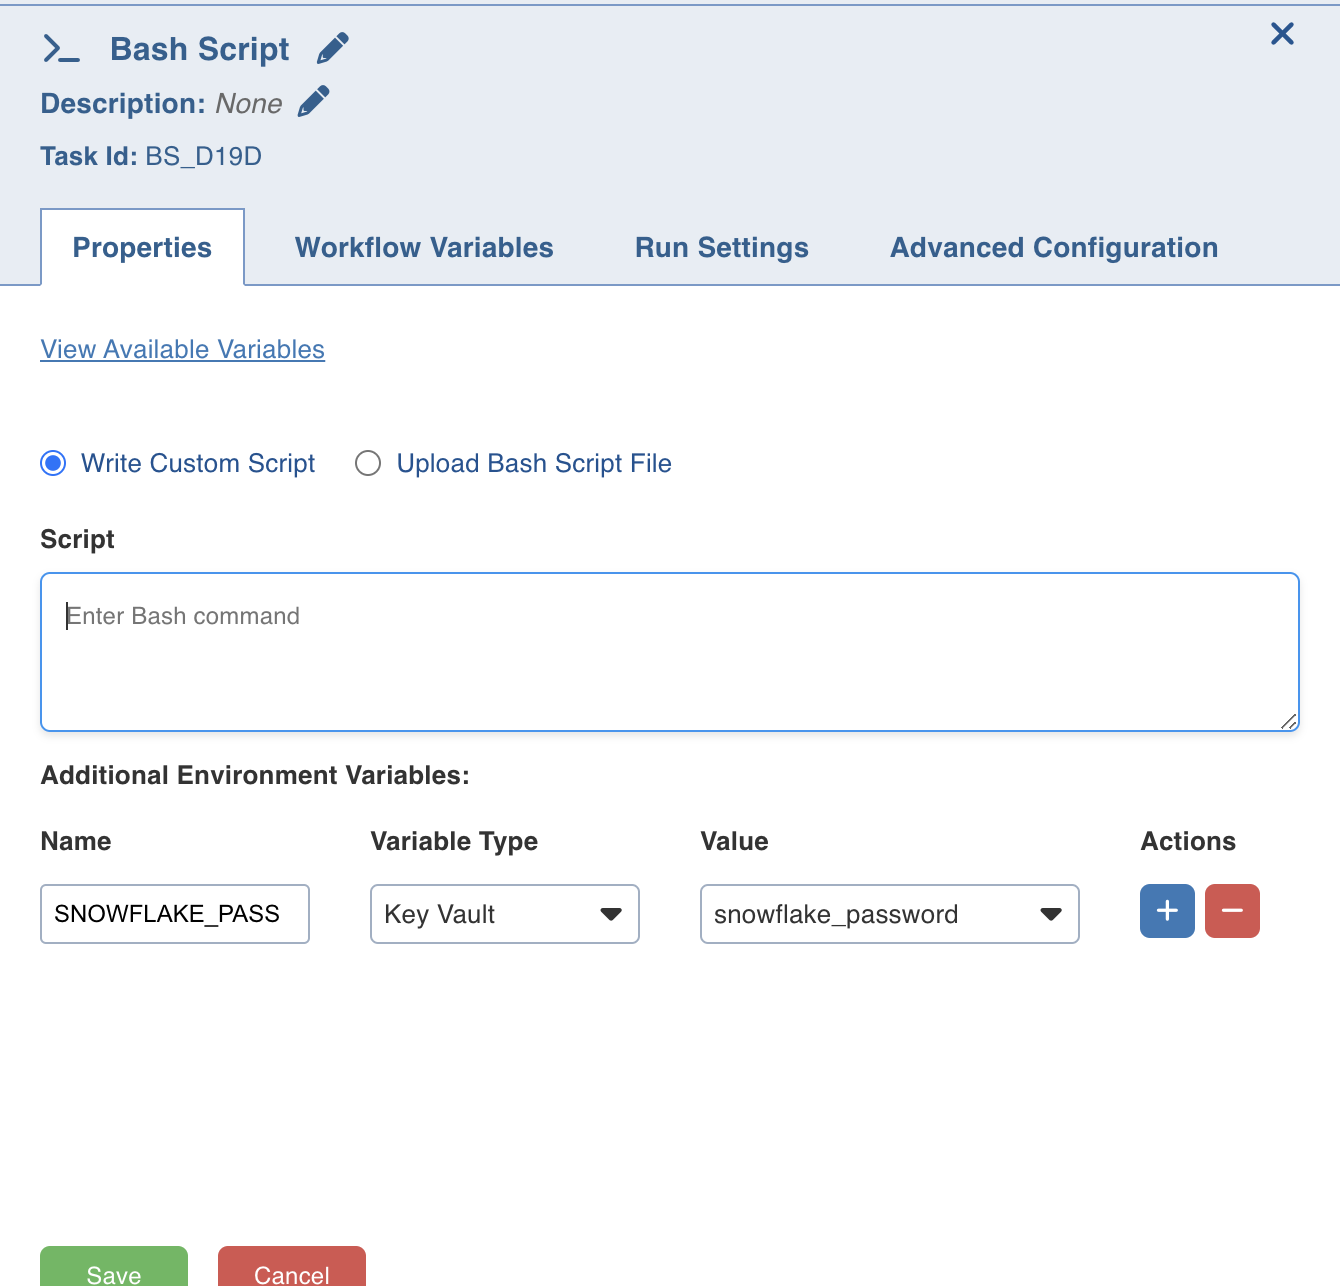
Bash script task can be used to run multiple bash statements. You can enter the bash statements in the text area and they will be executed sequentially.
- View available variables: This option displays if a task has another preceding task connected to it. When you click the option, a page with all the available variables from the upstream tasks displays.
The last thing that will be echoed to the standard system output from the bash commands will be stored as a workflow variable with the name return_value.
Example: ls; pwd;
This will store the current directory in the workflow variable as it is the last value echoed to the standard output.
You can also alternatively run your script files directly using this task by specifying the exact location of your file.
Example: sh /Users/ec2-user/bash-sample.sh python /Users/ec2-user/python-sample.py
Following are the environment variables that can be accessed within the Bash Node script:
- $IW_WF_DAG_ID: Identifier for the current workflow under execution
- $IW_WF_RUN_ID: Identifier for the current workflow run under execution
- $IW_WF_TASK_ID: Identifier for the current task under execution
- $IW_WF_DOMAIN_ID: Identifier for the domain under which the workflow is being executed
Additional environment variables: these are user configurable environment variables that can be configured to retrieve secrets from secret store and will be available in bash process with specified name.
- Migration of scripts being used in existing bash nodes is not supported in Kubernetes deployments. However, it is supported for new installations, where new bash scripts will be authored.
- You must include Python expressions and not variable names in the workflow variable values defined in the workflow editor. Else, the error message "NameError: name '<variable>' is not defined." appears.
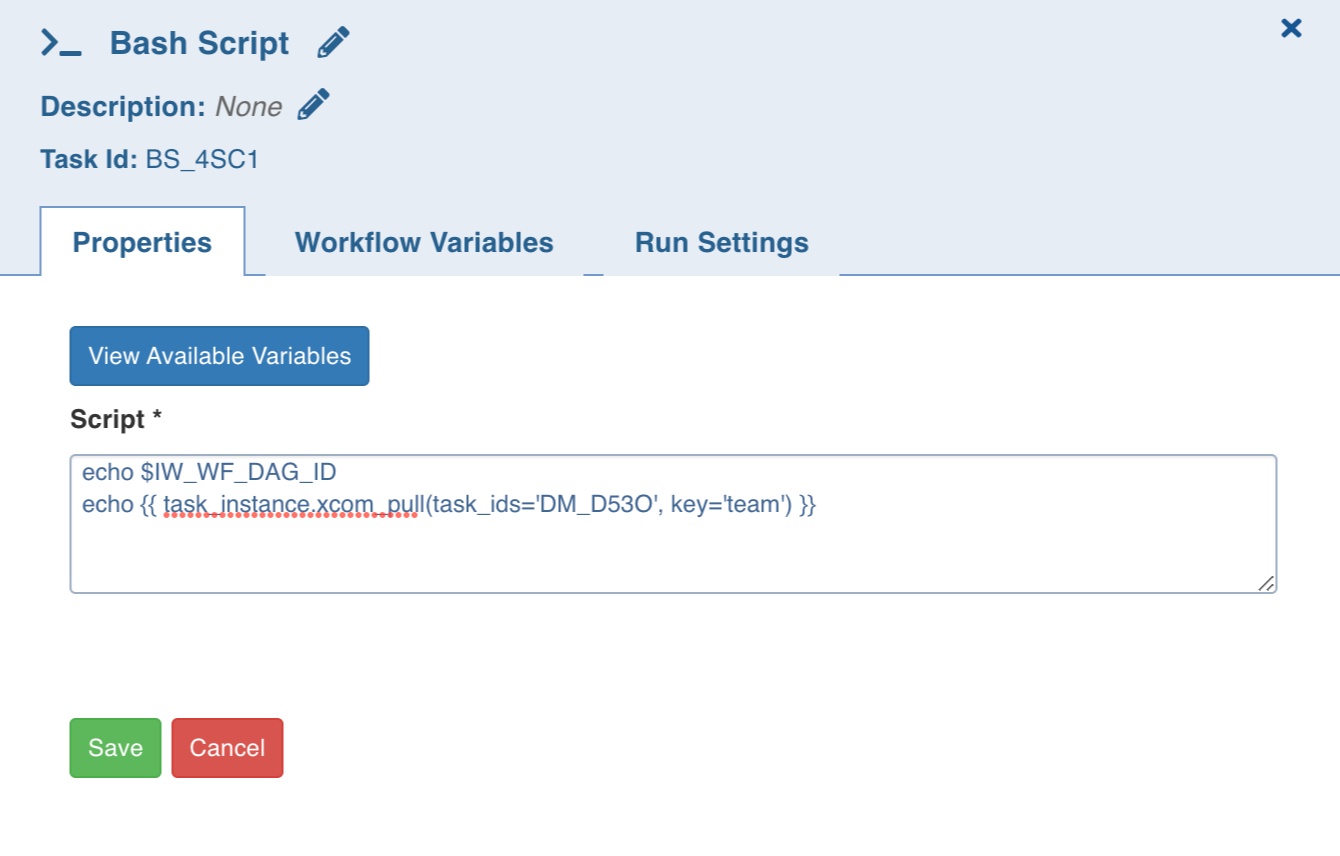
Reference a Workflow Variable in Bash Script Task
In the bash script, a user-defined workflow variable can be used as follows:
echo {{ task_instance.xcom_pull(task_ids='DM_D53O', key='team') }}
where task_ids is the task where workflow variable is set and key is the name of the workflow variable
Inside a bash script, user can also use automatically generated variables directly as follows:
- $IW_WF_DAG_ID: Current workflow id
- $IW_WF_RUN_ID: Current run id
- $IW_WF_TASK_ID: Current task id
- $IW_WF_DOMAIN_ID: Current domain id
Usage of variables:
For information regarding securing bash nodes, refer to Securing Bash Nodes.
Referring a Workflow Parameter in Bash Script Task
In the bash script, a user-defined workflow variable can be used as follows:
echo =)a or echo =){a} or echo {{ params.runtime.a }}
where “a” is the workflow parameter and the single flower brackets act as a separator of the key from the remaining part of the text. Anything inside the double braces is executed as python code and all workflow parameters are available in the python dict: “params.runtime”.
Inside a bash script, you can also use the following parameters which are available by default:
- =)workflow_id: Current workflow id
- =)run_id: Current run id
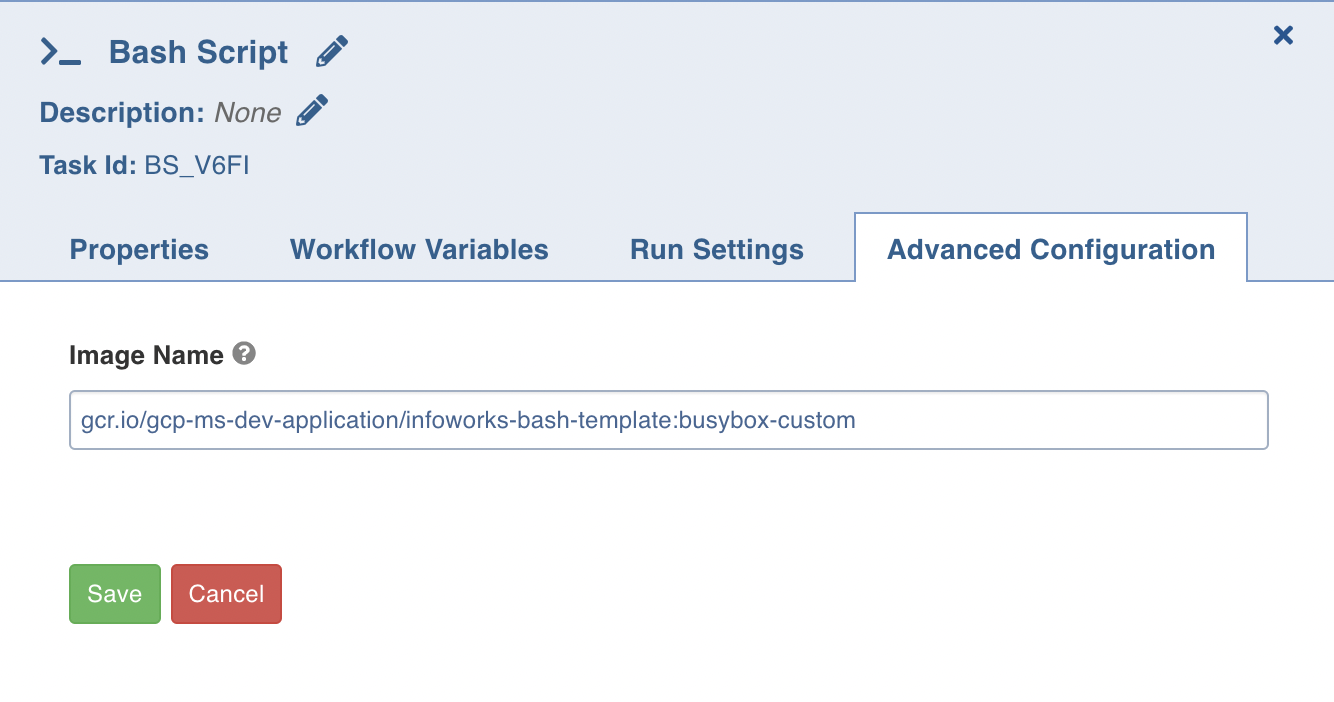
Bash Scripts in Kubernetes using Custom Images
You can run any custom script with any required libraries in the Bash Node in the Workflow in Kubernetes Infoworks. The script will be accessible to this container in the form of a mounted volume.
You need to provide an additional field Image Name in the Advanced Configuration tab: Image Name field contains a fully qualified image url to specify the custom image to run the script with. Since the field’s value is provided to Kubernetes, It is bound to the same rules.
You can also alternatively run your script files directly using this task by specifying the exact location of your file inside your image.
Example: sh /home/user/bash-sample.sh
python /Users/ec2-user/python-sample.py
- Infoworks uses CeleryKubernetesExecutor to run tasks, wherein the Bash Nodes will be executed using Kubernetes pods and rest of the tasks will be executed using celery worker.
- CeleryKubernetesExecutor will use dedicated orchestrator-worker pod to process tasks by launching new process in orchestrator-worker pod itself.
- Option to switch to KubernetesExecutor is available through values.yaml file, KubernetesExecutor will run all the tasks by launching kubernetes pod for all task types. To enable KubernetesExecutor change value of values.infoworksOrchestratorWorker.enabled to false. This will remove orchestrator-worker pod.
Kubernetes Service Mesh Requirements
If Service Mesh is enabled on the Kubernetes Installation, then the chosen Image must contain a curl utility. This is required to interact with the Service Mesh utility for proper termination of the pod. The other option is to disable the Service Mesh for the Bash Node specifically using annotations.
- Workflow variables for the normal bash script are not available to scripts run using custom images.
- Custom Image without a default shell won’t execute the scripts.
- Workflows with bash tasks cannot be cancelled when bash node is running on Kubernetes.
Manage Cluster Actions
The Manage Cluster Actions task allows you to create, terminate, start, and stop the persistent clusters.
- It's not recommended to manage the state of the persistent cluster marked as an interactive cluster.
- If a user tries to stop the Dataproc cluster (either from the environment compute template or from the manage cluster action workflow node) when an Infoworks job is running on that cluster, the Stop cluster job action fails.
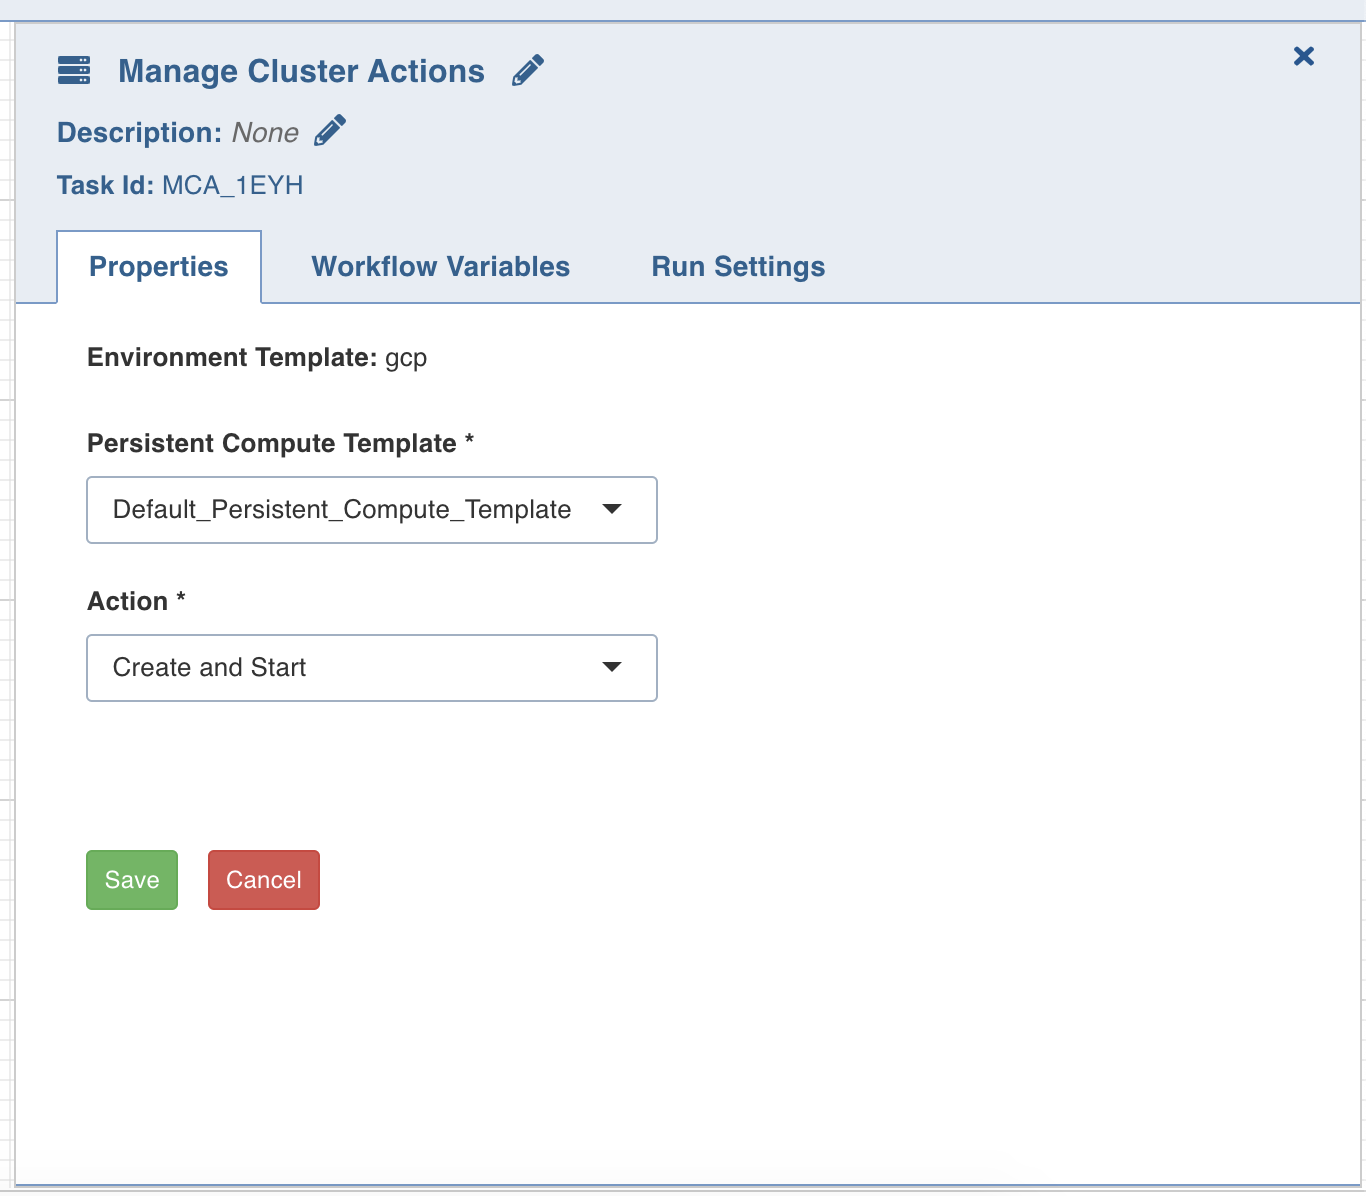
Properties
Double-click the Manage Cluster Actions task, and enter the following properties:
- Title: Double-click the default title Manage Cluster Task to change the title.
- Description: Enter the required task description.
- Data Environment: Select the required data environment from the dropdown, for the workflow to execute.
- Persistent Compute Template: This field displays a list of all the persistent compute templates available for the data environment selected above. From the drop-down, select the persistent compute template that you want to manage.
- Action: From the drop-down, select the required operation:
- Create and Start: Creates and starts the cluster
- Stop: Stops the cluster
- Start: Starts the cluster
- Terminate: Stops and terminates the cluster
- Amazon EMR supports only the Create and Start and Terminate actions.
- When two Manage Cluster Actions nodes are adjacent to each other, and if the first node has Terminate action and the second node has Start action for the same cluster, there needs to be a delay of greater than 5 secs, or else the second node fails. User can create a bash script node between the above two nodes having a sleep command for 5 secs or greater.
Workflow Variables
Workflow variables are the static variables you can set to use in the downstream nodes. Following are the types of workflow variables:
- Auto-generated workflow variables: These are the auto-generated workflow variables that you can see in the Properties section of a task.
- User-defined workflow variables: These are the variables that you can set in the Workflow Variables section of a task.
- View Reserved Variables: This displays the list of auto-generated and user-defined variables available to be user for this task. Names of the variables listed are reserved, and cannot be reused in this or the downstream tasks.
In the Workflow Variables section, click Add Variables and enter the variable name and value. You can add as many variables as required. These variables are applied to the downstream nodes and they override any variable values that are set in the admin or domain configuration settings.

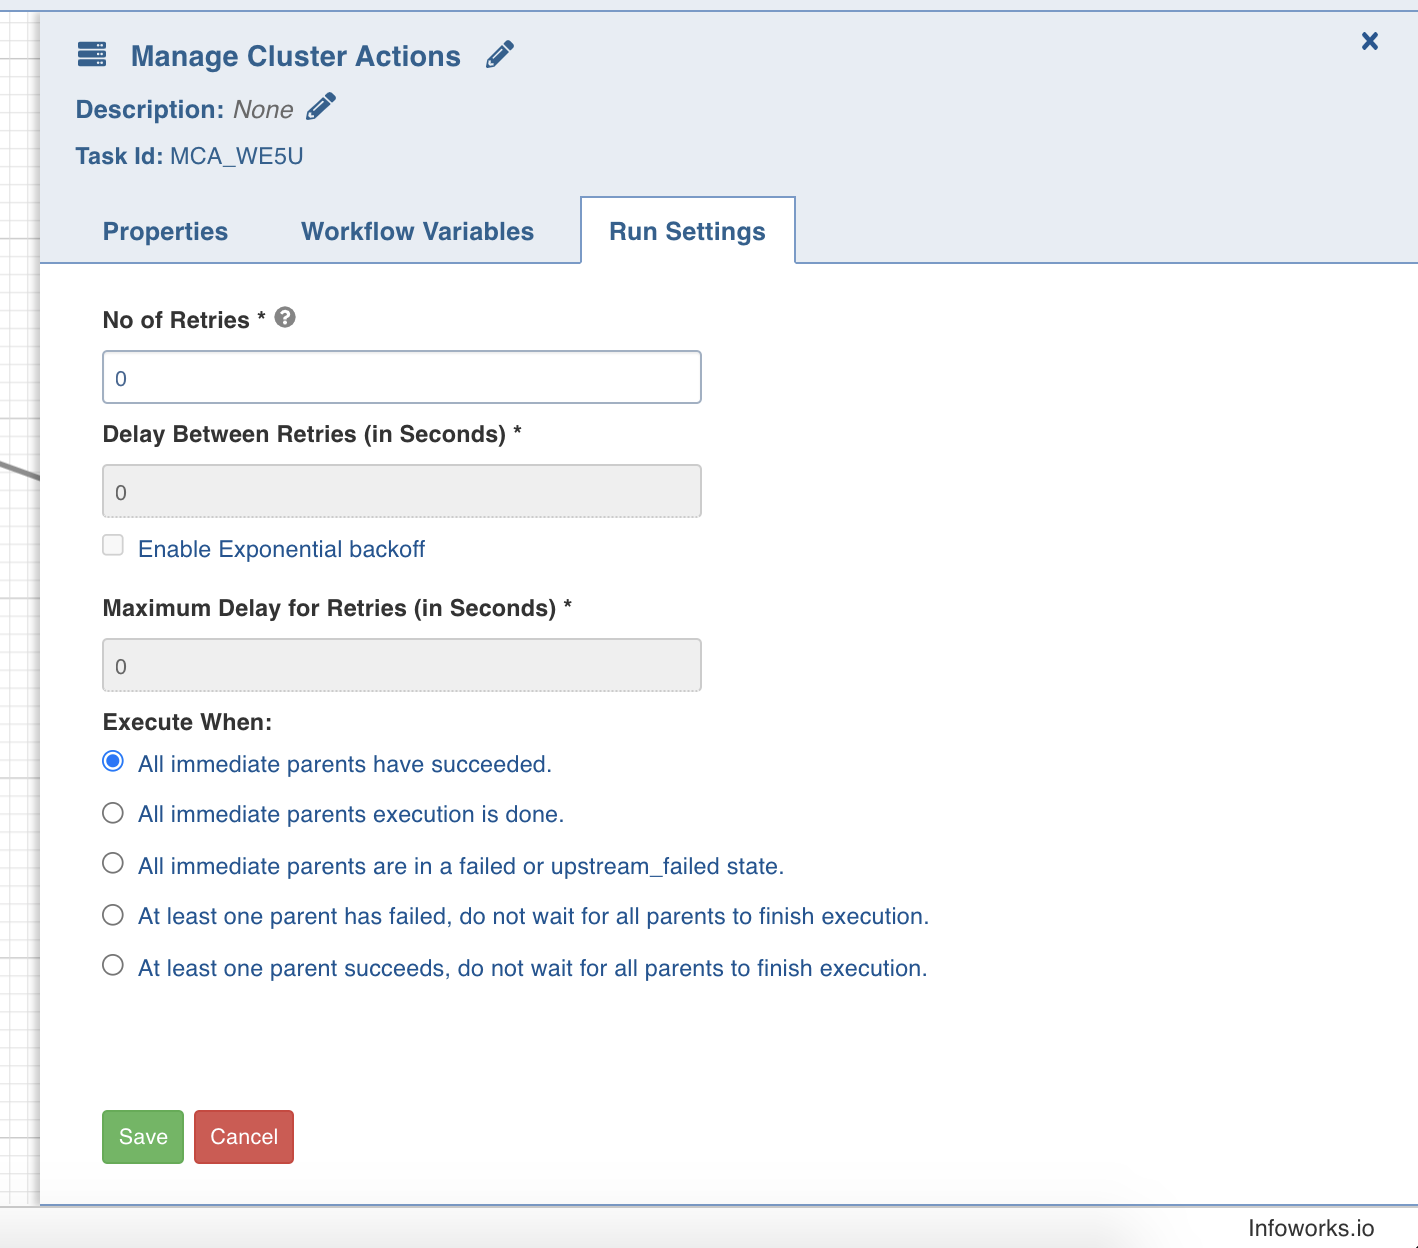
Run Settings
Run settings are the task level settings that control run time behaviour of the tasks in a workflow. Following are the options:
- No. of Retries: The number of times a task can be retried before stopping execution and failing. The default value is 0. When this value is set, the following options are enabled:
- Delay Between Retries: The delay between two retries. The default value is 300 seconds.
- Enable Exponential backoff: Enabling this option backs off task exponentially after every failed attempt of execution. The retry delay is multiplied by 2 for every failed execution. This option is disabled by default.
- Maximum Delay for Retries: This option is displayed when the Enable Exponential Backoff option is selected. Indicates the maximum delay time. The task does not exceed this time while retrying. The default value is 1000 seconds.
- Execute When: The set of rules which define the scenario in which the task should be triggered.
Sync to External Target
This node facilitates synchronizing data directly to external target via workflows.
Workflow Variables
Entity Type: This is defaulted to source.
Source: Select from a list of sources available corresponding to the data environments mapped to the domain.
Table Group: Select a table group from the existing list of table groups.
Dummy
The Dummy task, as the name suggests, acts as a dummy interface between multiple tasks, each of which must be connected to each other. Adding a dummy task between such tasks will avoid confusions and also makes the workflow look organized.

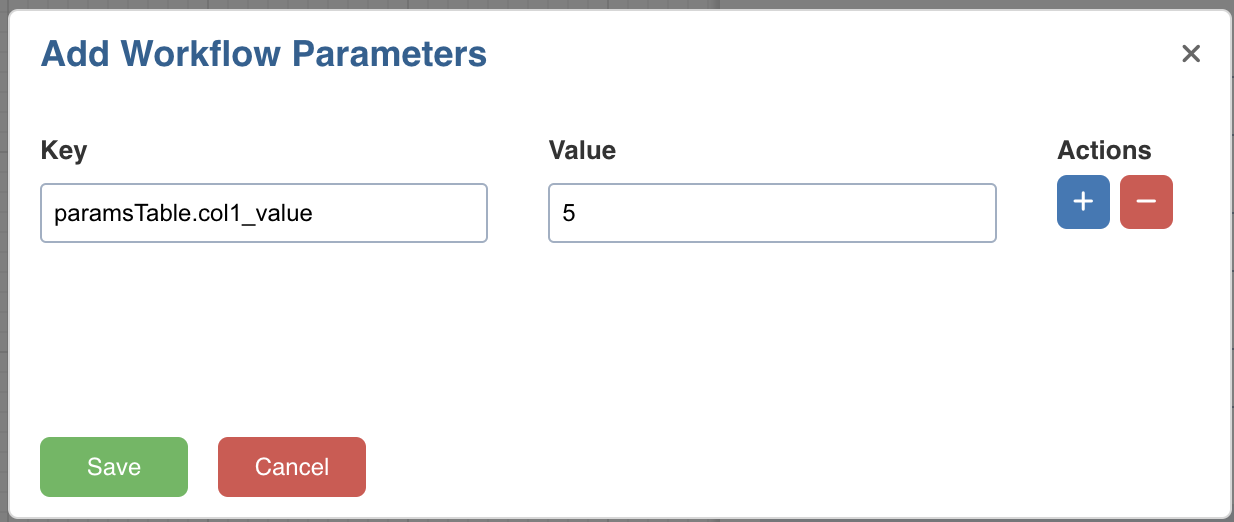
Workflow Parameters
The Workflow parameters provide the capability to add configurations to workflows. It eliminates the need to configure the parameters individually in each node under a workflow, which is a very tedious process.
You can set workflow-level parameters in the form of key-value pairs for each workflow. This set of key-value pairs is stored in the workflow metadata. However, this can be overridden at the runtime via API.
- In the case of Run Workflow Node, all of the parent workflow’s parameters are passed to the child workflow and automatically override any matching parameter keys.
- For ingest source nodes, the workflow parameter key will follow the
<table_name>.<parameter_name>format. If only<parameter_name>is provided, all tables with that parameter will have their values overridden.
Workflow Parameters in Build Pipeline Node
By default, every workflow parameter is available to the pipeline and overrides the pipeline parameter if defined with the same key. However, Pipeline parameters can be set at the workflow node level. This will override any other parameter set with the same key. This allows for passing parameters to individual Build Pipeline nodes from the workflow.
The workflow parameters in the pipeline node follow the following priority in decreasing order.
- Pipeline Parameters set in the workflow node.
- Workflow Runtime Parameters (via API)
- Workflow Parameters
- Pipeline Parameters set in pipeline.
Workflow Parameters in Ingest Source
The workflow parameters in the ingest source follow the priority order below, in decreasing precedence:
- Query Parameters set in the workflow node.
- Workflow Runtime Parameters (via API)
- Workflow Parameters
- Query Parameters set in Table group.
- Query parameters set in table configuration
How to Pass a User defined Workflow Variable in a Task
To pass a user-defined workflow variable in a task, perform the following steps:
- Go to the Design page of a workflow.
- Double-click on a task to edit.
- In the Workflow Variables tab, click Add. Add the key and its corresponding value as shown below:
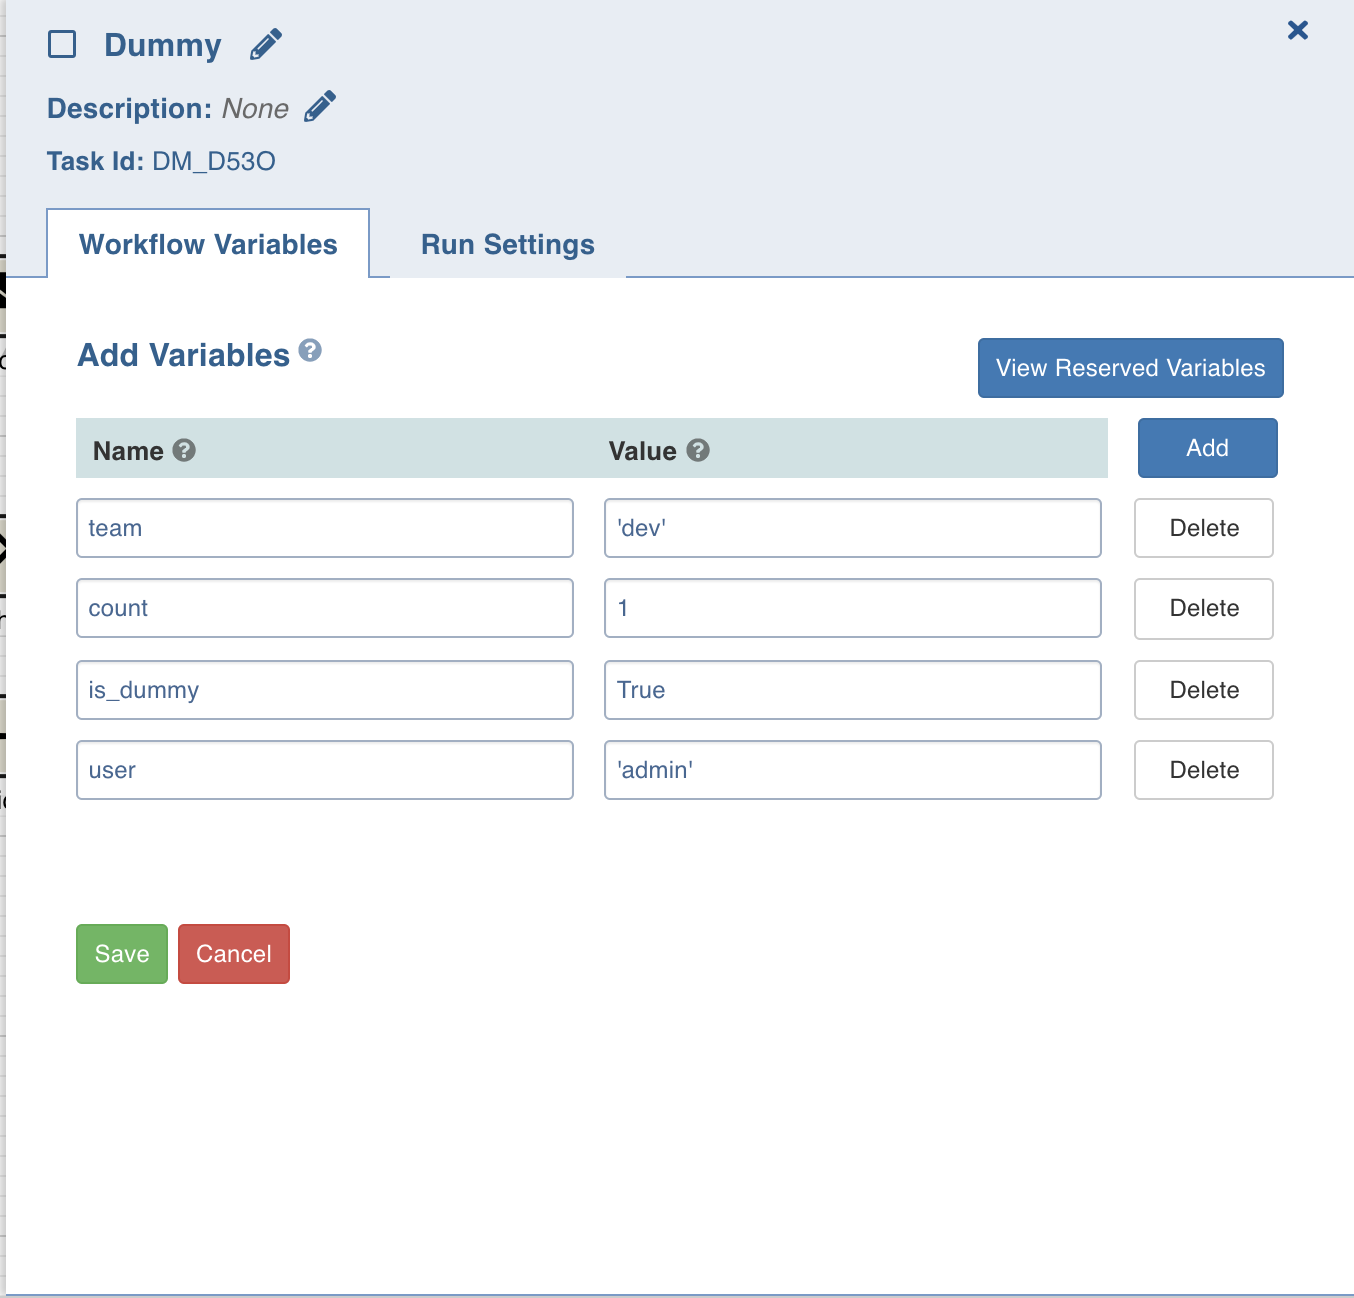
- In the Name field, enter the text without quotes.
- In the Value field, if it is a:
- String: Use double quotes
- Number: Use just the number
- Boolean: Use title case (True/False)
How to reference a Workflow Variable as a Parameter in a Task
In the Send Notification task, a workflow variable can be used as follows:
echo {{ task_instance.xcom_pull(task_ids='DM_D53O', key='team') }}
where task_ids is the task where workflow variable is set, and key is the name of the workflow variable.
This notation can be used within the body or the subject.
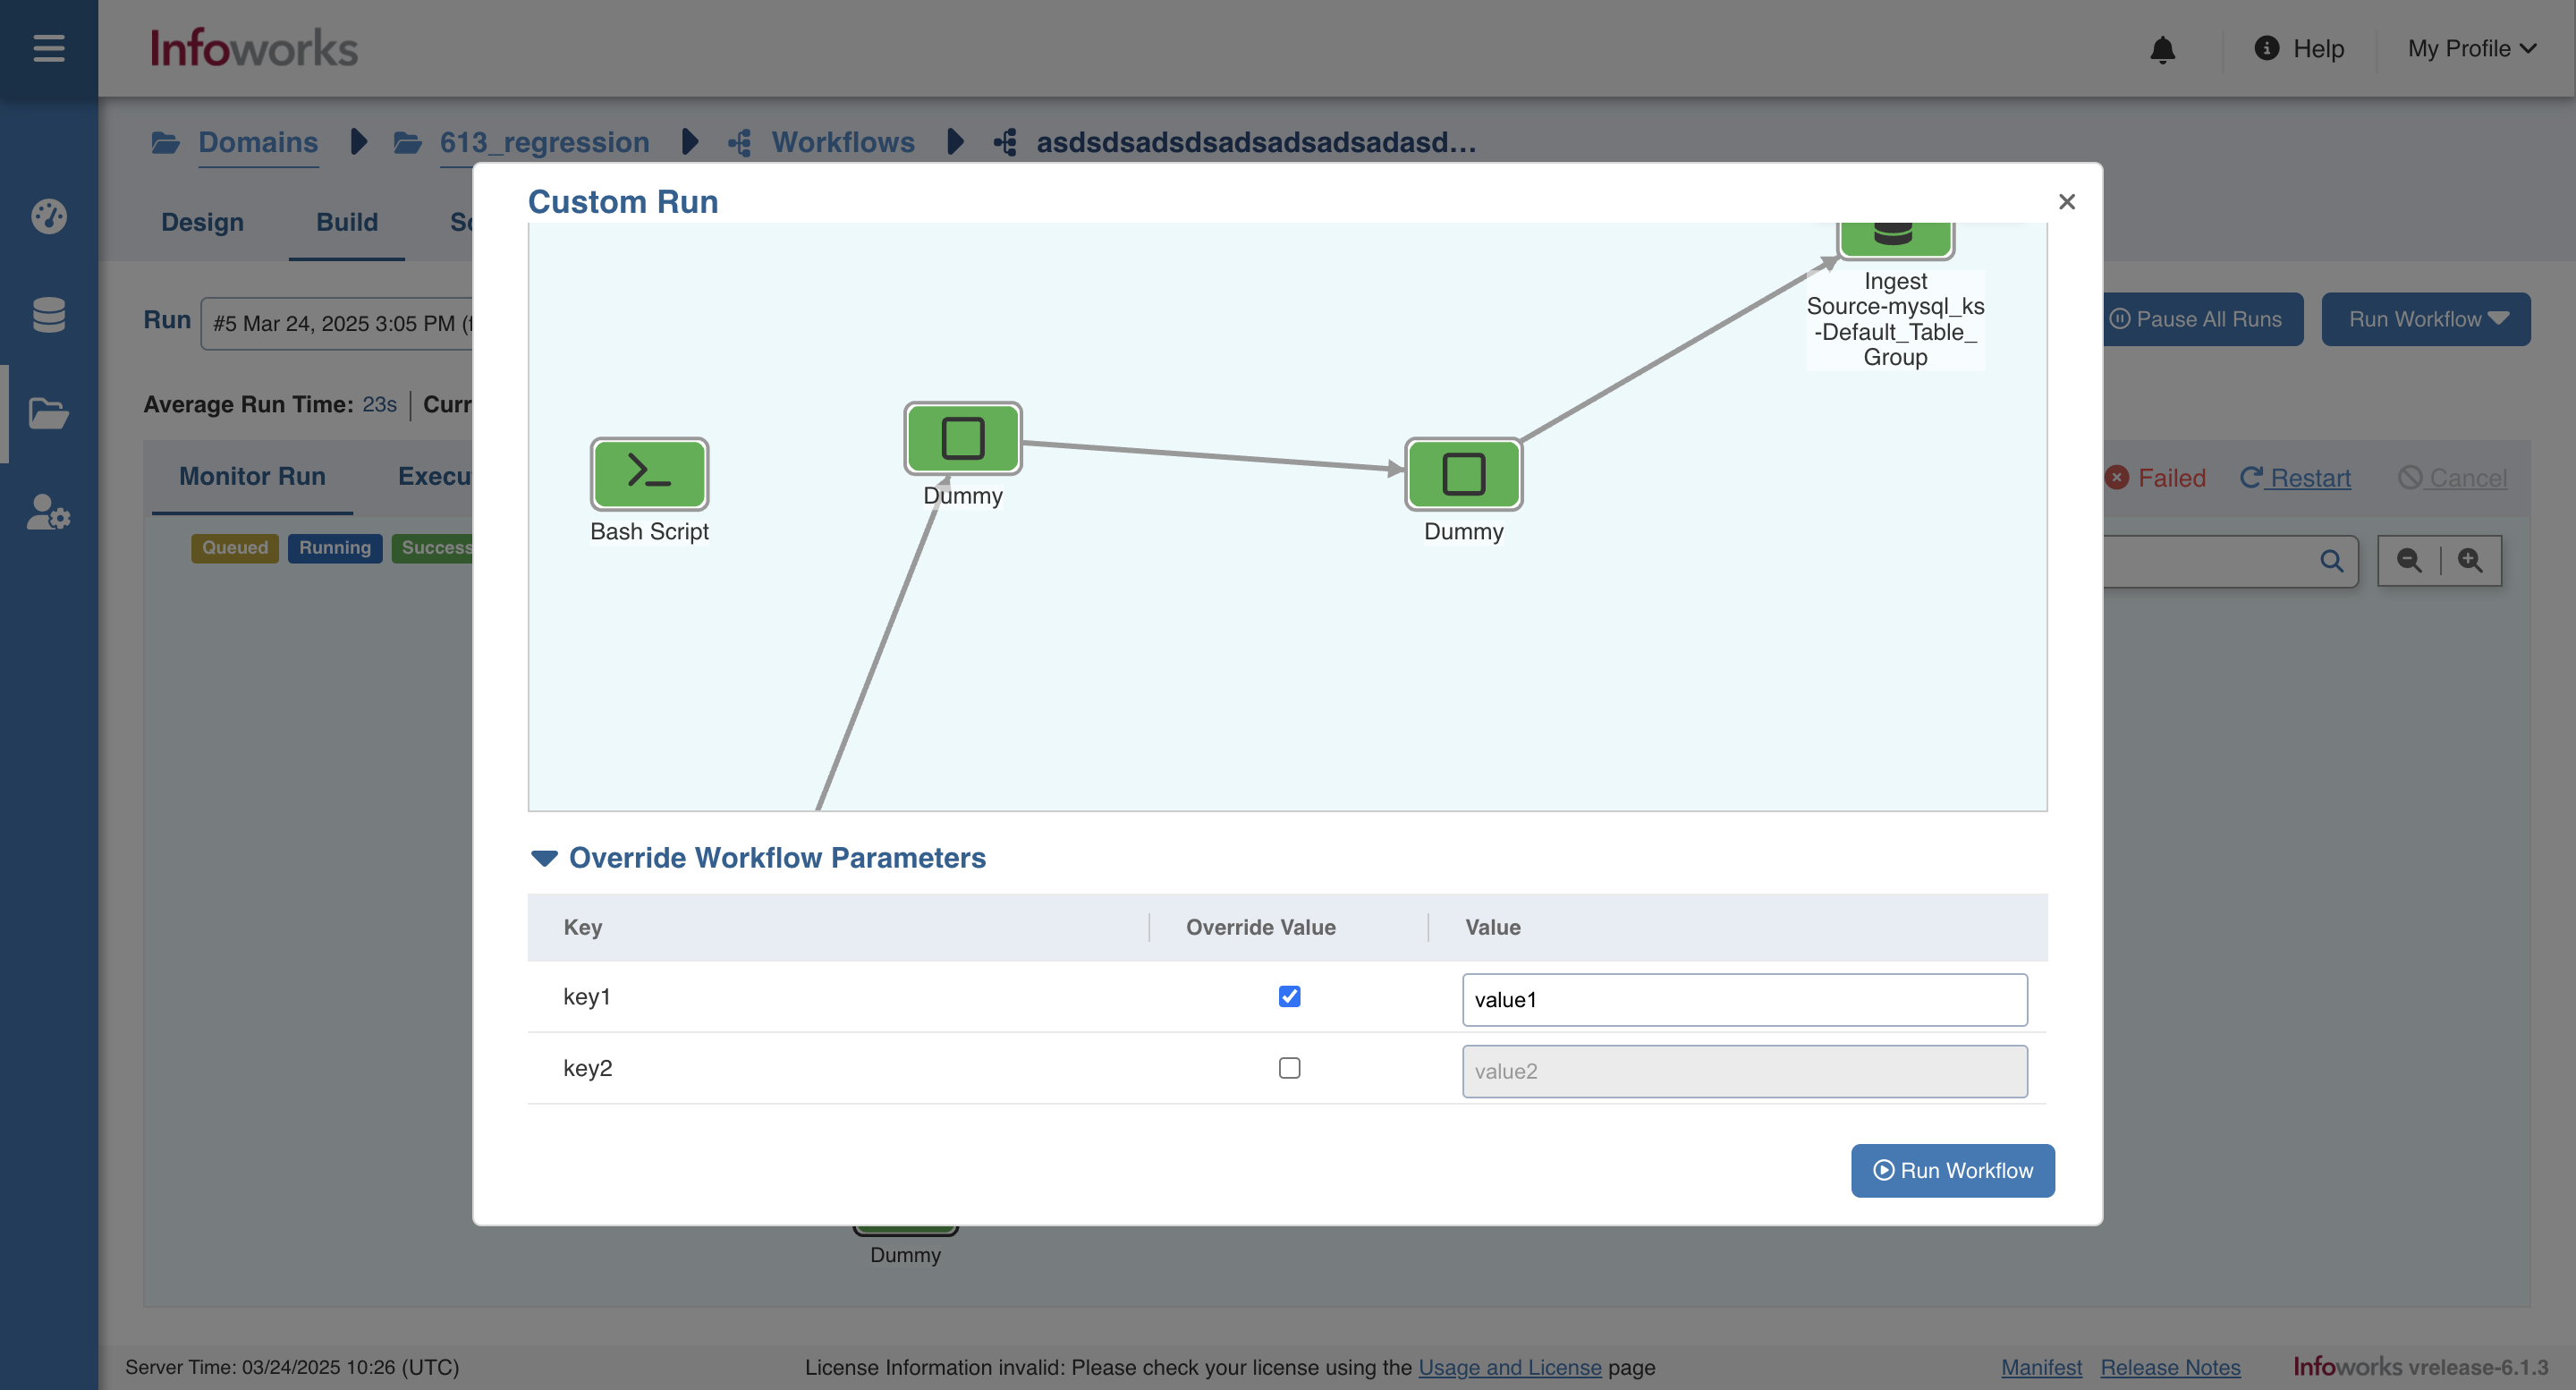
Override Workflow Parameters at run time
Following are the steps to override workflow parameters while building workflow:
- On the build page click on the Run Workflow button and select Custom Run.
- At the bottom of the modal click on the Override Workflow Parameters accordion to open it.
- Override any workflow parameters value and click Run Workflow.