Creating a JSON Source
For creating a JSON source, see Creating a Source. Ensure that the Source Type selected is JSON Files.
Configuring a JSON Source
Click the Data Catalog menu and click the Ingest button for the source you created.
The configuration flow is organised into four tabs as follows:
NOTE Configure details in each tab. Further, click on the next tab name displayed on the top of the window, to complete the JSON configuration.
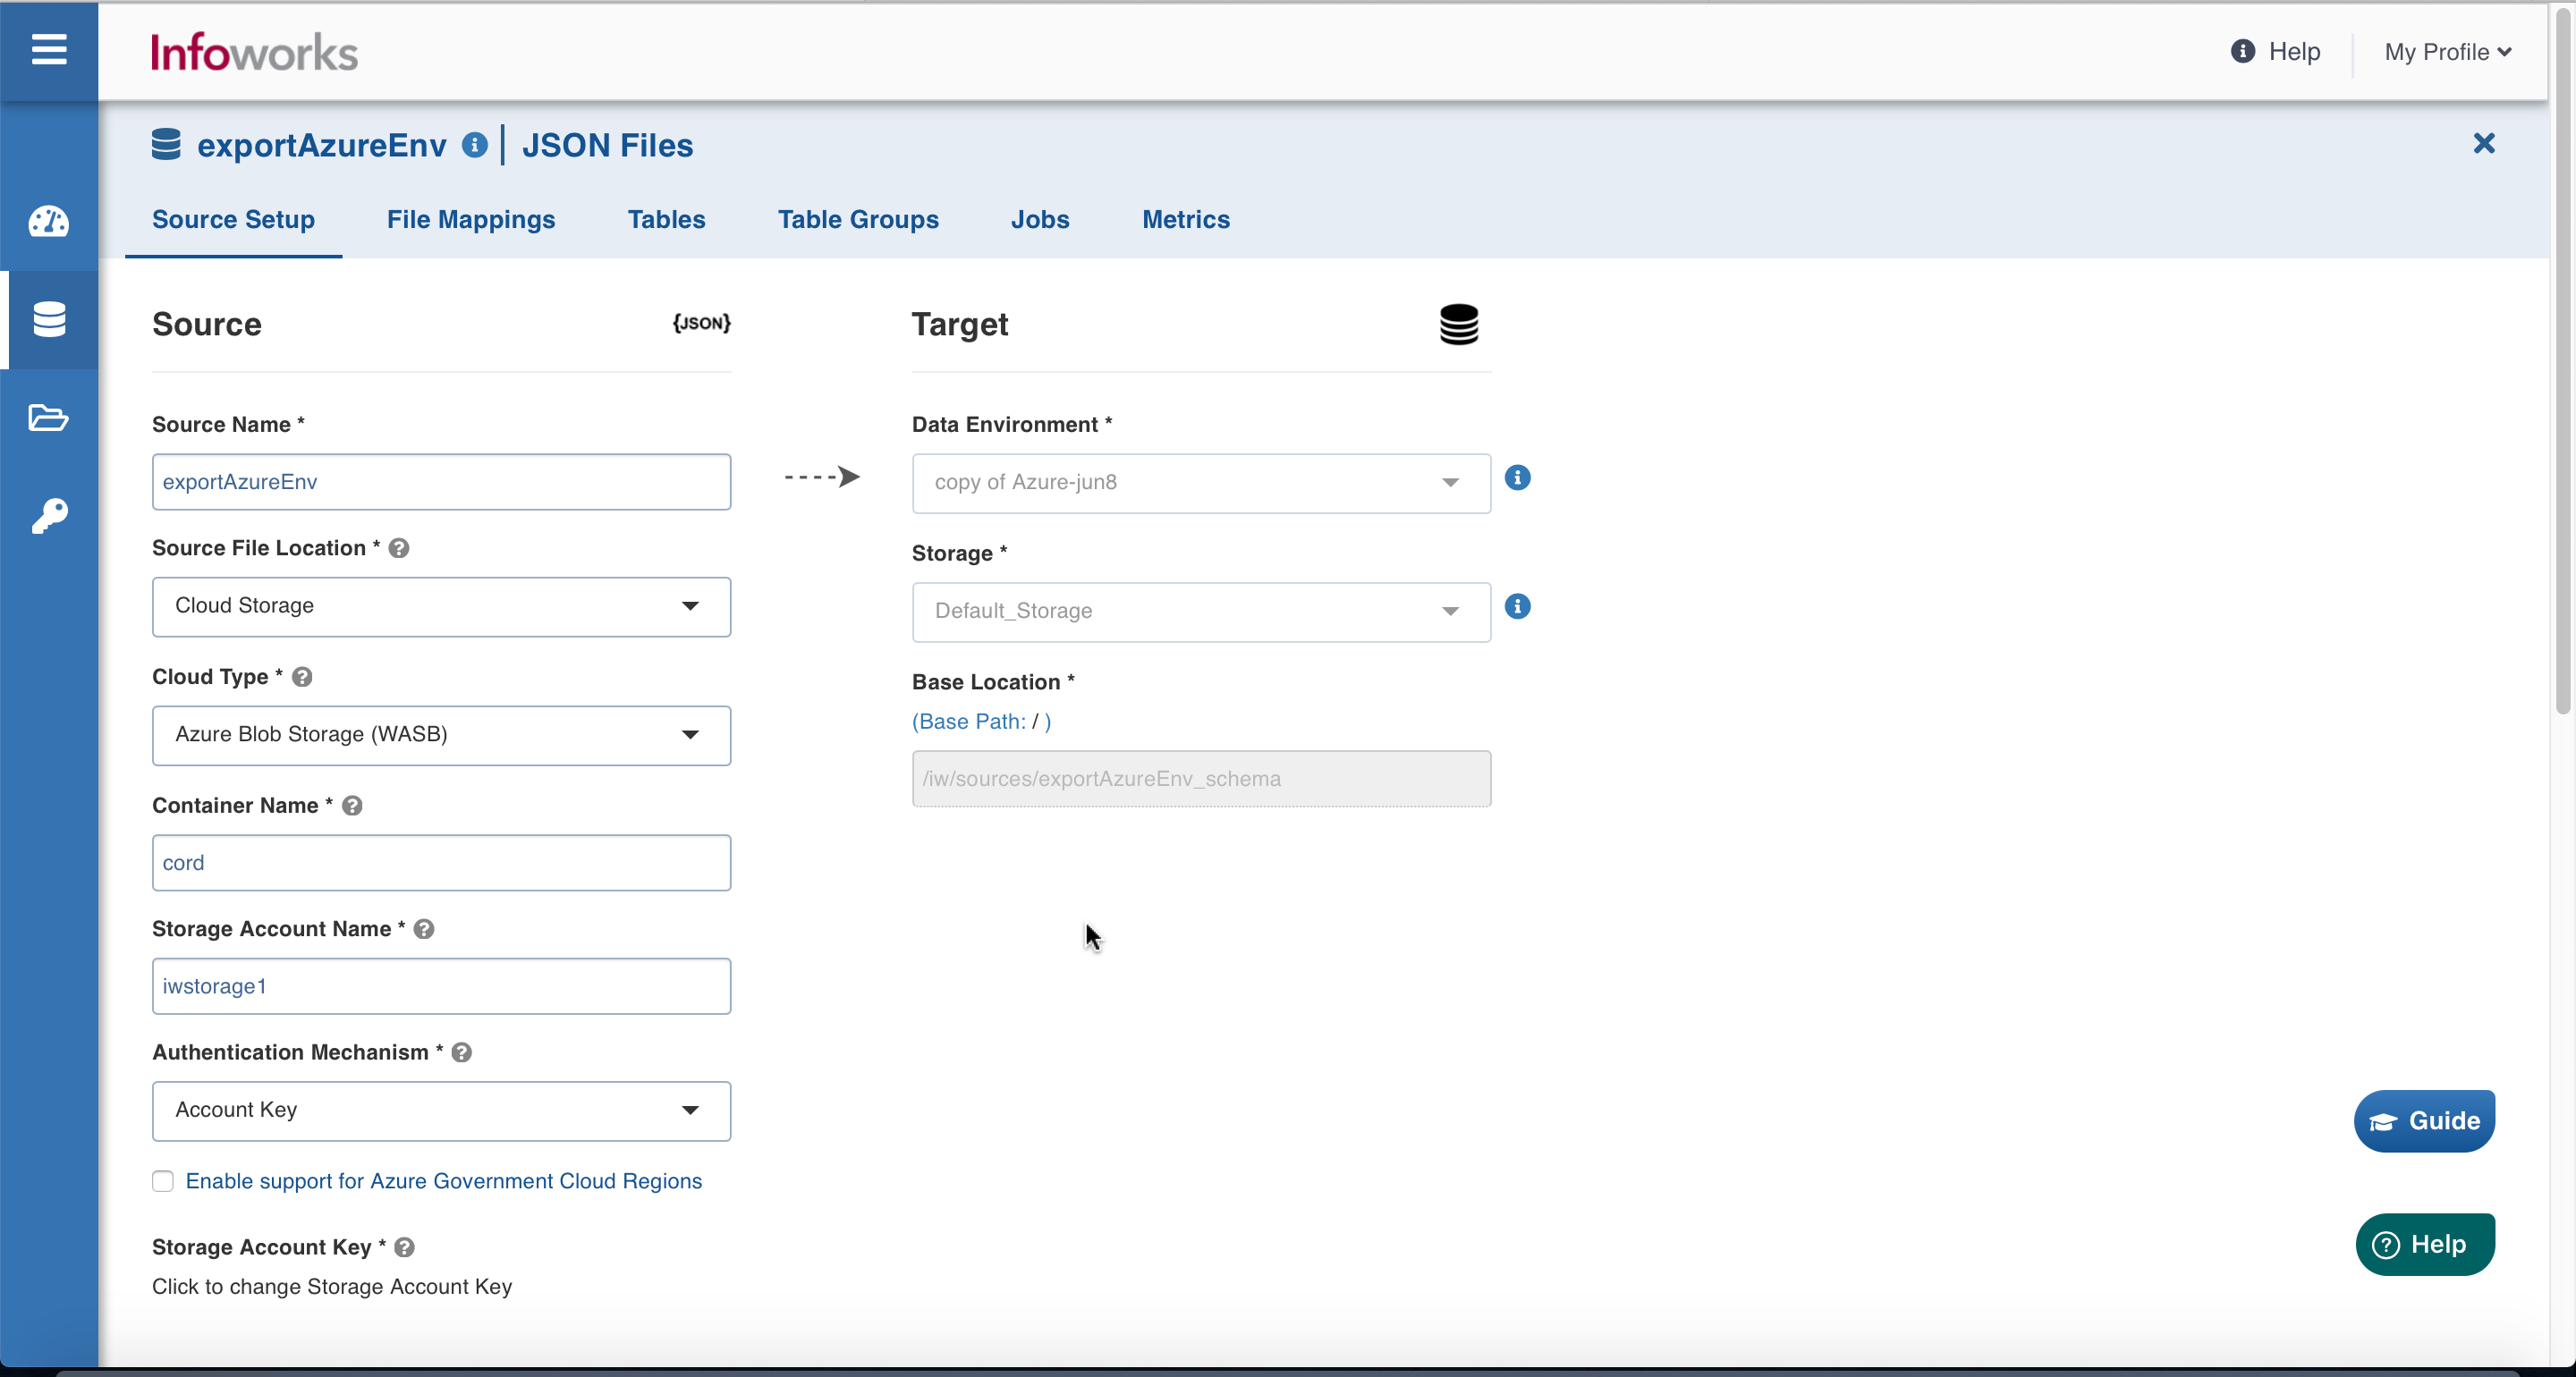
Setting Up Source
Field | Description |
|---|---|
Source File Location | The storage location where the files to be ingested are stored.Select one of the following supported storage locations: Databricks File System (DBFS), Remote Server (Using SFTP), or Cloud Storage. |
Depending on the selection, one of the following sections must be configured:
Databricks File System (DBFS)
Databricks File System (DBFS) is a distributed file system mounted into a Databricks workspace and available on Databricks clusters. DBFS is an abstraction on top of scalable cloud object storage. For more details, see Databricks Documentation.
There is no extra input required for the Databricks File System (DBFS) file location type in the Setup source tab.
Remote Server (Using SFTP)
Infoworks allows you to access files stored in remote servers using SSH File Transfer Protocol (SFTP). This ensures your data is transferred on a secured channel.
On selecting Remote Server (Using SFTP), the following fields appear:
Enter the required details as described in the following table:
Field | Description |
|---|---|
SFTP Host | The host from which data will be read. |
SFTP port | The port where the SFTP service is run. |
Username | The username to log in to the SFTP host. |
Authentication mechanism | Select if you want to authenticate using private key or password. |
Password | Type the password to log in to the SFTP host. NOTE This field appears only when Using Password is selected as Authentication Mechanism. |
Private Key | Type the private key to log into the SFTP host. It can either be a text, uploaded, or a path on the edge node. NOTE This field appears only when Using Private Key is selected as Authentication Mechanism. |
NOTES
When using Private Key as authentication mechanism:
The client public key needs to be added under
~/.ssh/authorized_keyson the SFTP server. The corresponding private key on the job cluster will be used to connect.The private key should be in RSA format. If it is available in OpenSSH format, use the command "
ssh-keygen -p -f <file> -m pem" to convert it into RSA format.
To resolve File Ingestion Failure from SFTP, refer to the File ingestion Failure from SFTP Server.
Cloud Storage
Infoworks allows you to ingest data from files available on cloud storage. Cloud storage refers to data stored on remote servers accessed from the internet, or cloud.
On selecting Cloud Storage, the Cloud Type field appears:
Enter the required details as described in the following table:
Field | Description |
|---|---|
Cloud Type | The options include Azure Blob Storage (WASB) and Amazon S3. |
Azure Blob Storage (WASB)
Windows Azure Storage Blob (WASB), also known as Blob Storage, is a file system for storing large amounts of unstructured object data, such as text or binary data. For more details, see Azure Blob Storage Documentation.
On selecting the Azure Blob Storage (WASB), the following fields appear:
Enter the required details as described in the following table:
Field | Description |
|---|---|
Container Name | The name of the container in the storage account, in which the files are stored. A container organizes a set of blobs, similar to a directory in a file system. For more details, see Create a container. |
Storage Account Name | The unique name of the storage account. For more details, see Create a storage account. |
Authentication mechanism | The options include Account Key and None.Account key: Uses access key to authenticate applications when making requests to this Azure storage account.None: No authentication required. This enables accessing data from public cloud storage folders. |
Enable Support for Azure Government Cloud Regions | Select this check box to enable ingestion from a source available in the Government Cloud regions. This option is not editable if the data source tables are already created. |
Storage Account Key | The access key to authenticate applications when making requests to this Azure storage account. For more details, see Manage storage account access keys. |
Amazon S3
Amazon S3 or Amazon Simple Storage Service is a service offered by Amazon Web Services that provides object storage through a web service interface. For more details, see Amazon S3 Documentation.
On selecting the Amazon S3, the following fields appear:
Enter the required details as described in the following table:
Field | Description |
|---|---|
Authentication Mechanism | Select the Use Access Credentials option. |
Access ID | For the access ID details, contact your AWS Cloud admin.The Access ID is a 20 character alphanumeric string. This uniquely identifies an AWS string. This allows you to send authenticated requests to Amazon S3. |
Secret key | For the secret key details, contact your AWS Cloud admin.The Secret Key is a 40 character alphanumeric string. This allows you to send authenticated requests using the Amazon S3. |
Google Cloud Storage (GCS) is an online file storage web service for storing and accessing data on Google Cloud Platform infrastructure. In GCS, buckets are the basic containers that hold the data. For more details, see GCS documentation.
For GCS, enter the following:
Field | Description |
|---|---|
Project ID | The ID of the project in the source. For more details, see Project ID. |
Authentication Mechanism | The mechanism using which the security information is stored. The Service Account Credential File option refers to the access key to authenticate applications when making requests to this Azure storage account. For more details, see Creating and managing service account keys. |
Service Account Credential File Upload | You can upload or enter the location where the service account JSON credential file is available in the edge node. This option is displayed if the Authentication Mechanism selected is Service Account Credential File. |
Source Base Path | The path to the base directory in the file system where all the JSON files to be accessed are stored. The base path must begin with gs://. For more details, see Creating storage buckets. |
For Azure DataLake Storage (ADLS) Gen2, enter the following:
Field | Description |
|---|---|
Access Scheme | Scheme used to access ADLS Gen2. The available options are abfs:// and abfss:// |
Authentication Mechanism | The mechanism using which the security information is stored. The options include Access Key and Service Principal. Access key refers to the key to authenticate applications when making requests to this Azure storage account. Service Principal functions as the identity of the application instance. |
File System | Provide a file system where all the data of an artifact will be stored. |
Storage Account Name | Provide the name of Azure storage account. |
Access Key | Provide the storage access key to connect to ADLS. NOTE This field appears only when the authentication mechanism is selected as Access Key. |
Application ID | Provide the ID that uniquely identifies the user application. NOTE This field appears only when the authentication mechanism is selected as Service Principal. |
Directory ID | Provide the ID that uniquely identifies the Azure AD instance. NOTE This field appears only when the authentication mechanism is selected as Service Principal. |
Service Credential | Provide the credential string value that the application uses to prove its identity. NOTE This field appears only when the authentication mechanism is selected as Service Principal. |
After entering the required details, click Save to save the configured settings.
Other sections available under Source setup tab are:
Now, click the File Mappings tab.
File Mappings
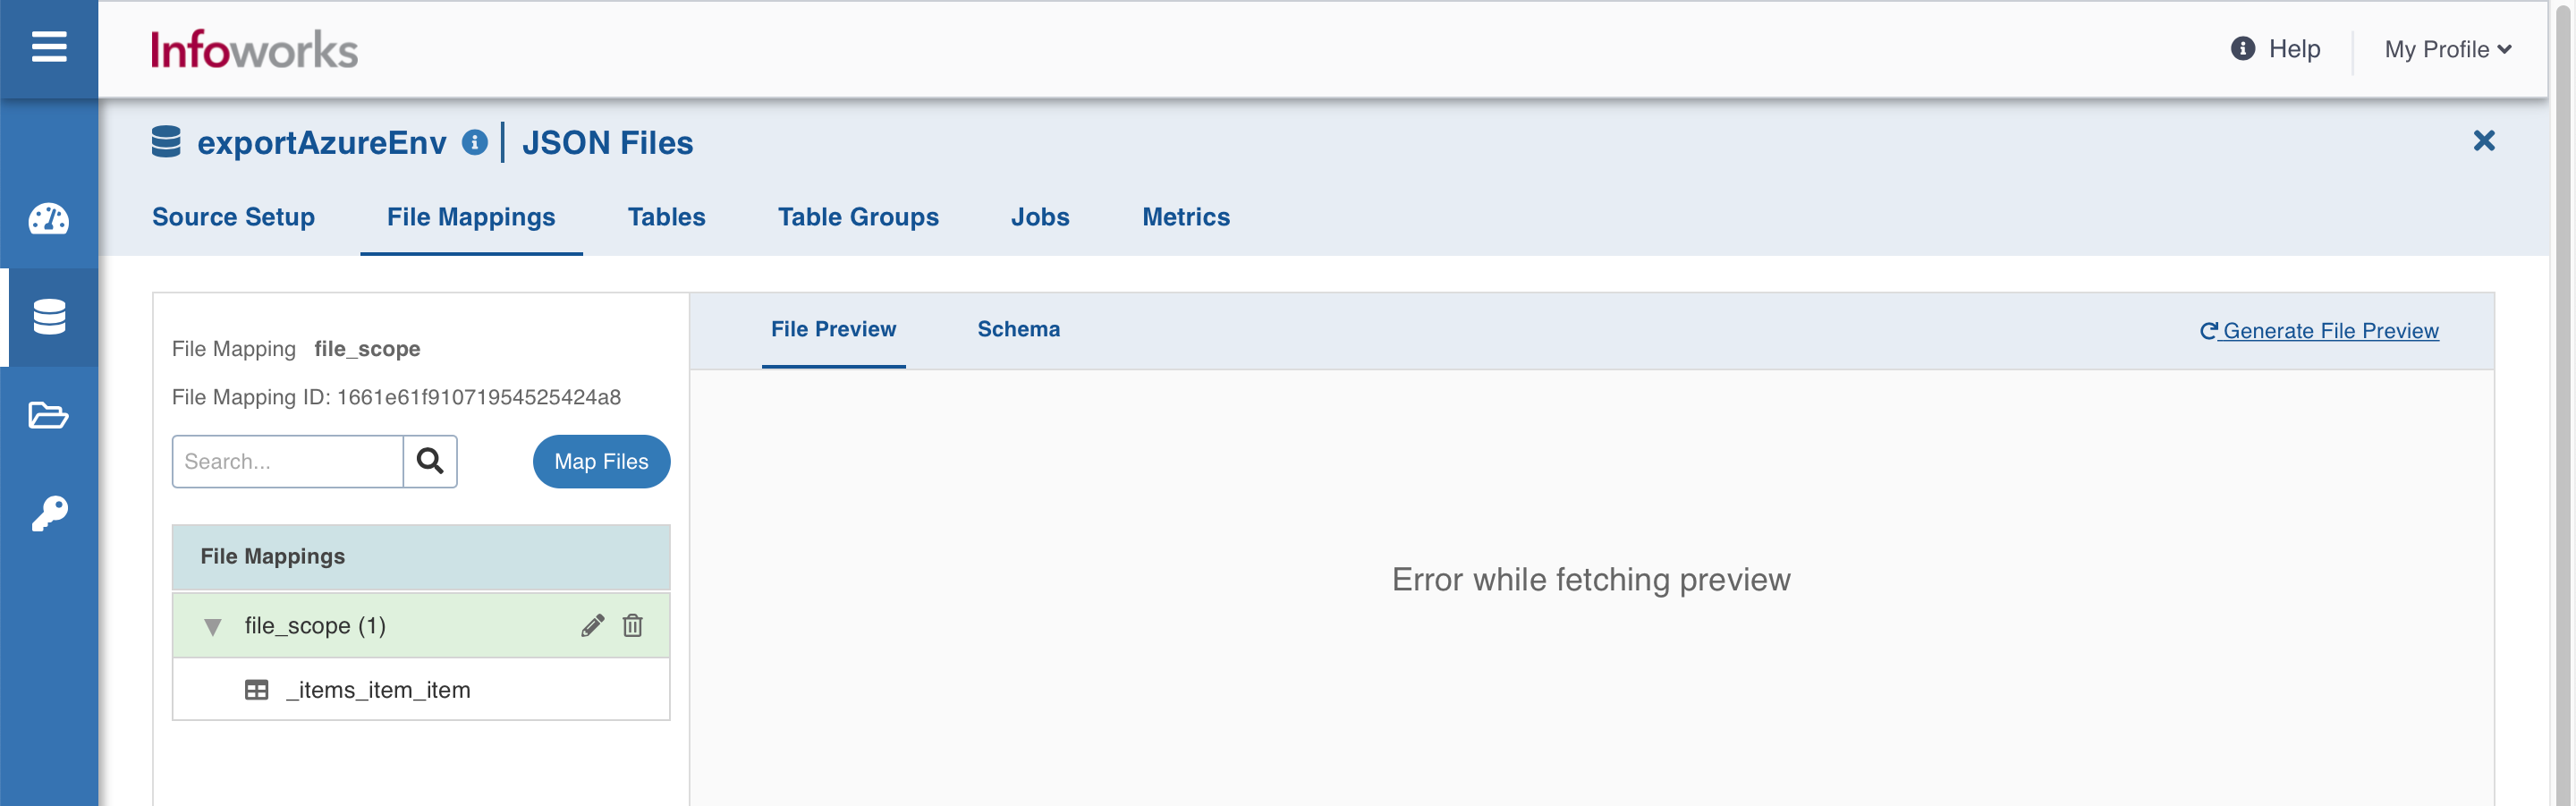
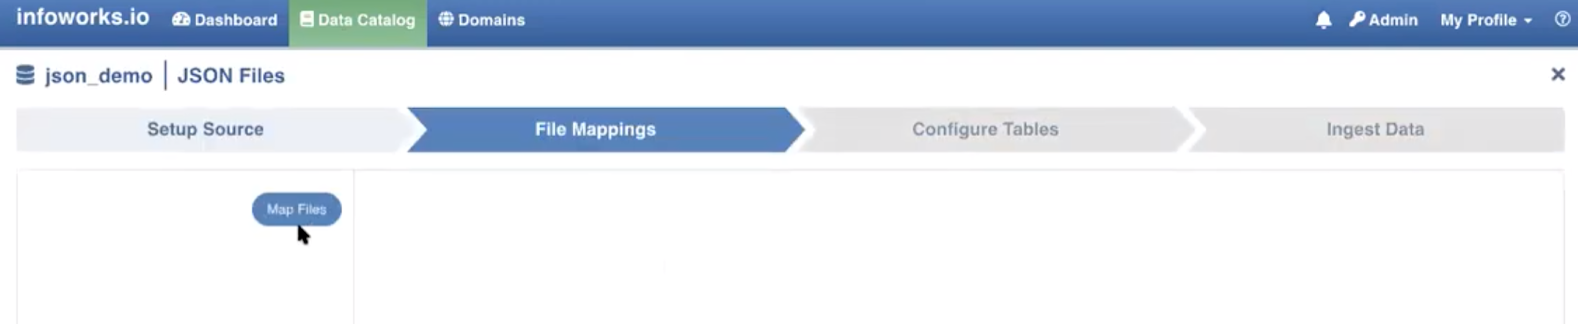
This tab allows you to configure the folder where the JSON files are stored. Each File Mapping will create a single JSON schema projection and may have multiple tables defined from the same schema. Each table must point to a different part of the JSON tree. You may preview the files, crawl them, and configure tables.
NOTE All the files in a file mapping must have the same schema structure. To configure files with different schema create multiple file mappings.
Click the Map Files button to start file mapping.
File Mapping Field Descriptions
Field | Description |
|---|---|
Mapping Name | Name for the file mapping that is being configured, as required by the user. |
Source Path | The path to the directory where JSON files are stored. For example, if the JSON file is stored in WASB, the source path is |
Records Scope | The scope of the ingested records. The available options are:File, where each file is a JSON record.Line, where each line is a JSON record. |
Include/Exclude File From Directory | The option to select inclusions or exclusion of file from the directory. The two available options are:Include Files Pattern (regex): The regex pattern to include files. Only the files matching this Java regex will be crawled.Exclude Files Pattern (regex): The regex pattern to exclude files. The files matching this Java regex will not be crawled. |
Include Subdirectories | The option to ingest the files present in the subdirectories of the source path. |
Character Encoding | The character encoding is UTF-8. |
After entering the required details, click Save to save the configured settings.
There are two tabs in this window that appears:
File Preview tab
File preview tab allows you to quickly view the snapshot of the files without opening them.
Click the + icon corresponding to every file displayed, to preview the file content, and then click Crawl Schema button. Ensure that the configured file contains data.
The maximum size of the file for which preview can be made available can be configured in the file_preview_size_limit parameter of the Advanced Configuration section. The default value is 10 MB. For files larger than the configured value, preview will not be available. In those cases, click the Crawl Schema button and move to the Schema tab.
In the file preview, two views:
Raw (displays the file content as it is read)
Pretty (displays the file content in a structured format) are available.
Schema Tab
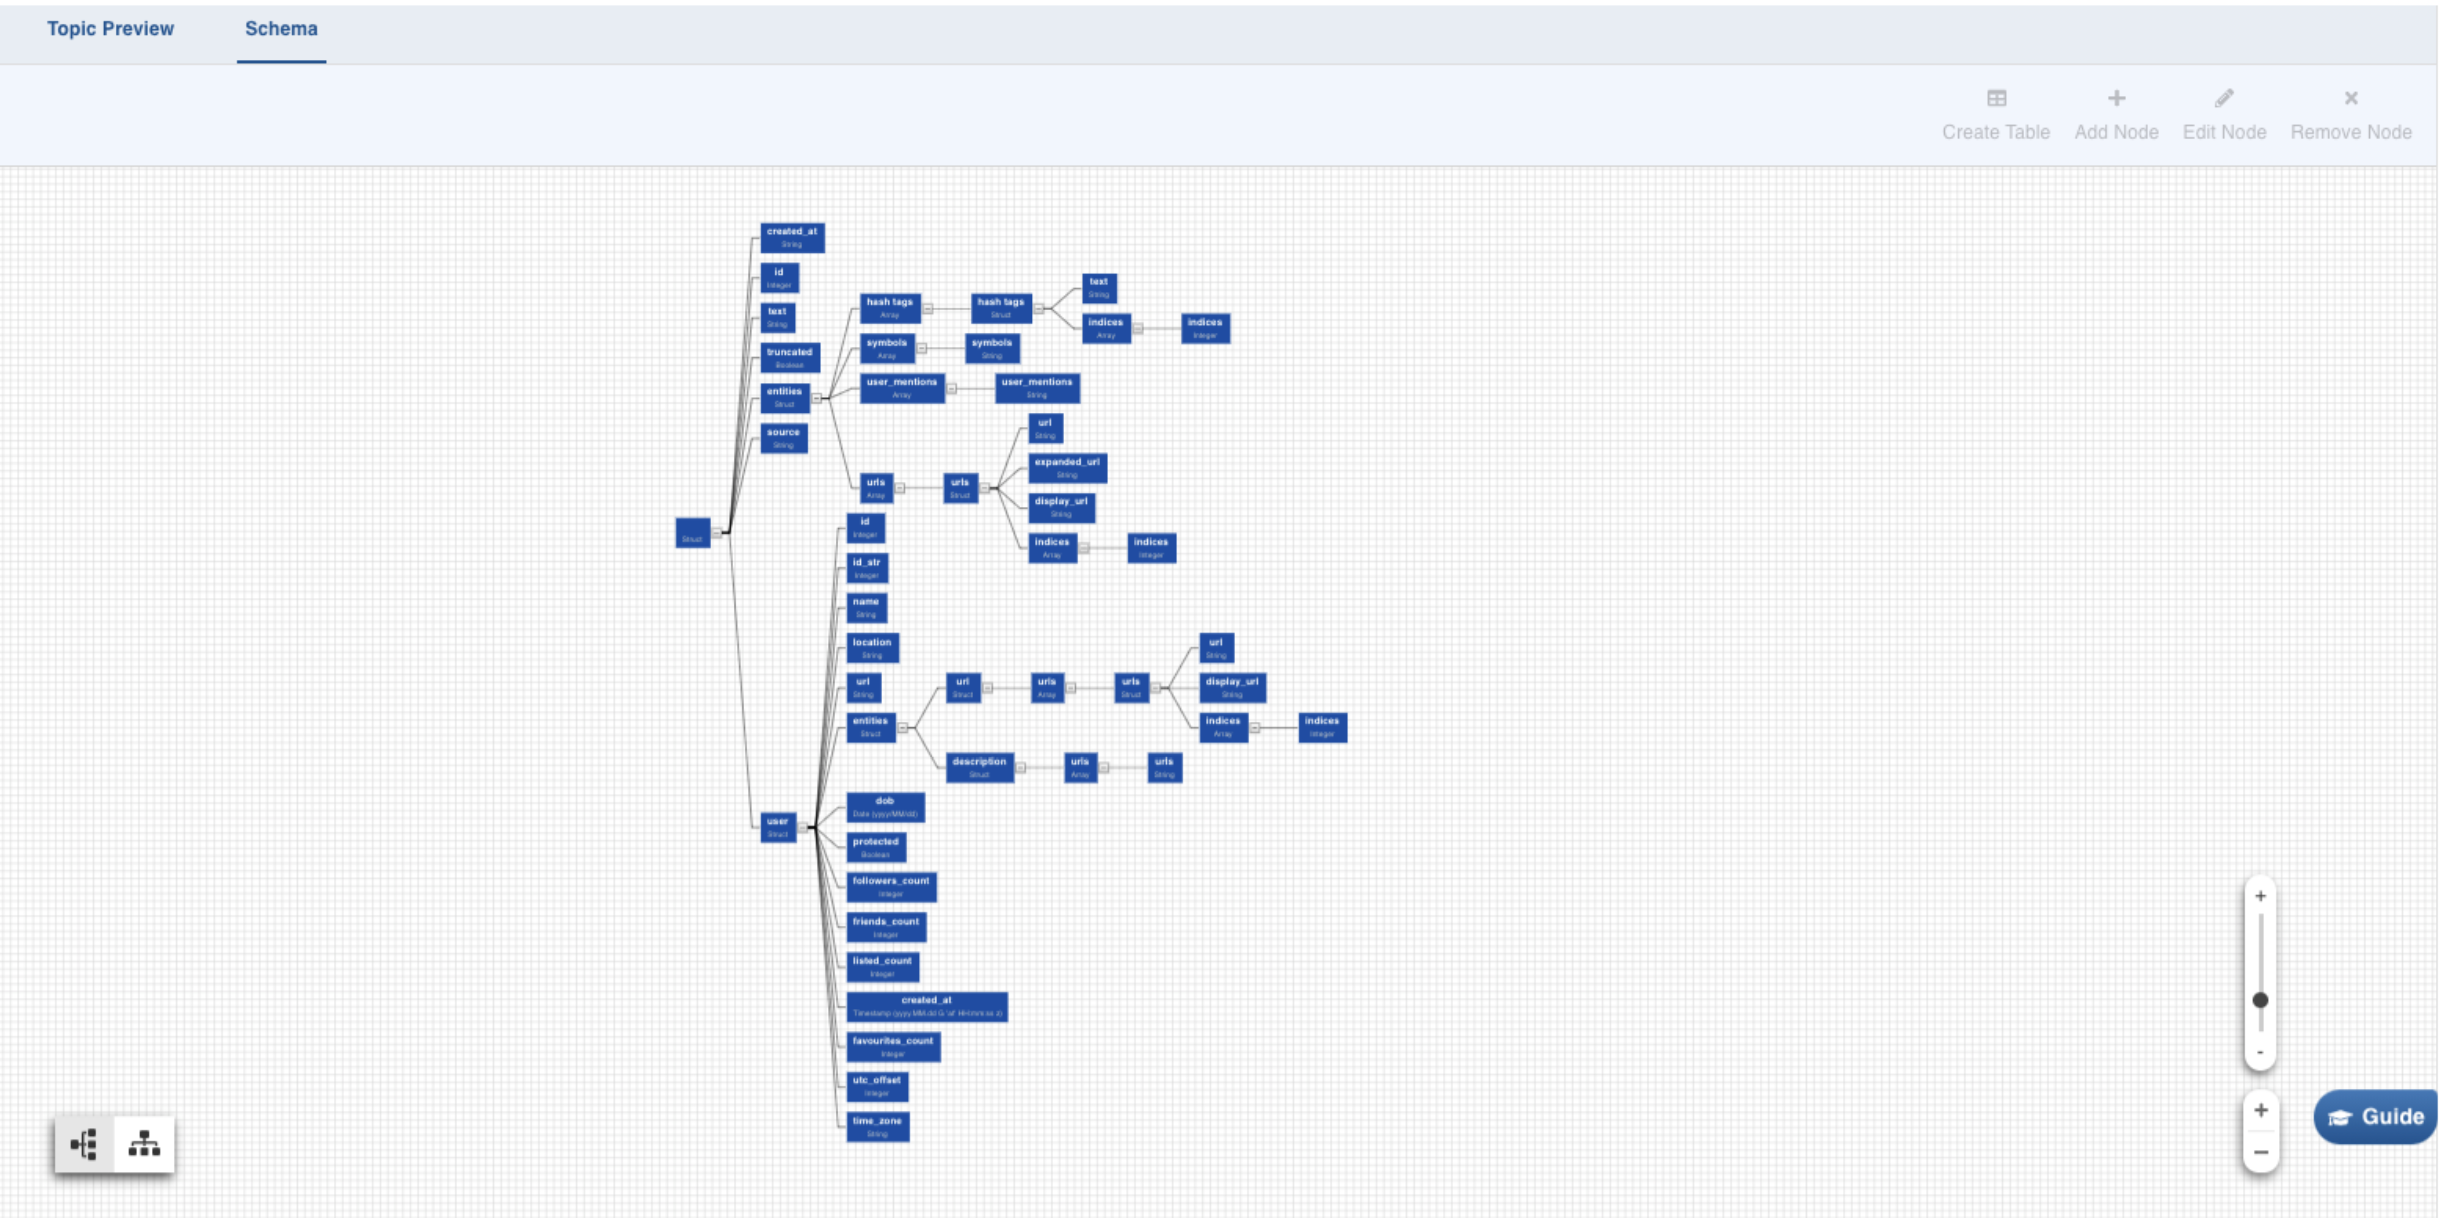
Select any path to create a table with the corresponding columns in it. Click on the Required Node. Further, you can also hold Shift key and click on multiple required nodes. The children nodes of all the parent nodes selected become table columns.
For example, If you select only topping in the example above, the table created will consist of two columns, id and type.
To manage the nodes in the schema, you may use the Add Node, Edit Node, and Remove Node (same as name suggests) buttons on the top-right corner of the tab. To revert the edits in schema, recrawl it from the File Preview tab.
For limitations on schema creation, see
Click Create Table, to create the table with selected parameters. The following window is displayed:
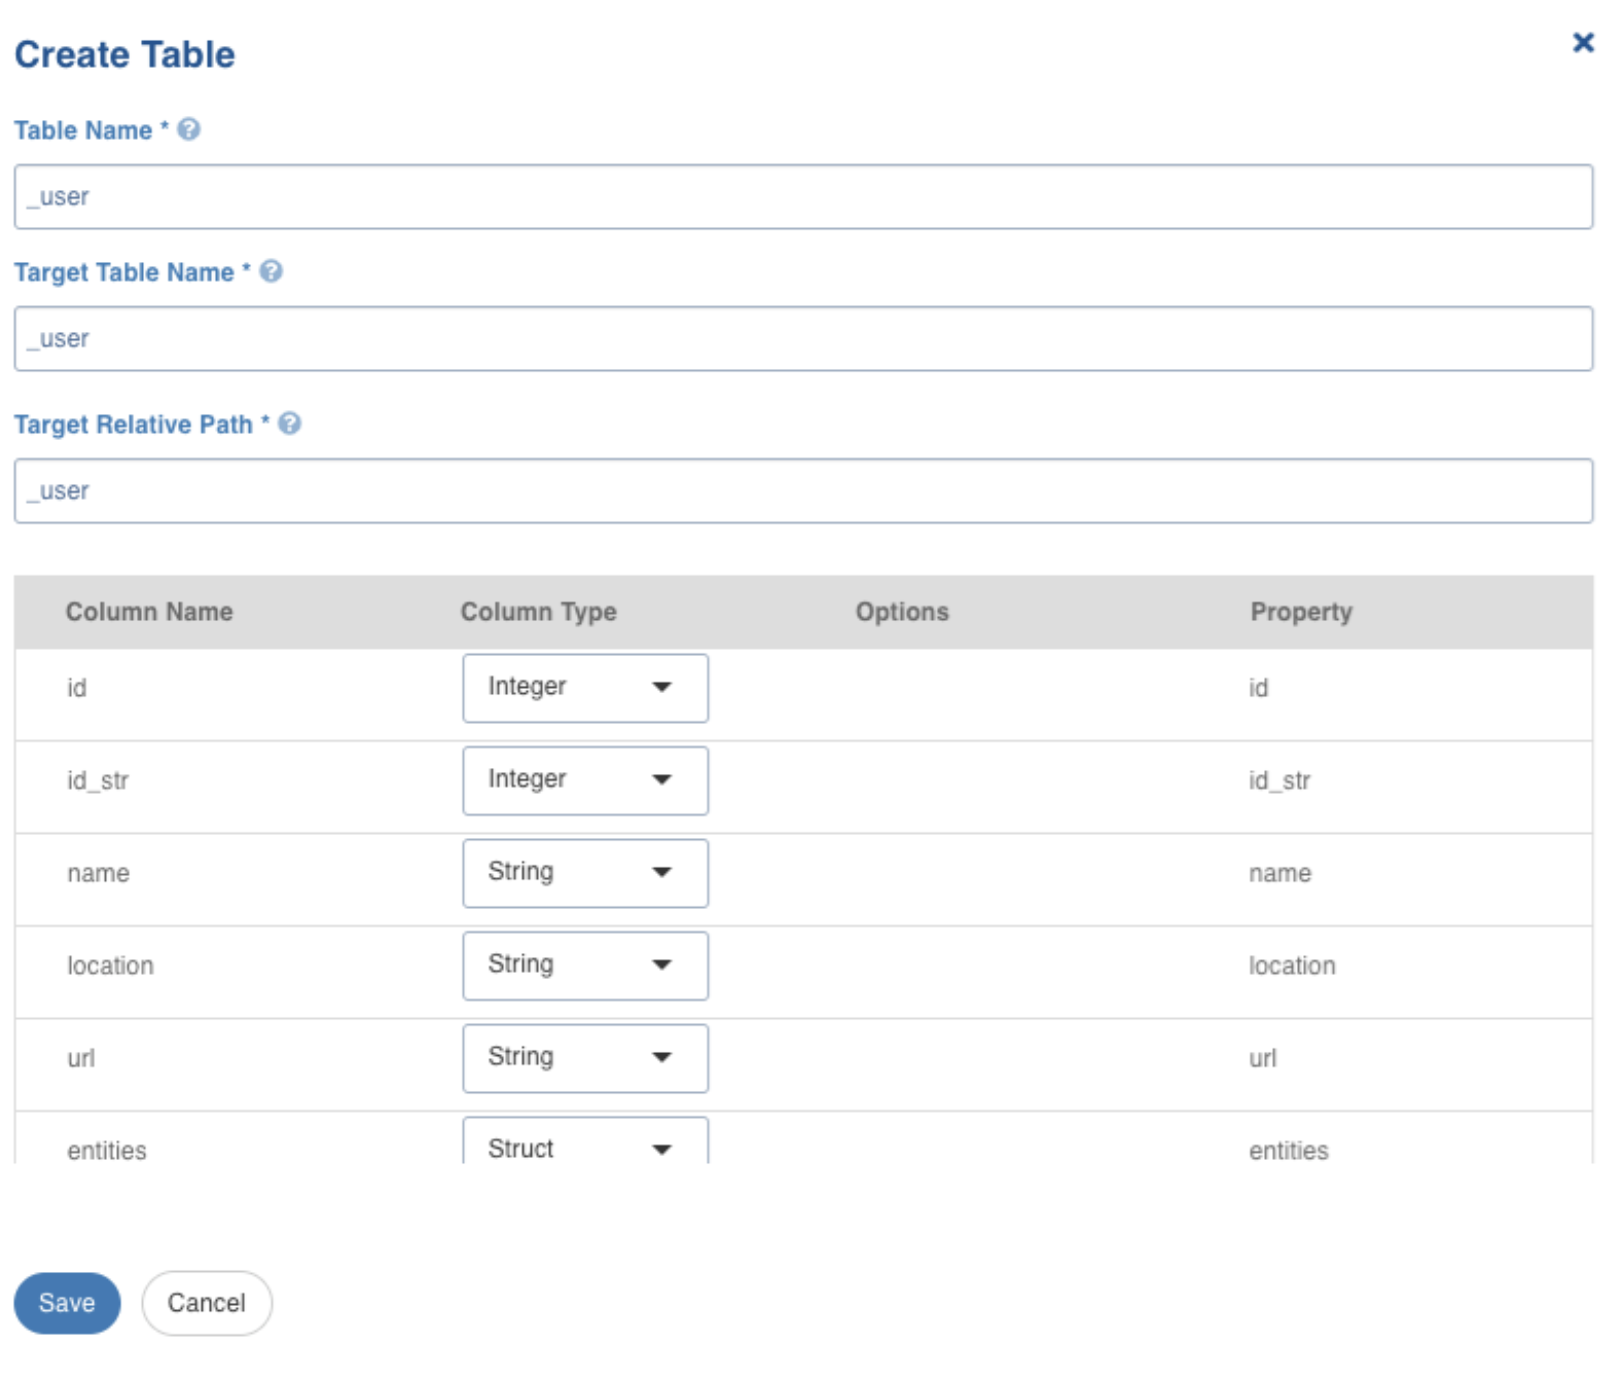
Create Table Field Description
Field | Description |
|---|---|
Table Name | Name for the table that is being configured, as required by the user. |
Target Table Name | Name for the target table to be created in the data lake. |
Target Relative Path | The target directory path (relative to the target base path) to store the crawled output. Hive external tables will be created in this directory. |
After configuring the required details, click Save.
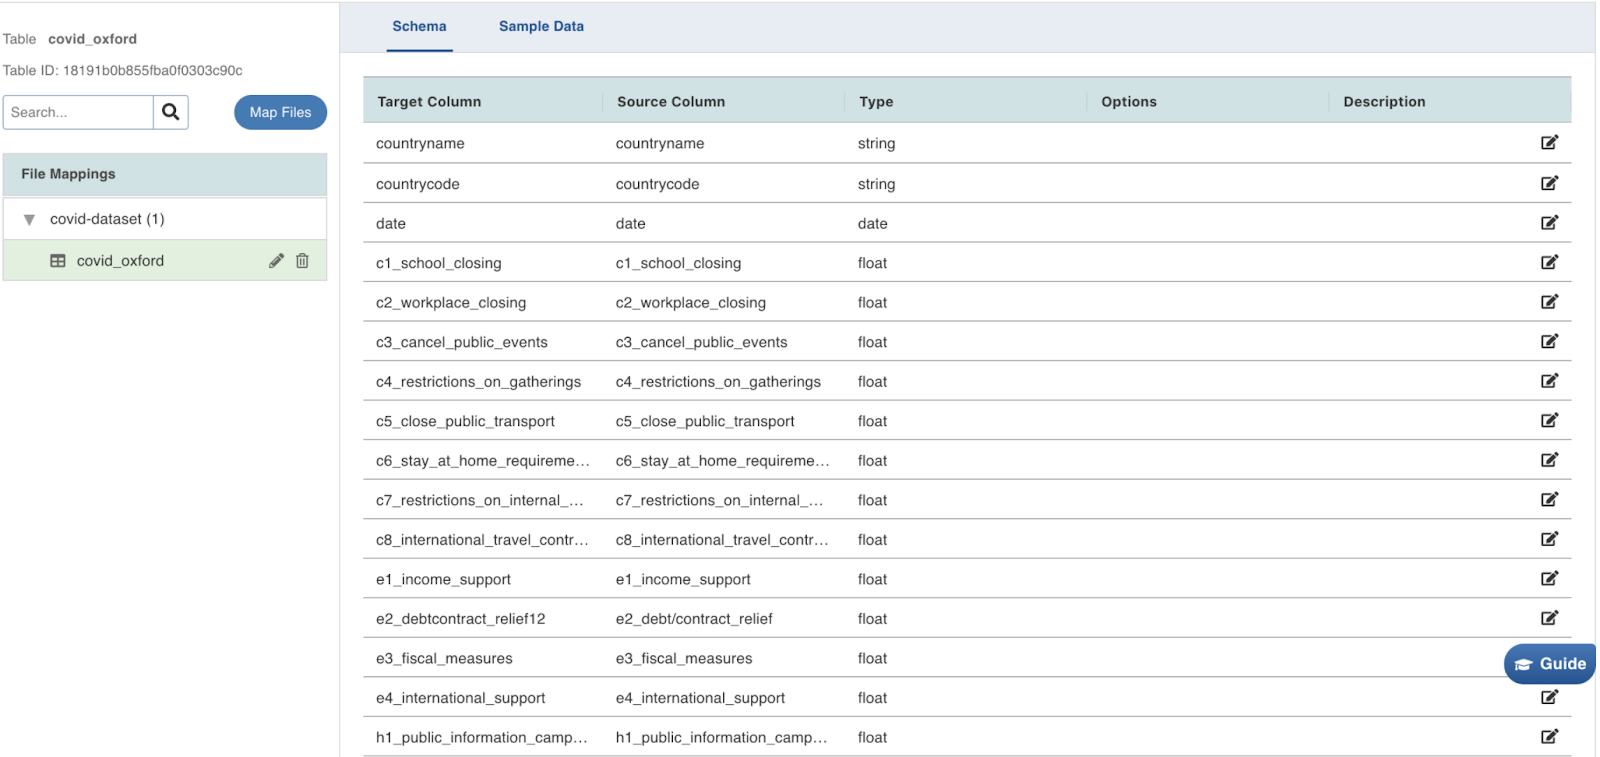
The left panel displays the list of the tables created. Click on the table name, to view/edit the table schema, and to view the sample data. Click the edit icon corresponding to the table name to edit the table configuration.
Now, navigate to the Configure Tables tab, on the top of the window.
Configure Tables
For configuring JSON tables, see Configure Tables.
After configuring the required details, click Save to save the settings. Now, click the Ingest Data tab.
Ingest Data
For ingesting JSON source data, see Ingesting Data. Further, perform the following steps:
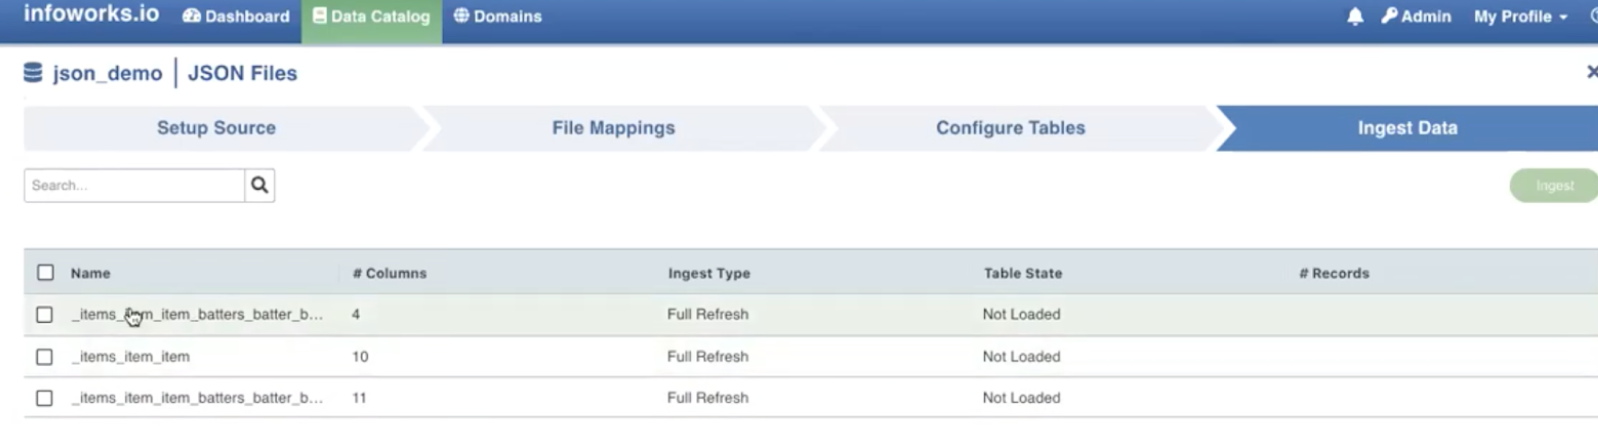
Ingest Configurations
Select the required tables and then click Ingest. The following window appears:
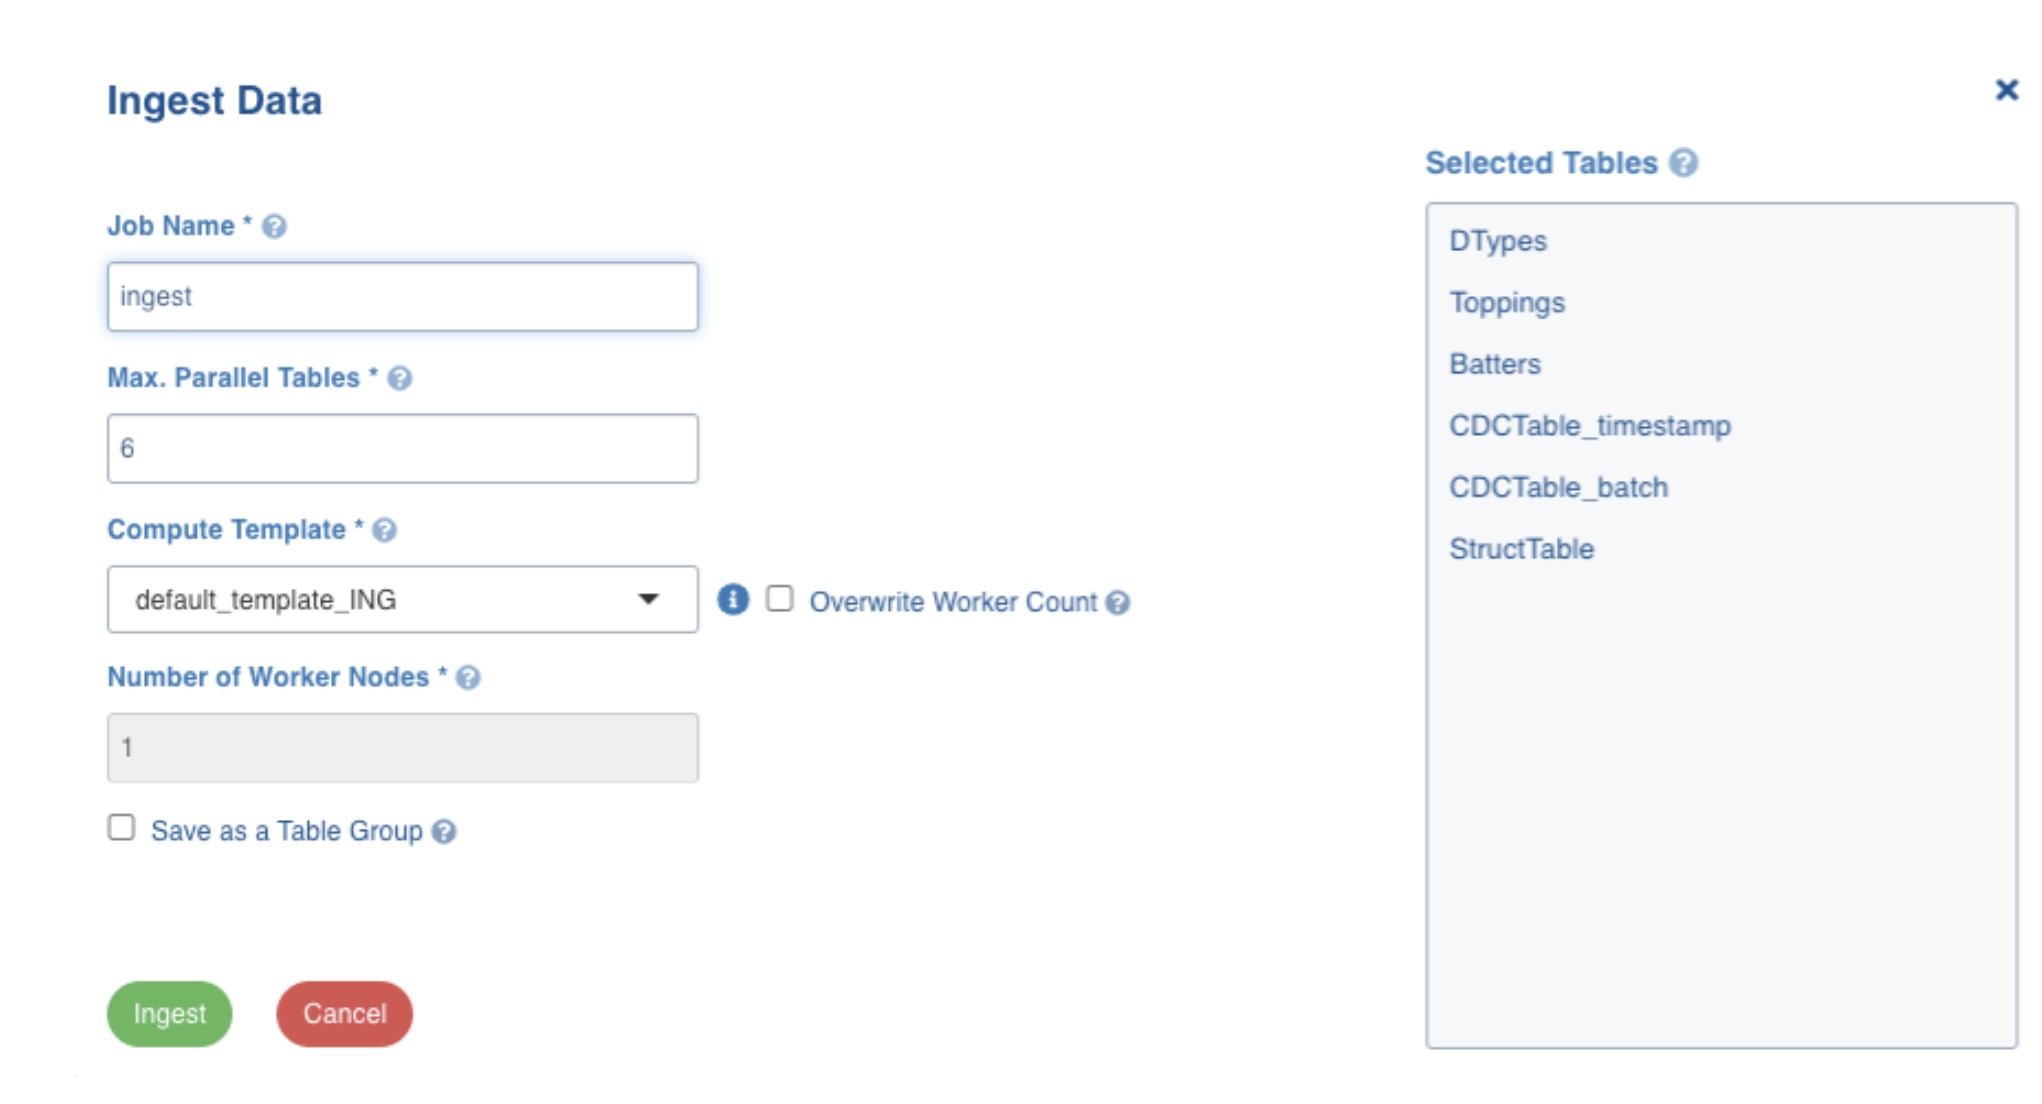
For more information on field values, see Ingestion Details section in the Ingestion Process topic.
Enter the required values and then click Ingest. The following window appears:

Click the Click here to track progress link to view the ingestion status. The following window appears on clicking this link.
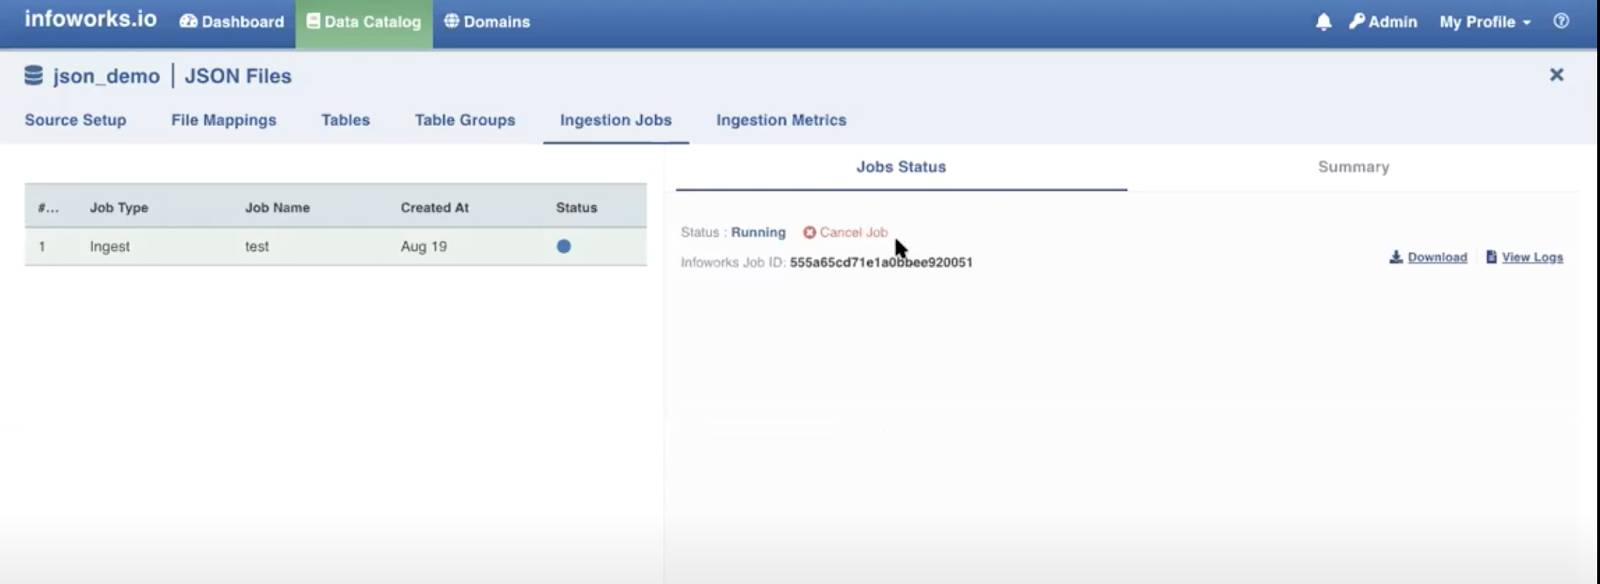
This takes a few minutes. You may cancel the job by clicking the Cancel Job option. On completion the job status and summary is displayed on the tab.
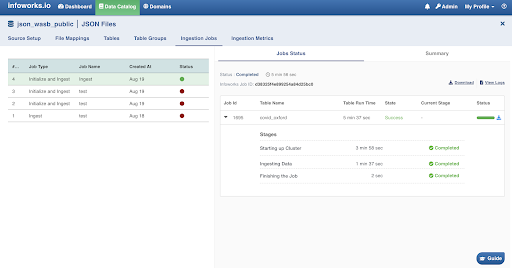
Click the Ingestion metrics tab to view the in-details summary of the job. This tab is equipped with helpful filters.
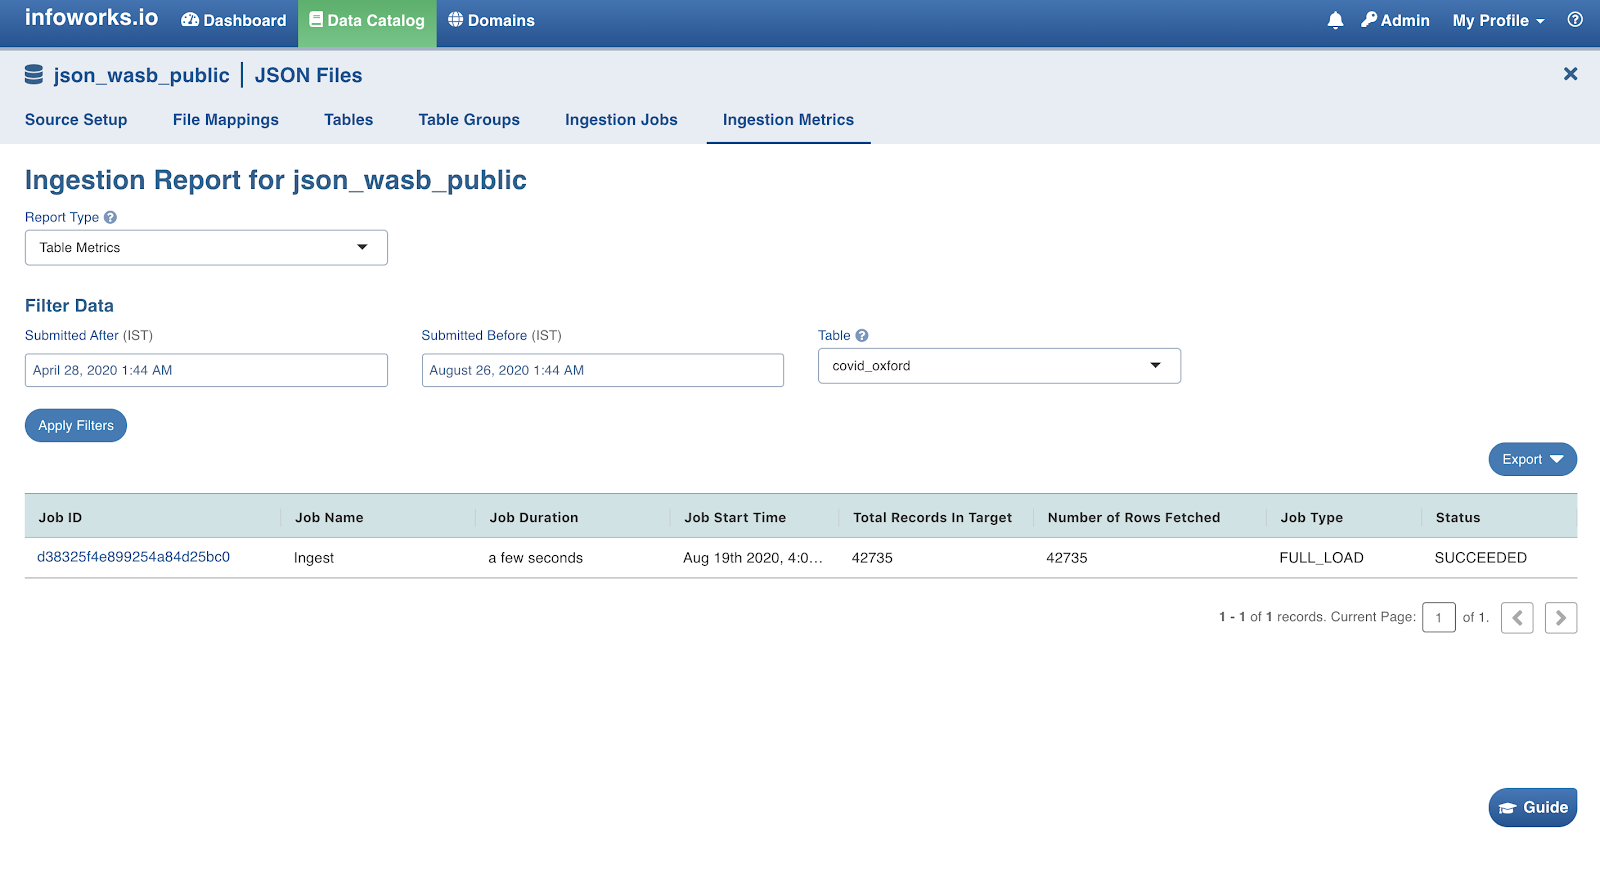
This summarises the complete JSON ingestion process.
Configuration Migration
NOTE: The configuration for the tables that are in ready state, will not be migrated.
In the Configuration Migration section of the Source setup tab, enable Pretty print configuration to download the configuration file with JSON syntax. Click Export. The source configuration will be downloaded.
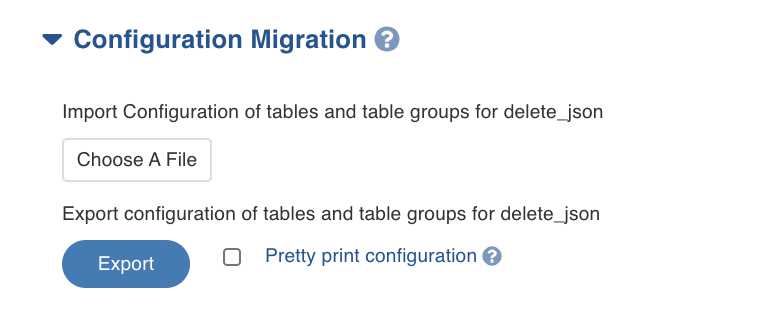
To import any existing configuration, click Choose A File and select the required configuration file. The following window appears:
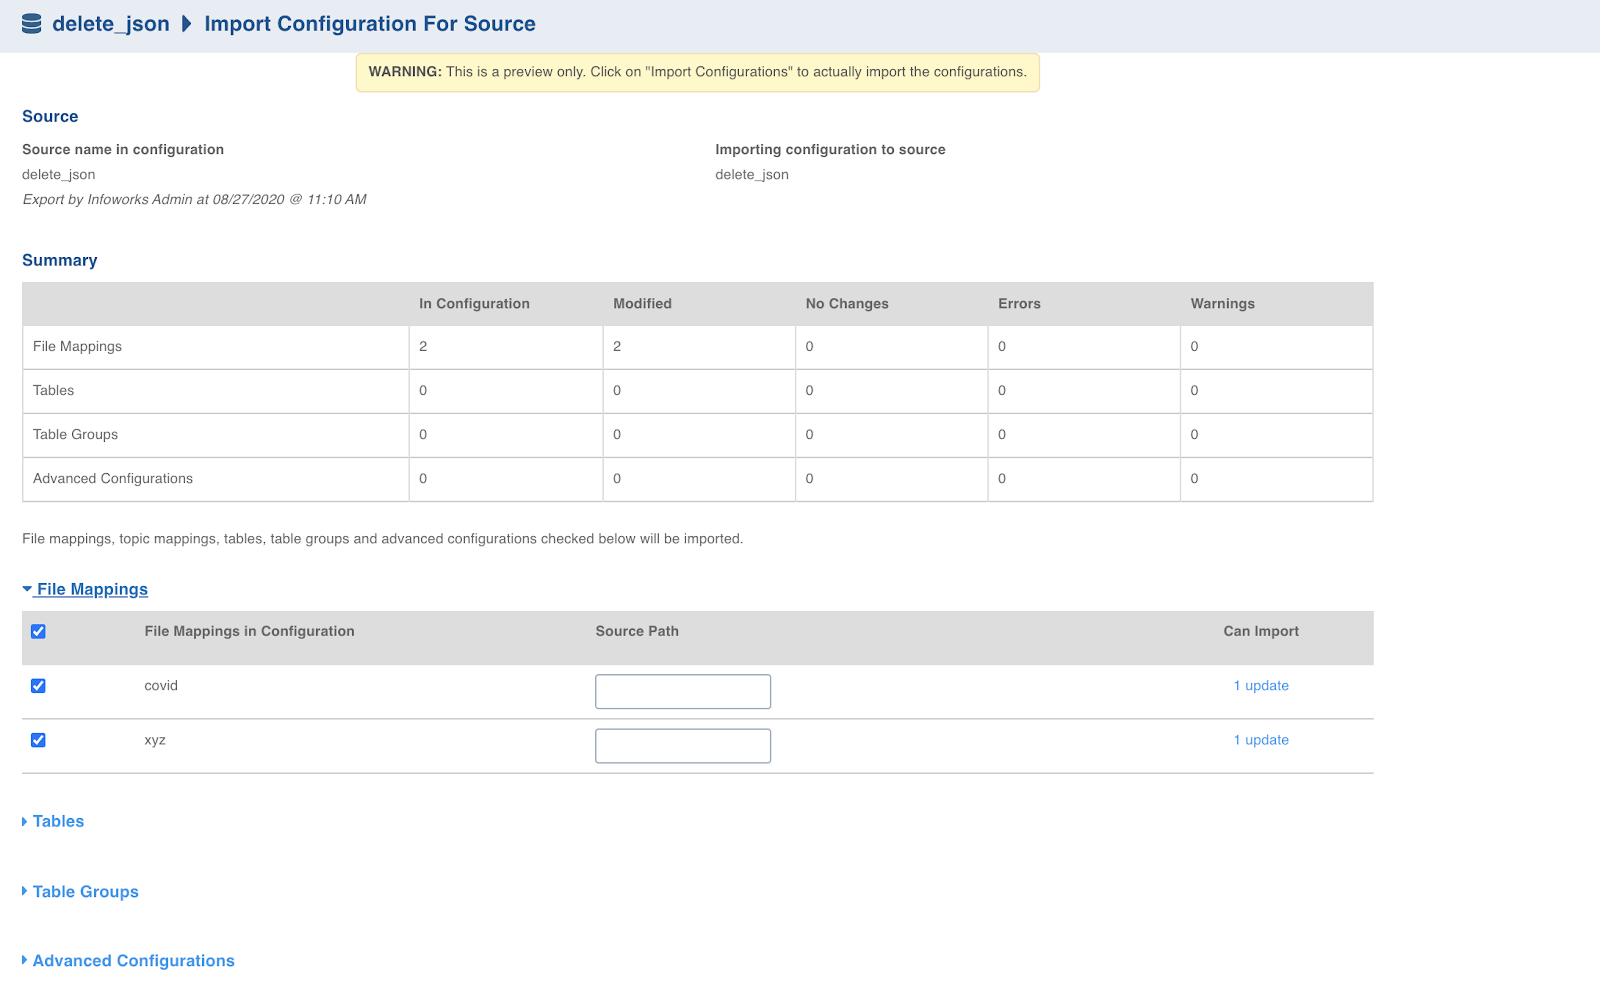
In the File Mappings section, you may edit the source path of the file mappings, as required.
For more information on configuration migration process, see Configuration Migration.
Advanced Configurations
Following table describes the advanced configuration available for JSON ingestion:
Name | Configuration Level | Default Value | Description |
|---|---|---|---|
| source | 10 | This configures the value of file size in megabytes(MBs). This defines the maximum limit of file size that can support file preview and sample data. |
| table | 134217728 | This configures the value in bytes (128 MB) which is used to split file. This is applicable only if record scope is 'Line'. |
| table | 1000 | This configures that the data crawl fails if there are more error records than this configured limit, or more than |
| source | 50 | This configures the threshold percentage for the meta crawl to fail. Meta crawl fails if the percentage of error records received is more than this configured value. |
| source | 50 | This configures the threshold percentage for the sample data to fail. Sample data fails if the percentage of error records received is more than this configured value. |
For more information on advanced configurations, see
Subscribers
For more information on subscribers, see Subscribers.
Error Tables
During data crawl, the data that cannot be crawled will be stored in an error table, <tablename>_error.
Limitations
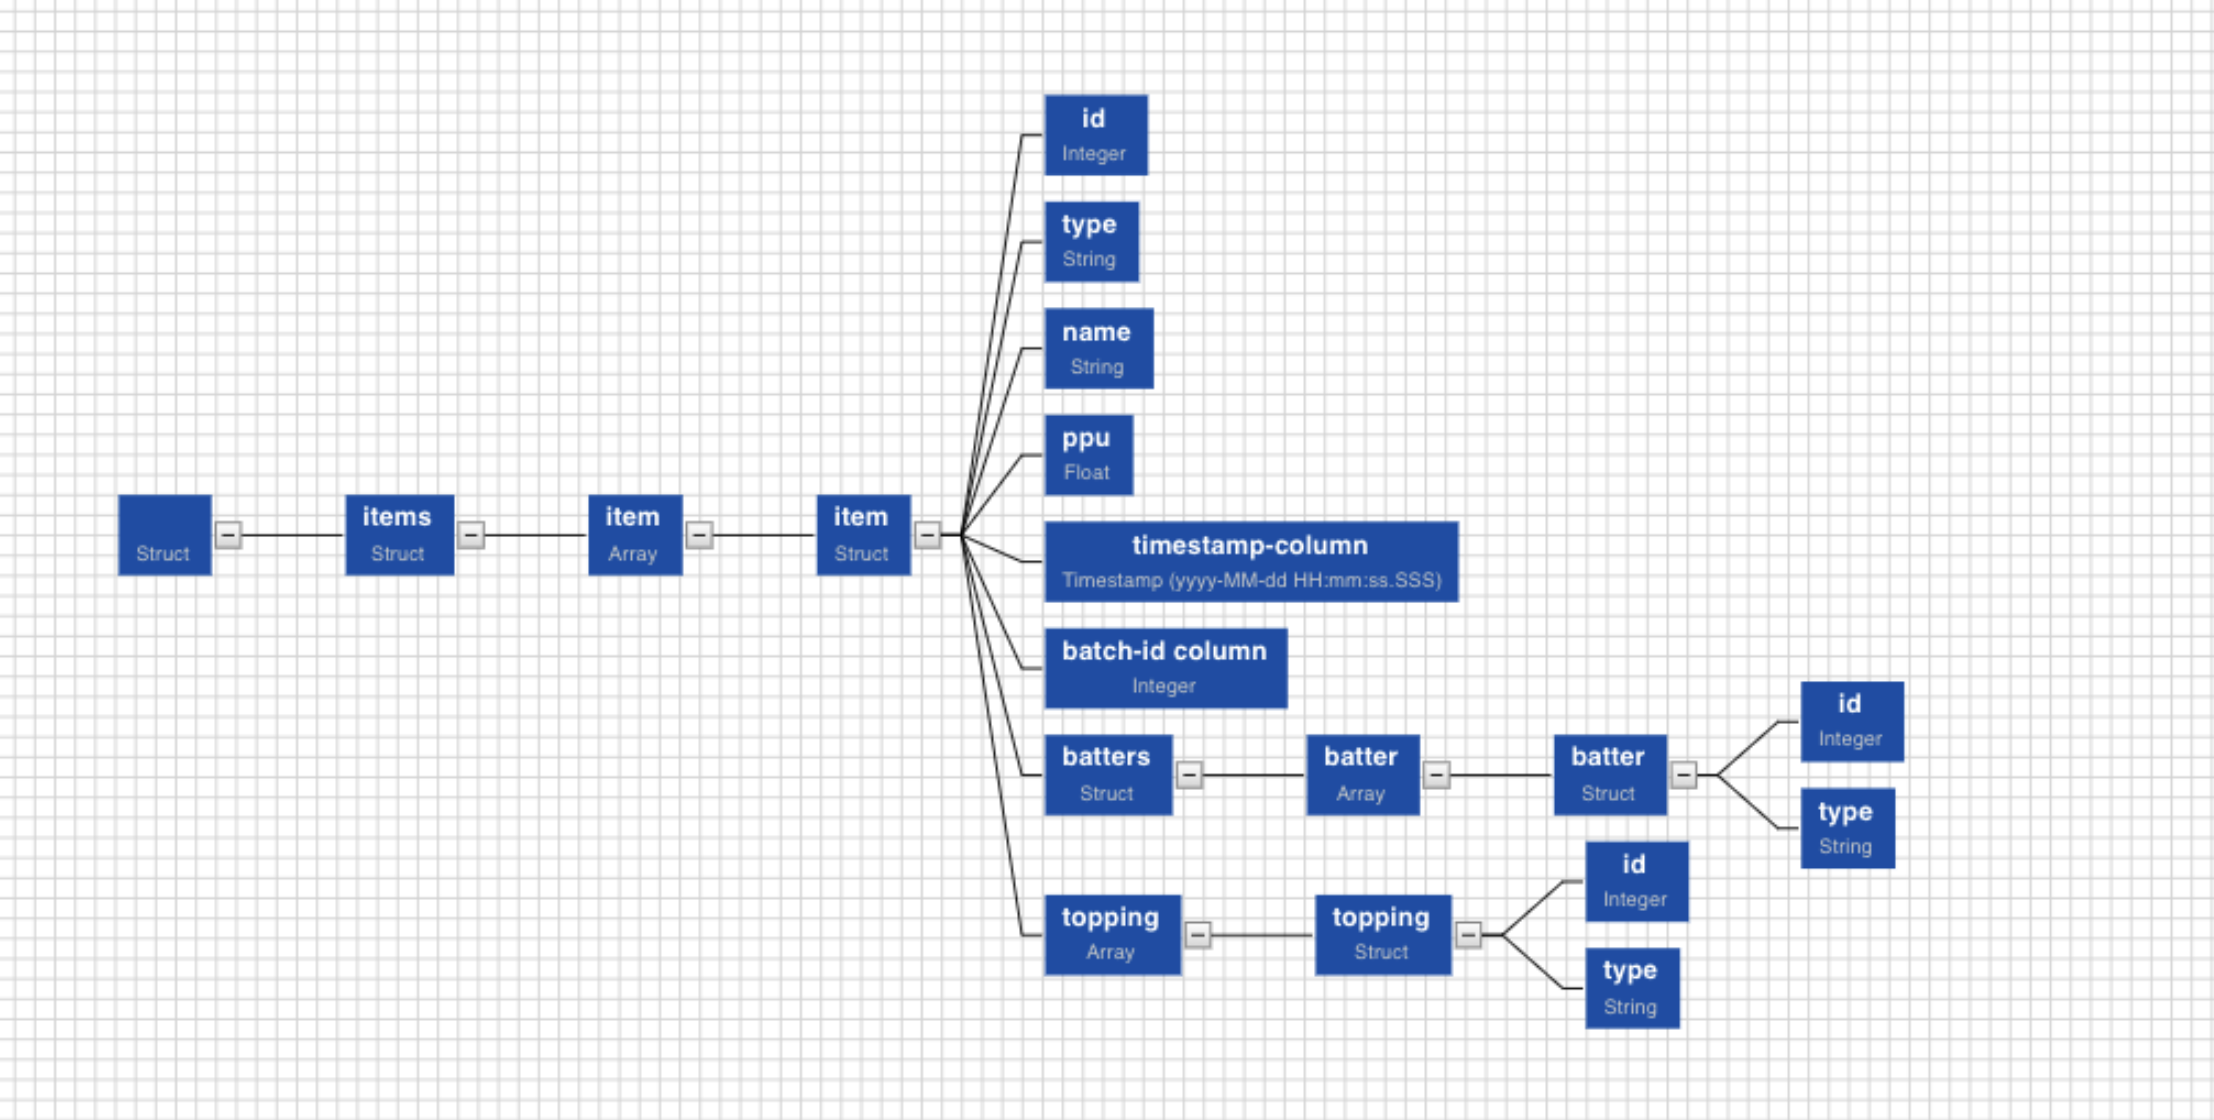
Non-struct nodes cannot be selected as the root element of the table. For example, nodes such as id, or type, cannot be selected to create tables.
Two different struct nodes which are not directly connected cannot be used to create table columns. For example, nodes such as item and batter, cannot be selected to create the same table.
Two struct nodes at the same level, cannot be selected to create the same table. For example, nodes such as batters and topping, cannot be selected to create the same table.
NOTE: REST APIs to manage JSON ingestion are not available in Infoworks.
Adding a column to the table
After metadata crawl is complete, you have the flexibility to add a column to the table. It can either be a source column or a target column.
Source Column refers to adding a source column to the table when the metadata crawl of the table did not infer any schema (since we infer the smallest file schema).
Target Column refers to adding a target column if you need any special columns in the target table apart from what is present in that source.
In both the cases, you can select the datatype you want to give for the specific column. You can select either of the following transformation modes: Simple and Advanced.
Simple Mode
In this mode, you must add a transformation function that has to be applied for that column. Target Column with no transformation function applied will have null values in the target.
Advanced Mode
In this mode, you can provide the Spark expression in this field. For more information, refer to the Adding Transform Derivation section.
NOTE When table is in ready state (already ingested), schema editing is disabled.
Additional Information
There will be error records if any record is not adhering to the schema and if the number of error records crosses the threshold value, the job will fail.
Gzip support: Infoworks supports two types of compressed files: .gz (Gzip) and .bz2 (Bzip2)