Infoworks uses locally managed MongoDB to store the metadata by default. Infoworks can be configured to use the hosted MongoDB Atlas service to use the following features of the cloud-hosted service:
- Durability
- Security
- Elasticity
Infoworks supports enabling MongoDB Atlas either during a fresh installation, upgrade from lower versions, or by manual configuration.
To enable the use of Atlas with Infoworks, we must set up the following:
- Atlas account
- Database
- Database users
Atlas Setup
Prerequisite
- Connection between MongoDB Atlas and Kubernetes cluster should be successfully established.
Account Creation
To perform any actions in Atlas we first need to set up an account, organization, and project. Refer to Atlas Account Creation for more information.
Cluster Setup
To create an Atlas MongoDB database cluster suitable for use in Infoworks, refer to Database Cluster Creation.
Recommended Configuration
- Supported MongoDB version: 5.0.8
- There should be a dedicated cluster.
- Supported Cluster type: M20 or higher tier.
- MongoDB Atlas should be on the same cloud provider and region as Infoworks and data plane.
- Use private endpoint or network peering
- Backup configuration depending on use case
For Atlas supported Cloud providers and regions, see Cloud Providers and Regions
For setting up private endpoints or network peering and network and security topics, see Configure Security Features for Database Deployments
MongoDB Atlas Setup Backup and Restore
Infoworks recommends enabling backup solution on MongoDB Atlas for better recovery in case of any failures. For more information refer to MongoDB Backup and Restore.
Database and User Setup
Creating Custom Roles
To create custom roles required by Infoworks DB, perform the following procedure.
Step 1: Go to navigation pane on the left-side, under the Security section, click Database Access, and then click Add New Custom Role.

Step 2: Once the Add New Custom Role dialog opens, provide the following:
- Under the Custom Role Name, type infoworksCustomRole.
- Under the Action or Role section, select enableprofiler from the dropdown, and add infoworks-new from the database.
- Under the Action or Role section, select enableprofiler from the dropdown, and add quartzio from the database.
- Click Add Custom Role.
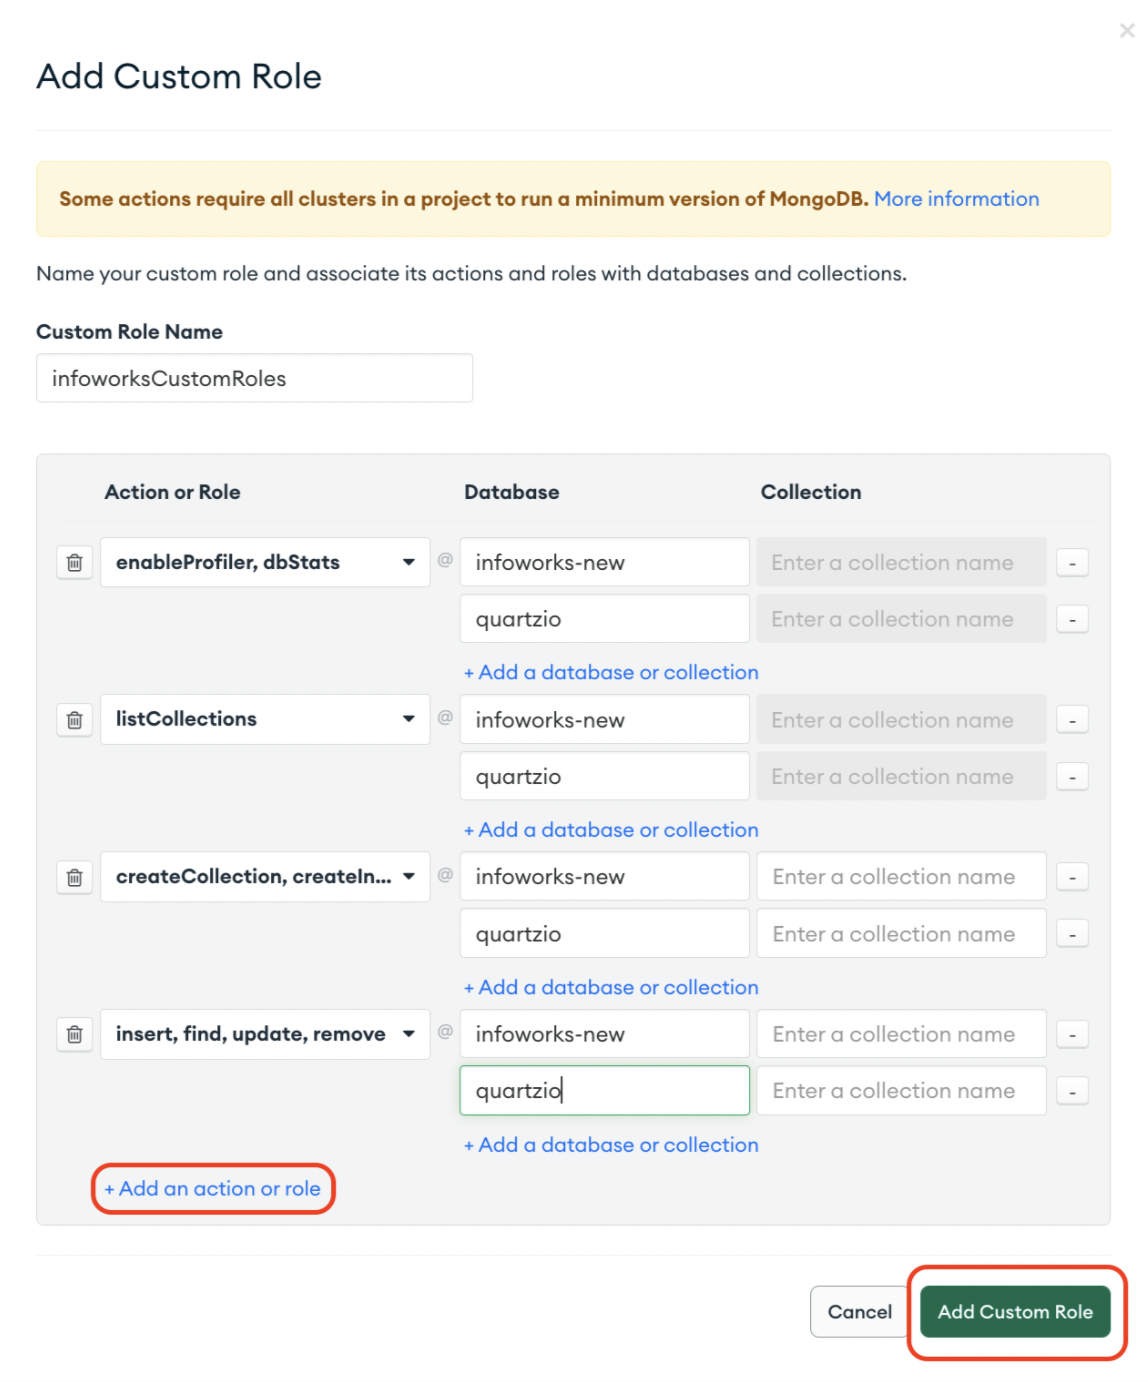
While creating Custom Roles, you should assign the privileges correctly.
MongoDB Atlas as a PaaS MetaDB for Infoworks can be setup in the following ways:
Without Drop (set MONGO_FORCE_DROP=false) - Infoworks will try to read database details.
- If the database is empty, the seed data will be restored.
- If the database has the collections, it will validate that there must be at least the required number of collections, and continue without restoring.
- Special Privilege Required - dbStats on the database.
With Drop (set MONGO_FORCE_DROP=true) - Infoworks will proceed to restore the seed data with the drop flag, dropping any conflicting collections.
Required Privileges:
| Privilege | Restore Without Drop | Restore With Drop |
|---|---|---|
| dbStats | Yes | No |
| listCollections | Yes | Yes |
| createCollection | Yes | Yes |
| dropCollection | No | Yes |
| listIndexes | Yes | Yes |
| createIndex | Yes | Yes |
| dropIndex | Yes | Yes |
| convertToCapped | Yes | Yes |
| insert | Yes | Yes |
| find | Yes | Yes |
| remove | Yes | Yes |
| update | Yes | Yes |
The MongoDB User (set in MONGODB_USERNAME) must have a role with the above privileges assigned on the given database (set in INFOWORKS_MONGODB_DATABASE_NAME).
Step 3: Note down the Infoworks MetaDB Database name and Infoworks Quartzio Database for Installation and Upgrade Steps.
Step 4: Note down the Custom Role Name for next steps.
For more information related to creating custom roles, refer to Configure Custom Database Roles
Setup Infoworks Database User
Infoworks supports the default SCRAM authentication method on MongoDB Atlas. To create Infoworks MetaDB users, follow these steps.
Step 1: From the Database Access tab, under the Database Users tab, add a new database user.
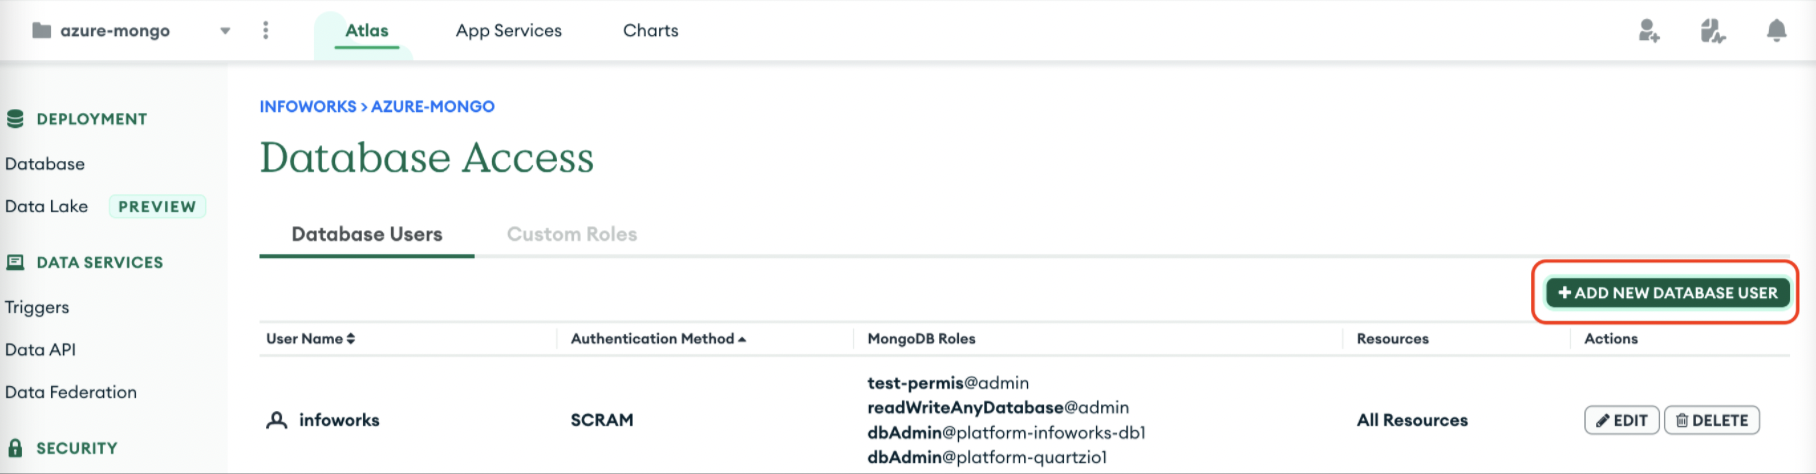
Step 2: Create an Infoworks DB username with a password on MongoDB Atlas and attach the previously created custom role to this user.

Step 3: Note these credentials for next steps.
For more information related to creating users on MongoDB Atlas, refer to Configure Database Users.
Verifying Connection from MongoDB to Infoworks
Verify that applications can access the Atlas cluster from Infoworks AKS cluster. For Infoworks-specific user, refer to the previously mentioned Database and User Setup.
Use the following procedure as a reference only.
Step 1: Log in to your Bastion host where Kubernetes cluster is accessible.
Step 2: Create a pod with MongoDB image in the respective namespace.
xxxxxxxxxxkubectl run mongodb --image mongo --restart=Never --namespace <namespace>Step 3: Run the exec command to run bash command inside the pod.
xxxxxxxxxxkubectl exec -it mongodb --namespace <namespace> -- bashStep 4: Get the connection string from MongoDB Atlas Connect. For example, consider the below given command.
root@mongodb:/# mongosh "mongodb+srv://<mongo-private-hostname>.mongodb.net/myFirstDatabase" --apiVersion 1 --username <username>Step 5: Provide the password.
Enter password: ************Current Mongosh Log ID: ********c023b******Connecting to: mongodb+srv://<credentials>@<mongo-private-hostname>.mongodb.net/myFirstDatabase?appName=mongosh+1.6.0Using MongoDB: 5.0.13 (API Version 1)Using Mongosh: 1.6.0 For mongosh info see: https://docs.mongodb.com/mongodb-shell/ To help improve our products, anonymous usage data is collected and sent to MongoDB periodically (https://www.mongodb.com/legal/privacy-policy).You can opt-out by running the disableTelemetry() command. Atlas atlas-ul0vpt-shard-0 [primary] myFirstDatabase>The MongoDB and Infoworks are successfully connected. In case of any errors, refer to official Mongo Documentation.
Step 6: Once the connection between MongoDB and Infoworks is successful. If you wish to delete MongoDB pod, execute the following command.
xxxxxxxxxxkubectl delete pods mongodb --namespace <namespace>MongoDB Atlas Backup and Restore
MongoDB Backup is a necessary step to support rollback, since upgrading Infoworks performs transformations on the mongo data, which makes it incompatible for the previous versions.
Backup
First Method: Using Mongo Atlas
Mongo Atlas provides a functionality to take snapshot of the databases created and stores them on a cloud platform, thus saving the space on your local system. To take one-time snapshot of the database, refer to MongoDb Atlas One-Time-On-Demand-Snapshot.
However, this method has some limitations.
- Snapshot takes a backup of the entire project and not only of a specific database inside the project.
- Restoration of snapshots is supported only within the same major version. For example, if a snapshot is taken for a db with Mongo Atlas 4.x, it cannot be restored in Mongo Atlas 5.x.
Second Method: Using Mongodump commands for Backup
To avoid the limitations encountered in the first method, you may take a backup of Mongo data through the mongotools binaries.
To take a backup using Mongodump commands on a Kubernetes environment:
Step 1: It is assumed that the environment variable IW_HOME is set to /opt/infoworks, which is the path where your current 5.4.0 charts are stored. In case it is not set, execute the following command:
xxxxxxxxxxexport IW_HOME=/opt/infoworksStep 2: Export the following environment variables.
xxxxxxxxxxexport IW_NAMESPACE="<your-infoworks-kubernetes-namespace>"export MONGODB_HOSTNAME="<mongodb-host>"export MONGODB_USERNAME="<mongodb-user>"export MONGO_PLAINTEXT_PASSWORD="<mongodb-plaintext-password>"export INFOWORKS_MONGODB_DATABASE_NAME="<infoworks-database>"export INFOWORKS_SCHEDULER_MONGODB_DATABASE_NAME="<quartzio-database>For more details regarding the above mentioned commands, refer to the Infoworks Installation on Azure Kubernetes Service (AKS).
Step 3: Create a directory to store the database backup dump using the below command.
xxxxxxxxxxmkdir -p ${IW_HOME}/mongodb_backupcd ${IW_HOME}Step 4: Clear any existing pods with the same name.
xxxxxxxxxxkubectl -n ${IW_NAMESPACE} delete po mongo-backupStep 5: Run the commands to create the required pod on the same namespace as the Kubernetes installation.
xxxxxxxxxxkubectl apply -f - <<EOFapiVersion: v1kind: Podmetadata: name: mongo-backup namespace: ${IW_NAMESPACE}spec: containers: - name: mongo-backup env: - name: IW_NAMESPACE value: "${IW_NAMESPACE}" - name: MONGODB_HOSTNAME value: "${MONGODB_HOSTNAME}" - name: MONGODB_USERNAME value: "${MONGODB_USERNAME}" - name: MONGO_PLAINTEXT_PASSWORD value: "${MONGO_PLAINTEXT_PASSWORD}" - name: INFOWORKS_MONGODB_DATABASE_NAME value: "${INFOWORKS_MONGODB_DATABASE_NAME}" - name: INFOWORKS_SCHEDULER_MONGODB_DATABASE_NAME value: "${INFOWORKS_SCHEDULER_MONGODB_DATABASE_NAME}" image: us-central1-docker.pkg.dev/iw-gcp-eng-dev/iwx-devops/infoworks-mongo-utils:mongo-5 imagePullPolicy: Always command: [ "/bin/bash", "-c", "--" ] args: [ "/opt/infoworks/scripts/mongodb_backup_and_restore.sh -d" ] restartPolicy: NeverEOFStep 6: Once the mongo-backup is up, run the following command to get logs
xxxxxxxxxxkubectl -n $IW_NAMESPACE logs mongo-backup -fAfter some time, you will receive the following message on your command prompt.
xxxxxxxxxxRun kubectl -n ${IW_NAMESPACE} cp mongo-backup:mongodb_backup/ mongodb_backup/ to copy to your localStep 7: Copy the generated artifacts to your machine.
date_time=$(date "+%Y_%m_%d_%H_%M_%S") rm -rf mongodb_backup/${INFOWORKS_MONGODB_DATABASE_NAME} mongodb_backup/${INFOWORKS_SCHEDULER_MONGODB_DATABASE_NAME} kubectl -n ${IW_NAMESPACE} cp mongo-backup:mongodb_backup/ mongodb_backup/ cp -rf mongodb_backup/${INFOWORKS_MONGODB_DATABASE_NAME} mongodb_backup/${INFOWORKS_MONGODB_DATABASE_NAME}_$date_time cp -rf mongodb_backup/${INFOWORKS_SCHEDULER_MONGODB_DATABASE_NAME} mongodb_backup/${INFOWORKS_SCHEDULER_MONGODB_DATABASE_NAME}_$date_timeThis should create the following files in the directory mongo_backup, $(date -I) being the current timestamp. To view the list of directories, execute the following command:
xxxxxxxxxxls mongodb_backupxxxxxxxxxx${INFOWORKS_MONGODB_DATABASE_NAME} ${INFOWORKS_MONGODB_DATABASE_NAME}_$date_time${INFOWORKS_SCHEDULER_MONGODB_DATABASE_NAME} ${INFOWORKS_SCHEDULER_MONGODB_DATABASE_NAME}_$date_timeKeep these files safe for restoring later.
Restore
When we have to rollback the Infoworks environment from a higher version to a lower version, it is important to restore the MongoDB database pertaining to the rollback version.
First Method: Using Mongo Atlas
Mongo Atlas provides a functionality to restore the snapshot of the databases created. To restore the one-time-on demand snapshot of the database, refer to MongoDb Atlas One-Time-On-Demand-Snapshot Restore.
However, this method has a limitation.
- Restoration of snapshots is supported only within the same major version. For example, if a snapshot is taken for a db with Mongo Atlas 4.x, it cannot be restored in Mongo Atlas 5.x.
Second Method: Using mongorestore commands for Restore
To avoid the limitations encountered in the first method, you may take a backup of Mongo data through the mongotools binaries.
The plaintext MongoDB Password has to be provided as an environment variable mounted to the ephemeral pod.
Step 1: It is assumed that the environment variable IW_HOME is set to /opt/infoworks, which is the path where your current 5.4.0 charts are stored. In case it is not set, execute the following command:
xxxxxxxxxxexport IW_HOME=/opt/infoworksStep 2: Export the following environment variables.
xxxxxxxxxxexport IW_NAMESPACE="<your-infoworks-kubernetes-namespace>"export MONGODB_HOSTNAME="<mongodb-host>"export MONGODB_USERNAME="<mongodb-user>"export MONGO_PLAINTEXT_PASSWORD="<mongodb-plaintext-password>"export INFOWORKS_MONGODB_DATABASE_NAME="<infoworks-database>"export INFOWORKS_SCHEDULER_MONGODB_DATABASE_NAME="<quartzio-database>"For more details regarding the above mentioned commands, refer to the Infoworks Installation on Azure Kubernetes Service (AKS).
It is recommended to take a backup of the current MongoDB by exporting the following variable. This requires the given user to have permissions to create a new Database. The pod will fail in case the backup fails, therefore do not export it to skip the backup.
This will attempt to DROP the given $INFOWORKS_MONGODB_BACKUP_DATABASE_NAME and $QUARTZIO_MONGODB_BACKUP_DATABASE_NAME databases to create a new one.
xxxxxxxxxxexport INFOWORKS_MONGODB_BACKUP_DATABASE_NAME="<mongo-infoworks-backup-database>"export QUARTZIO_MONGODB_BACKUP_DATABASE_NAME="<mongo-quartzio-backup-database>"Step 3: Switch to the directory where mongodb backups were stored.
xxxxxxxxxxcd ${IW_HOME}Step 4: Clear any existing pods with the same name.
xxxxxxxxxxkubectl -n ${IW_NAMESPACE} delete po mongo-backupStep 5: Run the commands to create the required pod on the same namespace as the Kubernetes installation.
xxxxxxxxxxkubectl apply -f - <<EOFapiVersion: v1kind: Podmetadata: name: mongo-backup namespace: ${IW_NAMESPACE}spec: containers: - name: mongo-backup env: - name: IW_NAMESPACE value: "${IW_NAMESPACE}" - name: MONGODB_HOSTNAME value: "${MONGODB_HOSTNAME}" - name: MONGODB_USERNAME value: "${MONGODB_USERNAME}" - name: MONGO_PLAINTEXT_PASSWORD value: "${MONGO_PLAINTEXT_PASSWORD}" - name: INFOWORKS_MONGODB_DATABASE_NAME value: "${INFOWORKS_MONGODB_DATABASE_NAME}" - name: INFOWORKS_MONGODB_BACKUP_DATABASE_NAME value: "${INFOWORKS_MONGODB_BACKUP_DATABASE_NAME}" - name: INFOWORKS_SCHEDULER_MONGODB_DATABASE_NAME value: "${INFOWORKS_SCHEDULER_MONGODB_DATABASE_NAME}" - name: QUARTZIO_MONGODB_BACKUP_DATABASE_NAME value: "${QUARTZIO_MONGODB_BACKUP_DATABASE_NAME}" image: us-central1-docker.pkg.dev/iw-gcp-eng-dev/iwx-devops/infoworks-mongo-utils:mongo-5 imagePullPolicy: Always command: [ "/bin/bash", "-c", "--" ] args: [ "/opt/infoworks/scripts/mongodb_backup_and_restore.sh -r" ] restartPolicy: NeverEOFStep 6: Once the pod is running, run the following command to copy the backup to the pod.
kubectl -n ${IW_NAMESPACE} cp ${IW_HOME}/mongodb_backup/${INFOWORKS_MONGODB_DATABASE_NAME} mongo-backup:mongodb_backup/${INFOWORKS_MONGODB_DATABASE_NAME}kubectl -n ${IW_NAMESPACE} cp ${IW_HOME}/mongodb_backup/${INFOWORKS_SCHEDULER_MONGODB_DATABASE_NAME} mongo-backup:mongodb_backup/${INFOWORKS_SCHEDULER_MONGODB_DATABASE_NAME}kubectl -n ${IW_NAMESPACE} exec -it mongo-backup -- touch mongodb_backup/start_restoreAfter copying the above file, the restore script will automatically restore from the backup files supplied.
Upgrading Mongo Database Deployment from 5.0.x to 7.0.x on Atlas
Caveat before starting the database upgrade : Please note that once the MongoDB database is upgraded to a major version, it will not be possible to roll back to a lower major version.
Before beginning the upgrade, make sure to take backup of the infoworks and quartzio databases to avoid data loss.
In order to update mongodb from 5.0.x to 7.0.x version, first we will have to upgrade to 6.0.x and then from 6.0.x to 7.0.x because mongodb atlas supports upgrading only to the immediate higher version which means from 5.0.x, you can upgrade only to 6.0.x. You directly cannot upgrade to 7.0.x from 5.0.x.
Follow the below steps to upgrade the mongodb version:
Step 1: Open the database deployment on MongoDb Atlas, and click on Edit Config Tab and select the database you want to upgrade.

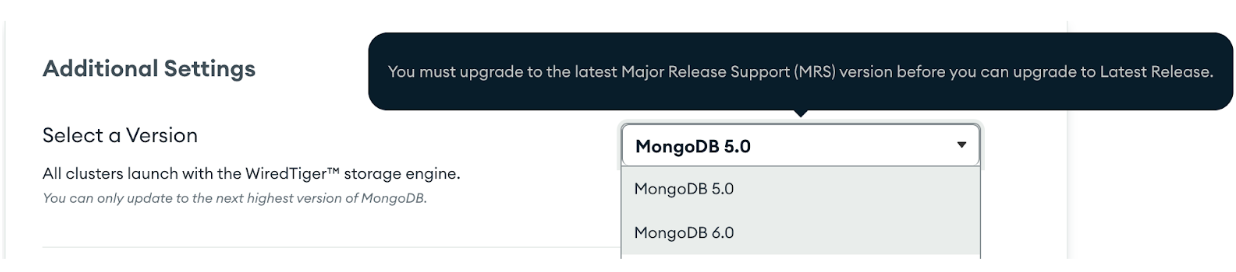
Step 2: After clicking on Edit Config, you will see a section saying Additional Settings. Expand this section. There will be a property by the name Select Version which will have dropdown option. In that dropdown, you will see a list of mongodb versions. Select MongoDB 6.0.
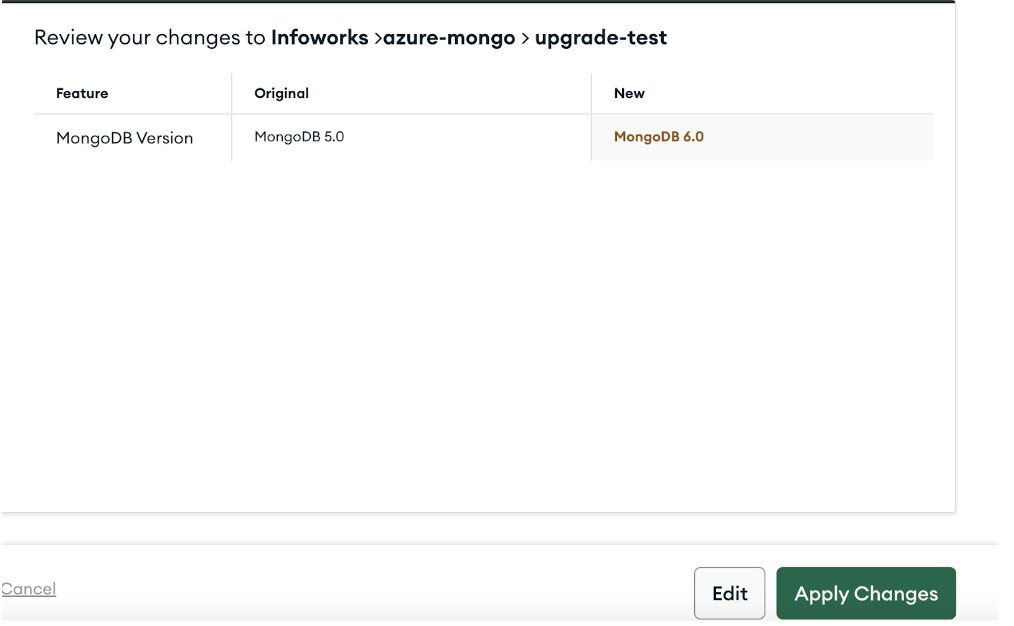
Step 3: Post selecting the MongoDB 6.0, version, click on Review Changes at the bottom of the page. Next, you will see the below window. Click on Apply Changes to start the upgrade process.
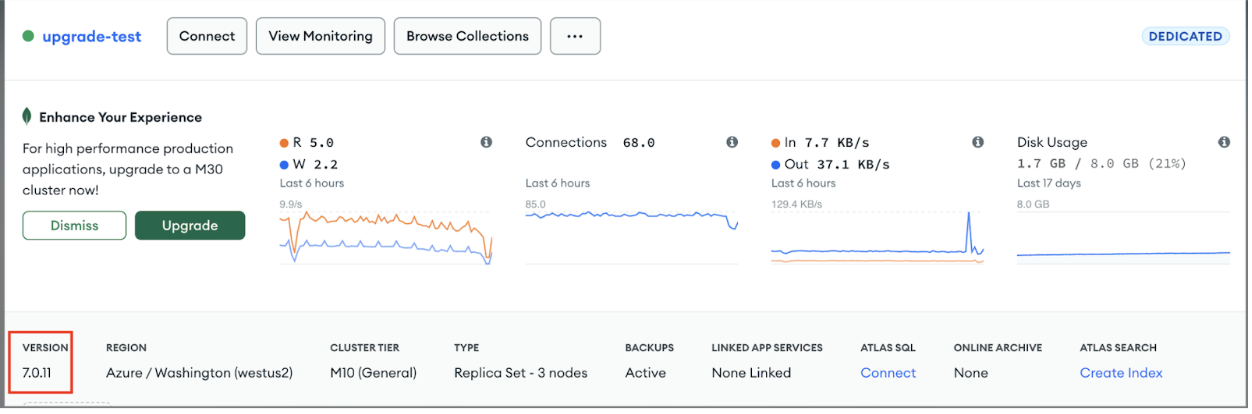
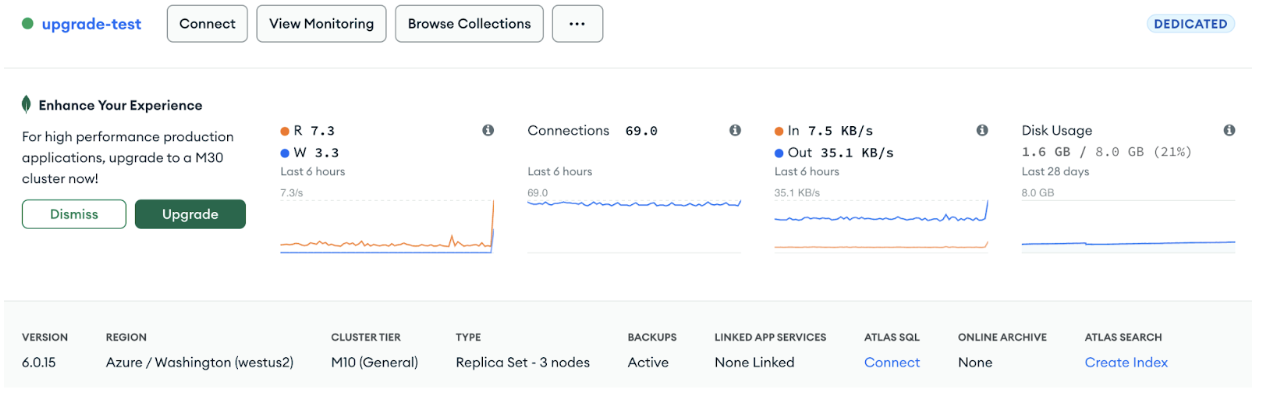
Step 4: When the upgrade is completed, the database deployment will look like this and the upgraded version will be displayed at the left corner as highlighted in the snippet.
Step 5: Now to upgrade MongoDB from 6.0.x to 7.0.x, repeat all the above steps and the mongodb will be updated to 7.0.x. Post the upgrade is completed , validate the version in the left bottom corner.