
Prerequisites
The following prerequisites are necessary for deploying Infoworks on Microsoft Azure Kubernetes Service.
A Microsoft account is required to work with Azure Cloud Platform. Sign up for a Microsoft account, if you do not have one.
Ensure that you have an Azure subscription with a billing account.
Ensure that there is an adequate quota limit for CPU cores for the machine types you want to use in your AKS.
Following permissions are required for the user to setup the Kubernetes cluster in Azure Cloud.
Global Administrator
Ensure you create a dedicated VNet or existing VNet to AKS cluster and peer it with the required VNet to access the other resources. Refer to the official documentation for creating VPC.
NOTE Ensure that there is a firewall rule to allow all ingress traffic within the VNet networks.
Set up a bastion host (VM) for security best practices to connect and communicate with Kubernetes cluster and its operations. Ensure the bastion host belongs to the same VNet/Subnet similar to Kubernetes Cluster or peer the bastion host VNet to Kubernetes Cluster VNet for communication.
Kubernetes Cluster
To set up the AKS Kubernetes cluster, refer to the official Azure Documentation.
NOTE Kubernetes default version is 1.26.x or above.
Category | Infoworks Recommendation | Notes |
|---|---|---|
Private Cluster | Yes | Create an AKS cluster with private access within the Virtual Network. Security Best Practices and Infoworks recommend creating a private cluster. |
Public Cluster | No | Infoworks supports public clusters but does not recommend it. |
Node Size | Yes | Infoworks requires a minimum of 8 vCPU and 32 GB RAM x 2 number instance type for decent workloads. |
Job Pool Nodes | Yes | Infoworks recommends running all Infoworks jobs in a separate node pool. Infoworks requires a minimum of 8 vCPU and 32 GB RAM x 2 number instance type for decent workloads. |
Setup AKS
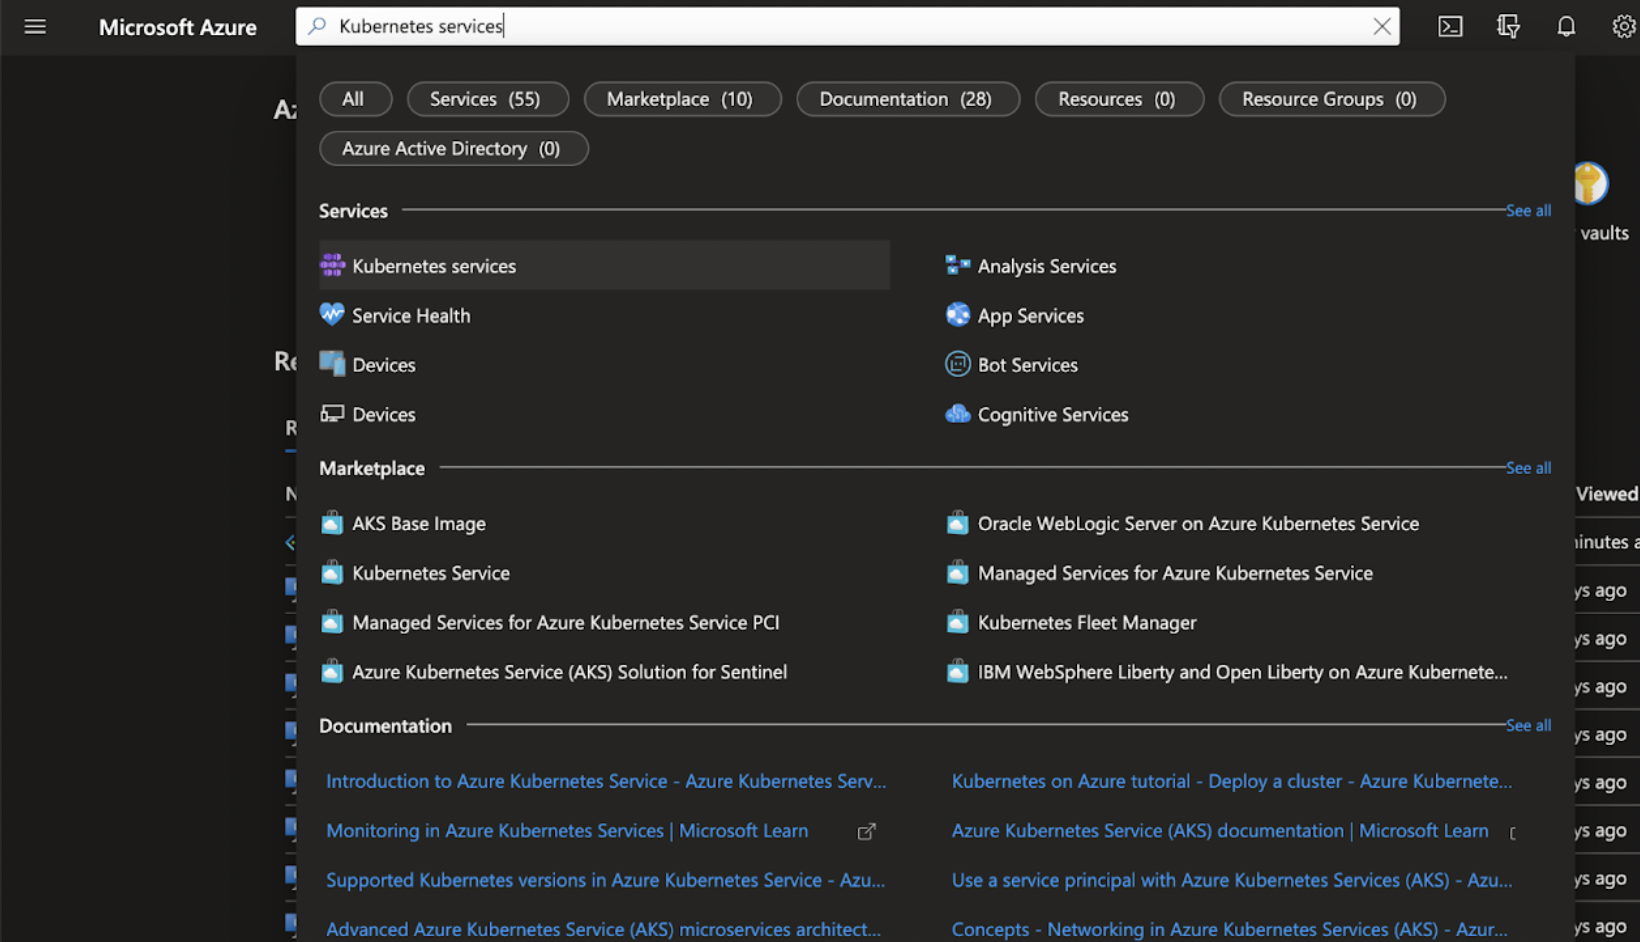
Step 1: To set up AKS, go to Azure Portal Console > Kubernetes Service.
Step 2: Click Create > Create a Kubernetes Cluster.
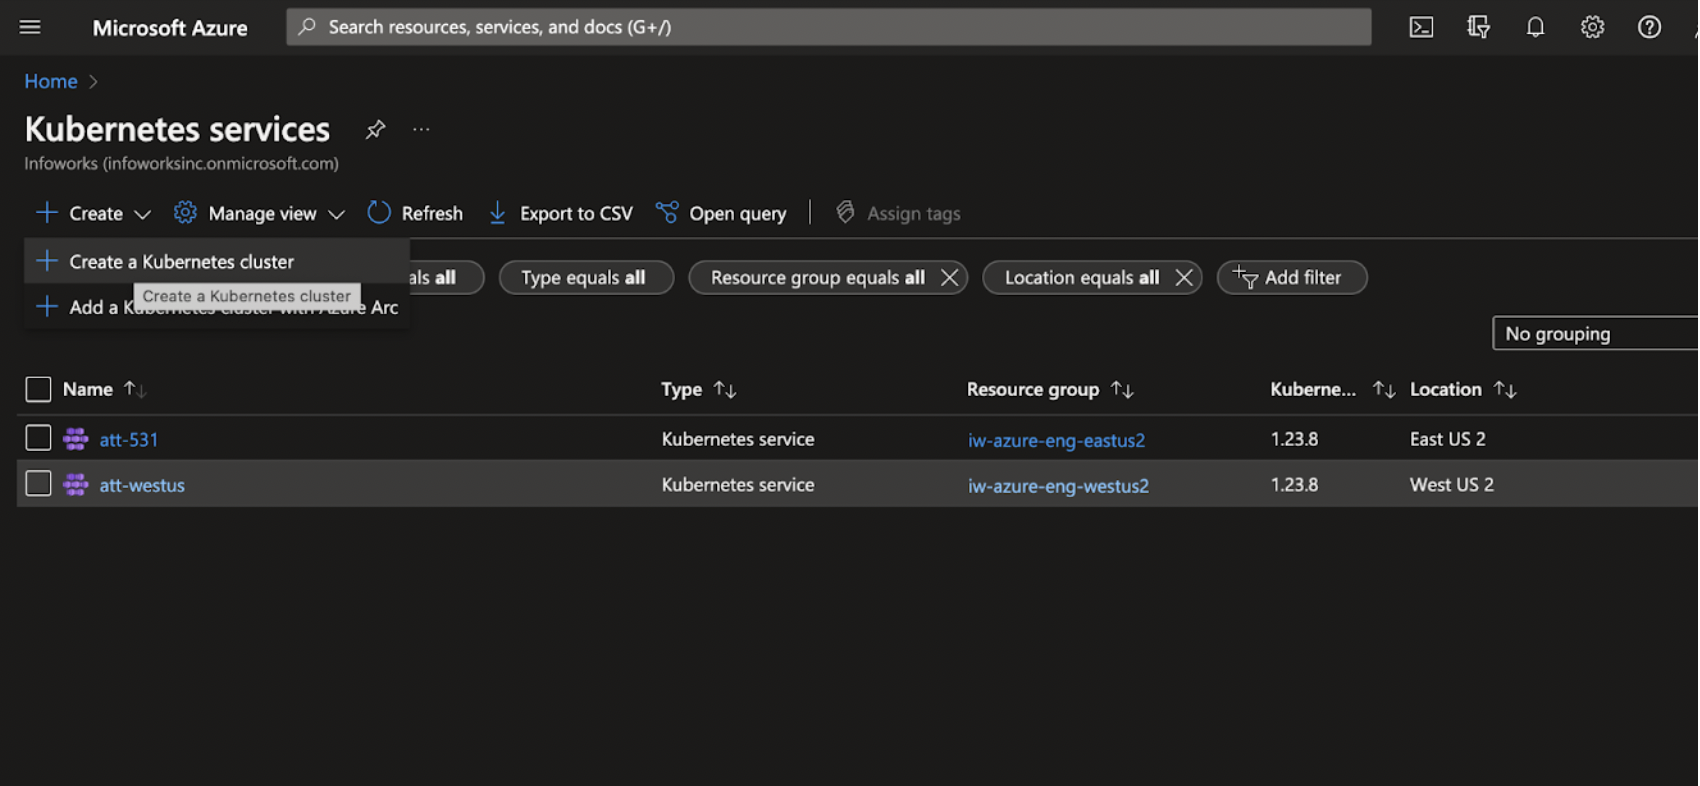
NOTE Infoworks requires a minimum of 8 vCPU and 32 GB RAM x 2 number machine type for minimal workloads. You can scale the machine based on the workload requirements.
Cluster Basics
This section provides basic information about your cluster.
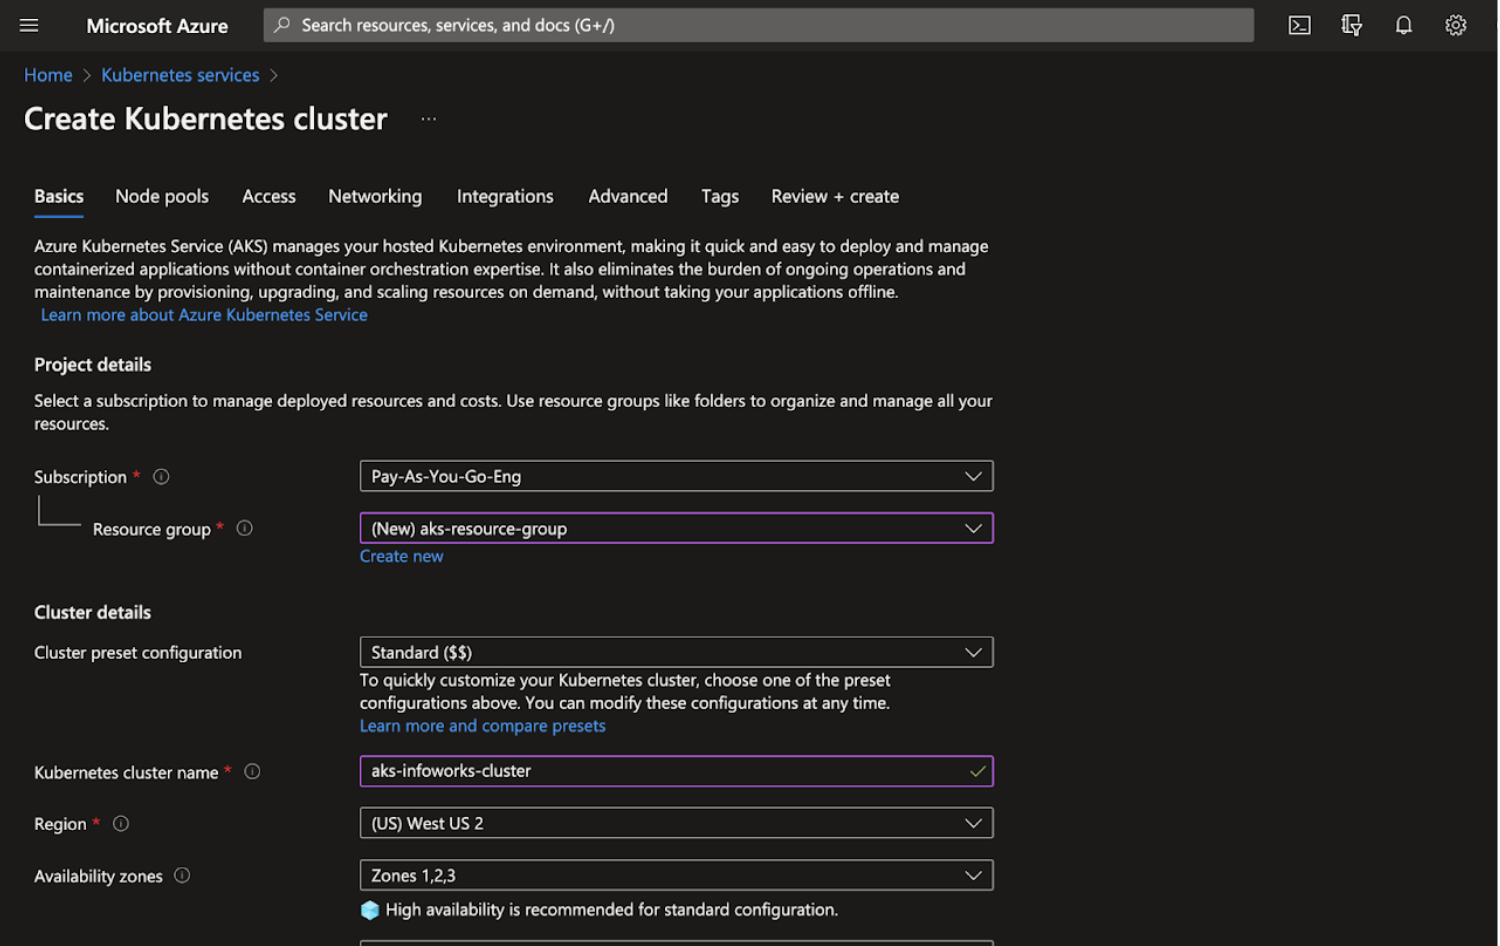
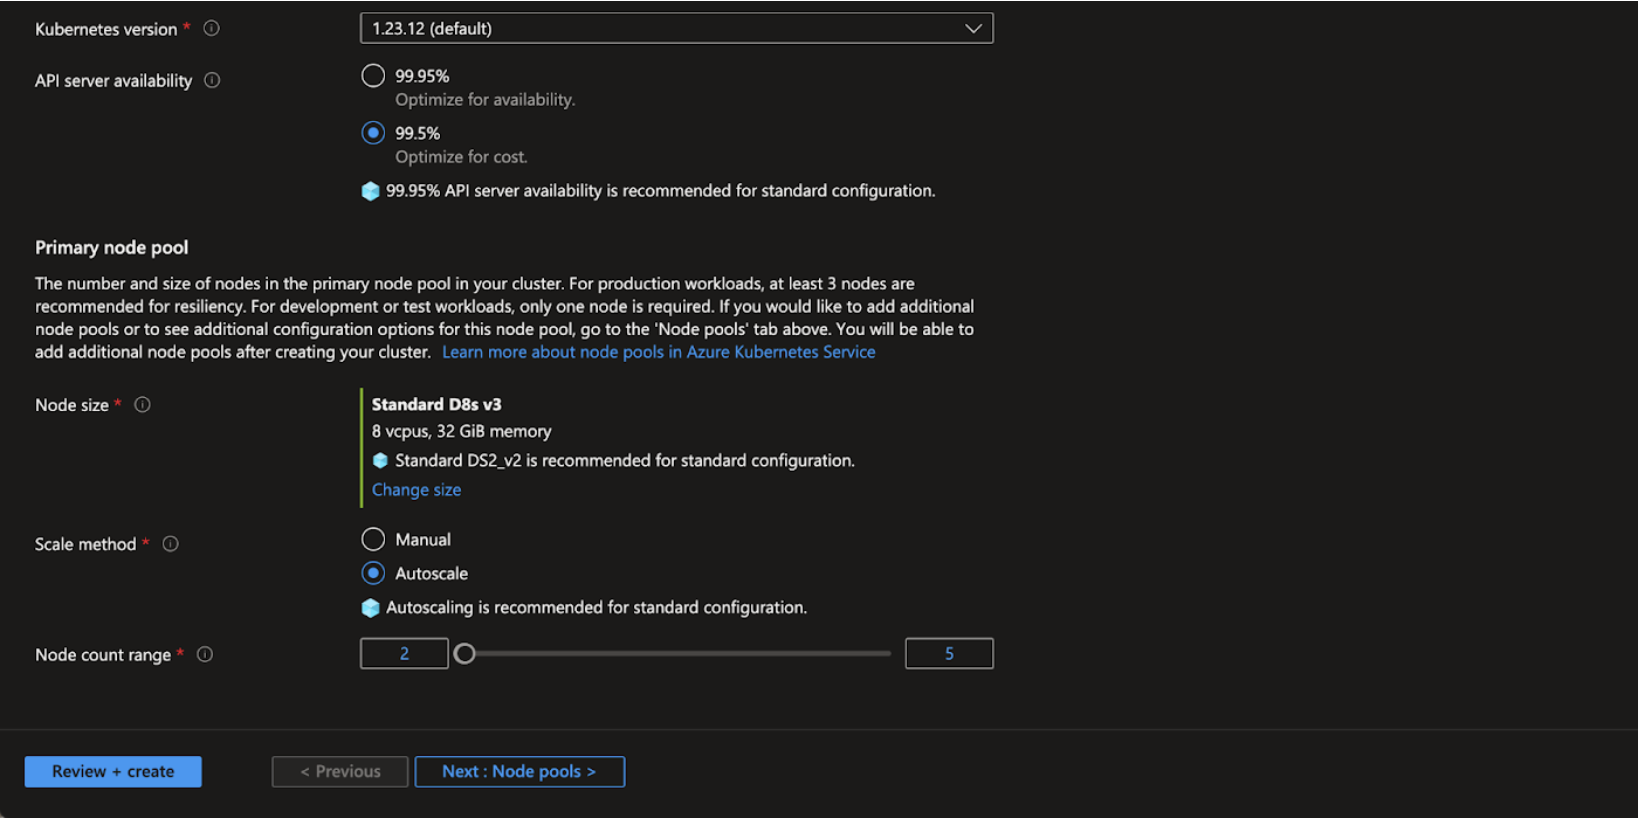
Step 1: Enter the required details for the following mandatory fields:
Subscription
Resource Group
Kubernetes Cluster Name
Region
Kubernetes Version
Node Size
Scale method
Node count range
Field | Description |
|---|---|
Subscription | The name of your Subscription (account) in which the K8s Cluster is to be set up. |
Resource Group | Name of the group under which all the required resources of the AKS cluster should be available. |
Kubernetes Cluster Name | Name of the Cluster |
Region | Name of the Region in which the cluster is to be set up |
Availability Zone | Name of the availability zone as per the selected Region |
Kubernetes Version | Select appropriate version of Kubernetes as per the requirement |
Node Size | The size of the dataplane of Kubernetes that will form the nodes in the cluster. This cannot be changed after creating the cluster. This system node pool can’t be modified/deleted. Infoworks requires a minimum of 8 vCPU and 32 GB RAM x 2 number instance type for decent workloads |
Scale Method | Choose between manual or automatic scaling for your cluster. Autoscaling can help ensure that your cluster is running efficiently with the right number of nodes for the workloads present. The minimum node count is 2 and maximum can be set based on the workload. |
Node Count Range | Set the minimum and maximum node counts for this node pool. You cannot set a lower minimum than the current node count in this node pool. If you want to set a lower minimum node count, you will need to manually scale down the cluster first. |
Step 2: Click Next: Node Pools >.
Node Pools
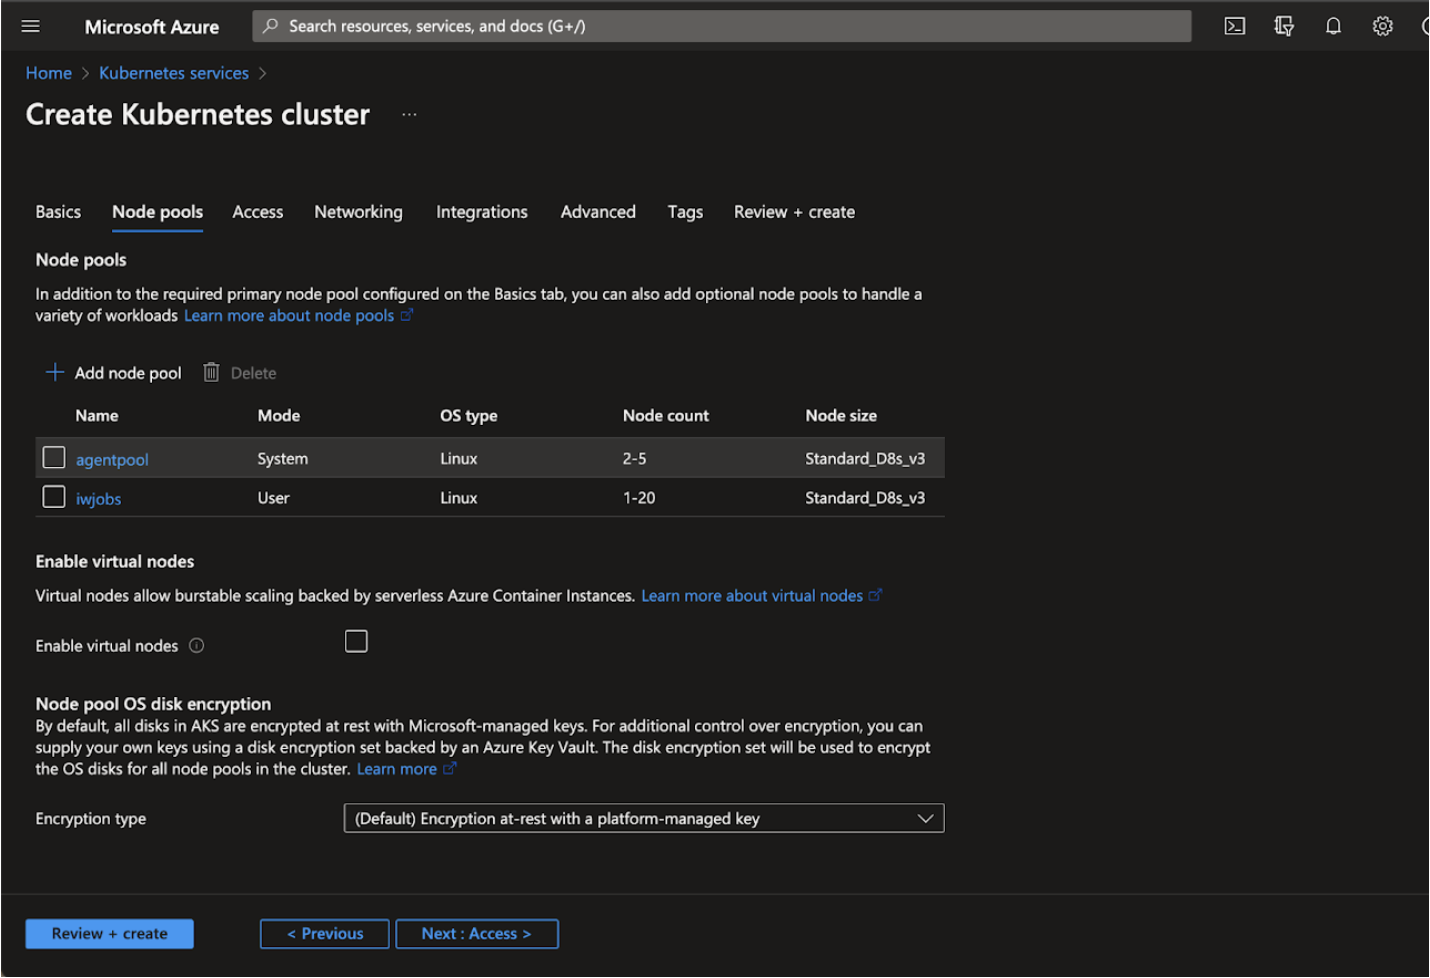
A node pool is a template for groups of nodes created in this cluster. The new cluster will be created with at least one node pool. More node pools can be added and removed after cluster creation. Infoworks recommends adding extra node pools for Jobs submissions.
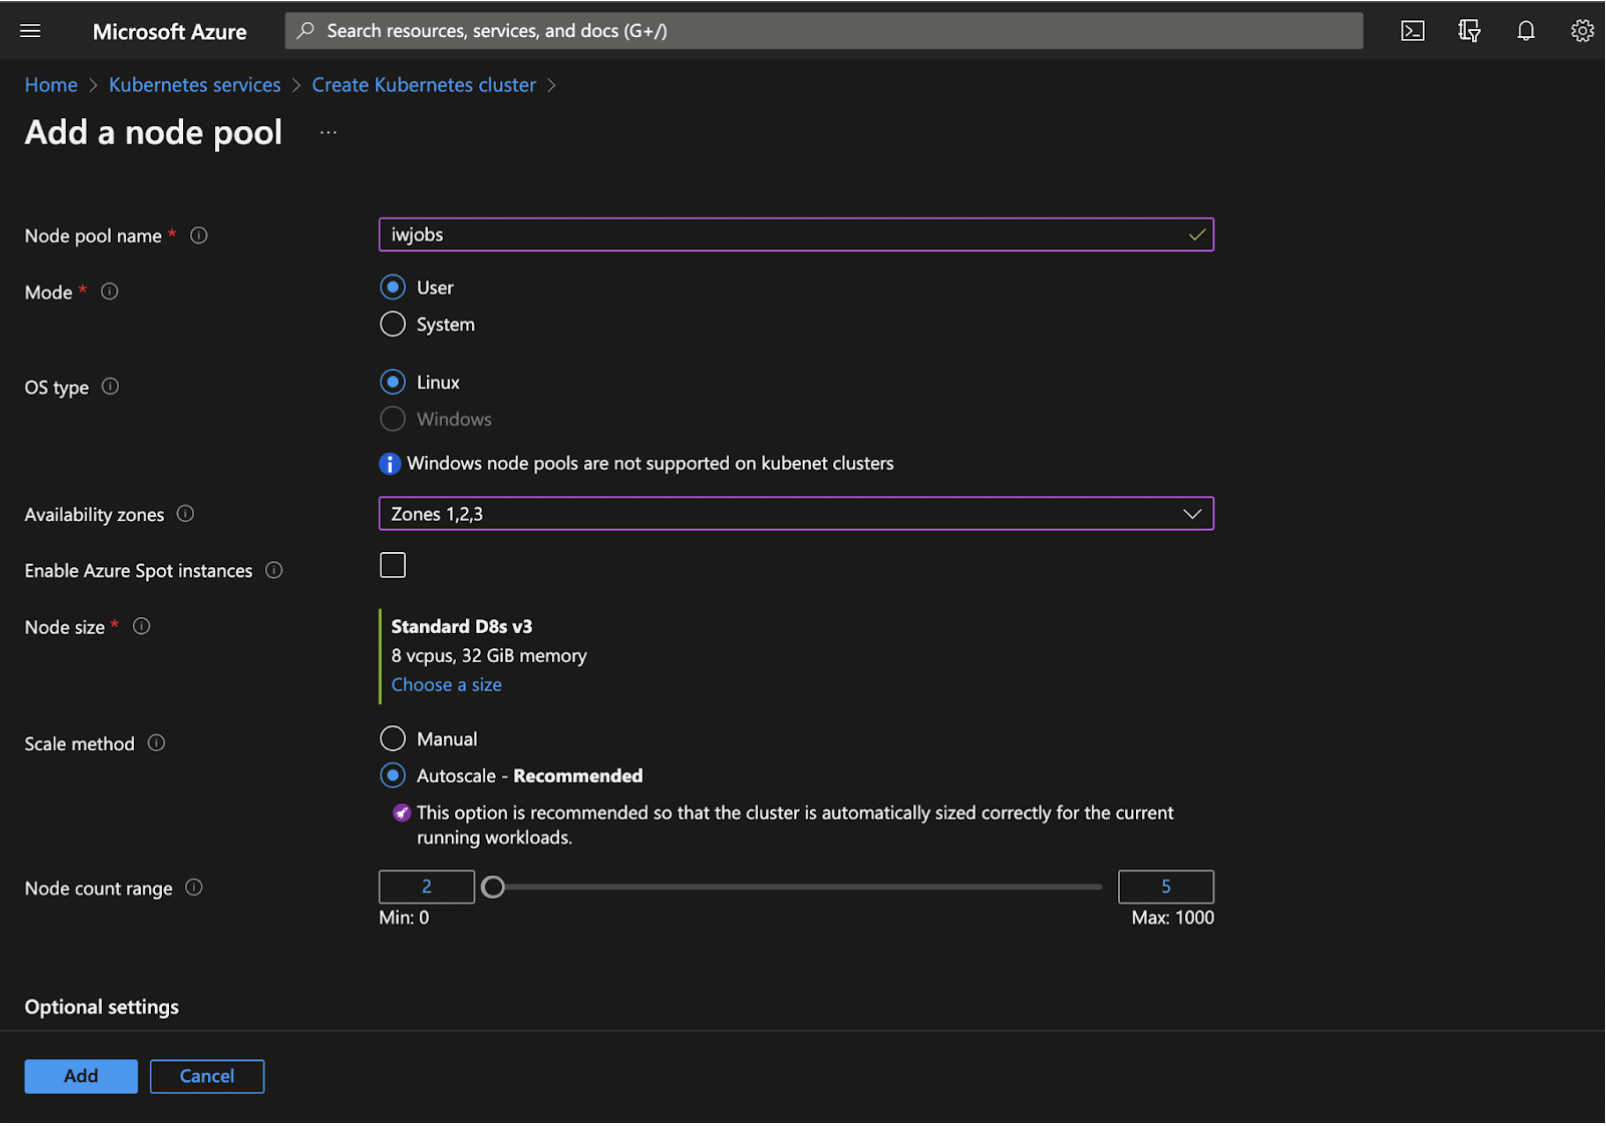
Step 1: Click + Add node pool and enter the required details for the following mandatory fields:
Node pool name
Mode
Node size
Max pods per node
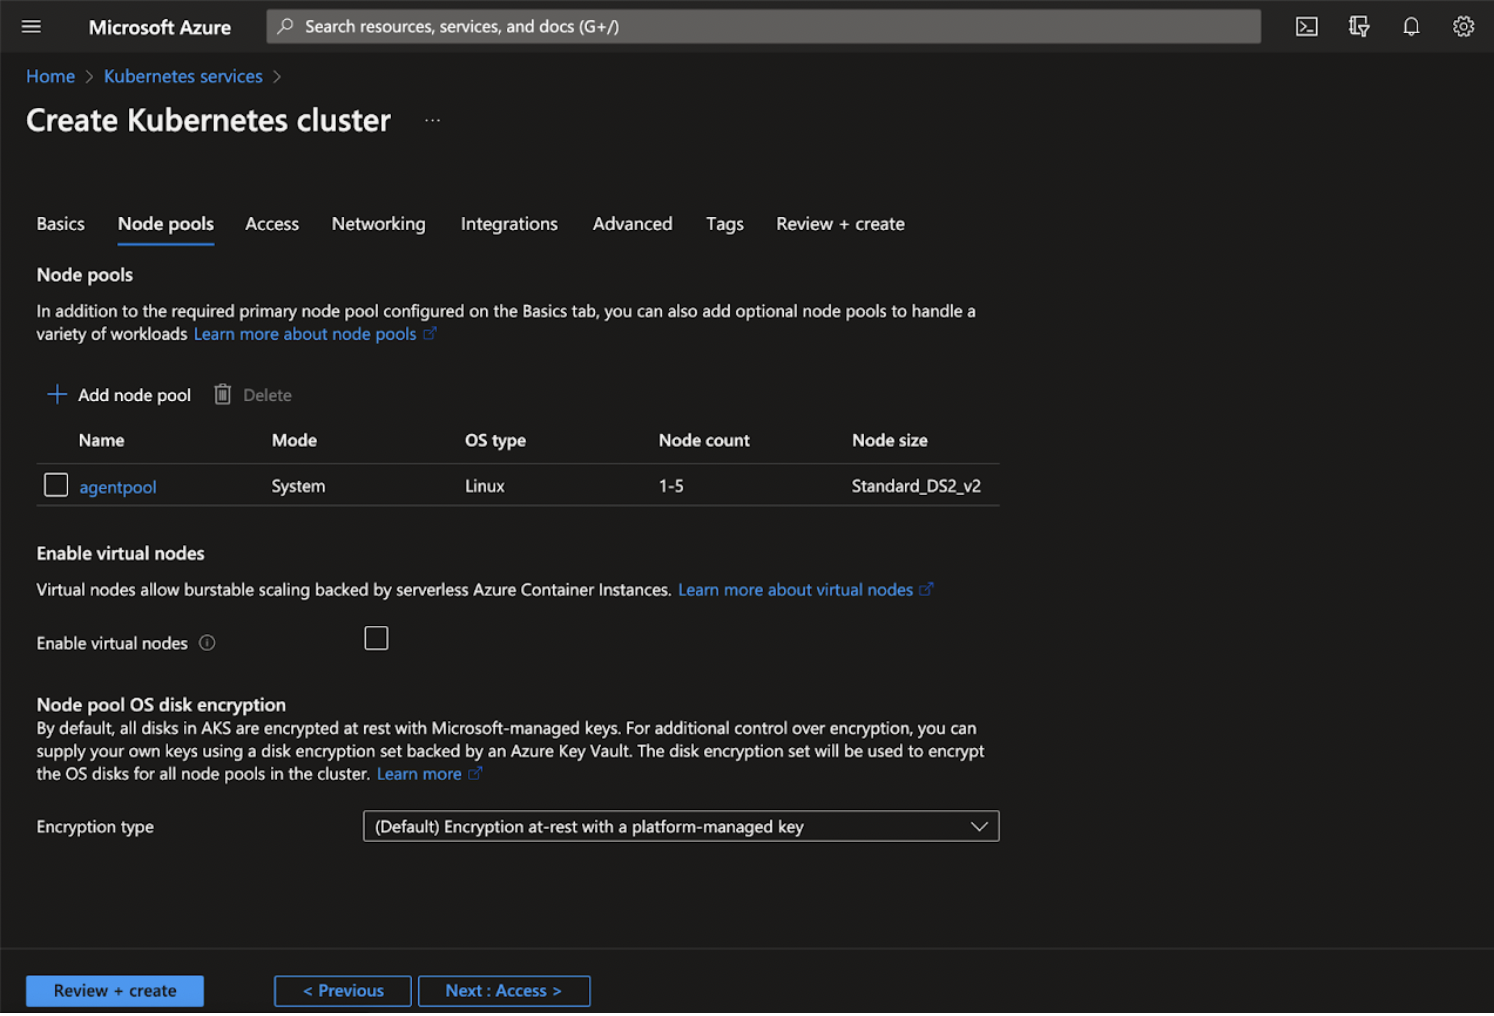
The following example guides you to create a new node pool with the required configuration.
(contd.)
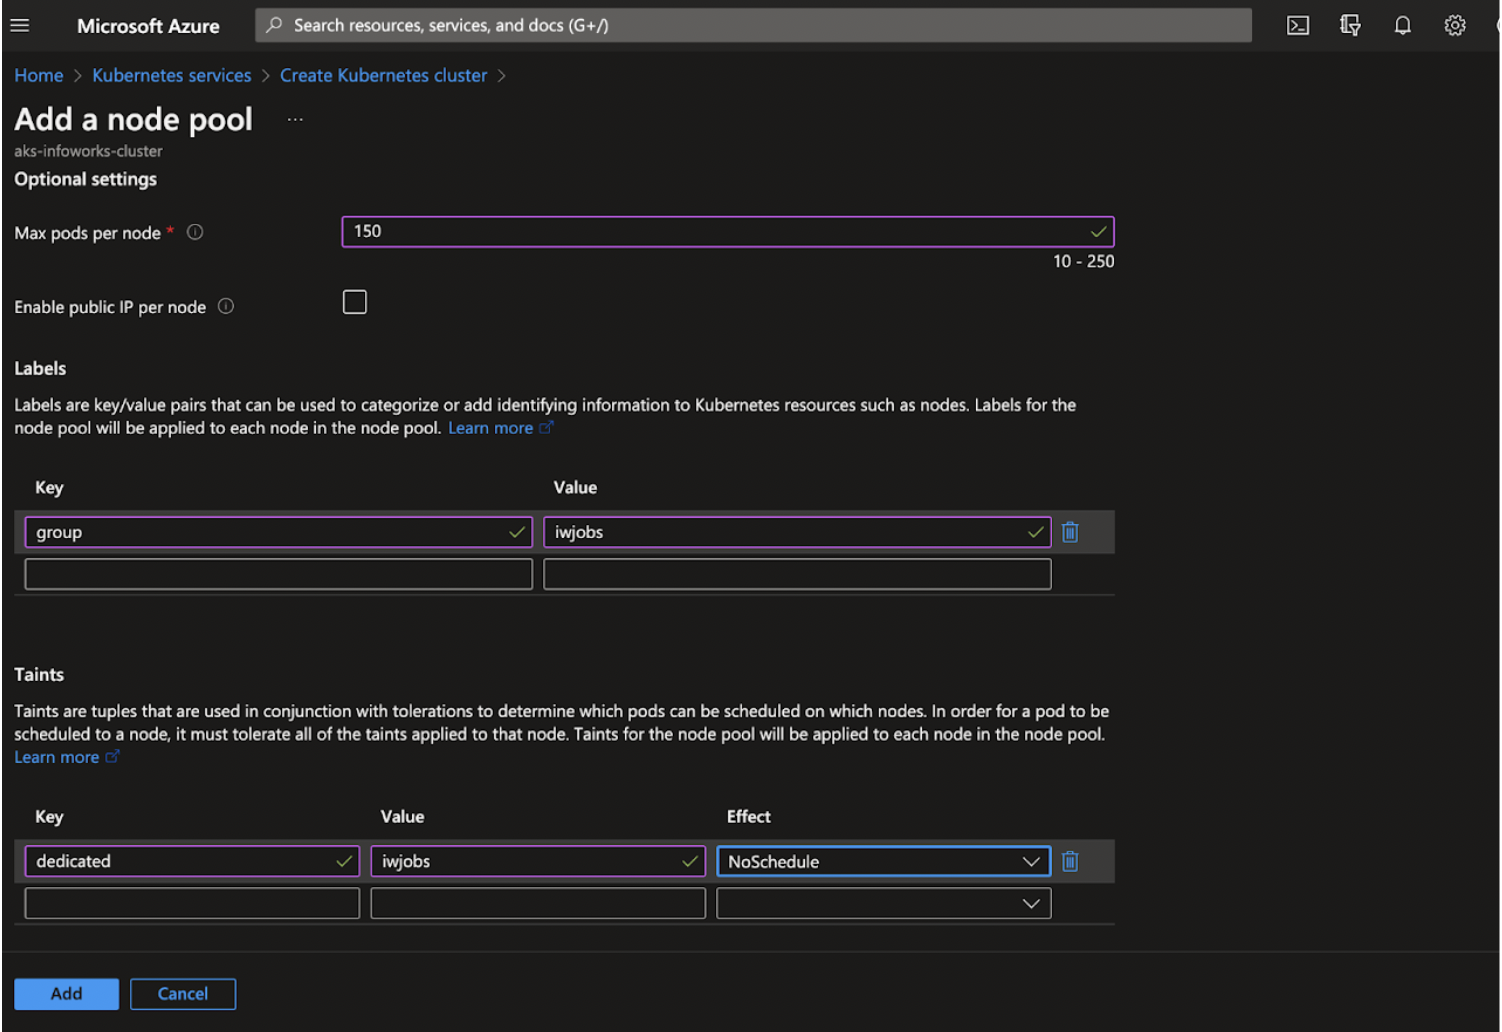
Step 2: Click Add.
NOTE Max Pods per node defines how many pods can be handled and scheduled by each node in Kubernetes. This property is directly proportional to the Network CIDR configured in the network section.
(contd.)
Field | Description |
|---|---|
Node Pool name | Name for this node pool. Node pool must contain only lowercase letters and numbers. For Linux node pools, the name cannot be longer than 12 characters, and for Windows node pools, the name cannot be longer than 6 characters. |
Mode | Choose between ‘system’ and ‘user’ mode for this node pool. System node pools are preferred for system pods (used to keep AKS running) and have size and other restrictions to ensure they have enough capacity to run those pods. User node pools are preferred for your application pods although application pods may be scheduled on system node pools. |
Node Size | The size of the virtual machines that will form the nodes in this node pool. |
Scale Method | Choose either manual or automatic scaling for your cluster. Autoscaling can help ensure that your cluster is running efficiently with the right number of nodes for the workloads present |
Node count range | Set the minimum and maximum node counts for this node pool. You cannot set a lower minimum than the current node count in this node pool. If you want to set a lower minimum node count, you will need to manually scale down the cluster first. |
Max pods per Node | You can configure the maximum number of pods that can be run on a node, which affects how many IP addresses you will need for each node pool. You can specify a value between 10 and 250 inclusive. |
Labels | Labels are key/value pairs that can be used to categorize or add identifying information to Kubernetes resources such as nodes. Labels for the node pool will be applied to each node in the node pool. |
Taints | Taints are tuples that are used in conjunction with tolerations to determine which pods can be scheduled on which nodes. In order for a pod to be scheduled to a node, it must tolerate all of the taints applied to that node. Taints for the node pool will be applied to each node in the node pool. |
Step 3: Click Next: Access.
Access
Azure RBAC for AKS is a fully managed RBAC solution providing both authentication and authorization through Azure IAM.
Step 1: From the Authentication and Authorization dropdown, select among native Kubernetes RBAC managed locally or leverage Azure AD to manage identities for your Kubernetes RBAC needs.
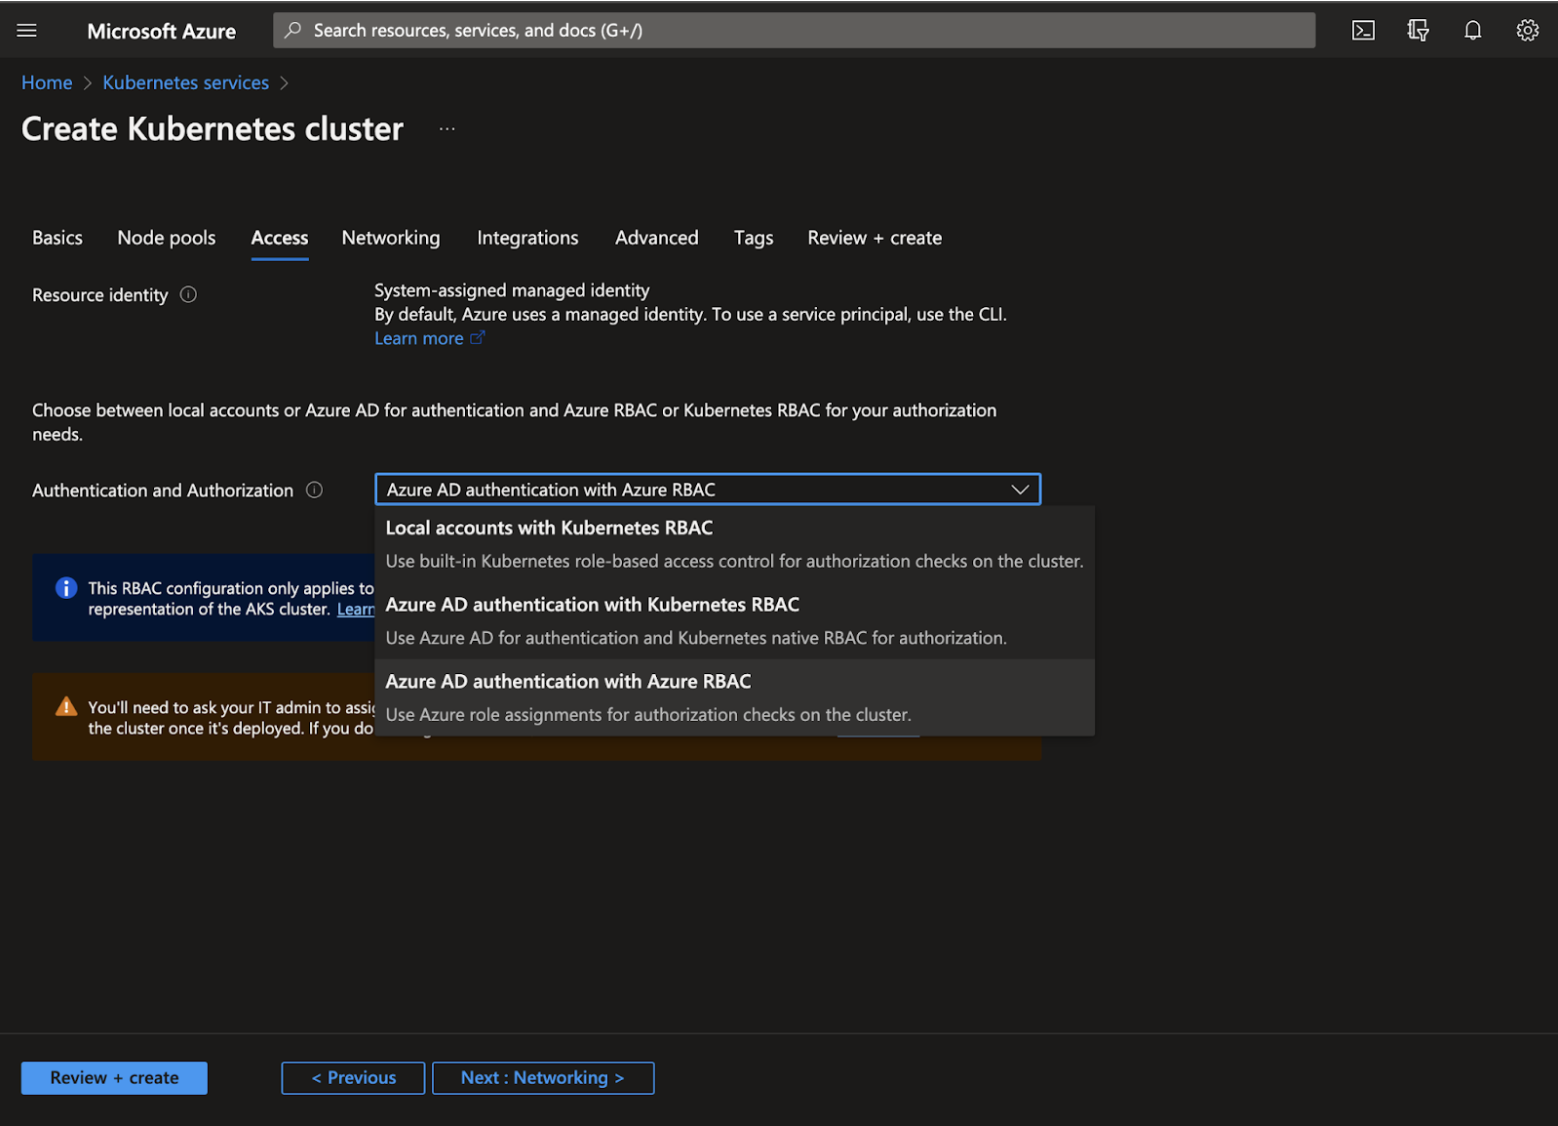
NOTE Infoworks recommends choosing Azure AD authentication with Azure RBAC as a security best practice to connect for Kubernetes cluster and accessing the Kubernetes resources for authentication using Azure AD user.
Step 2: Click Next: Networking >.
Networking
Cluster Networking describes securing the AKS cluster privately without exposing it to the outside world.
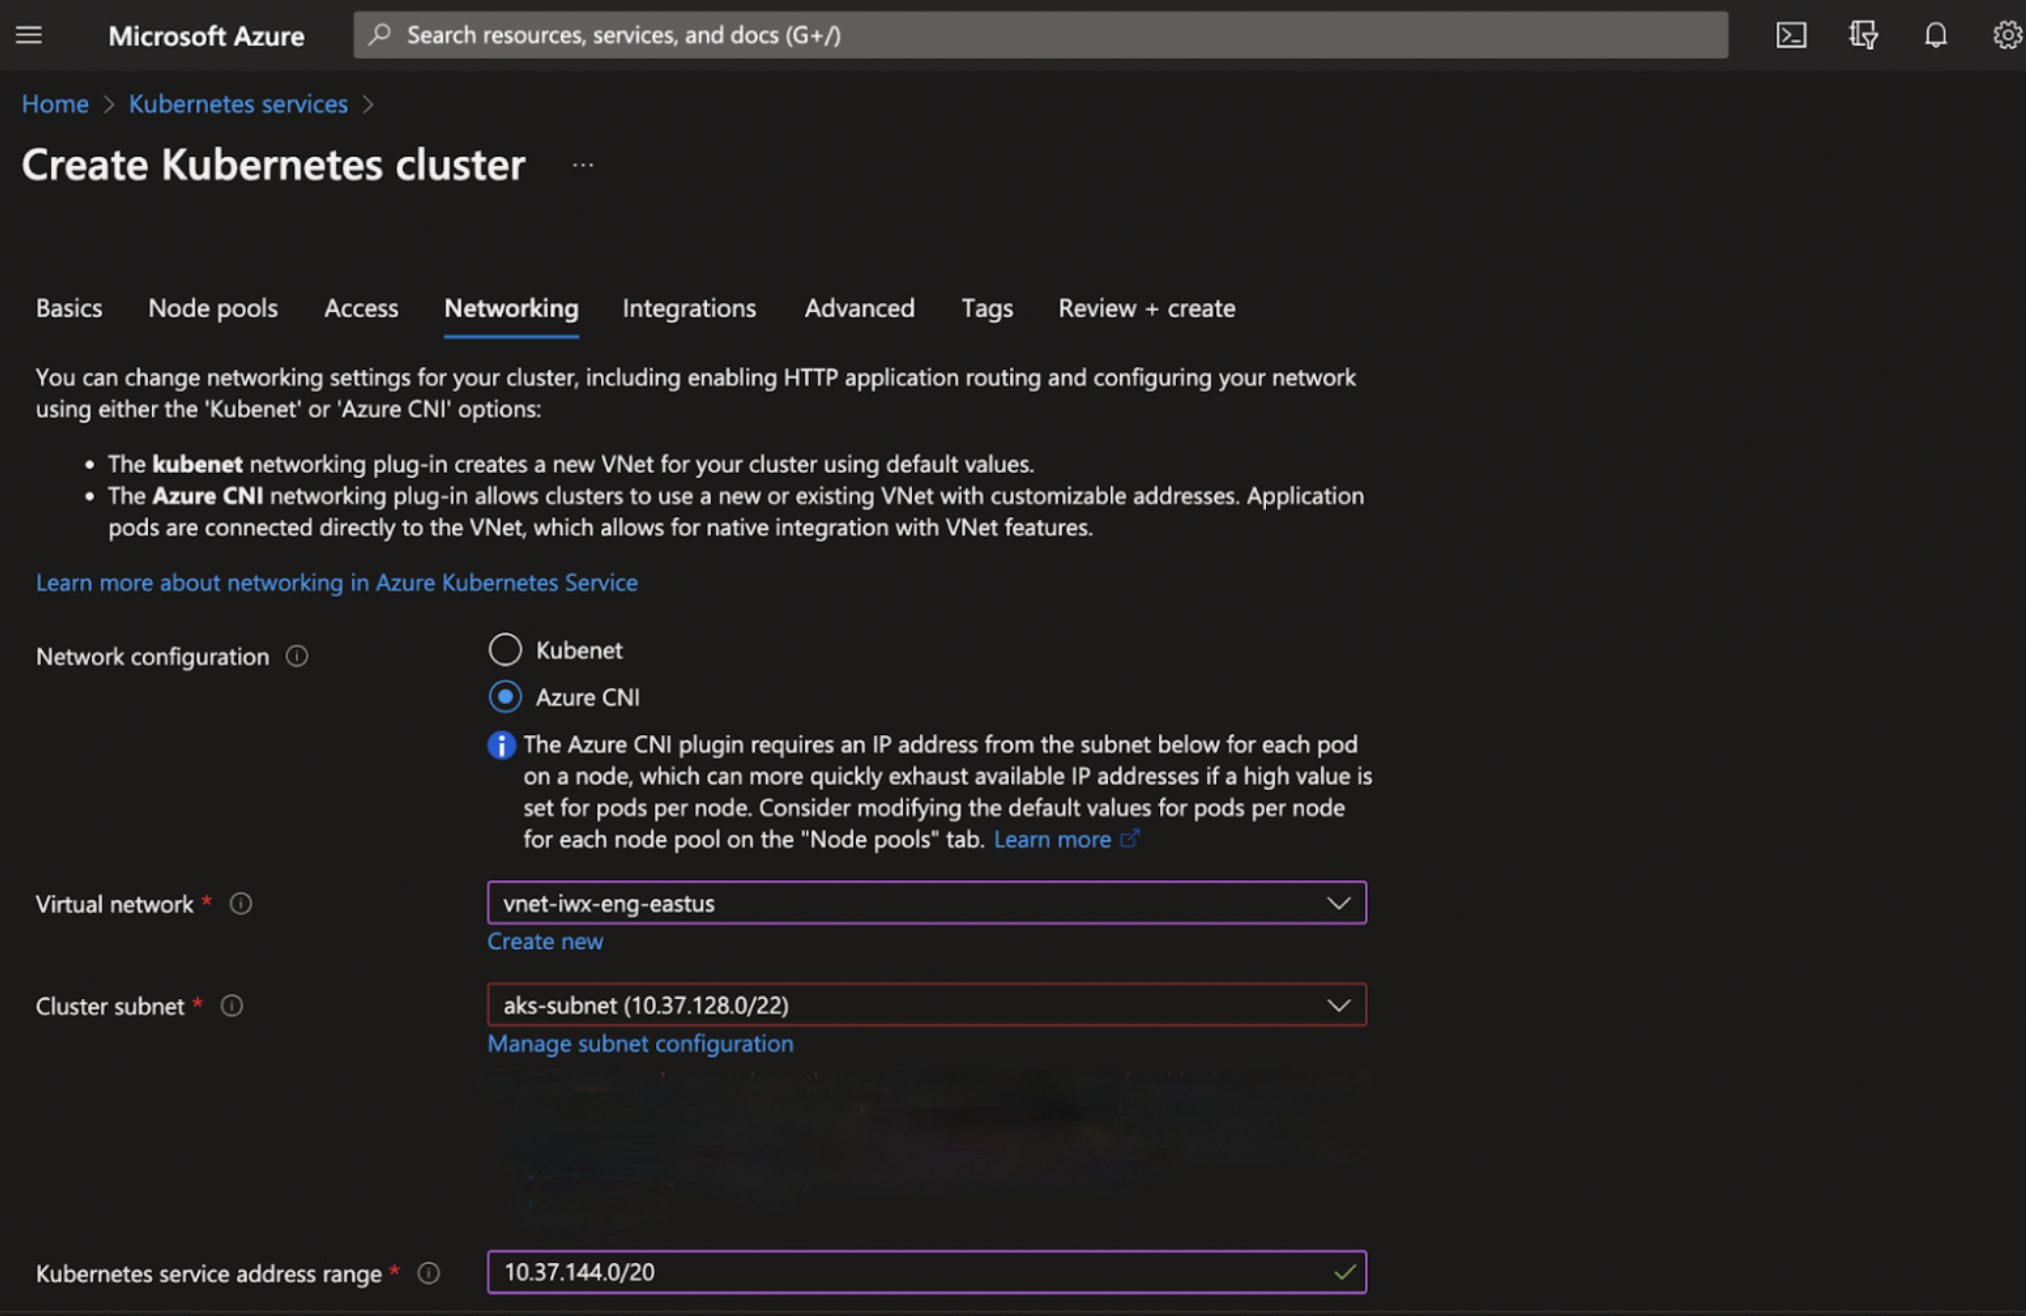
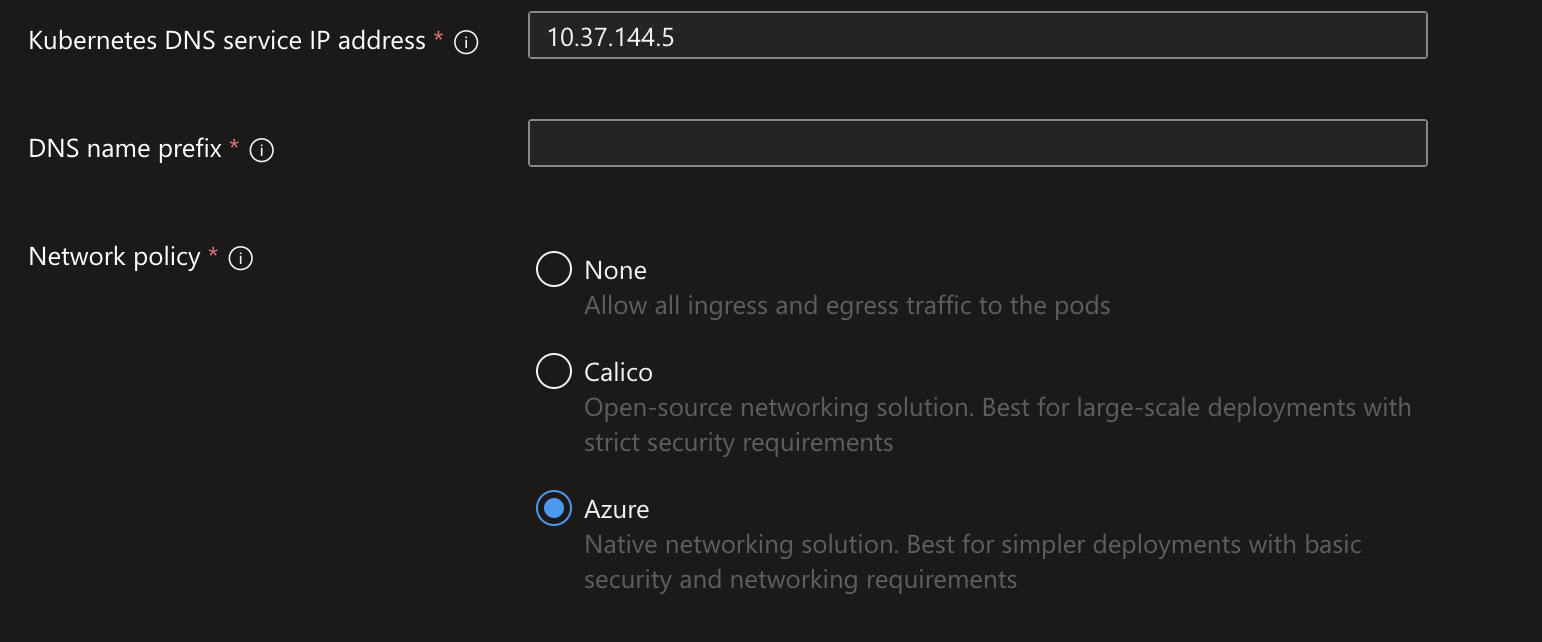
Step 1: Provide the following details.
Category | Description |
|---|---|
Network Configuration | Select either Kubenet or Azure CNI to manage the internal networking. NOTE Choose either Kubenet or Azure CNI. Infoworks recommends selecting Azure CNI since it can leverage existing VNet functionality with all the workloads connected to the VNet. On the other hand, Kubenet will create everything automatically. Refer to the Azure CNI official documentation to understand the networking. |
Virtual Network | Select the existing virtual networks in the current location listed. It should be at least /18. For example: 10.0.0.0/18. |
Cluster Subnet | The subnet into which both the nodes and containers in the cluster will be placed. NOTE Microsoft and Infoworks recommends using at least /22 subnet for the Cluster subnet. For example: 10.0.18.0/22 |
Kubernetes DNS service IP address | An IP address assigned to the Kubernetes DNS service. It must be within the Kubernetes service address range. For example: 10.0.0.10. |
Docker Bridge Address | An IP address and netmask assigned to Docker Bridge. It must not be in any Subnet IP ranges, or the Kubernetes service address range. For example: 172.17.0.1/16. |
DNS name prefix | DNS name prefix to use with the hosted Kubernetes API server FQDN. You will use this to connect to the Kubernetes API when managing containers after creating the cluster. |
Enable Private Cluster | You can choose the option ‘Enable Private Cluster’ if the AKS DNS endpoint should be accessible privately. NOTE Infoworks recommends enabling the option for security best standards and connecting via bastion host for better security over private connection endpoint. |
Network Policy | Network policies allow you to define rules for ingress and egress traffic between pods in a cluster, improving your cluster security by restricting access to certain pods. You can choose between Calico Network Policies and Azure Network Policies for your cluster. The Calico network policy can be used on Windows or Linux node pools, while the Azure network policy currently supports only Linux node pools. NOTE Infoworks recommends enabling the Network Policy option and selecting the Azure Network Policy. |
Step 2: Click Next: Integrations.
Integrations
This section enables integrating monitoring service and provides container registry service to AKS cluster.
Step 1: Keep the default details as is in Integrations tab. (Optional)
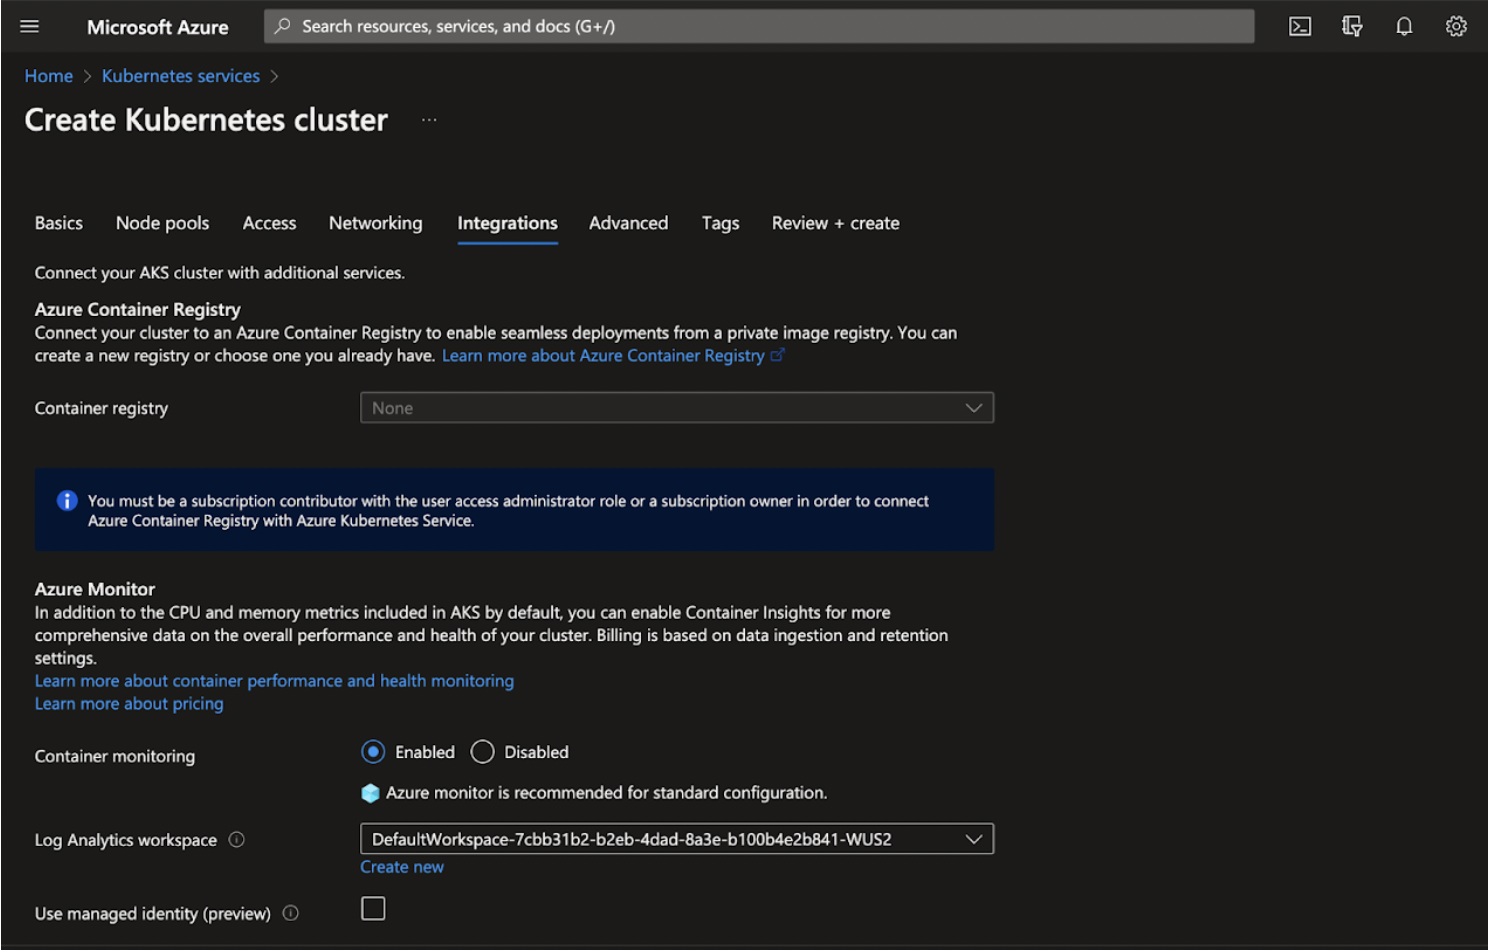
Step 2: Click Next: Advanced>.
Advanced
This section enables you to set up the advanced configuration for Kubernetes services.
Step 1: Keep the default details in the Advanced tab. (Optional)
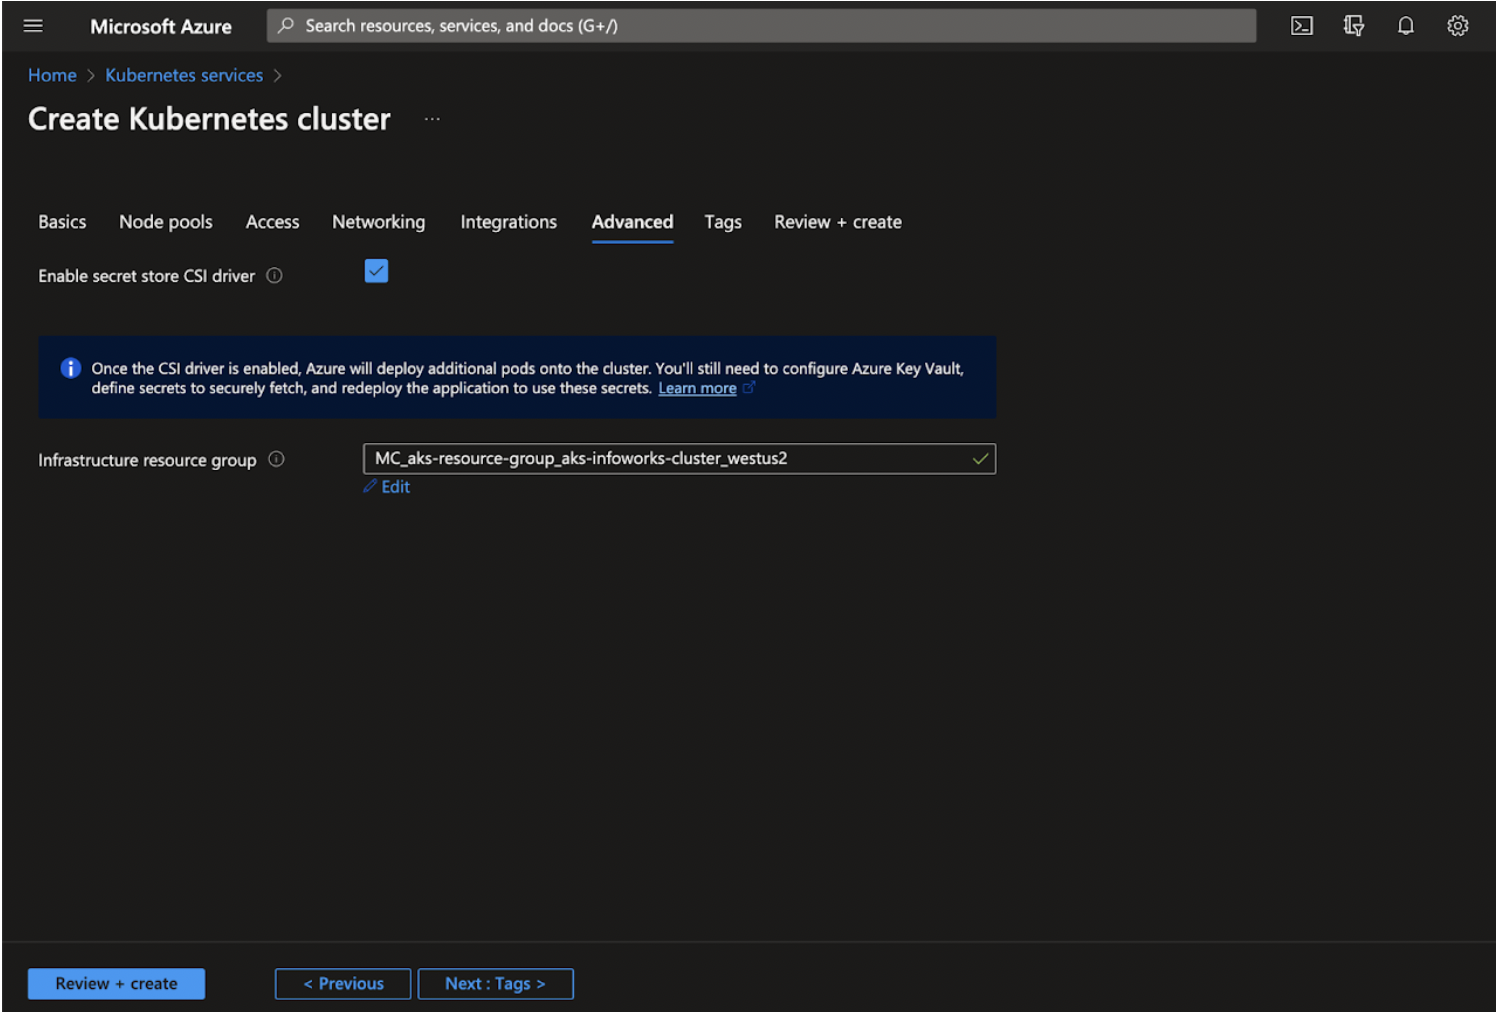
Step 2: Click Next: Tags>.
Tags
Tags are name/value pairs that enable you to categorize resources and view consolidated billing by applying the same tag to multiple resources and resource groups.
Step 1: Add the tags as per your organization standards.
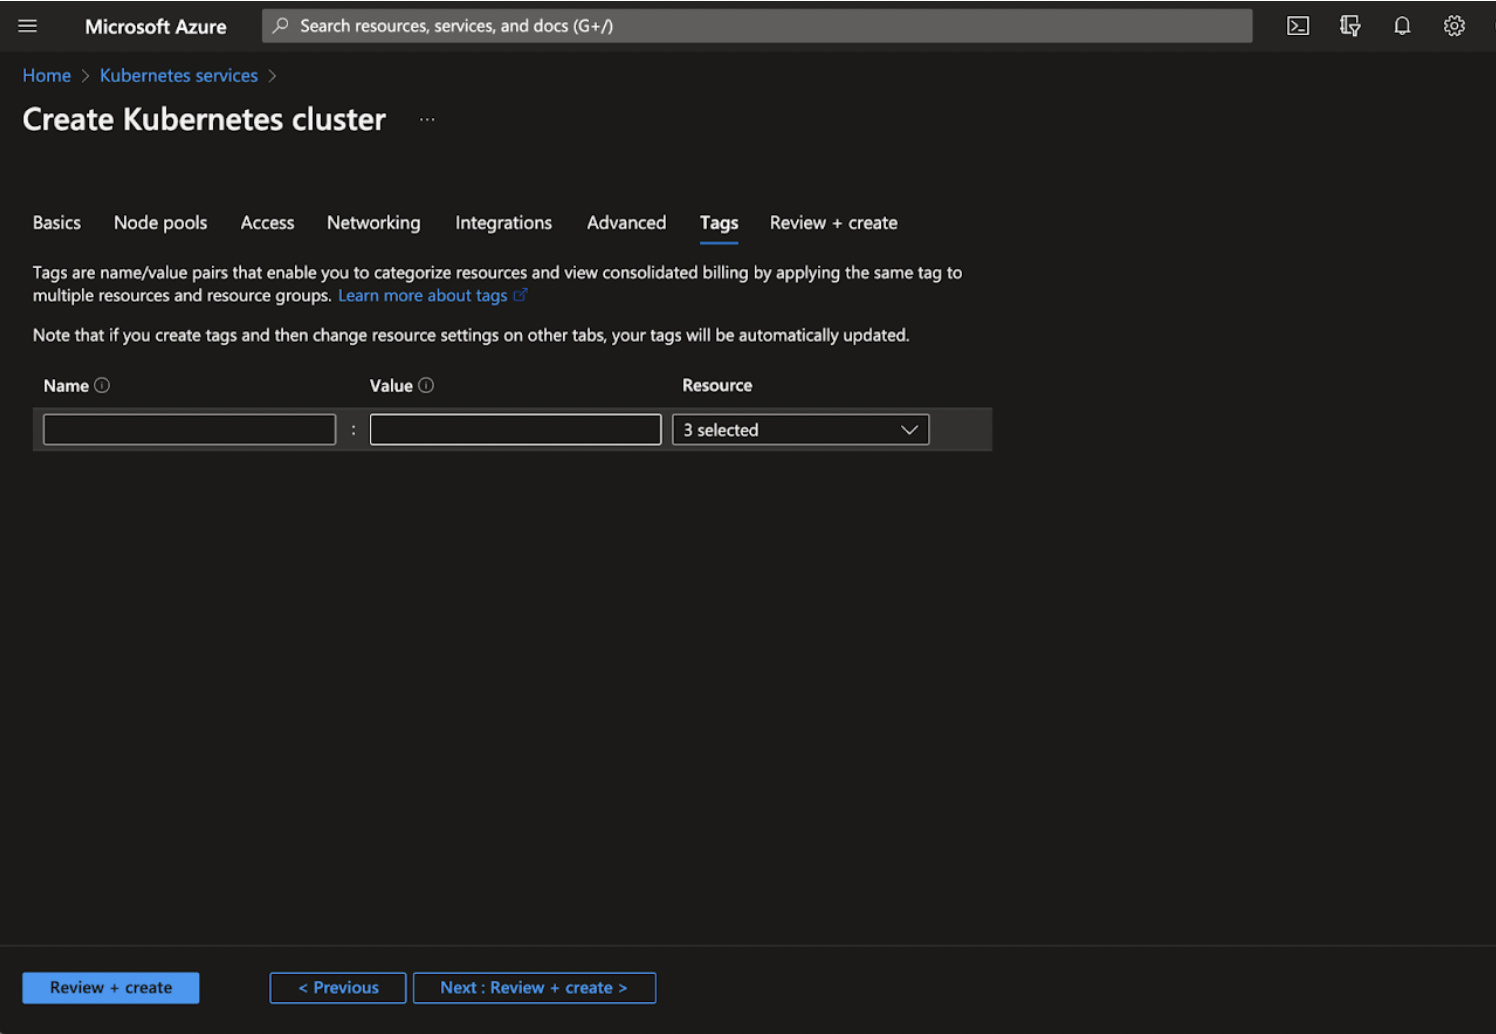
Step 2: Click Next: Review+create >.
Review+Create
Step 1: Verify the details and click Review+Create to complete the configurations and deploy the AKS Cluster.
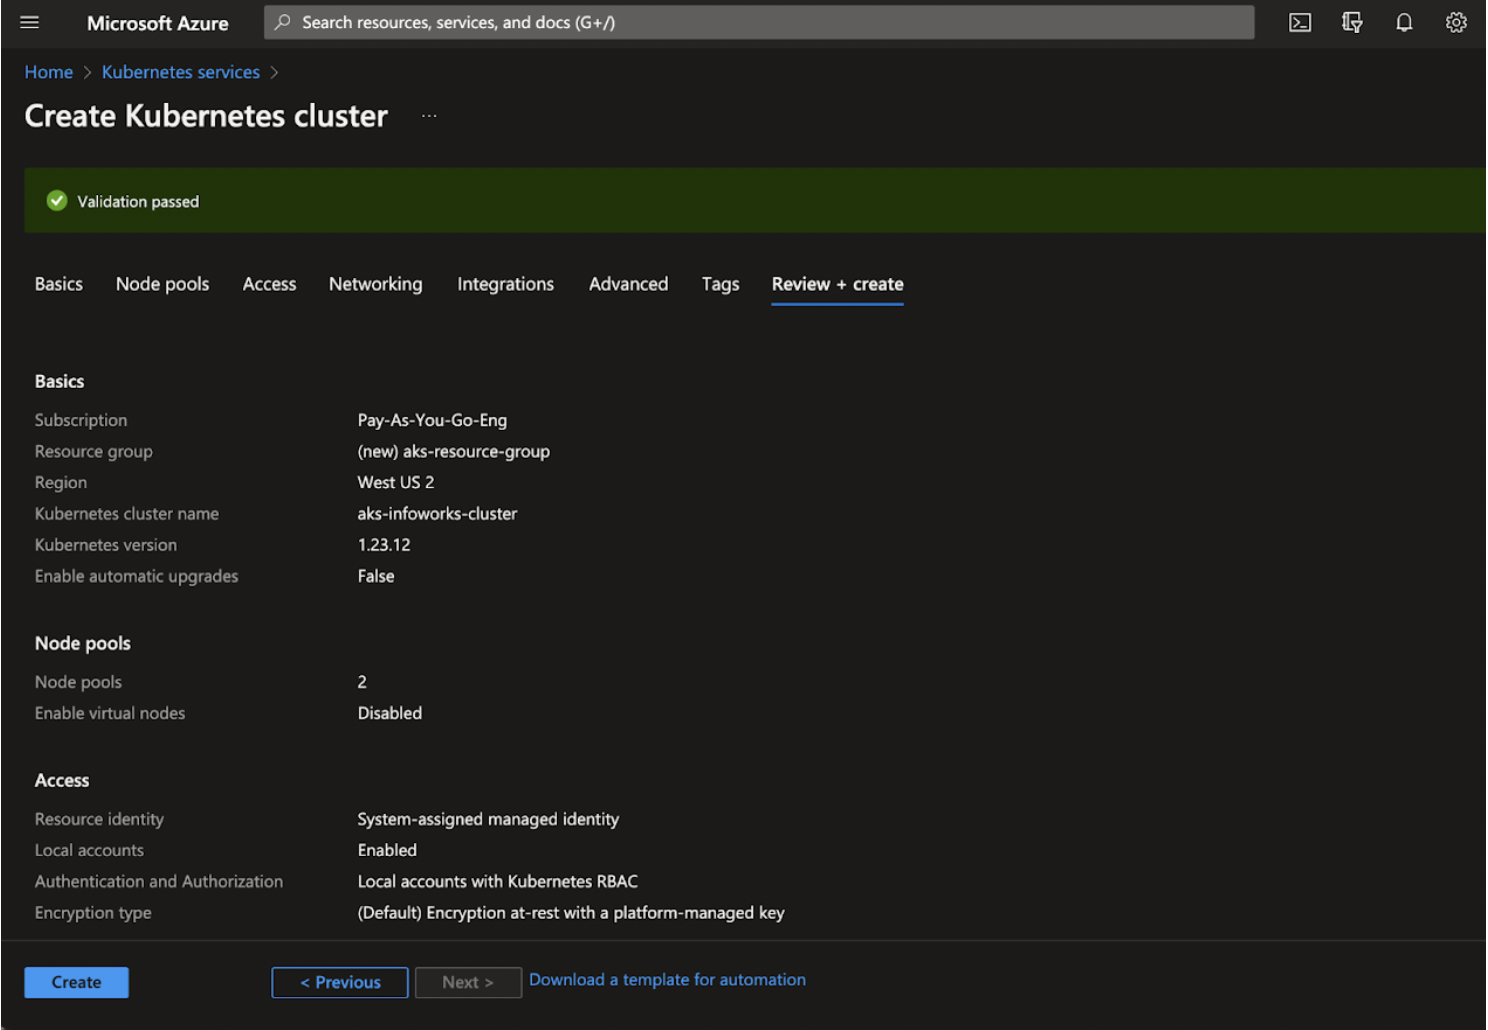
Step 2: Click Create.
Adding Azure Kubernetes Service RBAC Cluster Admin Role
To add Azure Kubernetes Service RBAC Cluster Admin role:
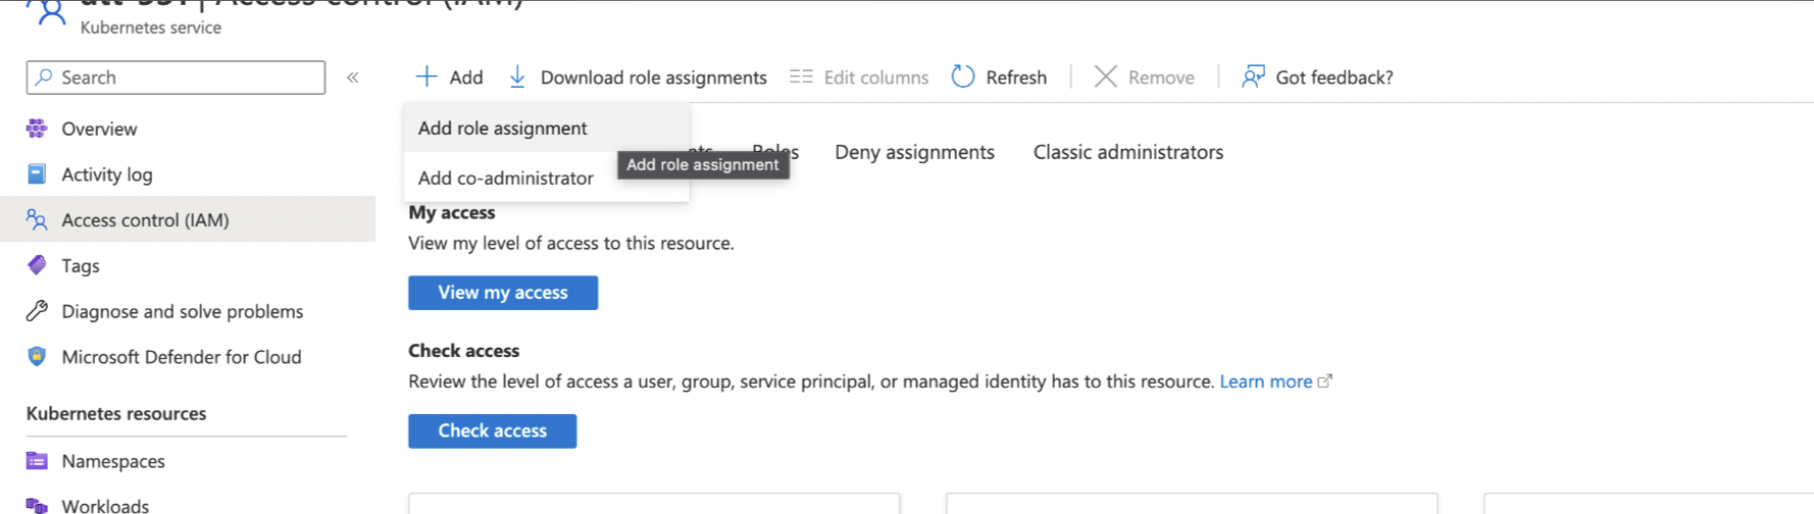
Step 1: Open Kubernetes services, go to left-side navigation page, click Access Control (IAM).
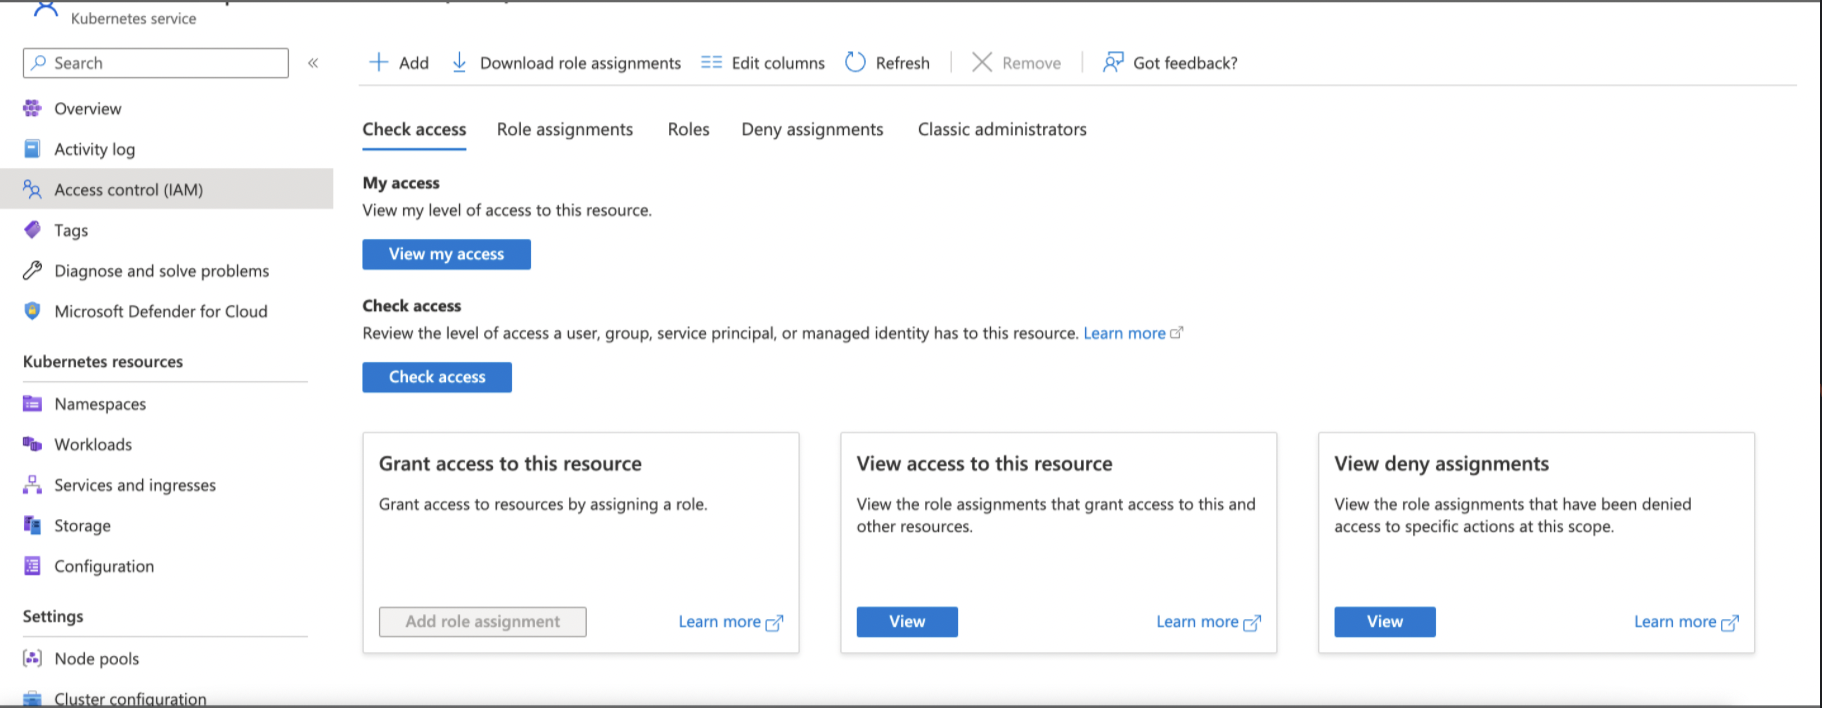
Step 2: Click +Add, and then select Add role assignment from the dropdown.
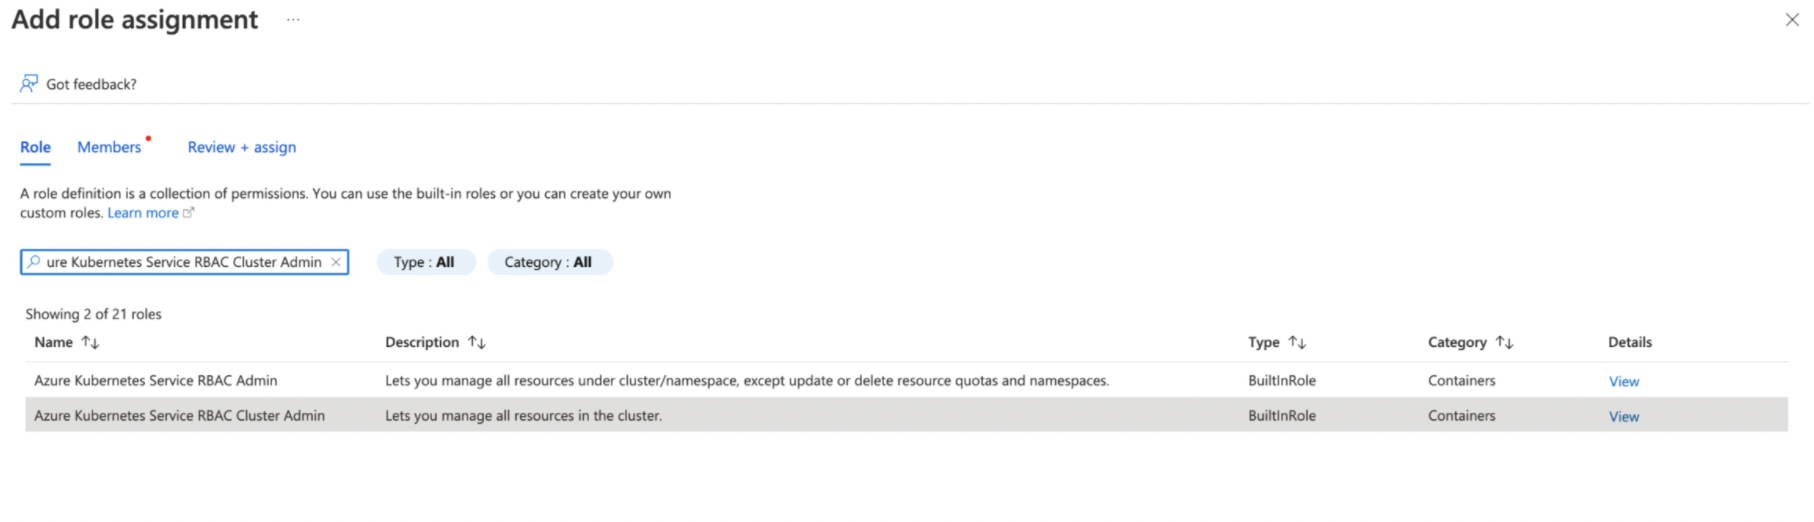
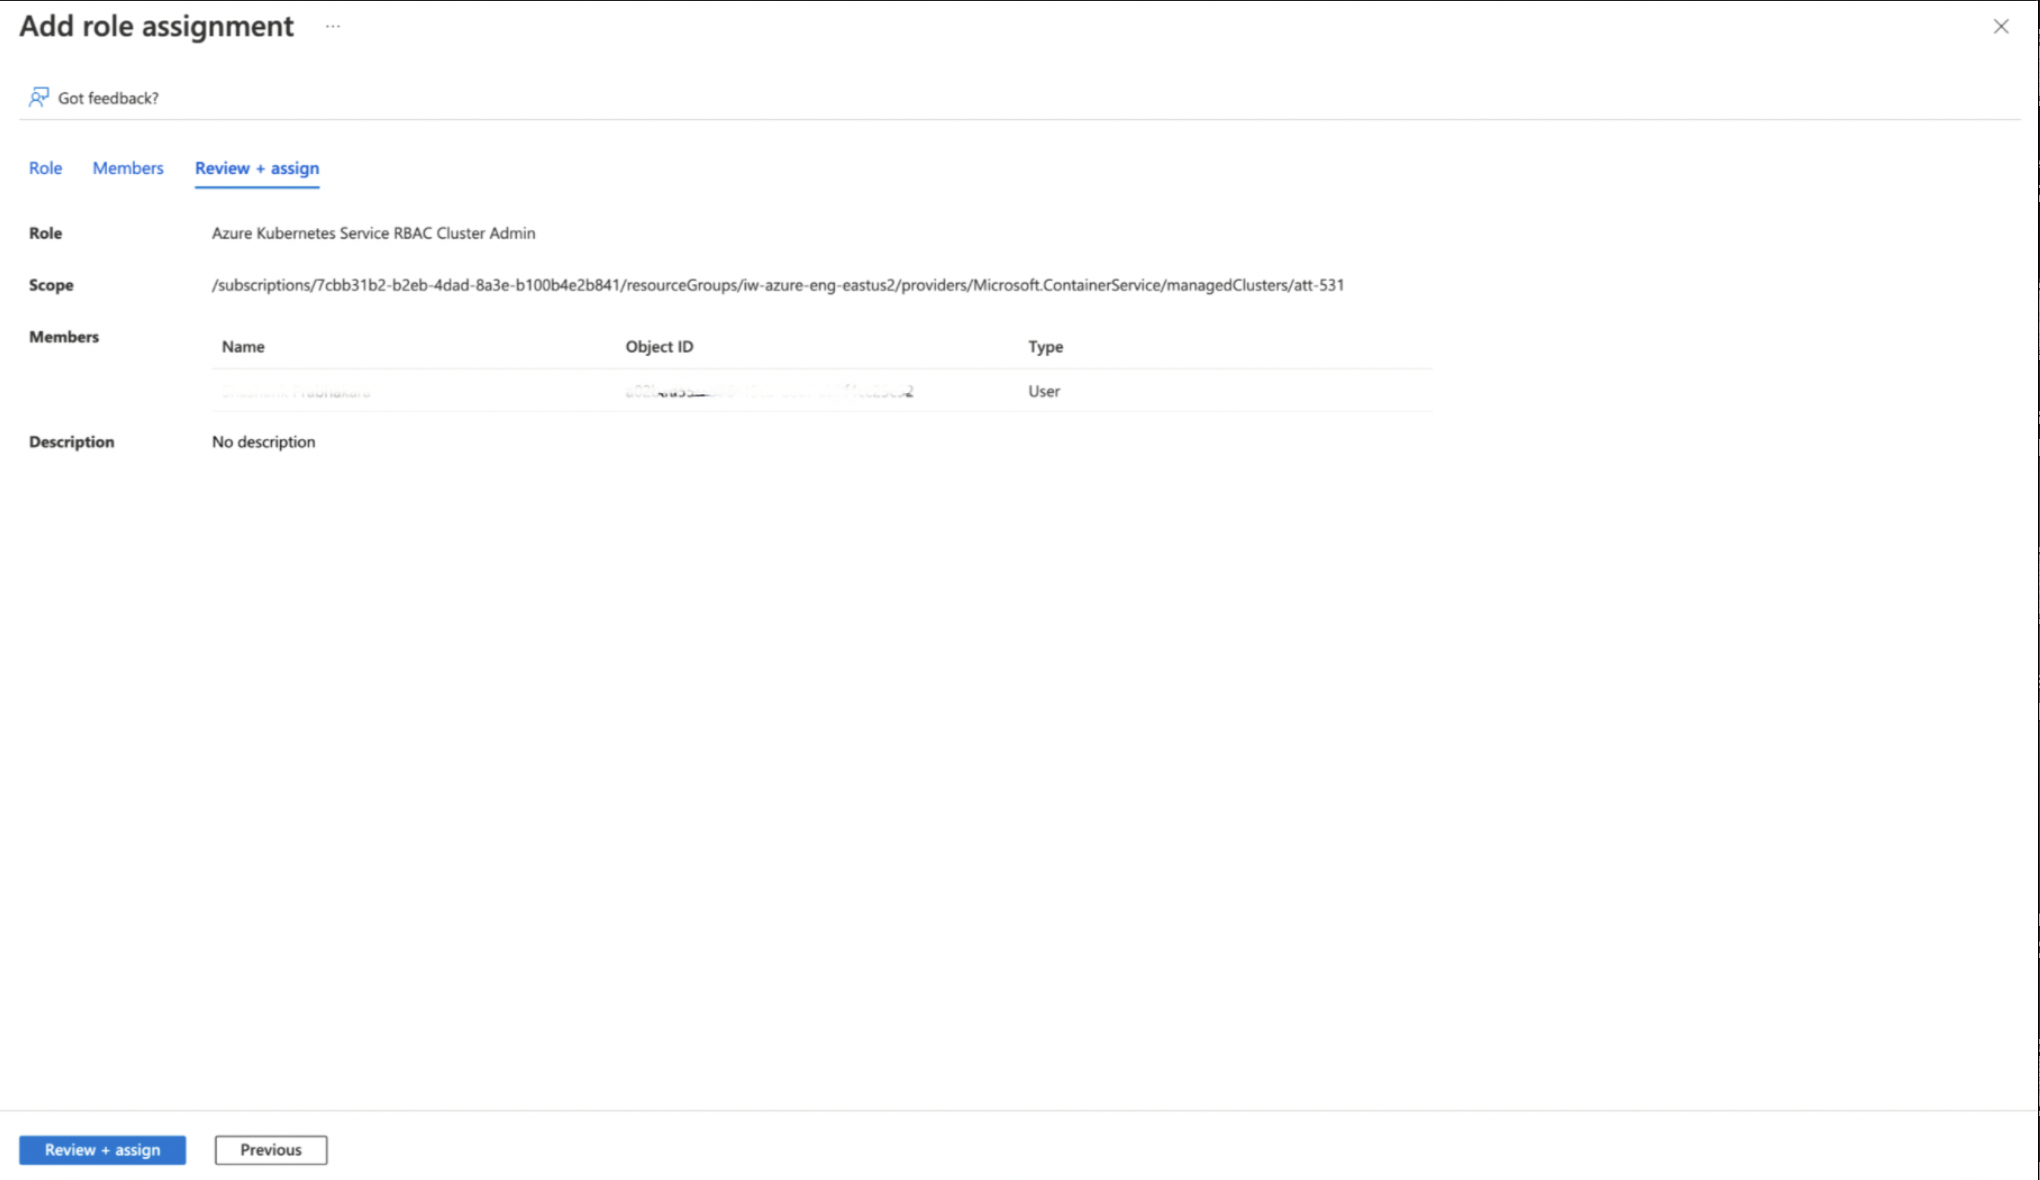
Step 3: Search for Azure Kubernetes Service RBAC Cluster Admin, select it, and click Next.
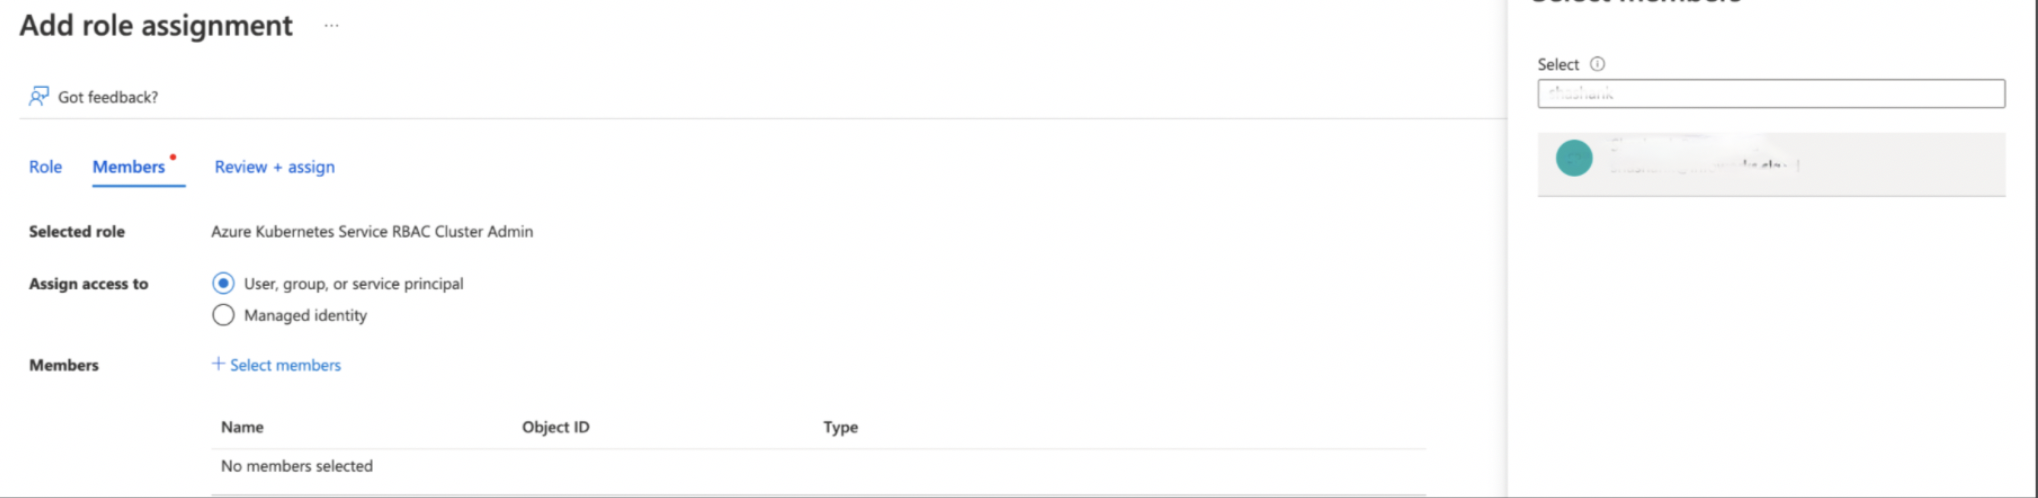
Step 4: On the Members Tab, for Assign access to field, select User, group or service principal, then click Select Members. The Select Members dialog appears. Search and select for the user to whom access needs to be given. Click Save.
Step 5: Verify the selected username and click Review + Assign.
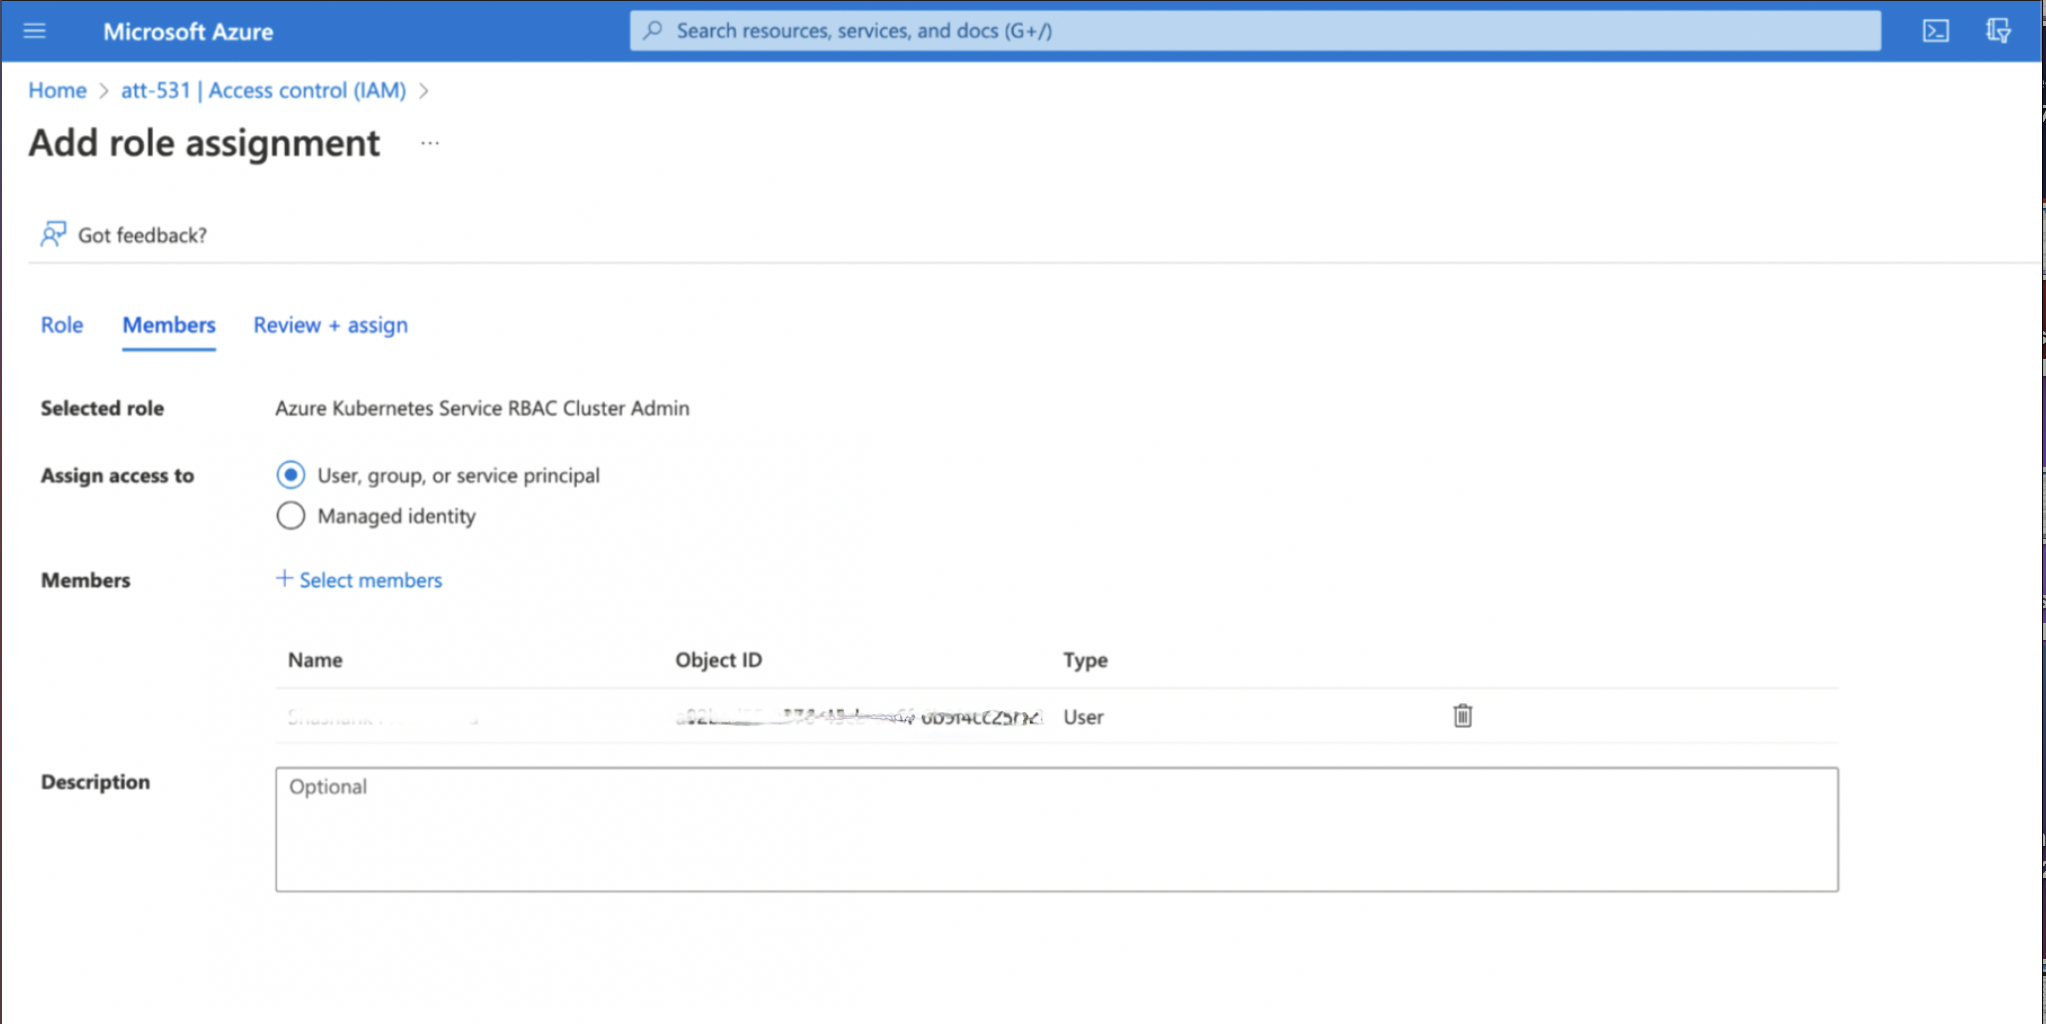
Step 6: Under the Review+Assign tab, click Review + Assign.
Step 7: To verify access, click Check Access tab, select User, group, or service principal, and search for the user.
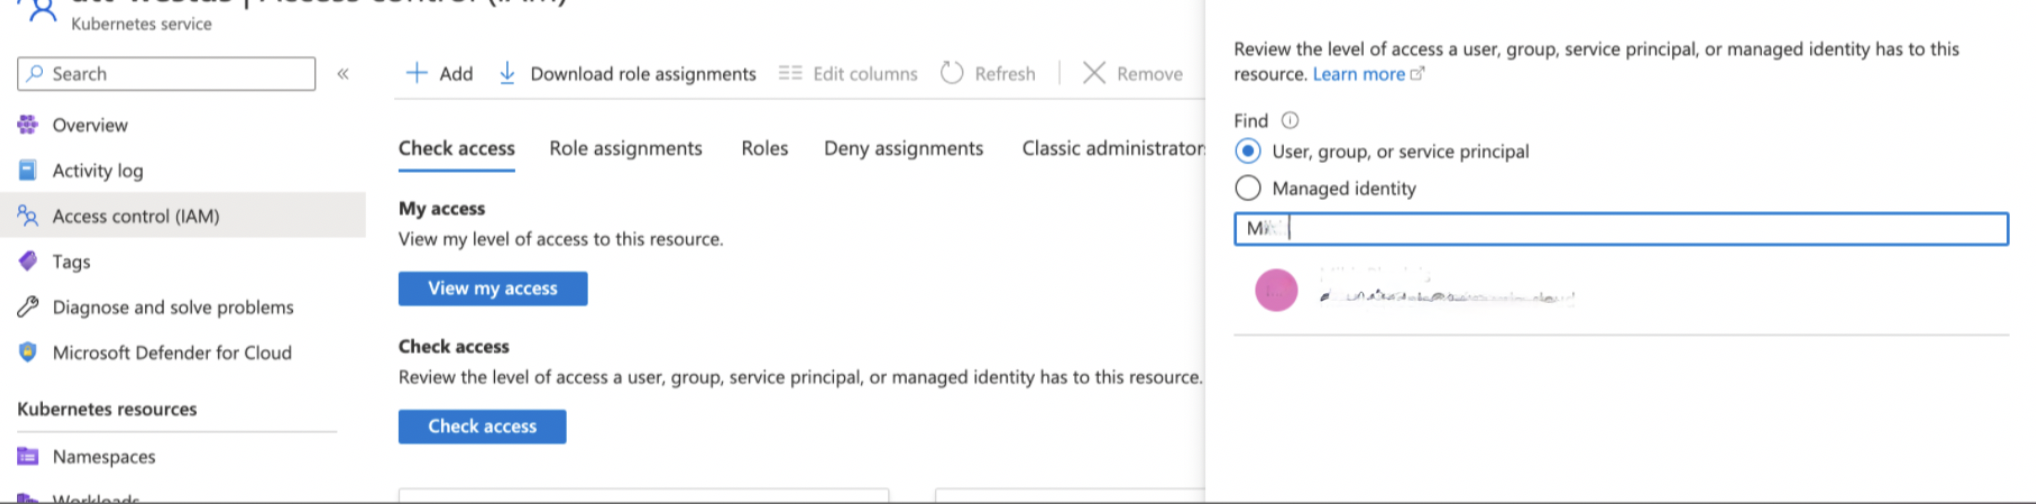
Step 8: Type "Azure Kubernetes Service RBAC Cluster Admin" in the search bar to verify if the access is provisioned.

NOTE The steps mentioned above are also applicable to assign Azure Kubernetes Service RBAC Admin role to the user.