
As most organisations rely on streaming data to provide real-time insights, it is necessary to discover, integrate and ingest data from the sources as soon as it is being produced, in any format and quality.
Infoworks supports ingestion of streaming data into data lakes. Data is stored in Delta or Avro format, and is updated via incremental data synchronization from Kafka.
Kafka Ingestion
Features
Ingest data from multiple topics into single or multiple tables via Topic Mapping.
Ingest data in Batches or Real Time, using Spark Streaming.
View snapshot of the configured topics under Topic Preview in Raw or Structured format.
Visual Schema Projection to create tables from a subset of data.
Ingestion Flow
Infoworks creates a Kafka consumer from the topics based on the user provided configurations.
The consumer reads records from topic(s) based on the configuration provided under Topic Mappings.
A configurable number of messages are read, and the schema for those records is crawled.
Messages are crawled using Spark Structured Streaming, which converts messages into dataframe, and are appended continuously.
The Value field in each message is parsed as JSON, and the detected schema is applied.
Based on the configurations like storage format, and path to the output directory, a delta target table is populated.
Prerequisites and Considerations
Infoworks supports Kafka records in JSON format only.
Kafka Ingestion cannot be integrated into a workflow as it is a near real time continuously streaming job.
Creating a Kafka Source
For creating a Kafka source, see Creating Source. Ensure that the Source Type selected is Kafka.
Configuring a Kafka Source
Click the Data Catalog menu and click the Ingest button for the source you created.
The configuration flow is organised into four tabs as follows:
NOTE Configure details in each tab. Further, click on the next tab name displayed on the top of the window, to complete the Kafka configuration.
Set Up Source
The Setup Source screens is as follows:
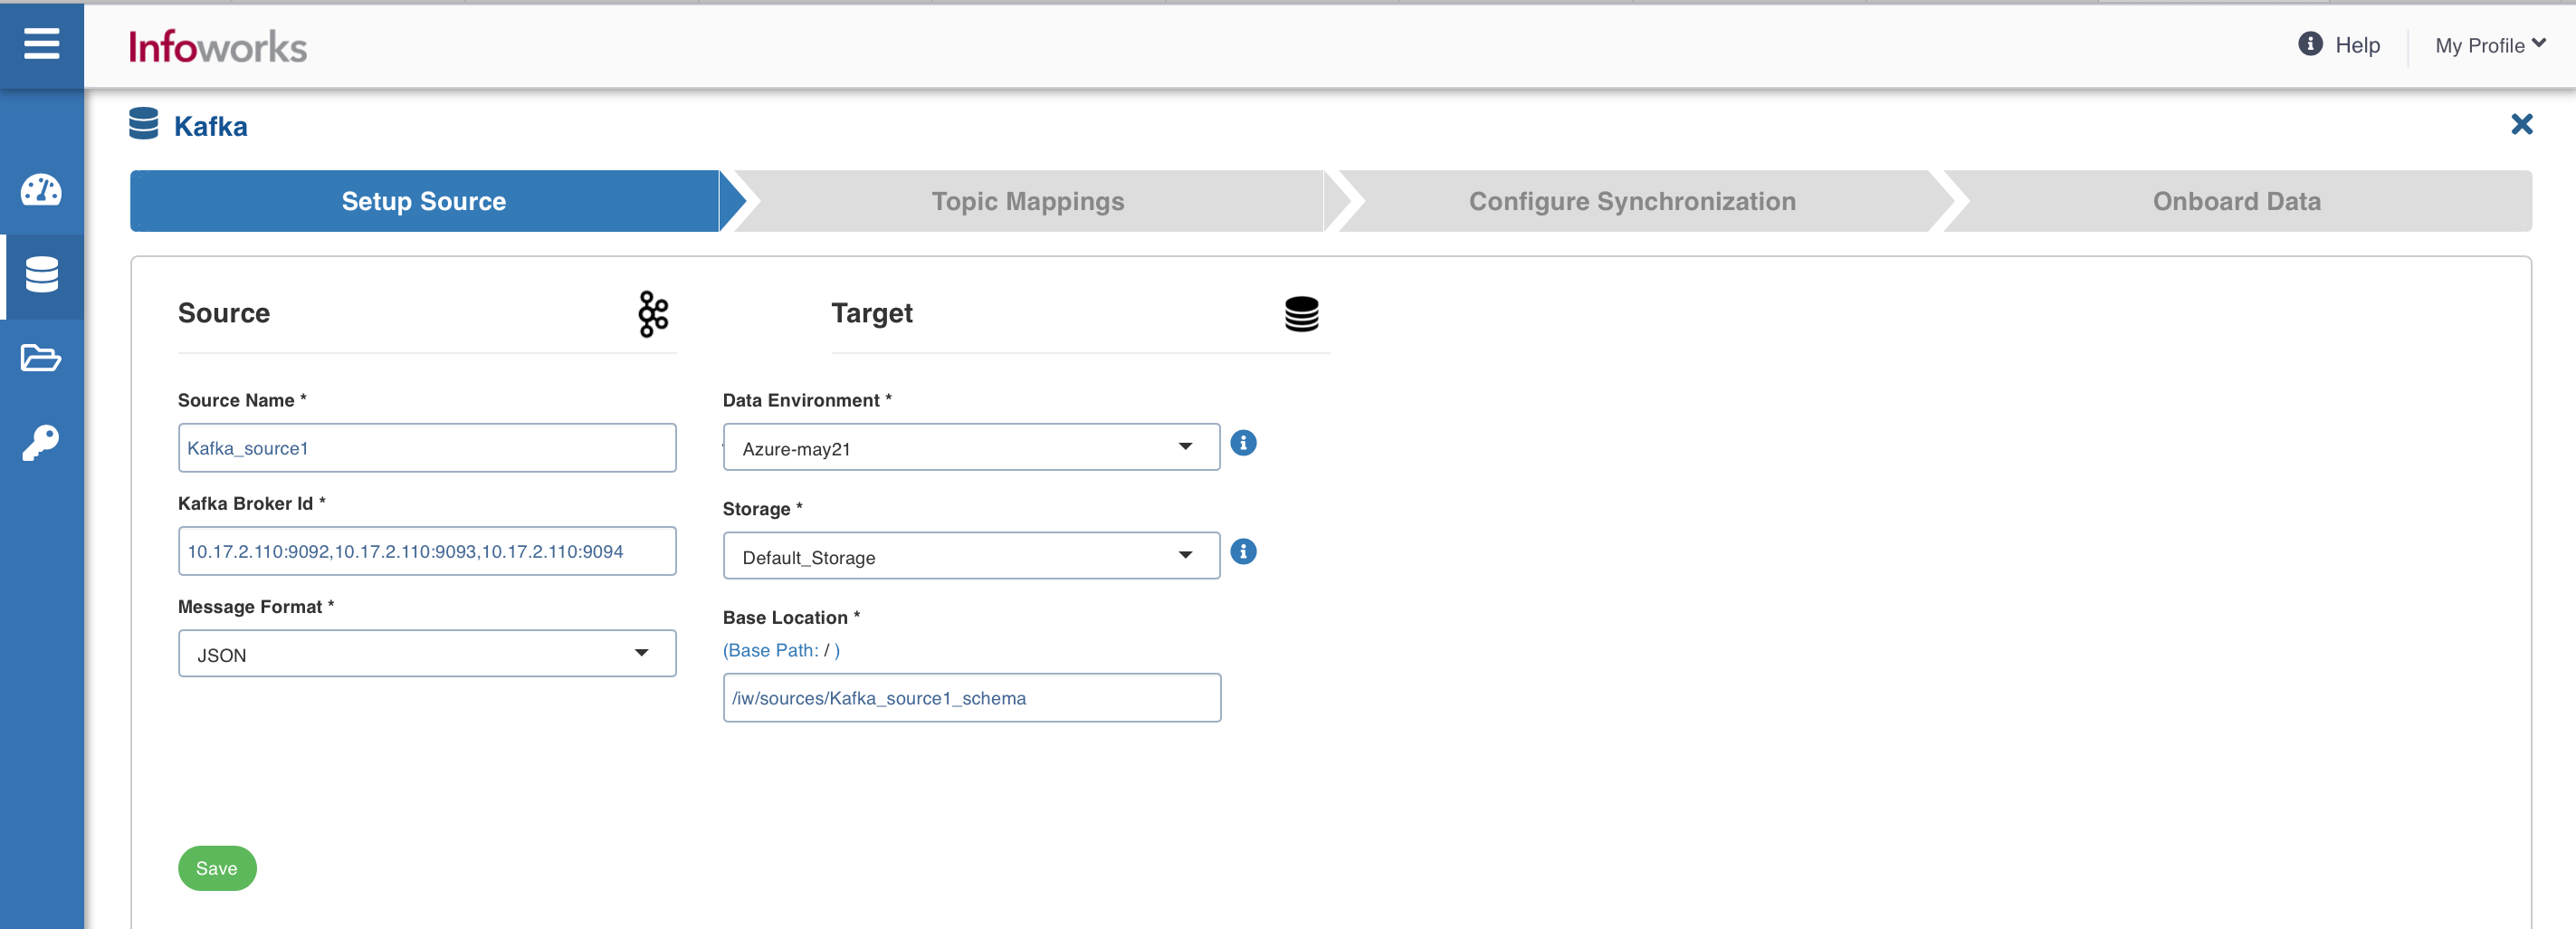
Source Tab Fields and Description
Field | Description |
|---|---|
Source Name | Provide a source name for the target table. |
Bootstrap Server | Kafka is run as a cluster of one or more servers that can span multiple data centers or cloud regions. Some of these servers form the storage layer, called the brokers. The identifier for this broker is termed as Kafka Broker ID. Broker ID can be entered in the following syntax: |
Message Format | Message format of all messages In Kafka. The supported format is JSON. |
Snowflake Warehouse | Snowflake warehouse name. Warehouse is pre-filled from the selected snowflake environment and this field is editable. NOTE This field appears only when the Data Environment is snowflake. |
Target Fields and Description
Field | Description |
|---|---|
Data Environment | Select the data environment from the drop-down list, where the data will be onboarded. |
Storage | Select from one of the storage options defined in the environment. NOTE This field becomes Temporary Storage when the Data Environment is snowflake. |
Base Location | The path to the base/target directory where all the data should be stored. |
Schema Name | The schema name of the target. NOTE This field becomes Snowflake Schema Name when the Data Environment is snowflake. |
Snowflake Database Name | The database name of the Snowflake target. NOTE This field appears only when the Data Environment is snowflake. |
Staging Schema Name | The name of the schema where all the temporary tables (like CDC, segment tables etc) managed by Infoworks will be created. Ensure that Infoworks has ALL permissions assigned for this schema. This is an optional field. If staging schema name is not provided, Infoworks uses the Target Schema provided. NOTE This field appears only when the Data Environment is Snowflake. |
Use staging schema for error tables | Click on this checkbox to create error tables in the staging schema. NOTE This field appears only when the Data Environment is Snowflake. |
Staging Dataset Name | The name of the dataset where all the temporary tables (like CDC, segment tables, and so on) managed by Infoworks will be created. Ensure that Infoworks has ALL permissions assigned for this dataset. This is an optional field. If staging dataset name is not provided, Infoworks uses the Target dataset provided. NOTE This field appears only when the Data Environment is BigQuery. |
Use staging dataset for error tables | Click this checkbox to create error tables in the staging dataset. NOTE This field appears only when the Data Environment is BigQuery. |
Make available in infoworks domains | Select the relevant domain from the dropdown list to make the source available in the selected domain. |
After entering the required details, click the Save and Test Connection button to save the settings and ensure that Infoworks is able to connect to the source system. Clicking on Save and Test Connection button also ensures that the Topics list is populated with the suggestions while configuring Topic Mappings in the next step.
Other sections available under Source setup tab are:
Now, click the Topic Mappings tab.
Topic Mappings
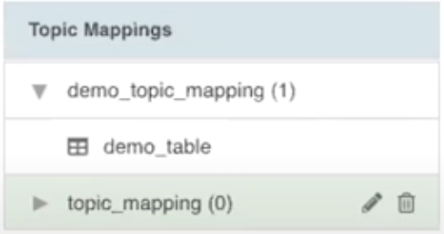
This tab allows you to subscribe to required topics using list or regex patterns, and map it to single or multiple tables.
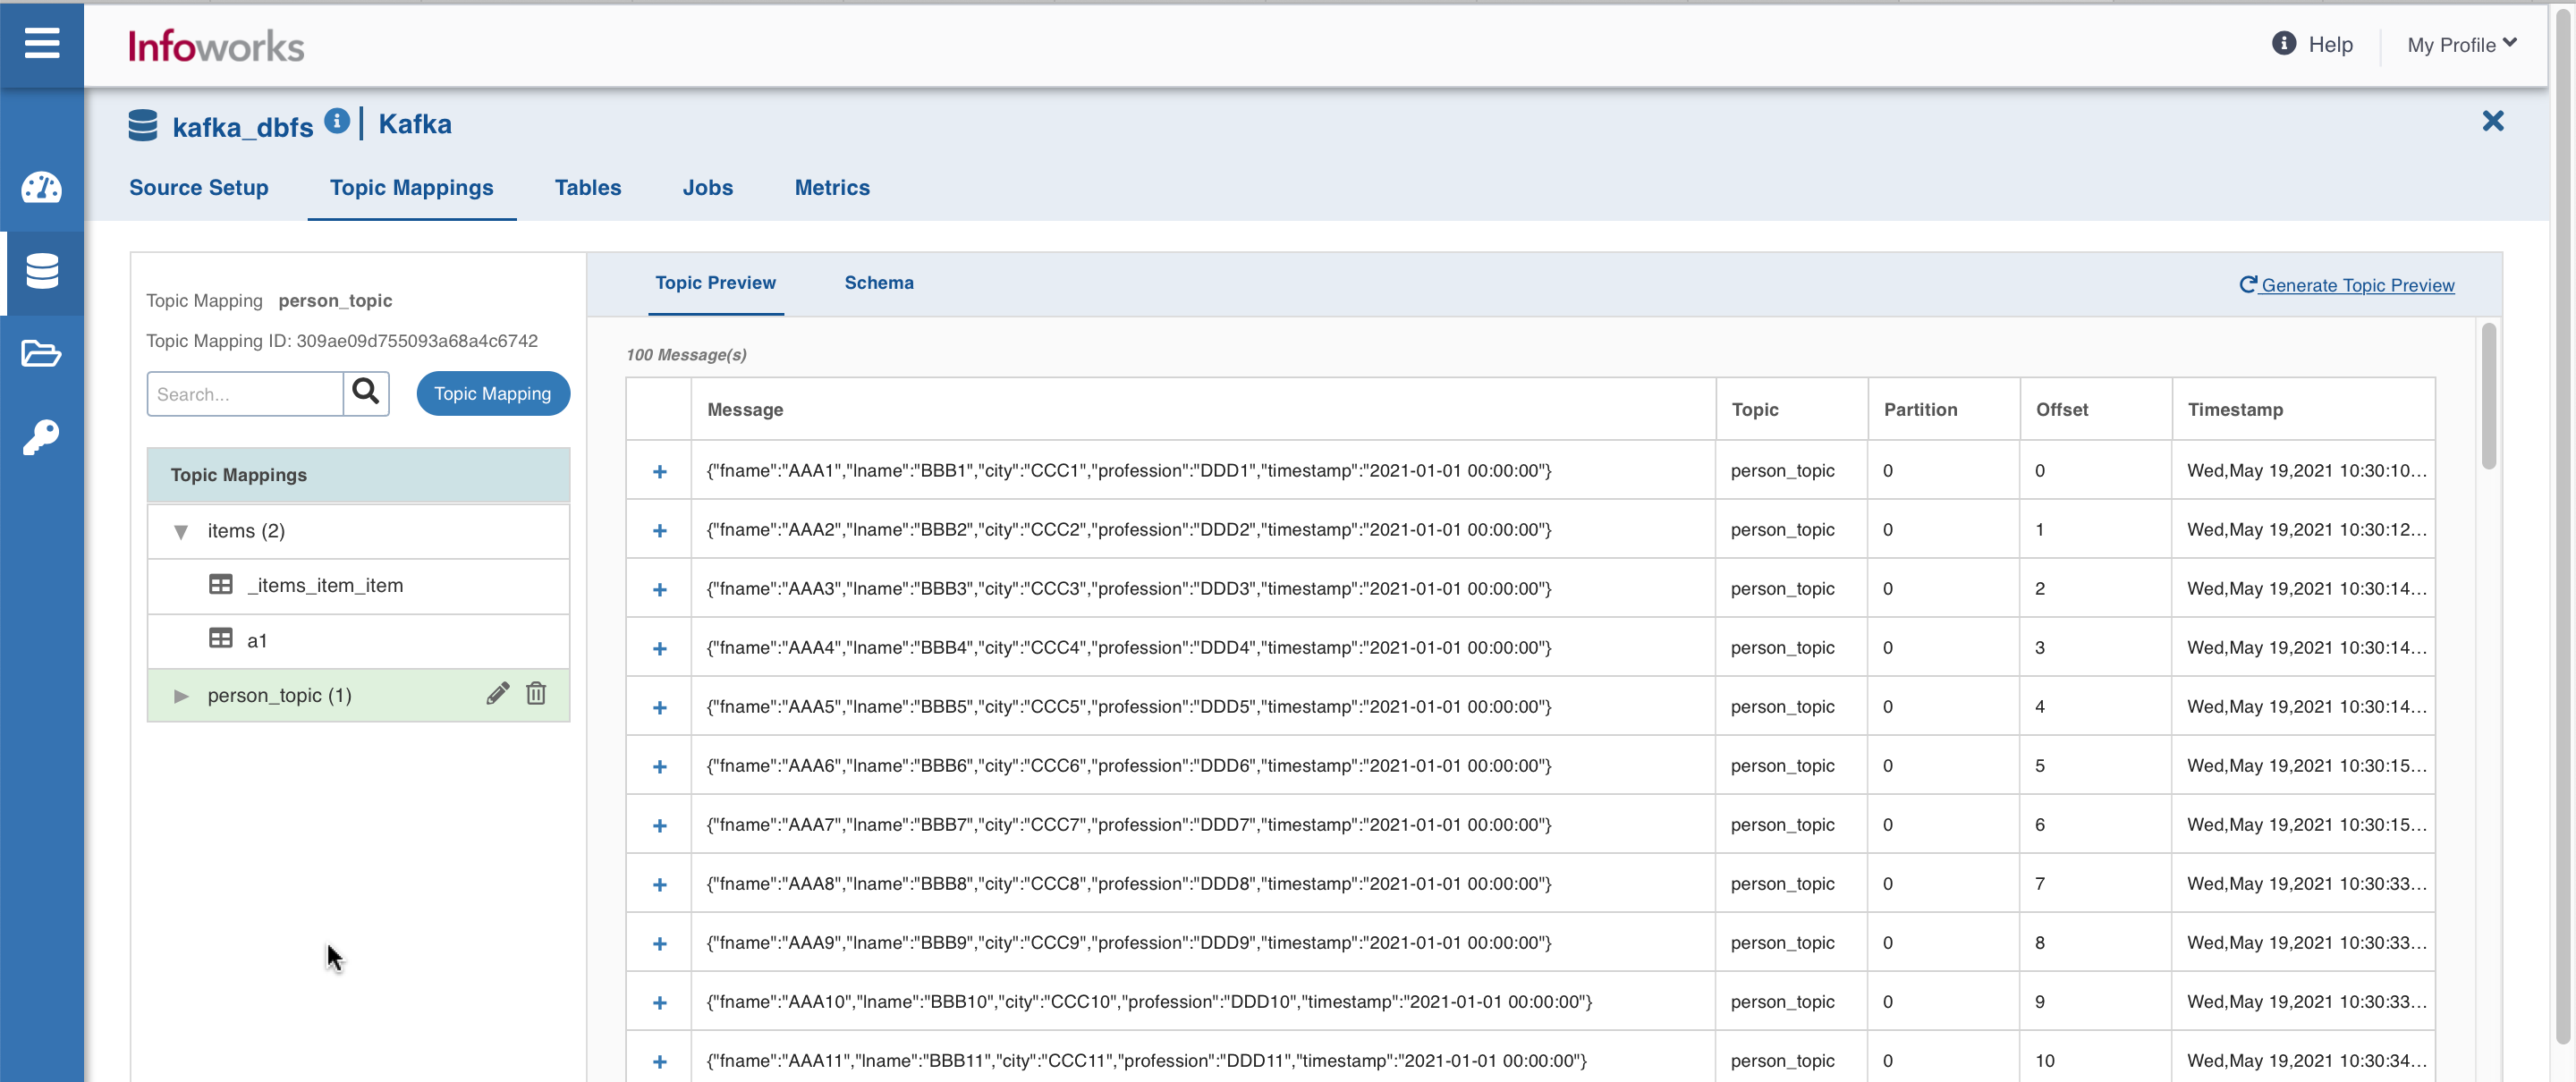
You may preview the messages in the topics subscribed, crawl them, and configure tables.
Click the Topic Mapping button to configure topics. The following window appears:
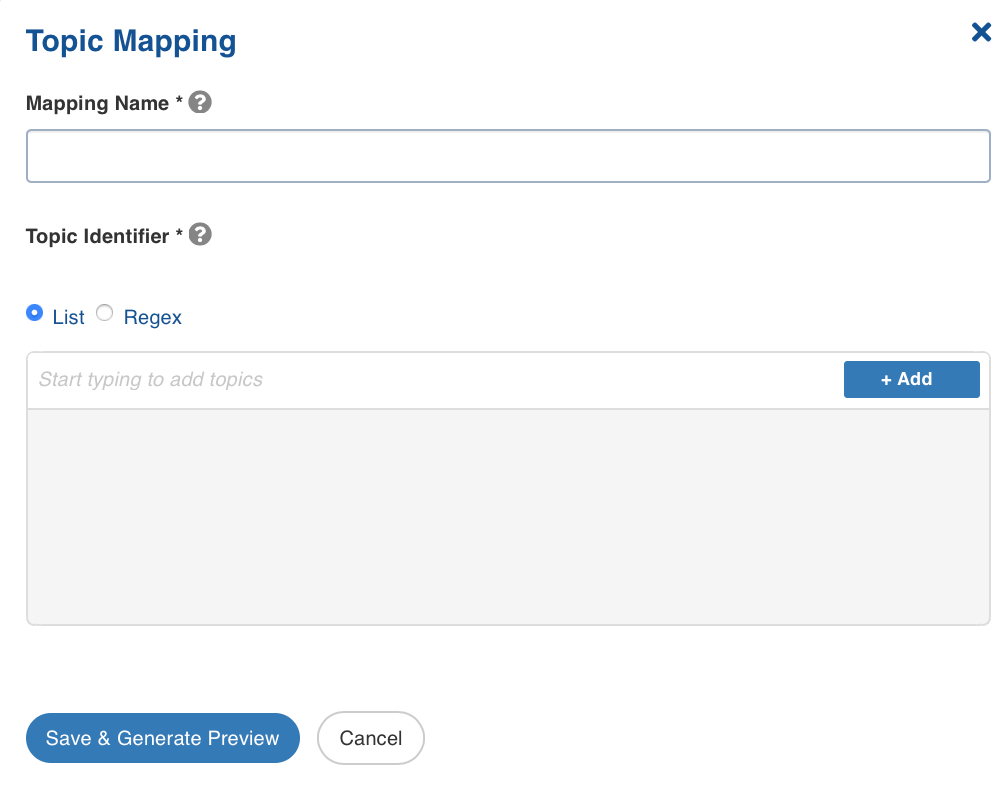
Topic Mapping Fields and Description
Field | Description | |
|---|---|---|
Mapping Name | Name for the topic mapping that is being configured, as required by the user. | |
Topic Identifier | List or regex pattern of the topics to be subscribed. Select the required radio button. The List option displays the topic suggestion while entering data in the text box. Start typing in the text box to view the list of available topics. Select the required topic and click +Add. The Regex option allows you to enter the regex pattern to add the required topics. Note: If the Topic Identifier box is not populated, please check the connection details under source configuration. If a new producer has been added recently, then click on the Save and Test Connection button to populate the list. |
After adding the required topics, click Save to save the configured settings.
The following tabs are displayed in this window that appears:
Topic Preview tab
The Topic Preview tab allows you to quickly view the snapshot of the topics.** **
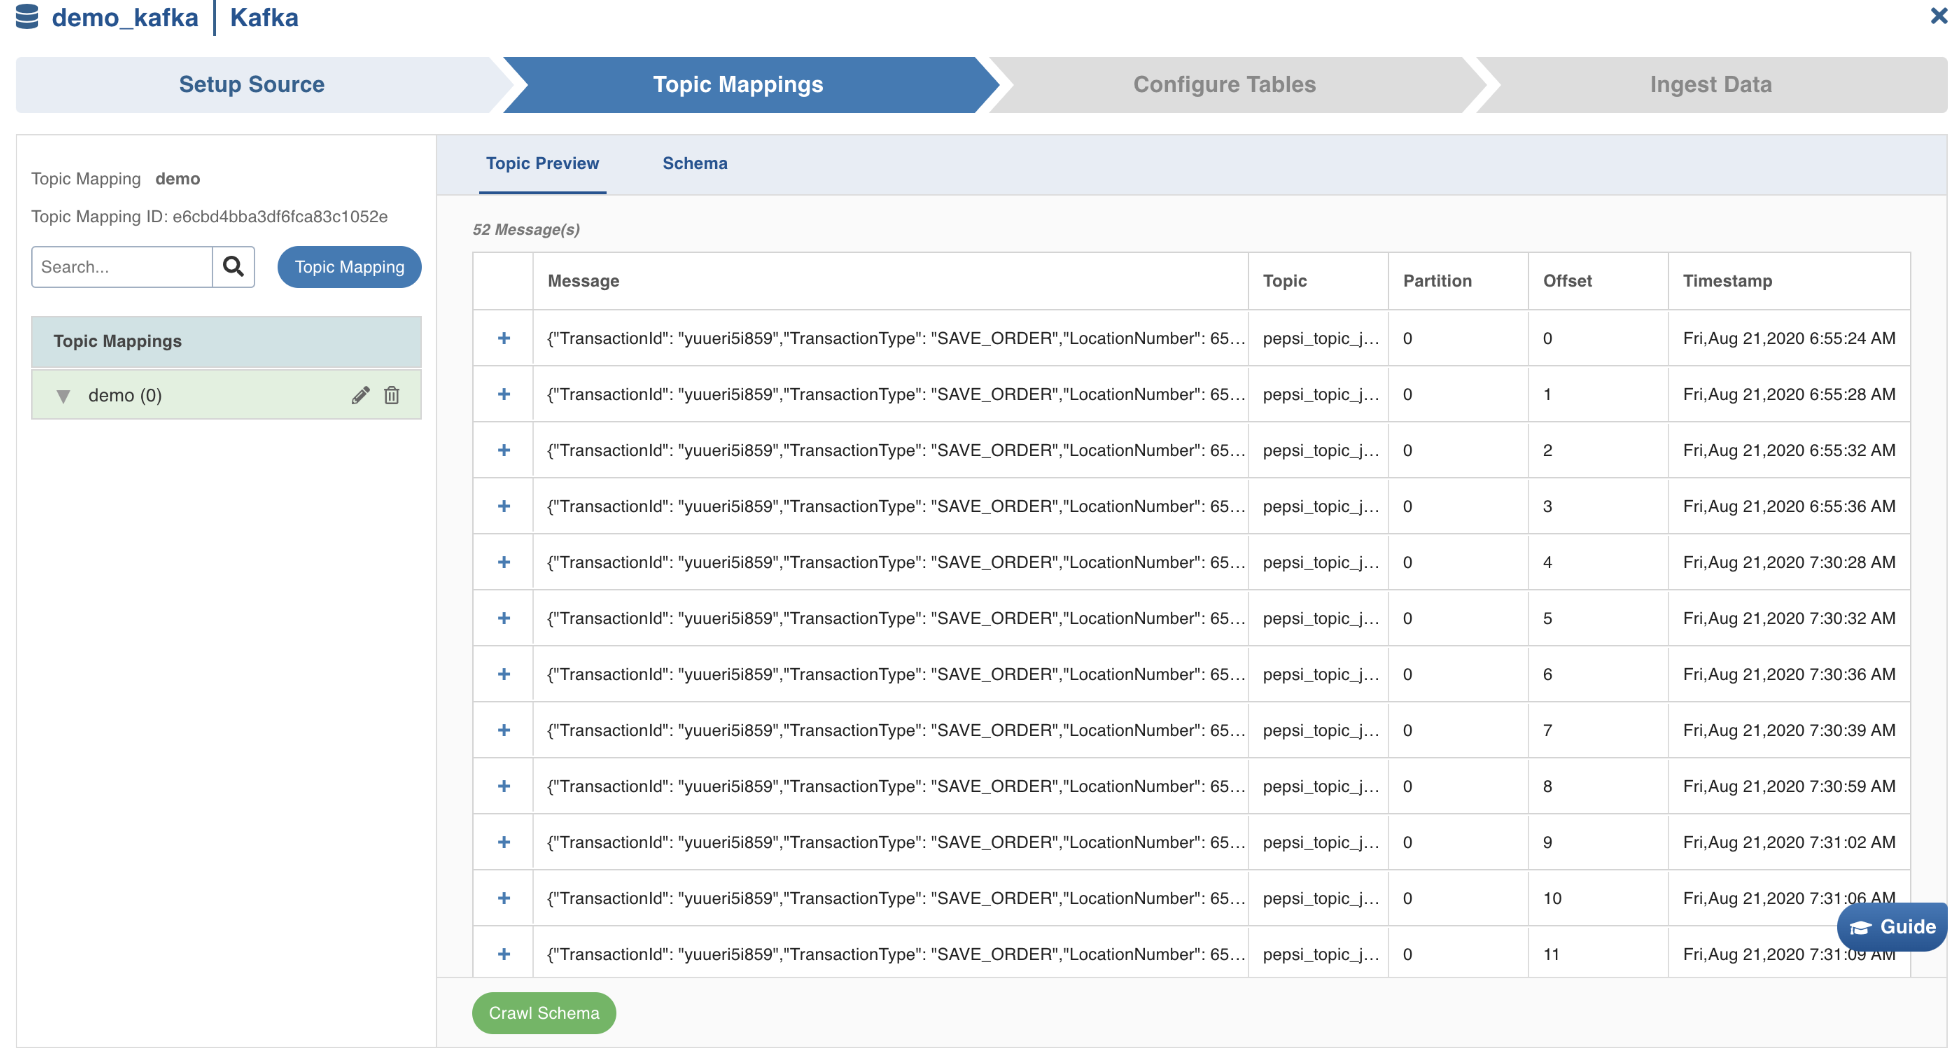
Click the + icon corresponding to every message displayed, to preview the content, and then click Crawl Schema button.
The maximum number of rows of messages for which preview can be made available can be configured in topic_preview_row_count parameter of the Advanced Configuration section. The default value is 100 rows.
In the topic preview, two views: Raw(displays the content as it is read) and Pretty(displays the content in a structured format) are available.
Note If the Topic Preview is not populated, please check the broker connection details under source configuration or check the list or regex entered in the Topics Mapping page.
Schema tab
Schema tab is then displayed as follows:
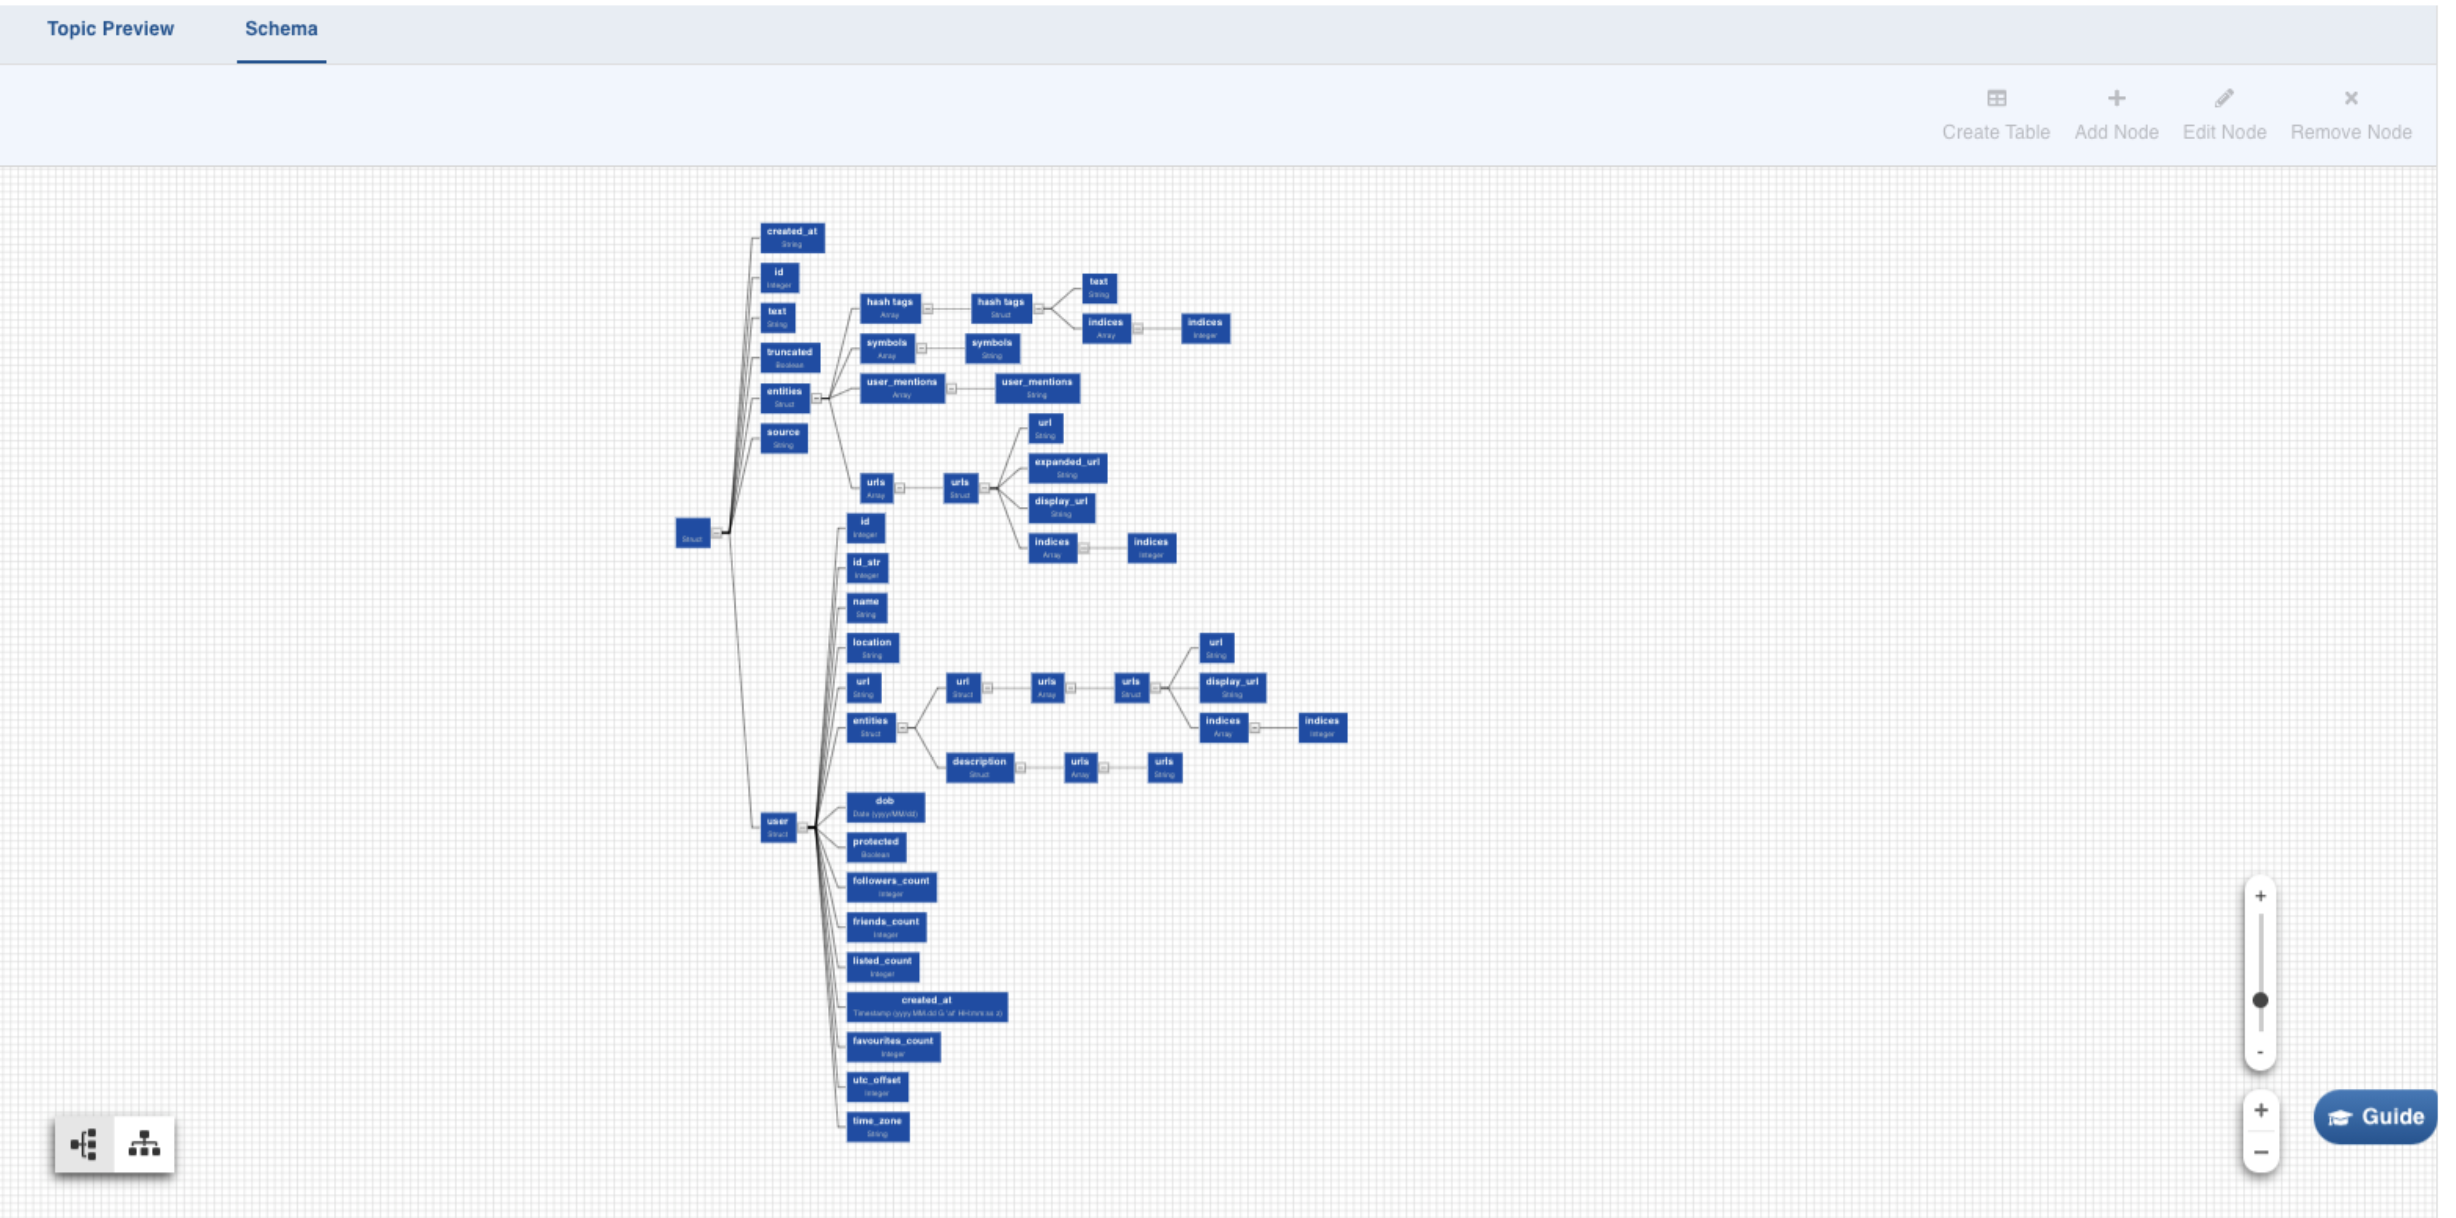
Select any path to create a table with the corresponding columns in it. Click on the Required Node. Further, you can also hold Shift key and click on multiple required nodes. The children nodes of all the parent nodes selected become table columns.
For example, If you select only the address in the example above, the table created will consist of four columns: street address, city, state and postal code.
To manage the nodes in the schema, you may use the Add Node, Edit Node, and Remove Node (same as name suggests) buttons on the top-right corner of the tab. To revert the edits in schema, recrawl it from the Topic Preview tab.
Click Create Table, to create the table with the selected nodes. The following window is displayed:
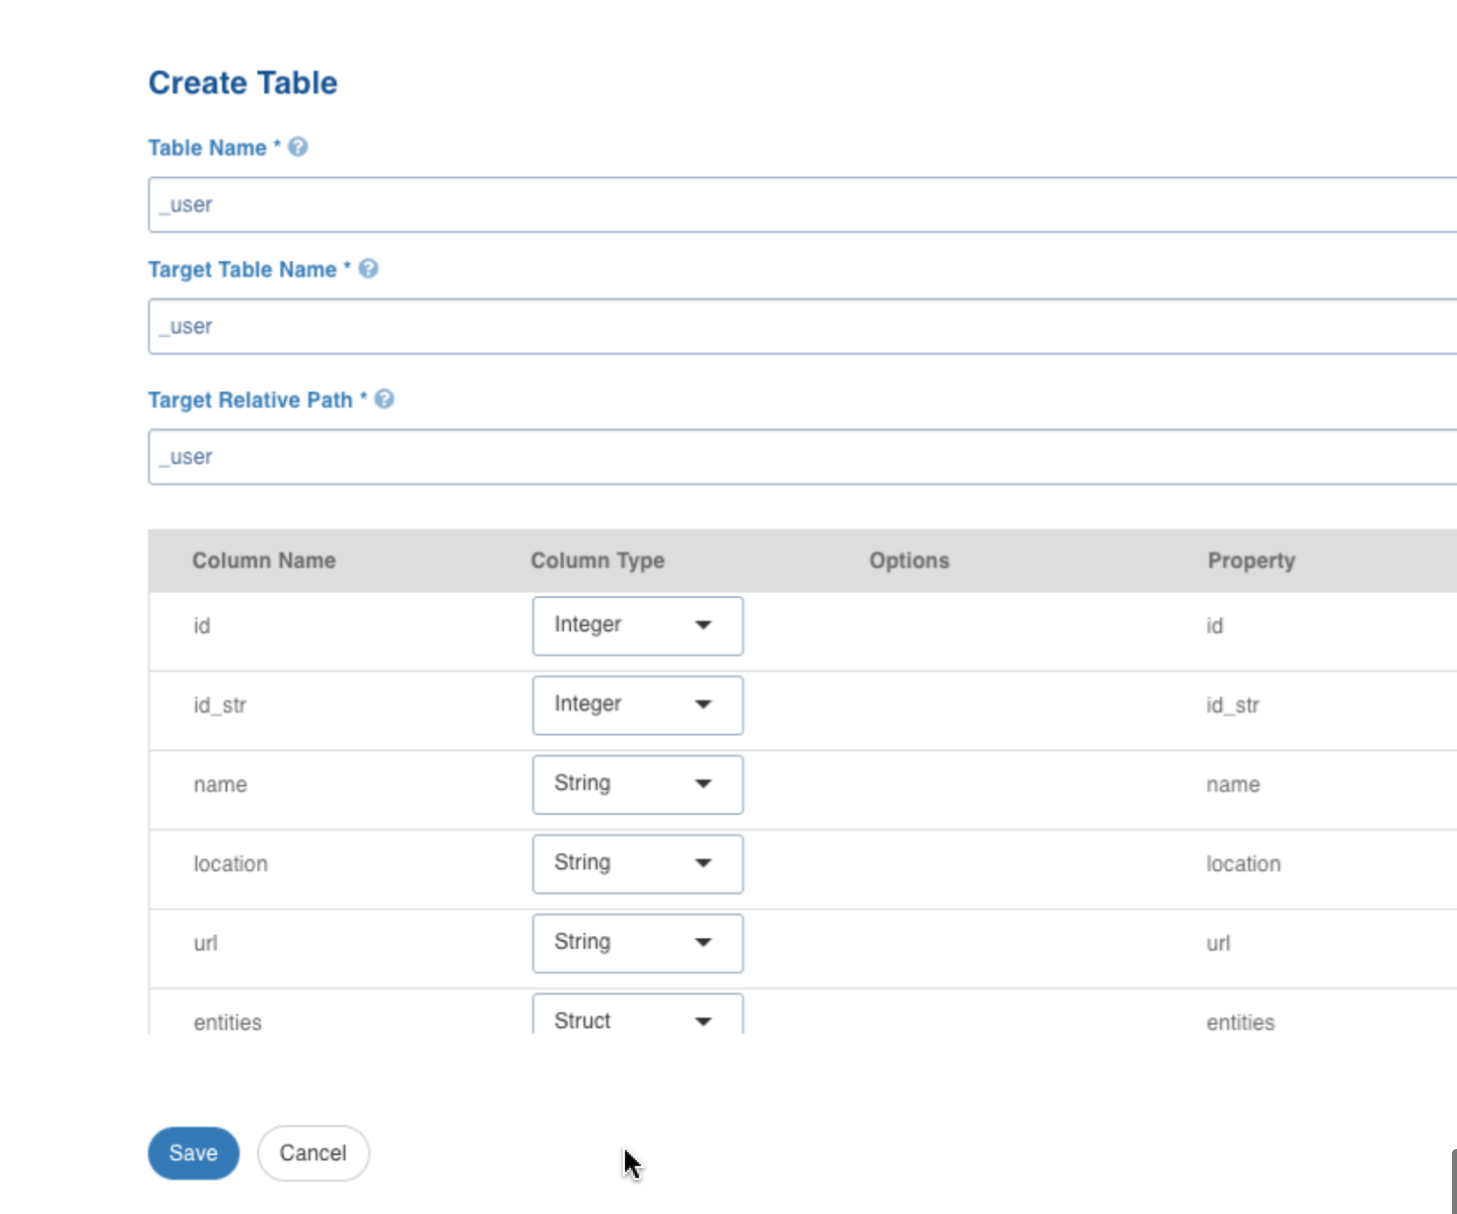
Create Table Field Description
Field | Description |
|---|---|
Table Name | Name for the table that is being configured, as required by the user. |
Target Table Name | Name for the target table to be created in the data lake. |
Target Relative Path | The target directory path (relative to the target base path) to store the crawled output. |
Note In case of CDW onboarding (Snowflake Environment) table names are converted to upper case once they are saved. In order to create tables with case sensitive names, please enter the table names within quotes.
After configuring the required details, click Save.
The left panel displays the list of the tables created. Click on the table name, to view/edit the table schema, and to view the sample data. Click the edit icon corresponding to the table name, to edit the table configuration.
Now, navigate to the Configure Tables tab.
Configure Synchronization
For configuring Kafka tables, select the required table, and then enter required details.
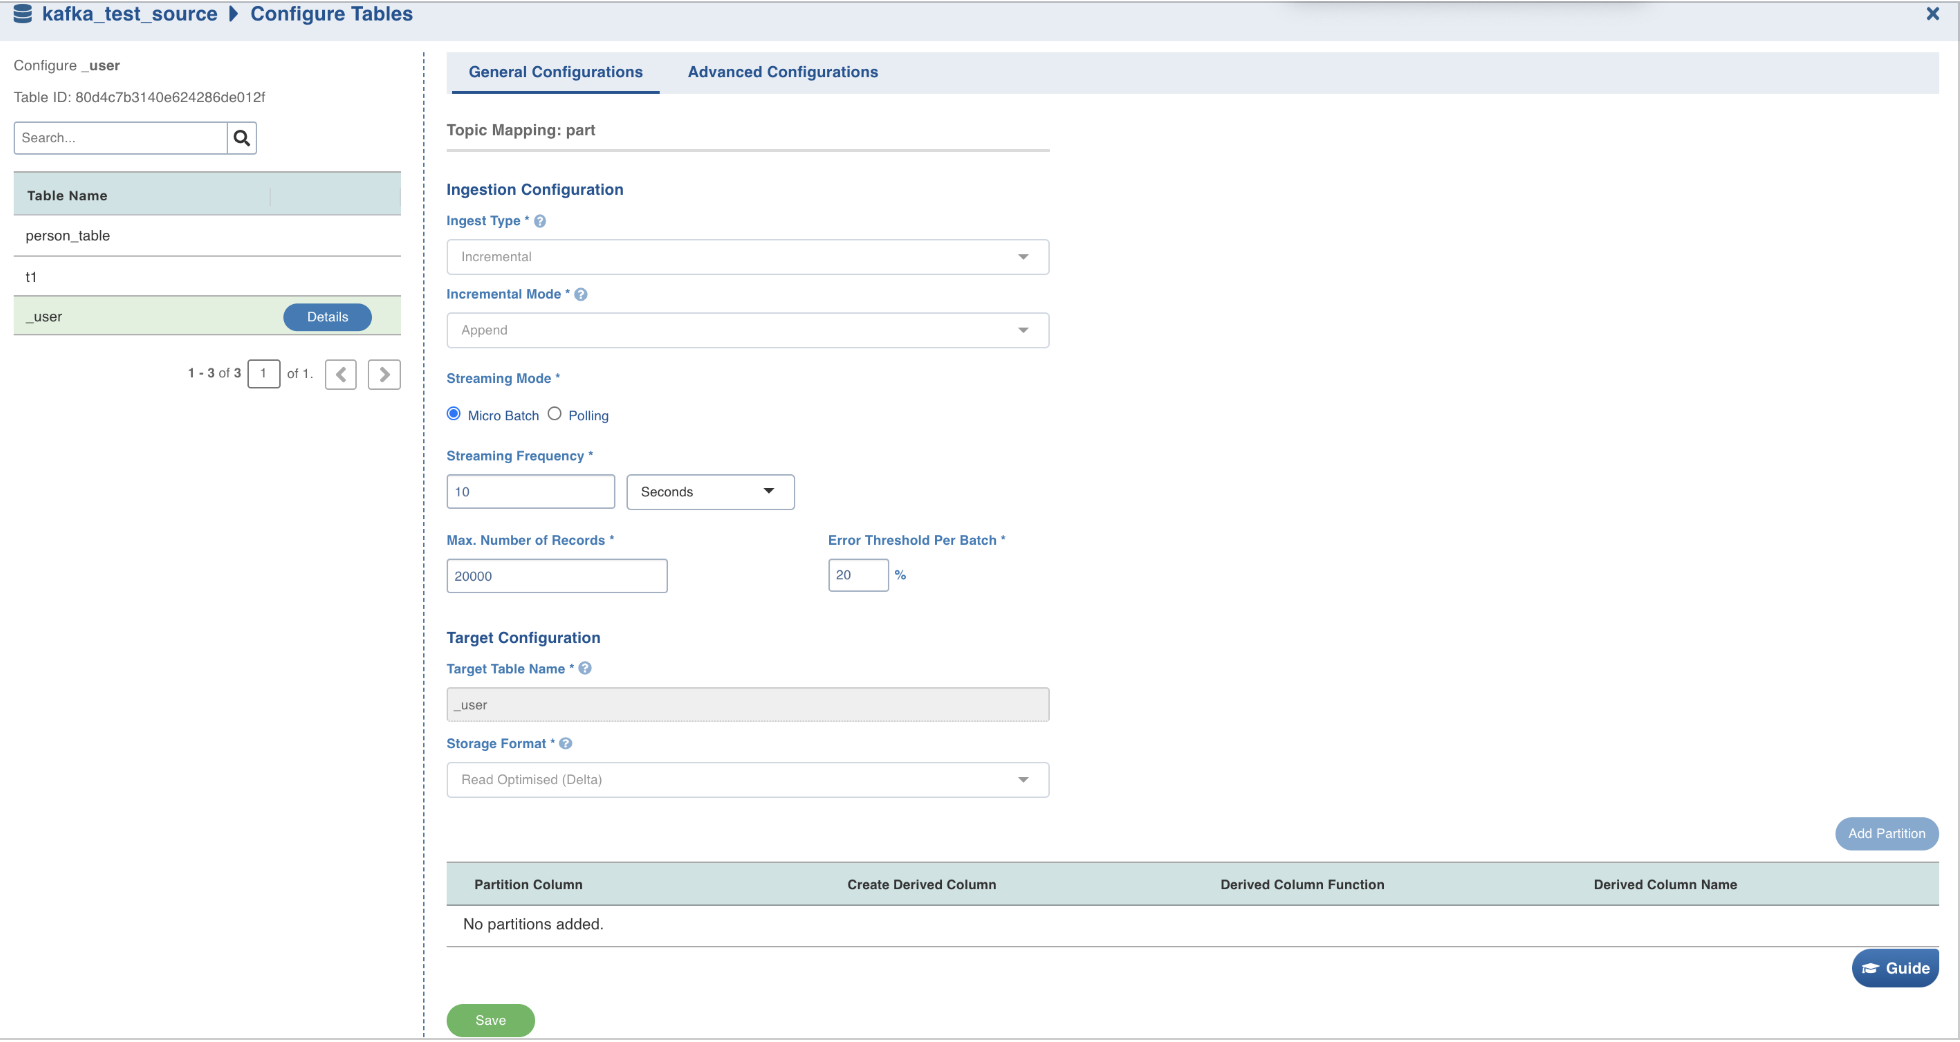
Configure Table Field Description
Field | Description |
|---|---|
Ingest Type | The type of synchronization for the table. The only available option is incremental. |
Incremental Mode | The option to indicate if the incremental data must be appended or merged to the base table. This field is displayed only for incremental ingestion. The available options are append and merge. |
Streaming Mode | There are two streaming mode available:Micro-batch processing: Reading data in small groups (batches) for processing. Micro batches are read at an interval specified under the Streaming Frequency field.Polling: This option allows near real-time processing of data. Here, the next set of micro-batch is read immediately after the first micro-batch is processed. |
Max. Number of Records | Maximum number of records that must be read in the batch. |
Error Threshold Per Batch | The percentage of threshold for error, beyond which the job shall fail. |
Merge Details
Enter the following fields under Merge Details.
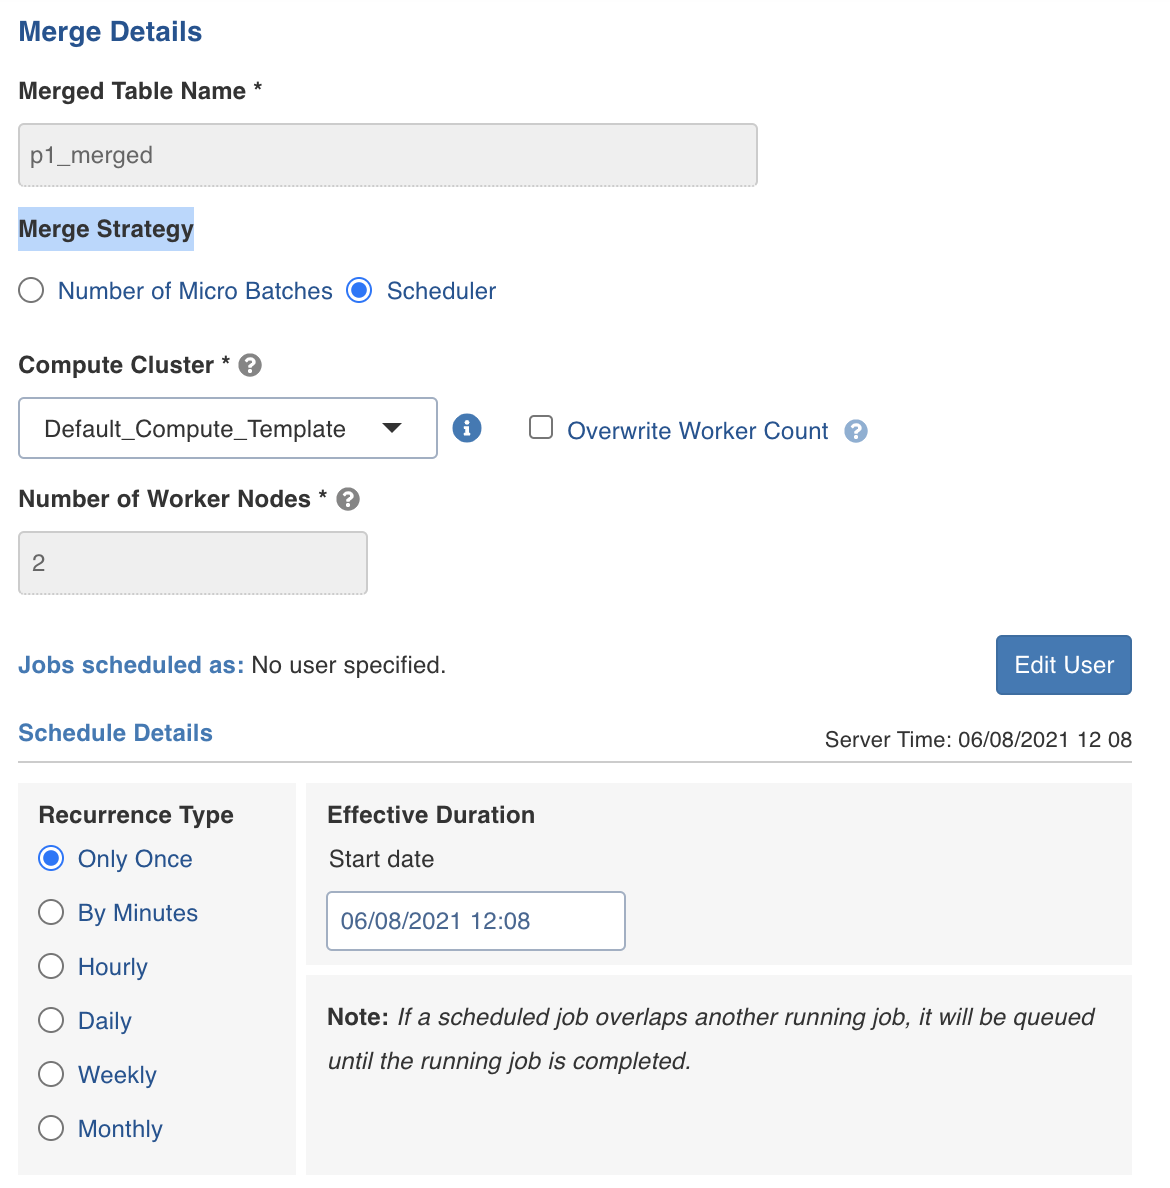
Merge Fields and Description | |
|---|---|
Field | Description |
Merged Table Name | Provide the table name for the table that is maintained separately from base table. This table includes no duplicate records. |
Merge Strategy | Includes the merge strategy. Number of Micro Batches denotes the number of micro batches processed during ingestion job after which the asynchronous merge operation must start. Scheduler denotes the pre-scheduled time when the asynchronous merge operation must occur. NOTE The Merge job under Number of Micro Batches strategy will trigger during ingestion job while Merge job using Scheduler will trigger a separate job. |
Compute Cluster | Denotes the same compute cluster that will be used for ingestion/streaming job. If Scheduler is selected under Merge strategy, then a different Compute cluster is used. |
Number of worker nodes | Denotes the number of worker nodes. |
Overwrite worker count | Denotes if the worker count is to be overwritten. |
Edit User
You can either edit the user details for the current user or a new user.
Select either Current User or Different User.
Enter the E-mail.
Enter the refresh Token available under My Profile -> Settings.
Click Save.
Schedule Details
If you select Scheduler under Merge details, then you can set the recurrence details as follows.
Recurrence Type: Select one of the following recurrence types. The default recurrence type is Daily.
Only Once
By minutes
Hourly
Daily
Weekly
Monthly
Effective duration: Enter the effective start date of the schedule.
NOTE If a scheduled job overlaps another running job, then it will be queued until the running job is completed.
For more information on table configuration, see Configuring a Table.
After configuring the required details, click Save to save the settings.
Target Configuration
Enter the following fields under Target Configuration.
Field | Description |
|---|---|
Target Table Name | The name of the target table created, if the incremental mode selected is Append. |
Database Name | The name of the target database. |
Schema Name | The schema name of the target table. |
Merged Table Name | The name of the merged table. This table is created only in case of Merge mode. This table has the de-duplicated data |
Table Name | The name of the target table maintained in Infoworks UI. |
Storage Format | The format in which the tables must be stored. The options include Read Optimized (Delta), Write Optimized (Avro), and Parquet. Note Selecting the storage format is not supported in Snowflake environments |
Partition Column | The column used to partition the data in target. Selecting the Create Derived Column option allows you to derive a column from the partition column. This option is enabled only if the partition column datatype is date or timestamp. Provide the Derived Column Function and Derived Column Name. Data will be partitioned based on this derived column. Click Add Partition to add a new partition. Note This is not supported in Snowflake environments. |
Adding a column to the table
After metadata crawl is complete, you have the flexibility to add a target column to the table.
Target Column refers to adding a target column if you need any special columns in the target table apart from what is present in that source.
You can select the datatype you want to give for the specific column
You can select either of the following transformation modes: Simple and Advanced
Simple Mode
In this mode, you must add a transformation function that has to be applied for that column. Target Column with no transformation function applied will have null values in the target.
Advanced Mode
In this mode, you can provide the Spark expression in this field. For more information, refer to Adding Transform Derivation.
NOTE When table is in ready state (already ingested), schema editing is disabled.
Onboard Data
Perform the following steps to onboard data from Kafka:
Click Onboard Data tab.
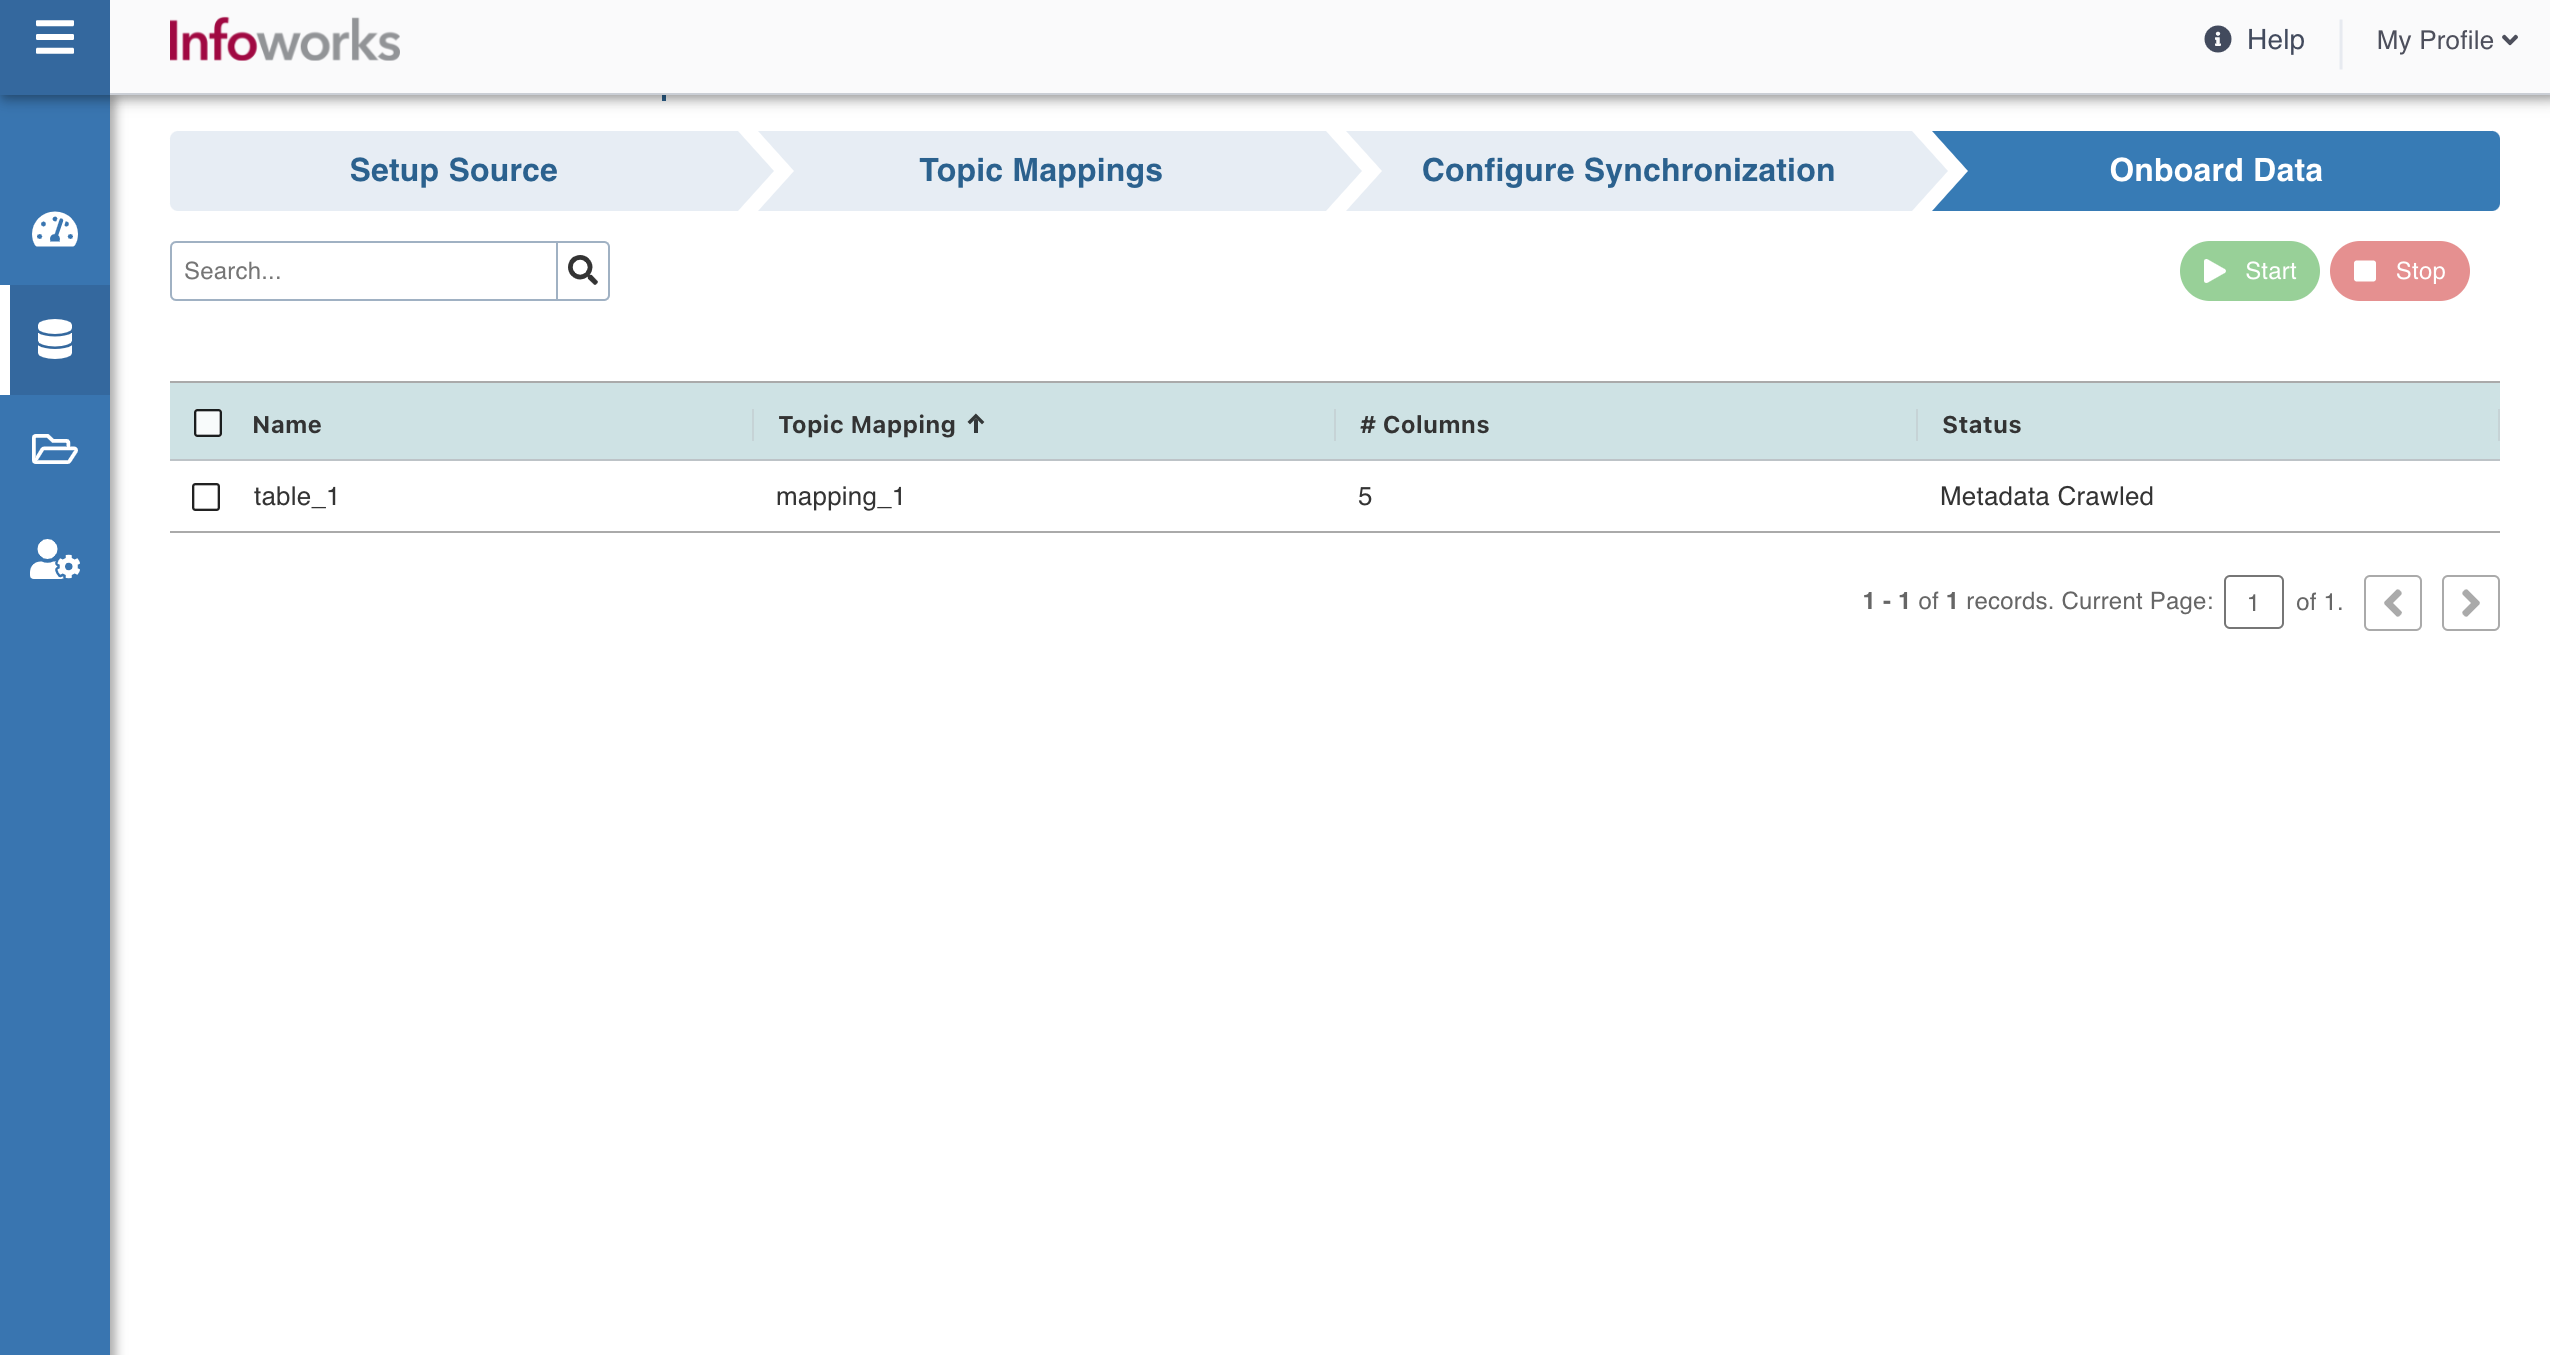
Select the required table(s), and then click Start to start streaming the data.
You may also stop the data streaming by clicking the Stop button. The Truncate button allows you to delete a table.
On clicking Start, the following window appears:
Fill in the required details and then click Ingest. Ensure that the cluster template setup is configured for your source. For more information on field values, see section in the topic.
The following window appears:

Click the Click here to track progress link to view the ingestion status. This takes a few minutes. On clicking the link, job status and summary is displayed on the tab.
Click the Ingestion metrics tab to view the in-details summary of the job. This tab is equipped with helpful filters.
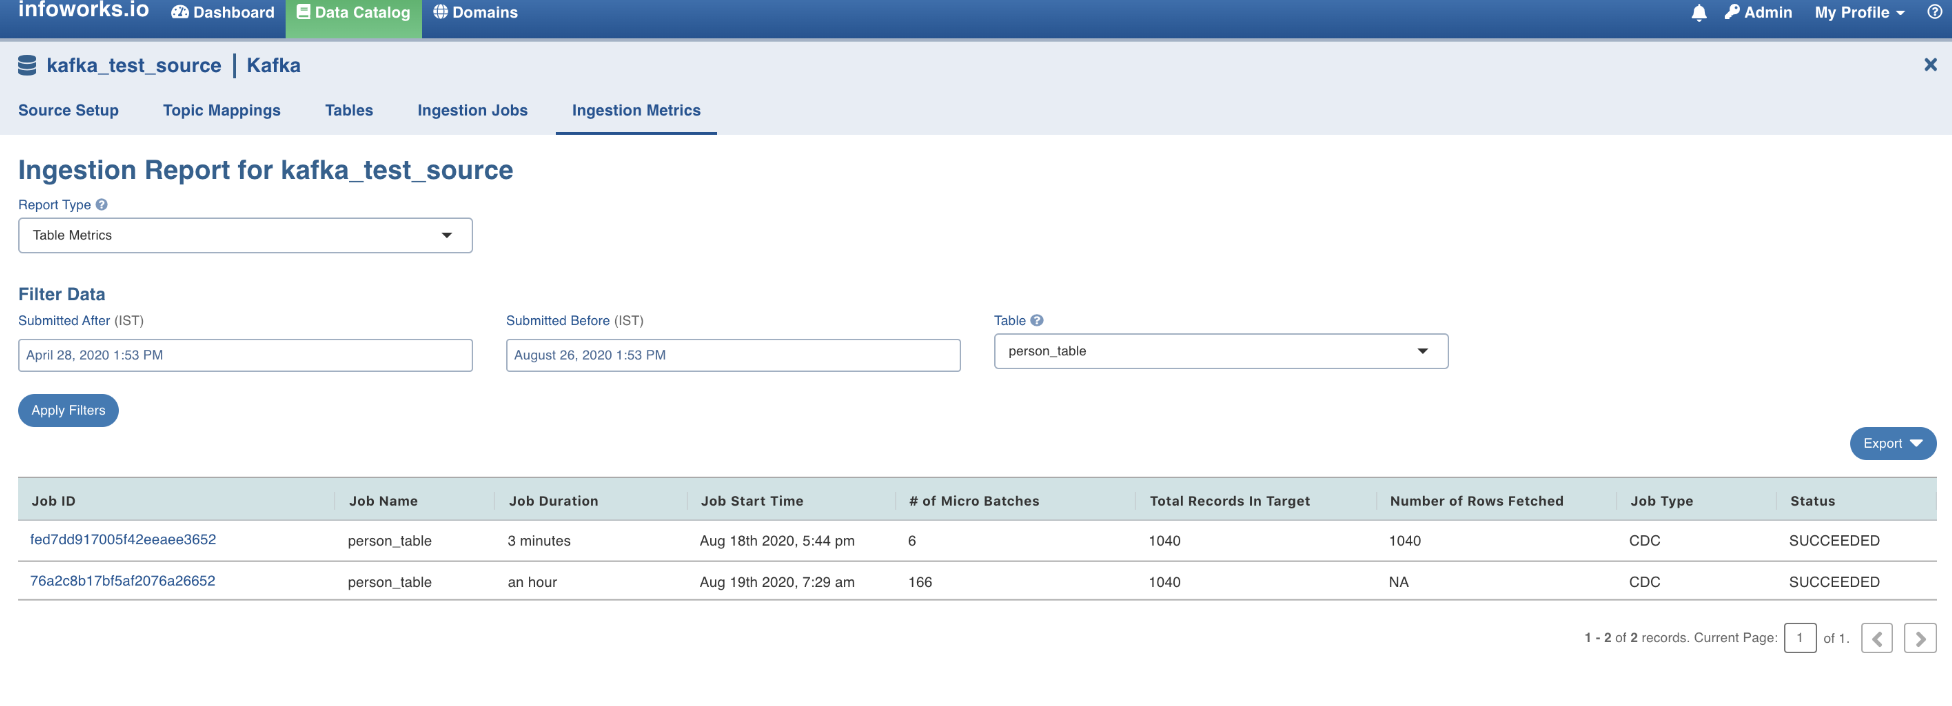
This summarises the complete Kafka ingestion process.
Configuration Migration
NOTE The configuration for the tables that are in ready state, will not be migrated.
For details on configuration migration process, see Configuration Migration
Advanced Configurations
Field | Configuration Level | Default Value | Description |
|---|---|---|---|
| table | null | This configures the desired minimum number of partitions to read from Kafka. By default, Spark has a 1-1 mapping of topic partitions to Spark partitions consuming from Kafka. |
| table | null | This configures the Kafka Group ID to be used in the Kafka consumer, while reading data from Kafka. By default, each query generates a UUID for reading data. |
| table | 10 | This configures the number of batches after which the optimize query will be run. |
| source | 100 | This configures the number of messages to be shown in the topic preview. |
kafka_consumer_num_retries | source | 5 | This configures the Kafka consumer retries for metacrawl. |
| source | 50 | This configures the threshold percentage for the meta crawl to fail. Meta crawl fails if the percentage of error records received is more than this configured value. |
| source | 50 | This configures the threshold percentage for the sample data to fail. Sample data fails if the percentage of error records received is more than this configured value. |
| table | FALSE | This configures whether the query must be failed when there is a possibility that the data is lost (For example, topics are deleted, or offsets are out of range). |
| table | 1000 | This configures that the data crawl fails if there are more error records than this configured limit, or more than successful records. |
| source | null | This configures the extra properties required (For example, SSL configuration). Value must be semicolon separated, in the following format: key=value pairs. For example: key1=value1;key2=value2;key3=value3 |
| table | earliest | This configures the start point for a query. The "earliest" option (default value) ingests all the messages from the beginning, "latest" option ingests the messages that are pushed to topic after the query has started (which are the latest messages). You can also add a custom offset.For more details refer here. |
For setting up advanced configuration, see Advanced Configurations.
Subscribers
For more information on subscribers, see Subscribers.
Limitations
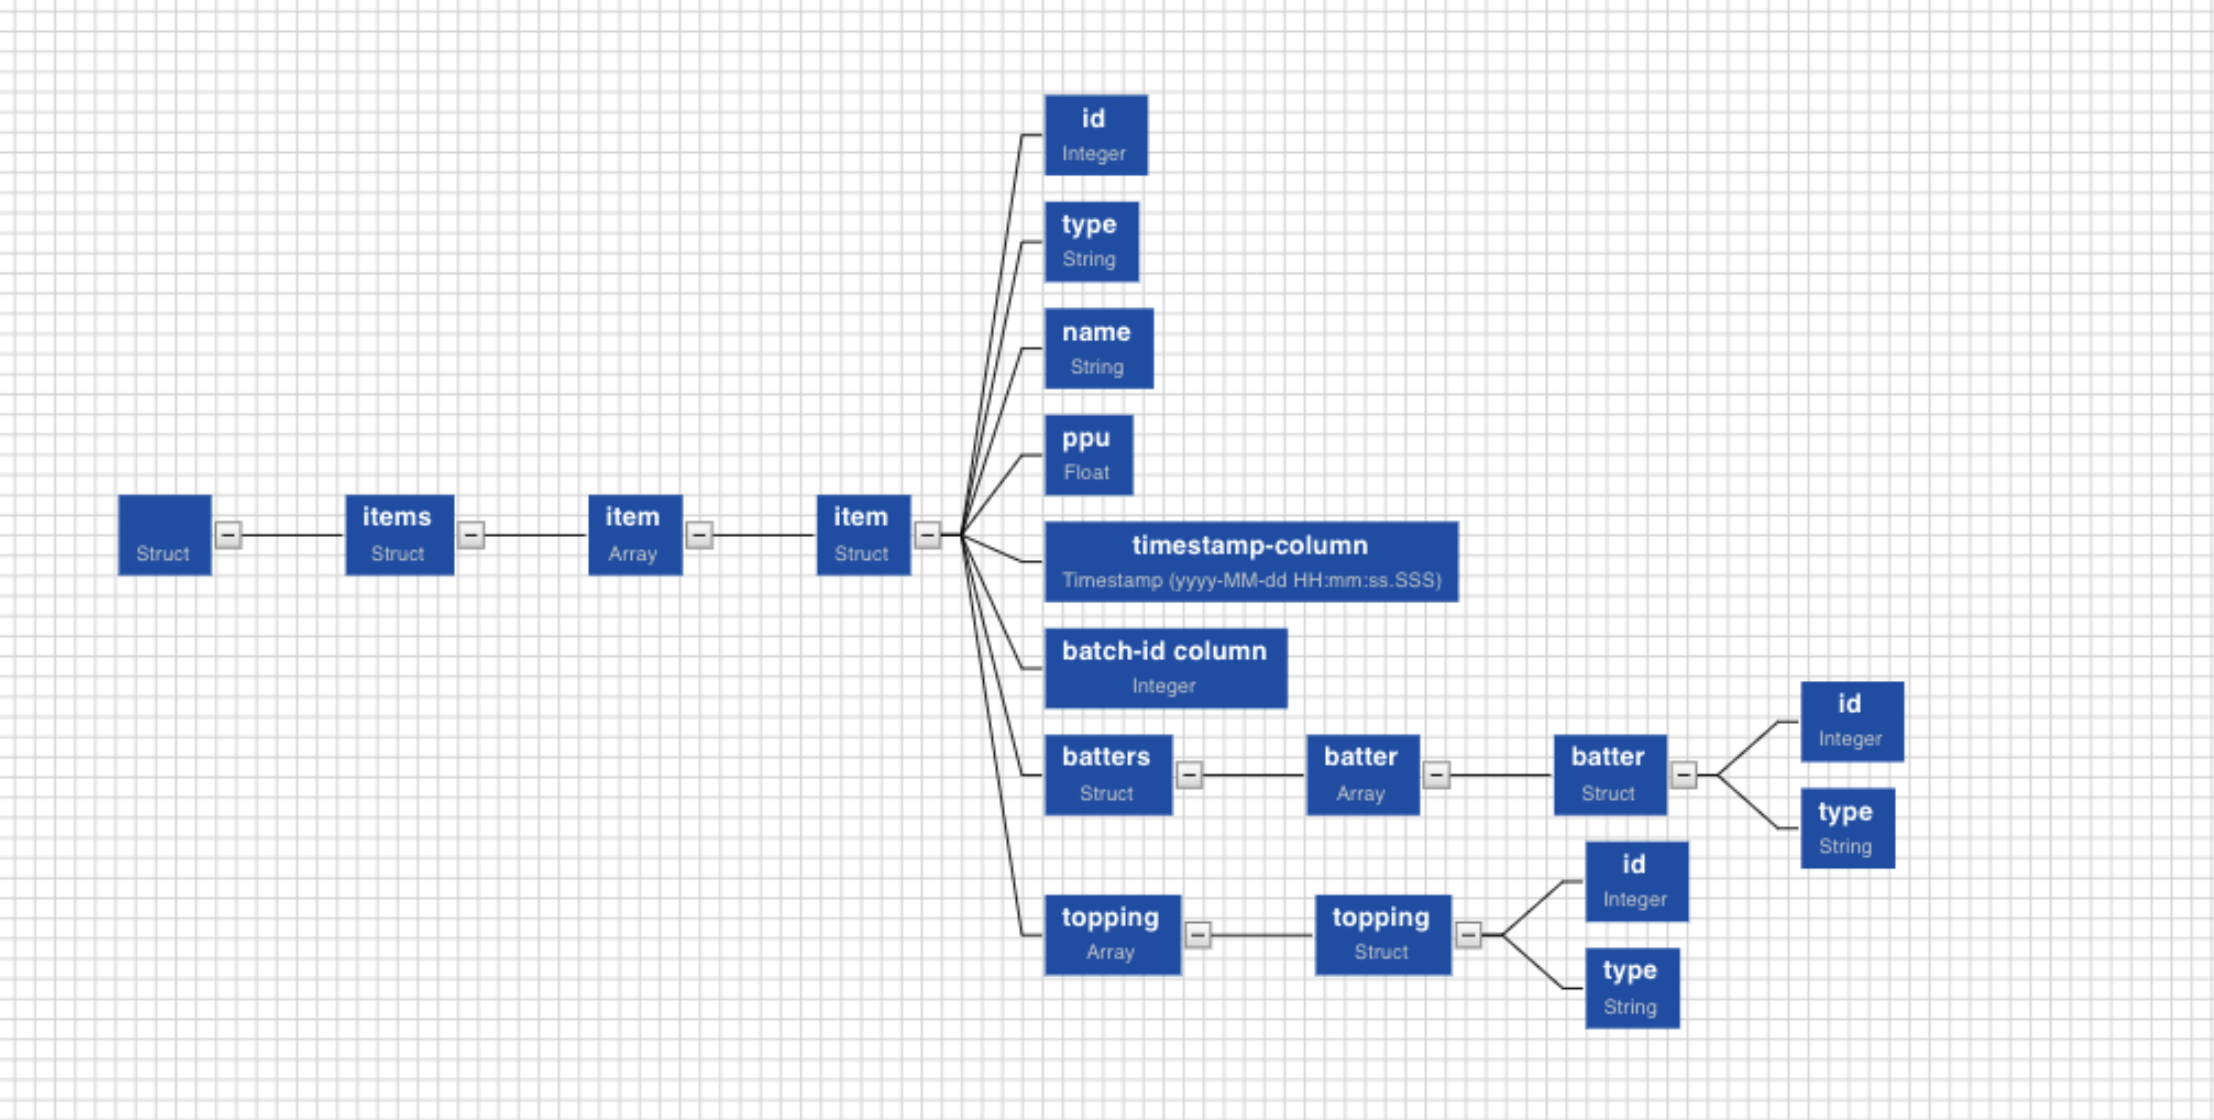
Non-struct nodes cannot be selected as the root element of the table. For example, nodes such as id, or type, cannot be selected to create tables.
Two different struct nodes which are not directly connected cannot be used to create table columns. For example, nodes such as item and batter, cannot be selected to create the same table.
Two struct nodes at the same level, cannot be selected to create the same table. For example, nodes such as batters and topping, cannot be selected to create the same table.