Overview
Infoworks supports authentication using the following three mechanisms.
- Default: This option is the Infoworks application based authentication where the user account details are stored in MongoDB and any user who tries to access the application is authenticated and authorized against that.
- LDAP Authentication: LDAP is an open, vendor-neutral, industry standard application protocol for accessing and maintaining distributed directory information service. It authenticates against Active Directory. An Active Directory is a Directory services implementation that provides all sorts of functionality like authentication, group and user management, policy administration and more.
- SAML Authentication: Security Assertion Markup Language (SAML) is an open standard that allows identity providers (IdP) to pass authorization credentials to service providers (SP). This enables SSO. SAML transactions use Extensible Markup Language (XML) for standardized communications between the identity provider and service providers
Configuring LDAP Authentication
Following are the steps to perform LDAP Authentication:
- Log in to the Infoworks with admin credentials.
- Click the Admin menu.
- Click the Configuration icon. Click the Authentication tab. The Authentication Configuration page is displayed.
- Select the authentication type as LDAP.
- Set the LDAP configurations parameters as mentioned below.
- Click Save Changes.
| Field | Description | Details |
|---|---|---|
| LDAP Connection Configurations | ||
| LDAP Host | The host on which the active directory/LDAP server is running. | Provide the host address. |
| LDAP Port | The port on which the server is running. | Provide the port address. |
| Use SSL | The option to determine if SSL should be used in the connection. | The server provided SSL certificates will be used without trust verification. |
| Bind User DN | The Distinguished Name for the user for binding to LDAP. | Provide the distinguished name of the user. |
| Bind User Password | The password for the user for binding to LDAP. | Provide the password of the user. |
| LDAP User Configurations | ||
| Base DN Users | The base Distinguished Name for all the users allowed for login into Infoworks platform. | |
| Login Attribute | The attribute in the active directory/LDAP which uniquely identifies a user. | |
| Fullname Attribute | A comma-separated list of attributes which forms the full name of the user. The full name on the Infoworks User Interface displays all the attribute values separated by space. | |
| Email Attribute | The attribute to specify the email address of the user. | |
| Role Attribute | The attribute to determine the system role in Infoworks for the user. | |
| Role Value Separator | The character used to separate the role attribute value specified in LDAP into multiple roles in the Infoworks. For example, if in LDAP the role attribute is Title and the values are admin, data modeller, then the Role Value Separator must be specified as, (comma). | |
| Infoworks Login Screen Hint | The message displayed when logging in to the Infoworks with LDAP credentials. | |
| LDAP Roles Configurations | ||
| System Admin | A semi colon-separated list of attribute values. User will be assigned the System Admin role if any one of the values match the value in the active directory. | |
| Database Admin | A semi colon-separated list of attribute values. User will be assigned the Database Admin role if any one of the values match the value in the active directory. | |
| Data Analyst | A semi colon-separated list of attribute values. User will be assigned the Data Analyst role if any one of the values match the value in the active directory. | |
| Data Modeller | A semi colon-separated list of attribute values. User will be assigned the Data Modeller role if any one of the values match the value in the active directory. | |
| Operations Analyst | A semi colon-separated list of attribute values. User will be assigned the Operations Analyst role if any one of the values match the value in the active directory. |
- Infoworks UI and Platform services, Rest API service must be restarted after setting the Authentication Type to LDAP.
- You must login through the Infoworks at least once to use the REST API service. This holds true for default, LDAP and SAML authentication mechanism.
Securing Services with SSL
To enable SSL communication for services which include Ingestion services, Platform services, Governor, Configuration, DT, Monitoring, UI and Rest API, perform the following steps:
- Navigate to Nginx configuration directory using the following command:
cd ${IW_HOME}/resources/nginx-portable/conf/infoworks - Run the following command to open
platform.conf.templatefile for editing:vi platform.conf.template
The structure of the template file will be as follows:
- Add the string ssl after the proxy_server_port as follows:
listen $ {PROXY_SERVER_PORT} ssl; - Add the respective ssl certificate key path and certificate file path as described below:
Step 1: Uncomment # ssl_certificate /etc/nginx/ssl/infoworks_ssl.crt;.
Step 2: Update it to ssl_certificate <path-to-certificate>/infoworks_ssl.crt; , where path-to-certificate is your respective path to the generated certificate file.
Step 3: Uncomment # ssl_certificate_key /etc/nginx/ssl/infoworks_ssl.key;.
Step 4: Update it to ssl_certificate_key <path-to-certificate>/infoworks_ssl.key;,where path-to-certificate is your respective path to the generated certificate file.
Step 5: Update the conf.properties file by changing the key: proxy_server_scheme=https
Step 6: Add proxy_server_port=433 in the conf.properties file.
Step 7: Restart all Infoworks services using the following commands:
cd ${IW_HOME}/bin
$IW_HOME/bin/stop.sh all mongo
$IW_HOME/bin/start.sh mongo all
Configuring SAML Authentication
Prerequisites
Ensure to register Infoworks with the identity provider. For example, for integrating Infoworks with OKTA, follow the steps mentioned here.
Following are the steps to perform SAML Authentication:
- Log in to the Infoworks with admin credentials.
- Click the Admin menu.
- Click the Configuration icon. Click the Authentication tab. The Authentication Configuration page is displayed.
- Select the authentication type as SAML.
- Set the SAML configurations parameters as mentioned below.
- Click Save Changes.
| Field | Description |
|---|---|
| SAML Connection Configurations | |
| SAML Provider | The Identity Provider that verifies the identity of the user, in response to a request by the Service Provider, in this case Infoworks. The options include Azure and Okta. |
| Assertion Consumer Service URL | The ACS URL is an endpoint of the service provider that is responsible for receiving and parsing a SAML assertion. In the Okta SAML template, this is entered in the Single Sign on URL field. Though Okta supports HTTP Endpoint for ACS URL, it is recommended to enable SSL service on Infoworks to enable an HTTPS endpoint for the ACS URL as it will be used to transfer Personally Identifiable Information (PII). For example: https://<Infoworks IP address or DNS>/auth/saml or http://<Infoworks IP address or DNS>:3000/auth/saml |
| Service Provider Entity Identifier | A unique identifier for a SAML entity. A SAML entity can be a Service Provider or an Identity Provider. As a Service Provider, you define your Entity ID. When setting up your account with the Identity Provider, you must specify the Entity ID, which must be unique within the IdP so that the IdP can identify your Service Provider. <Infoworks ID> In case of OKTA, this value needs to be entered in the Audience URI field. |
| Entity Descriptor XML | Entity Descriptor is a document that describes features of a SAML entity. It’s a way through which a party reveals it’s own id (entityID), roles (SP and IDP features), exact locations it communicates trough, it’s certificate which other parties use to verify it’s message signatures and for encryption, as well as some other details. You can choose to upload a file , by selecting the "Upload File" option or provide a location of the file by entering the complete path of the file location on the server. To retrieve the entity descriptor XML on Okta, navigate to the configured Okta application, click the Sign on tab and scroll down to select Actions in SAML signing certificates. Click View Idp Metadata and save the XML content as a file. Upload this file using Infoworks UI or declare the file location path on the Infoworks instance. |
| SAML User Configurations | To view examples, refer to User Configuration Examples in OKTA |
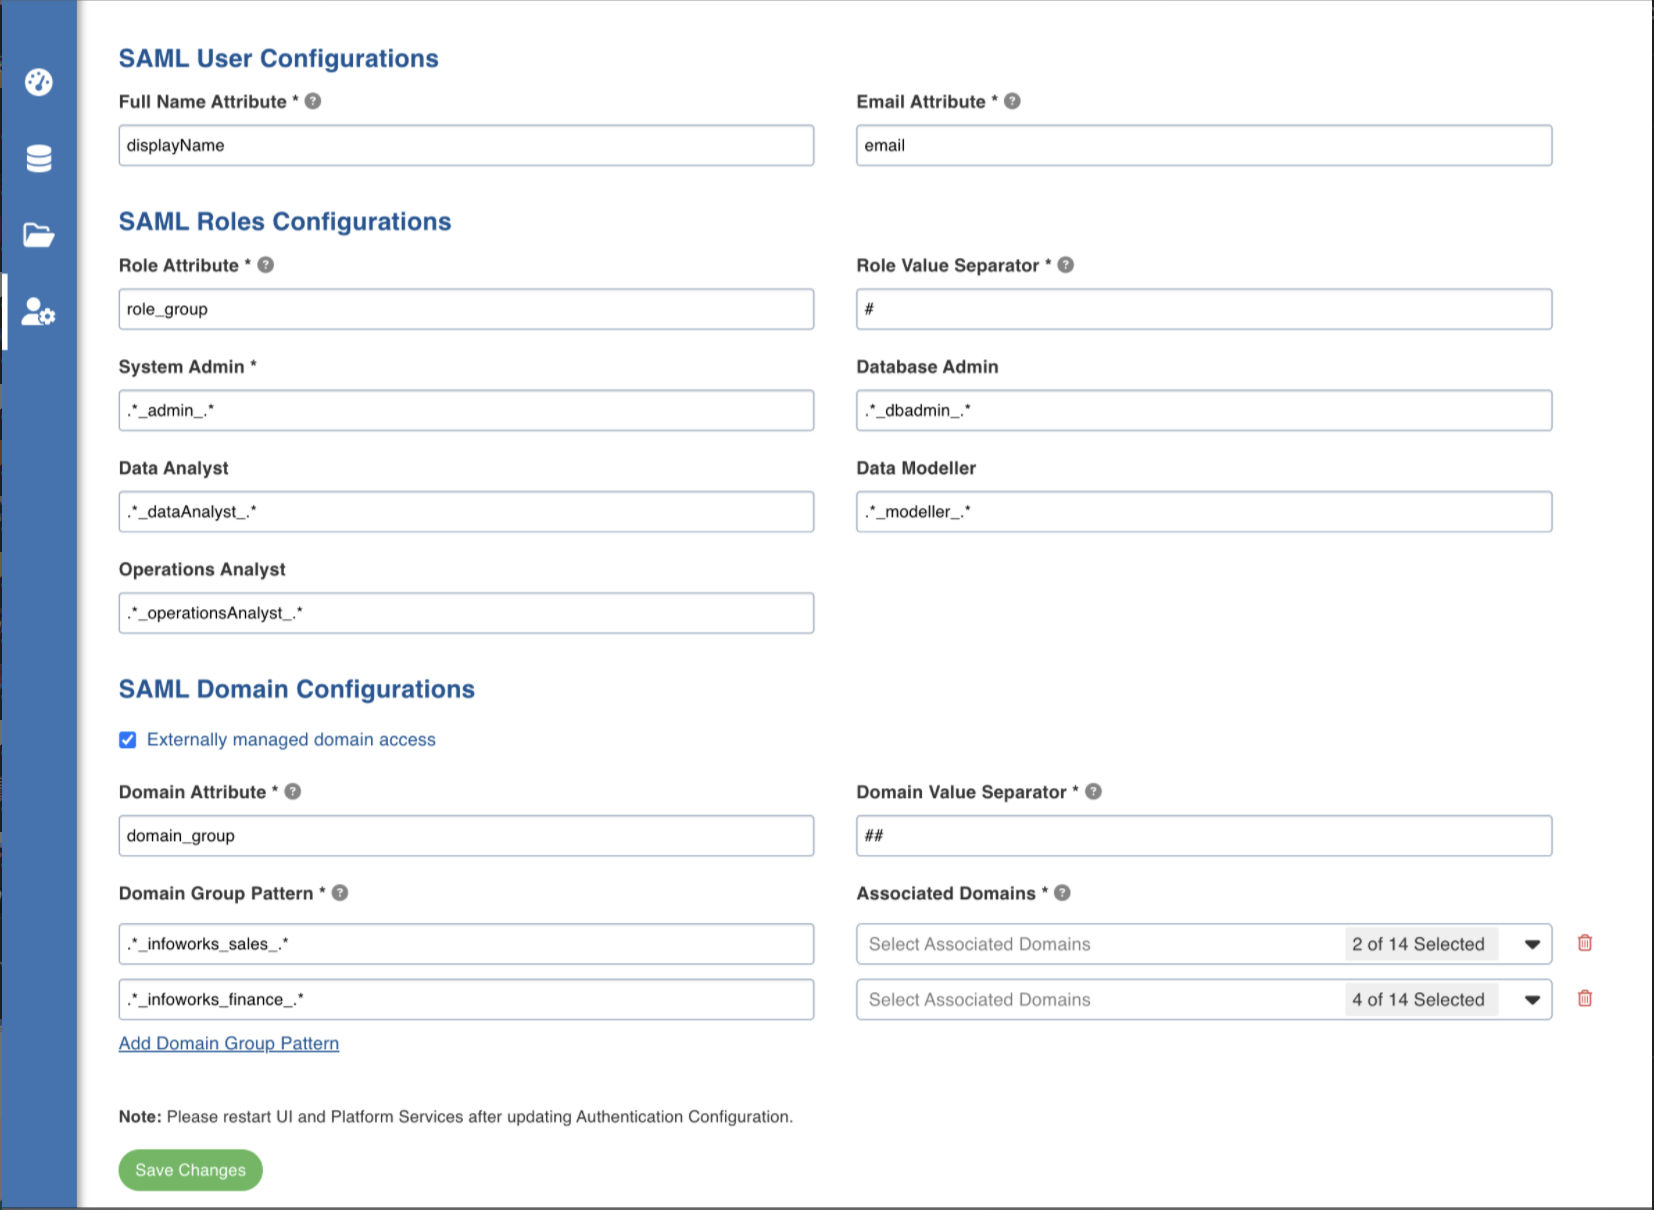
| Full Name Attribute | A comma-separated list of attributes which forms the full name of the user. The full name on the Infoworks User Interface displays all the attribute values separated by space. For example, firstname,lastname. |
| Email Attribute | The attribute to specify the email address of the user. |
| SAML Roles Configuration | To view examples, refer to User Configuration Examples in OKTA |
| Role Attribute | The attribute to determine the system role in Infoworks for the user. |
| Role Value Separator | The character used to separate the role attribute value specified in IdP into multiple roles in the Infoworks. For example, if in IdP the role attribute is Title and the values are admin, data modeller, then the Role Value Separator must be specified as, (comma). |
| System Admin | A semi colon-separated list of attribute values or patterns. User will be assigned the System Admin role if any one of the values match the value in the active directory. |
| Database Admin | A semi colon-separated list of attribute values or patterns. User will be assigned the Database Admin role if any one of the values match the value in the active directory. |
| Data Analyst | A semi colon-separated list of attribute values or patterns. User will be assigned the Data Analyst role if any one of the values match the value in the active directory. |
| Data Modeller | A semi colon-separated list of attribute values or patterns. User will be assigned the Data Modeller role if any one of the values match the value in the active directory. |
| Operations Analyst | A semi colon-separated list of attribute values or patterns. User will be assigned the Operations Analyst role if any one of the values match the value in the active directory. |
| SAML Domain Configurations | |
| Externally managed domain access | This checkbox enables/disables SAML Control domain assignment to the user. |
| Domain Attribute | The attribute to determine the domain group in Infoworks for the user. |
| Domain Value Separator | The character used to separate the domain group attribute value specified in IdP into multiple domain groups in the Infoworks. For example, if in IdP, the domain group attribute is organization and the values are sales, revenue, then the domain group Value Separator must be specified as, (comma). |
| Domain Group Pattern | This field contains the pattern that will be matched against the domain group of the user. |
| Associated Domains | This field contains the list of domains that will be assigned to the user in case the Domain Group Pattern matches against any of the domain groups of the user. |
User Configuration Examples in OKTA
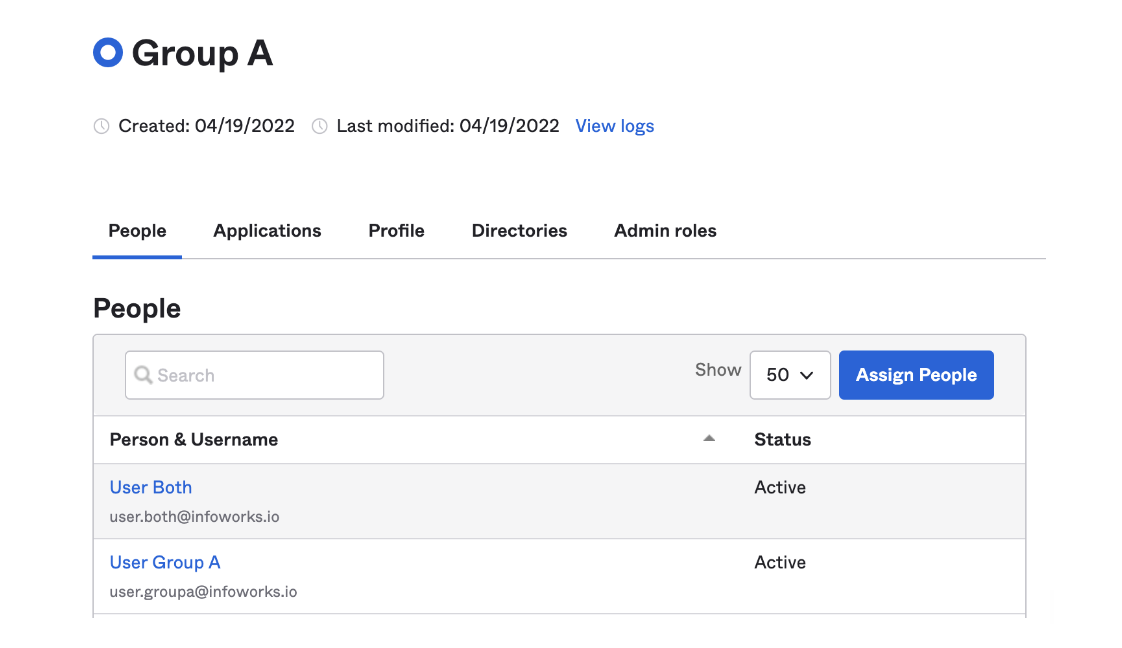
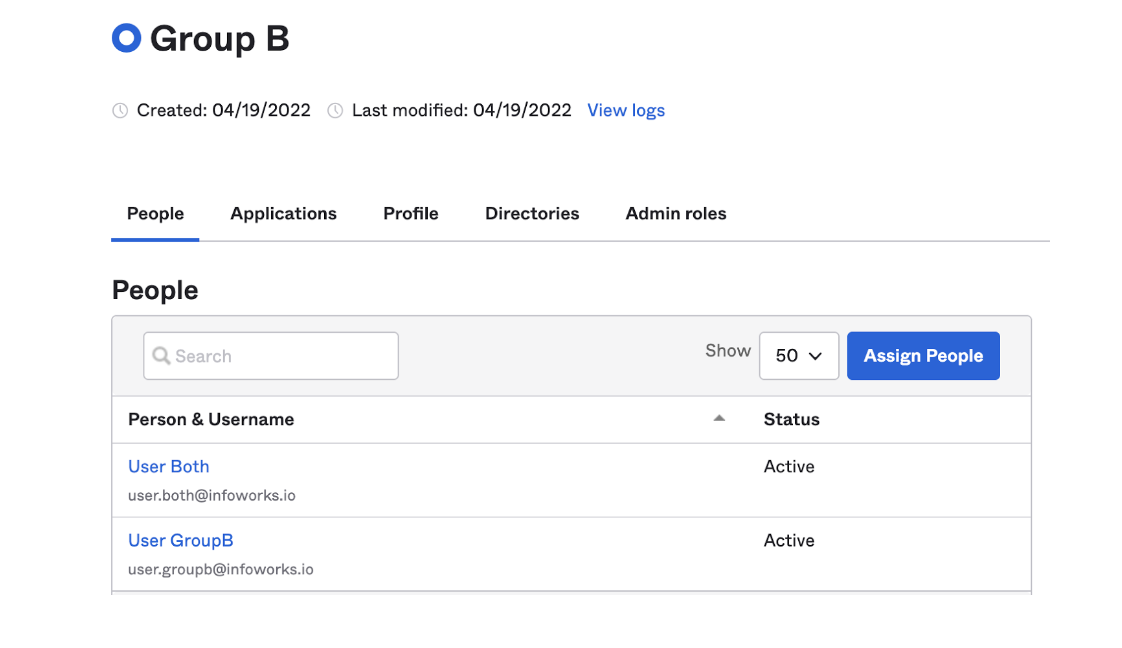
This setup shows four users, User Group A, User Group B, User Both, and User Neither. The screenshots below shows that User Both belongs to both Group A and Group B, and User Neither doesn’t belong to either.
Groups that Directly Match Roles
If the groups directly match roles that you wish to assign the user, you can use the GROUP ATTRIBUTE STATEMENTS area provided in Okta.
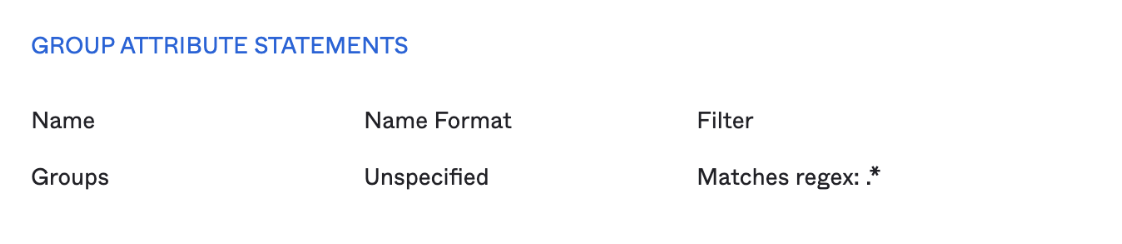
The below statement gives the attribute “Groups” which contains all the groups that the user belongs to and are assigned to this application in Okta.
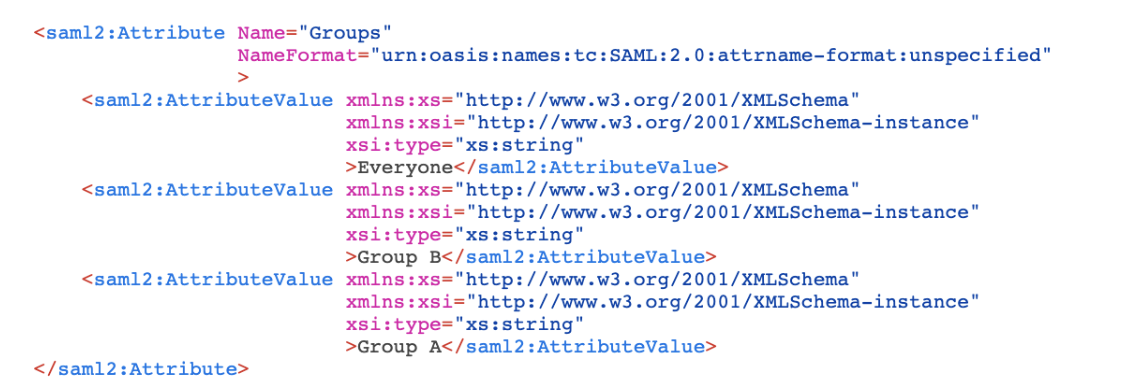
Given below are the values received for “User Both”:
Based on the above configuration, User Group A, User Group B, and User Both are assigned with the following roles:
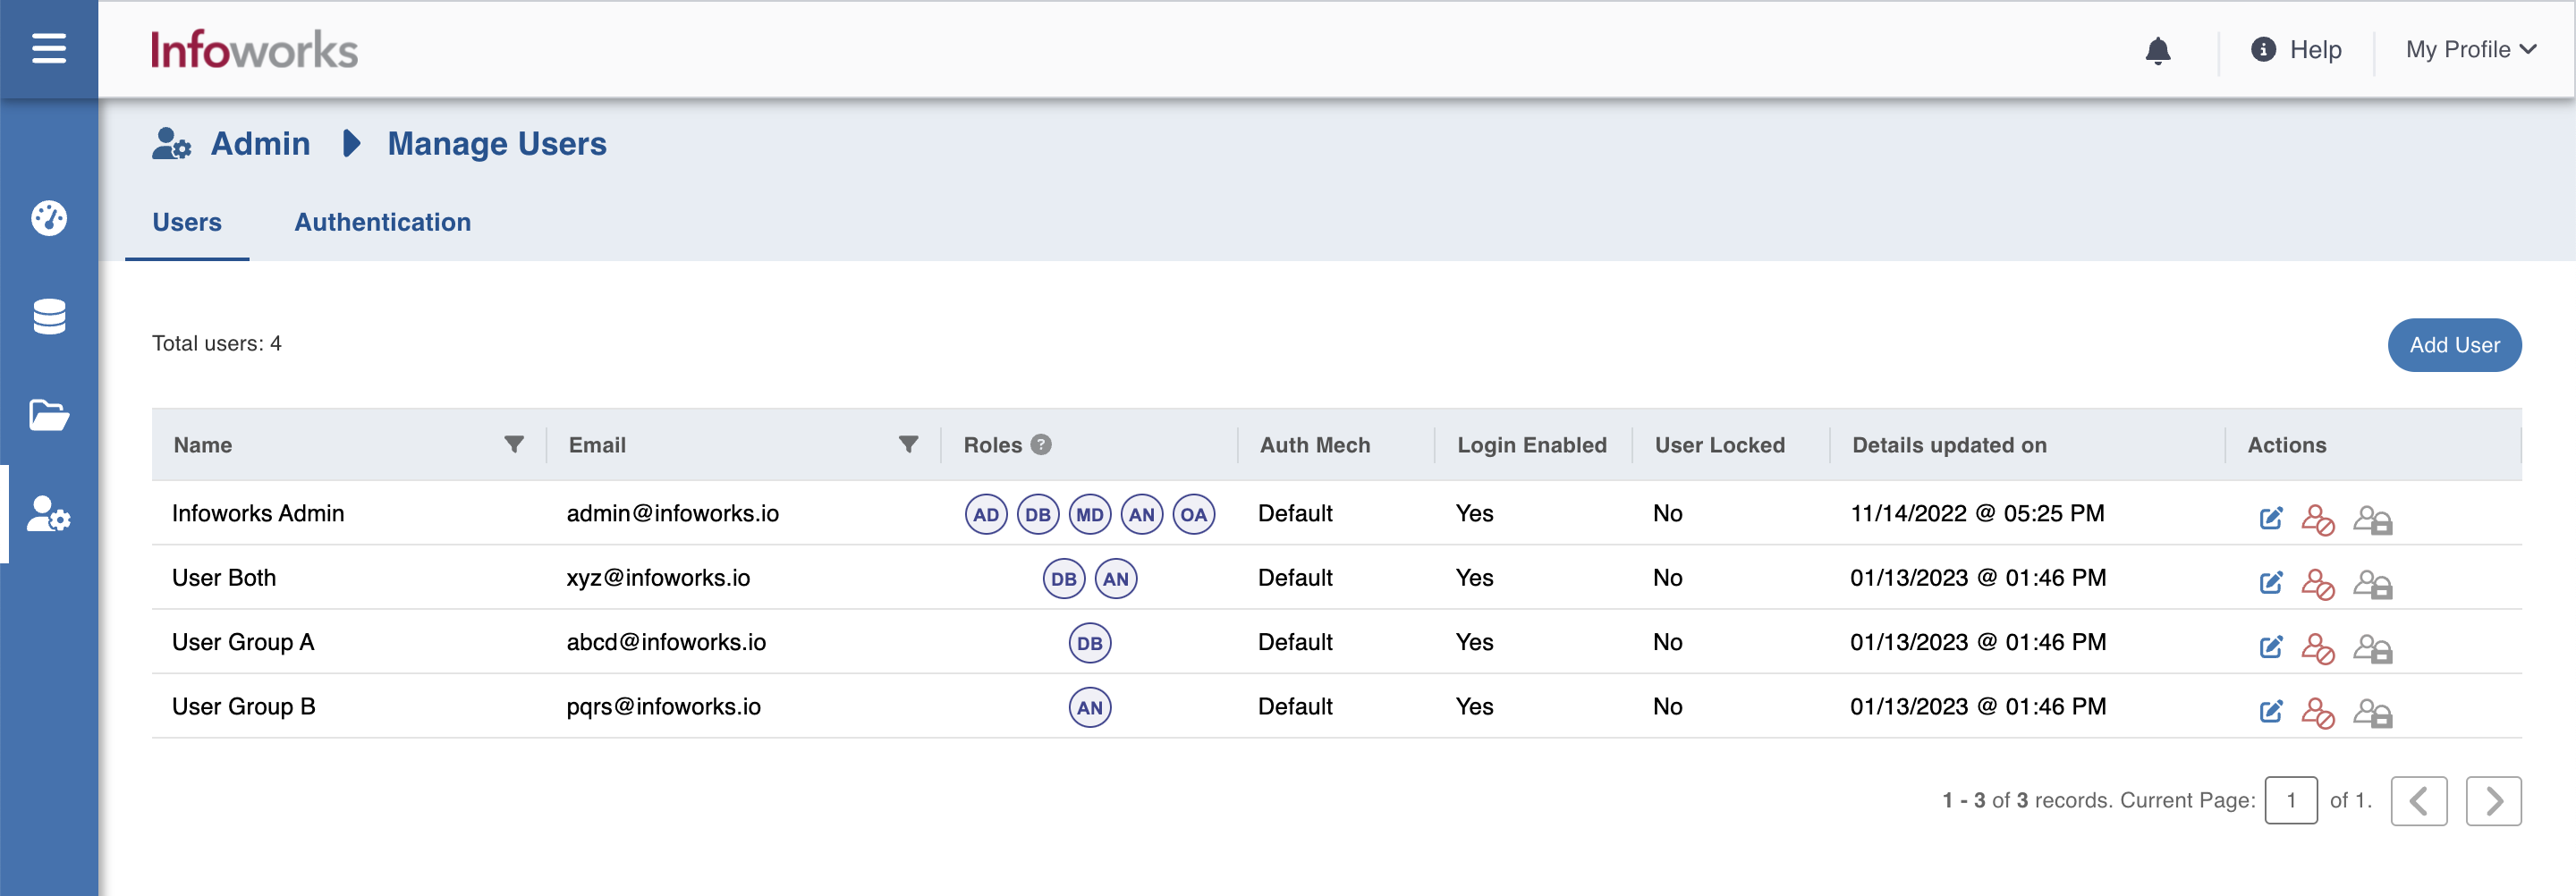
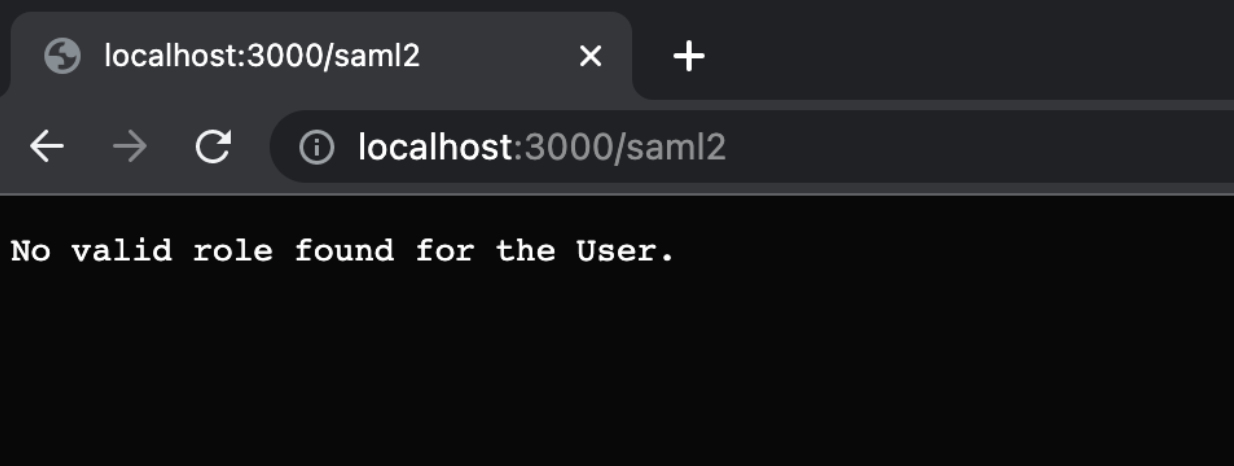
Note that none of the users are assigned to Admin role as the value of Group C does not match any of the groups that the users have. User Both gets DBAdmin and Analyst roles as he has groups matching the values input in those roles. User Neither is not assigned any role as he does not have any group values matching any of those that are specified in the roles. If you try to sign in with that user, you tend to get the following error:
Multi Group Combination in Okta With Combinations of Group Belongings
If you do not wish to directly match the group values to Role Inputs, you can manipulate the values or add new ones entirely or substitute them depending on your requirements. The following example shows how an AND condition is achieved, that is, a user is assigned with Admin role if they belong to two groups simultaneously.
The attribute custom is comma separated string of all the groups that the user belongs to as well as including “Both” or “Neither” based on whether a user belongs to both Group A and Group B or neither of them.
It is defined in the User Attribute in Okta with the following Expression (The Alphanumeric strings are All Group Ids to scan the user’s groups against):
Arrays.toCsvString(getFilteredGroups({"00g4qf335wjjqgxzh5d7", "00g4qf43leVm18RDH5d7", "00g7cbjxtIIEMiBRa5d6"}, "group.name", 50)) + (isMemberOfGroupName("Group A") && isMemberOfGroupName("Group B") ? ",Both" : "") + (!isMemberOfGroupName("Group A") && !isMemberOfGroupName("Group B") ? ",Neither" : "").
Given below is the screenshot of the expression:
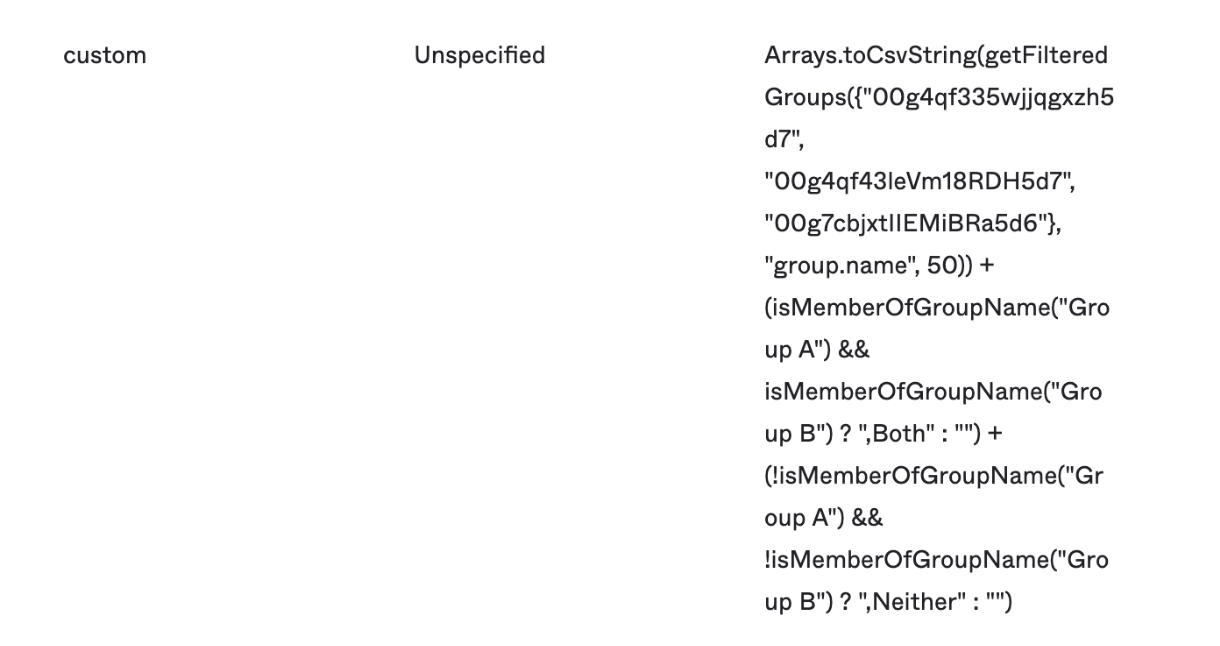
Below you can see the value of the custom attribute for User Both:

The following is the SAML Configuration.
- For more details on creating custom attributes in OKTA, refer to Okta Expression Language.
- For more details on adding Okta groups to Okta application, refer to https://help.okta.com/en/prod/Content/Topics/users-groups-profiles/usgp-assign-app-group.htm and https://help.okta.com/en/prod/Content/Topics/users-groups-profiles/usgp-assign-multiple-app-group.htm.
- Infoworks UI and Platform services, Rest API service must be restarted after setting the Authentication Type to SAML.
- You must login through the Infoworks at least once to use the REST API service. This holds true for default, LDAP and SAML authentication mechanism.
If the SAML authentication is enabled, any user accessing the Infoworks UI, shall be redirected to the Identity Provider's page, where the user will have to provide the credentials. After the user is authenticated by the IdP, she or he will be redirected to Infoworks page.
As long as the session is active in the IdP, the user will be able to Single Sign On (SSO) in Infoworks UI, without entering the credentials again.
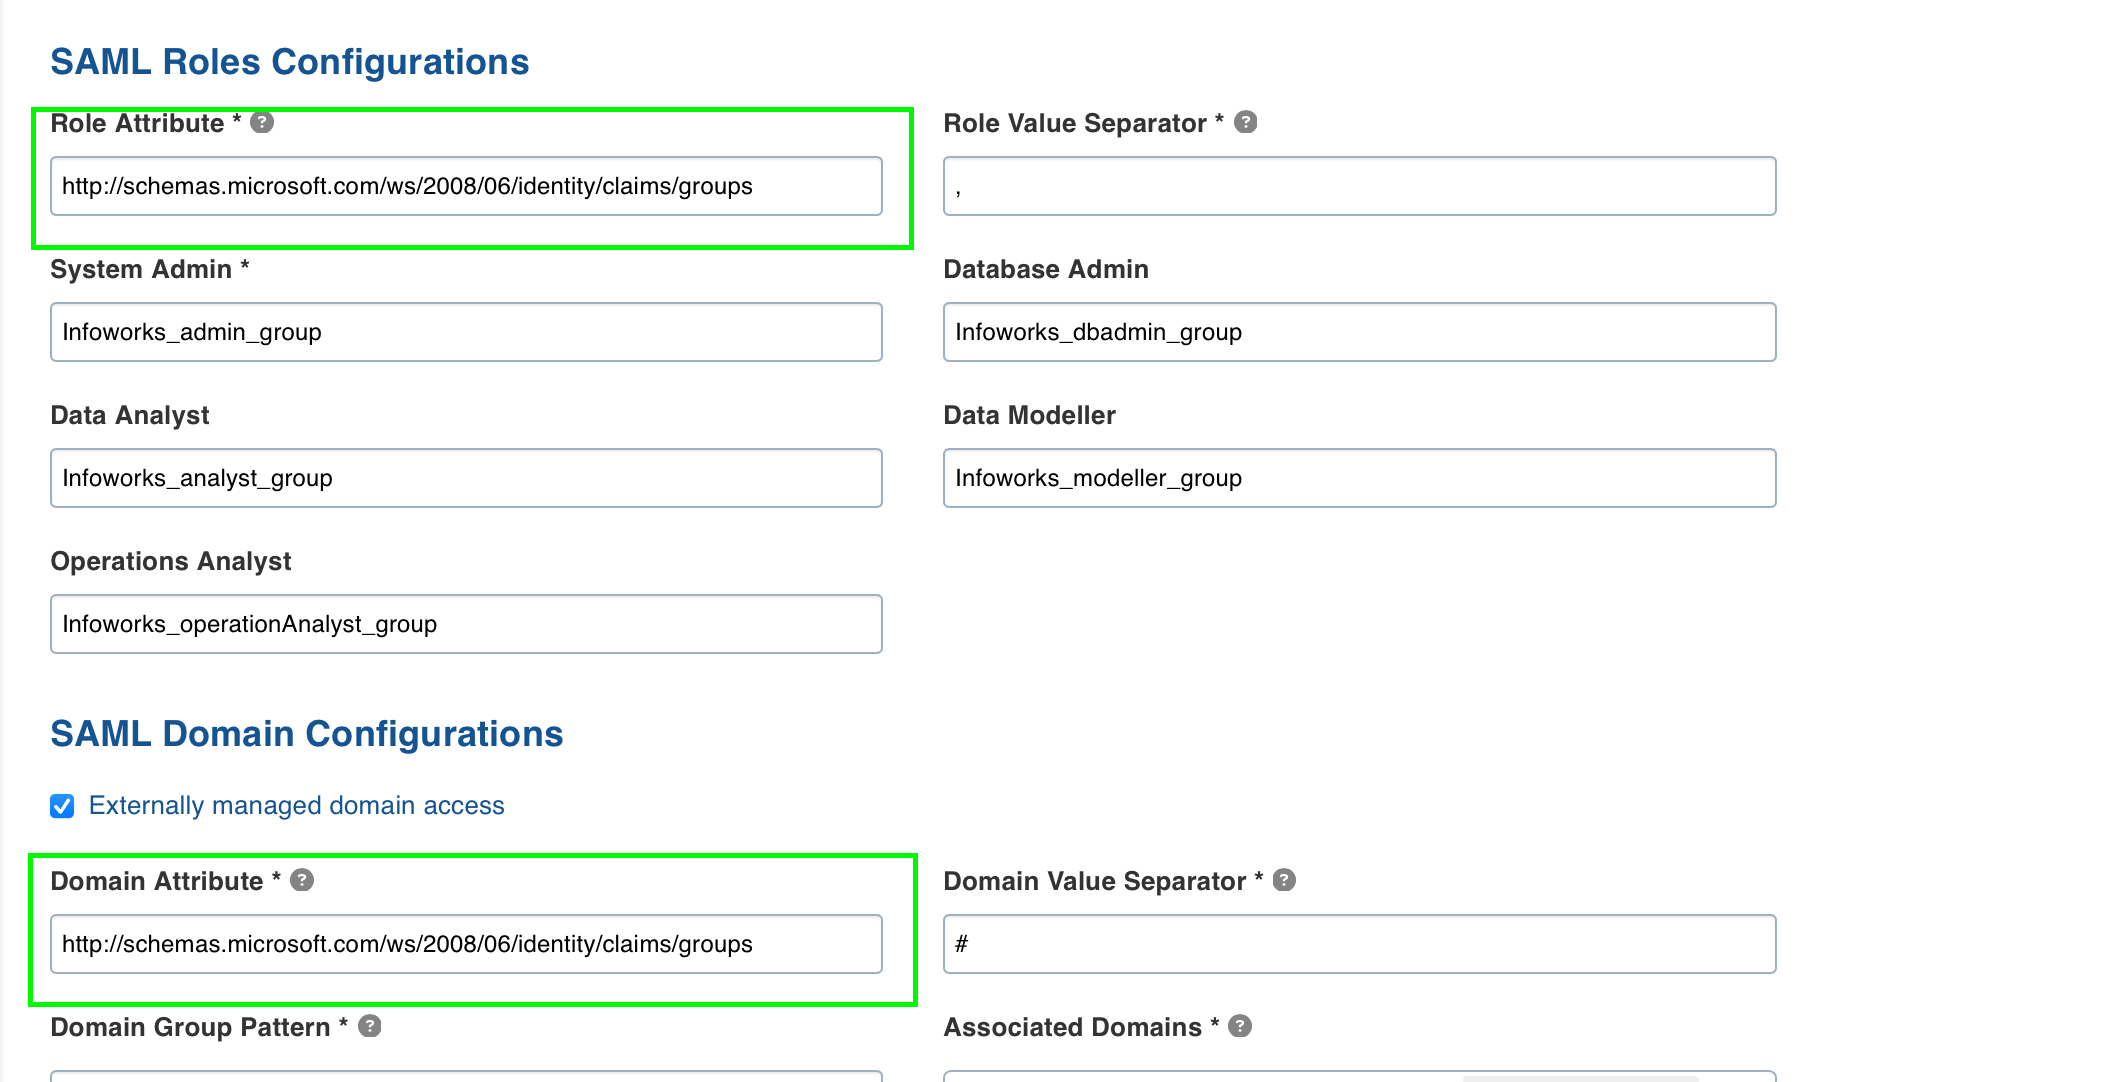
Refer the following SAML Configuration for Azure AD to fetch Role Attribute and Domain Attribute. To get group names in Azure AD, refer to Configuring Group Claims.
Resetting to Default MongoDB Authentication.
If you’re unable to login via SAML or LDAP authentication, you can reset the authentication mechanism to default using a script provided with the package.
Step 1: Log in to Infoworks VM and switch to infoworks user.
Step 2: Execute the following commands.
source /opt/infoworks/bin/env.sh
python /opt/infoworks/scripts/reset_to_default_auth.py
Step 3: Restart UI and Platform Services via Start/Stop Scripts